
What are the HPE GreenLake APIs for Data Services on the HPE GreenLake Platform?
These HPE GreenLake APIs are multiple sets of APIs that enable client applications to manipulate the REST API resources available as part of Data Services on HPE GreenLake edge-to-cloud platform. For more information about Data Services on HPE GreenLake platform, see the Data Services landing page in the HPE Developer Forum. The landing page provides information on accessing the documentation for each set of HPE GreenLake APIs related to the data services on the HPE GreenLake platform.
How can I use the HPE GreenLake APIs documentation for my automation projects?
All HPE GreenLake APIs provide example code snippets from different programming or scripting languages in the interactive website. All adopters can make use of the code snippets to create any client application or to create any client library for their development purposes. For early adopters, this method is the quickest and the easiest way to get started with their automation script. As the time goes on, you will see more blog posts in HPE Developer forum that provide comprehensive code samples to address common use.
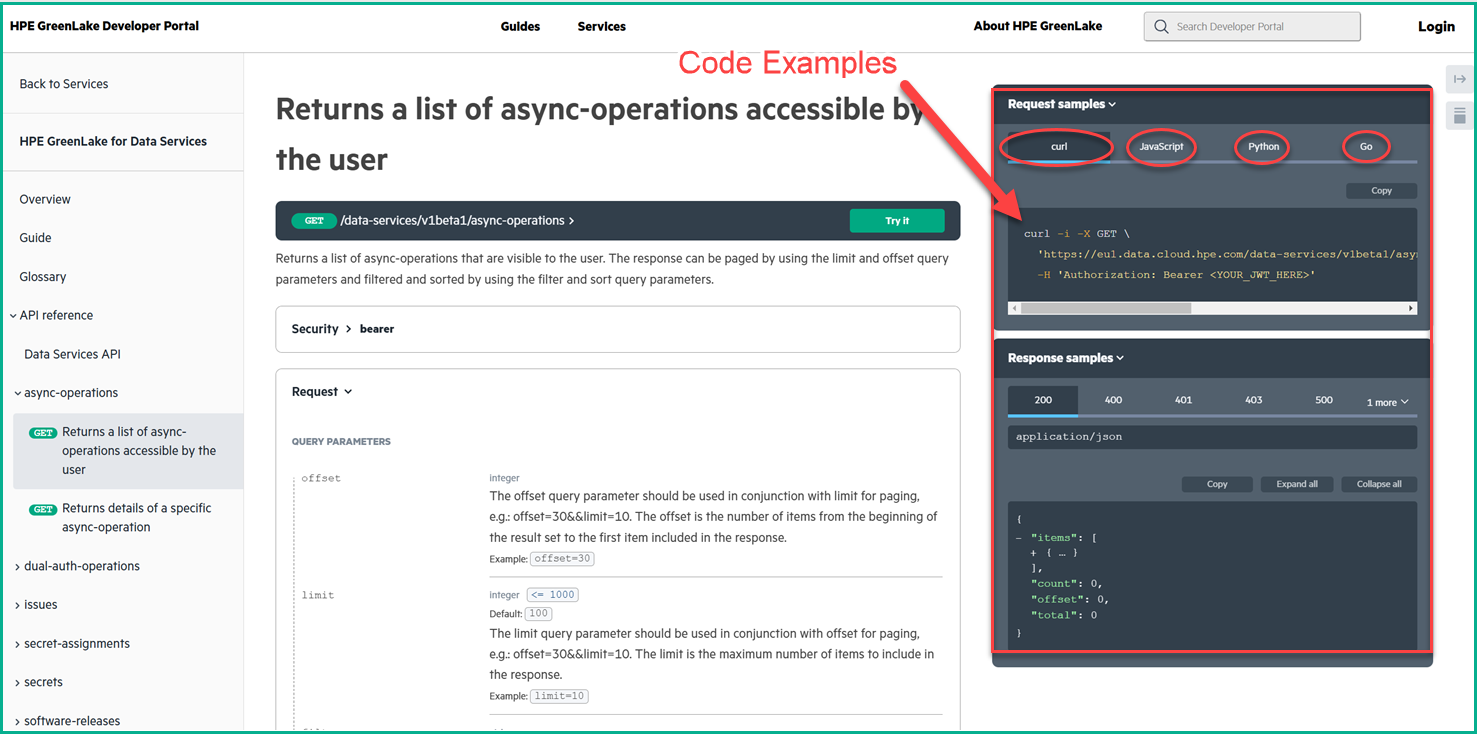
The previous figure displays the request and response samples pane that is present on every API documentation page in the HPE GreenLake Developer website. The pane contains the examples of the particular API using the code in cURL, JavaScript, Python, or GO.
Do I have an alternative to use these REST APIs for my development?
From the documentation for each set of HPE GreenLake APIs, you will recognize that these APIs were documented using OpenAPI specification files in either JSON or YAML format. However, you will also notice that a single set of the HPE GreenLake APIs, called Data Services Cloud Console, is based on the OpenAPI Standard 3.0. However, the rest of the HPE GreenLake APIs are based on the OpenAPI Standard 3.1.
If you decide to use a tool to perform the conversion of these OpenAPI spec files into a client Library for particular programming language or scripting, there are a couple of blog posts that discuss how to convert these files into Python or PowerShell client libraries.
This method enables an agile adoption of the HPE GreenLake APIs because many of these HPE GreenLake APIs, as of this blog post, are ongoing development cycle. So there is expectation that the existing APIs will be updated, deprecated, or new resources will be introduced. This method opens the opportunity to deploy code development automation by pushing the generated client Library into the GitHub as the new spec is made available.
For more information about the versioning for the APIs based on the OpenAPI Standard 3.1, see this link.
First tool of the day: a converter from OpenAPI Standard 3.1 to the OpenAPI Standard 3.0
The OpenAPI initiative provides a framework to describe any APIs so that these APIs can be consumed by different organizations for documentation, client side, server-side mocks, and many other opportunities. This framework has evolved from standard version 3.0 to version 3.1 with all the benefits as described in this video.
As of this blog post, the HPE Developer forum uses an open source tool to generate client libraries for blog posts. However, the challenge of using this tool is that it only allows the Open API standard version 3.0 specification as the input. However, the majority of the HPE GreenLake APIs were documented using the OpenAPI Standard version 3.1.
Let me introduce a tool to convert the spec file in OpenAPI standard 3.1 to a spec file in OpenAPI standard 3.0 to enable conversion using the openapi-generator-cli. The open-source tool is named apiture/openapi-down-convert by David Biesack and Mike Ralphson. It is documented in this GitHub site, and shown in the following figure.
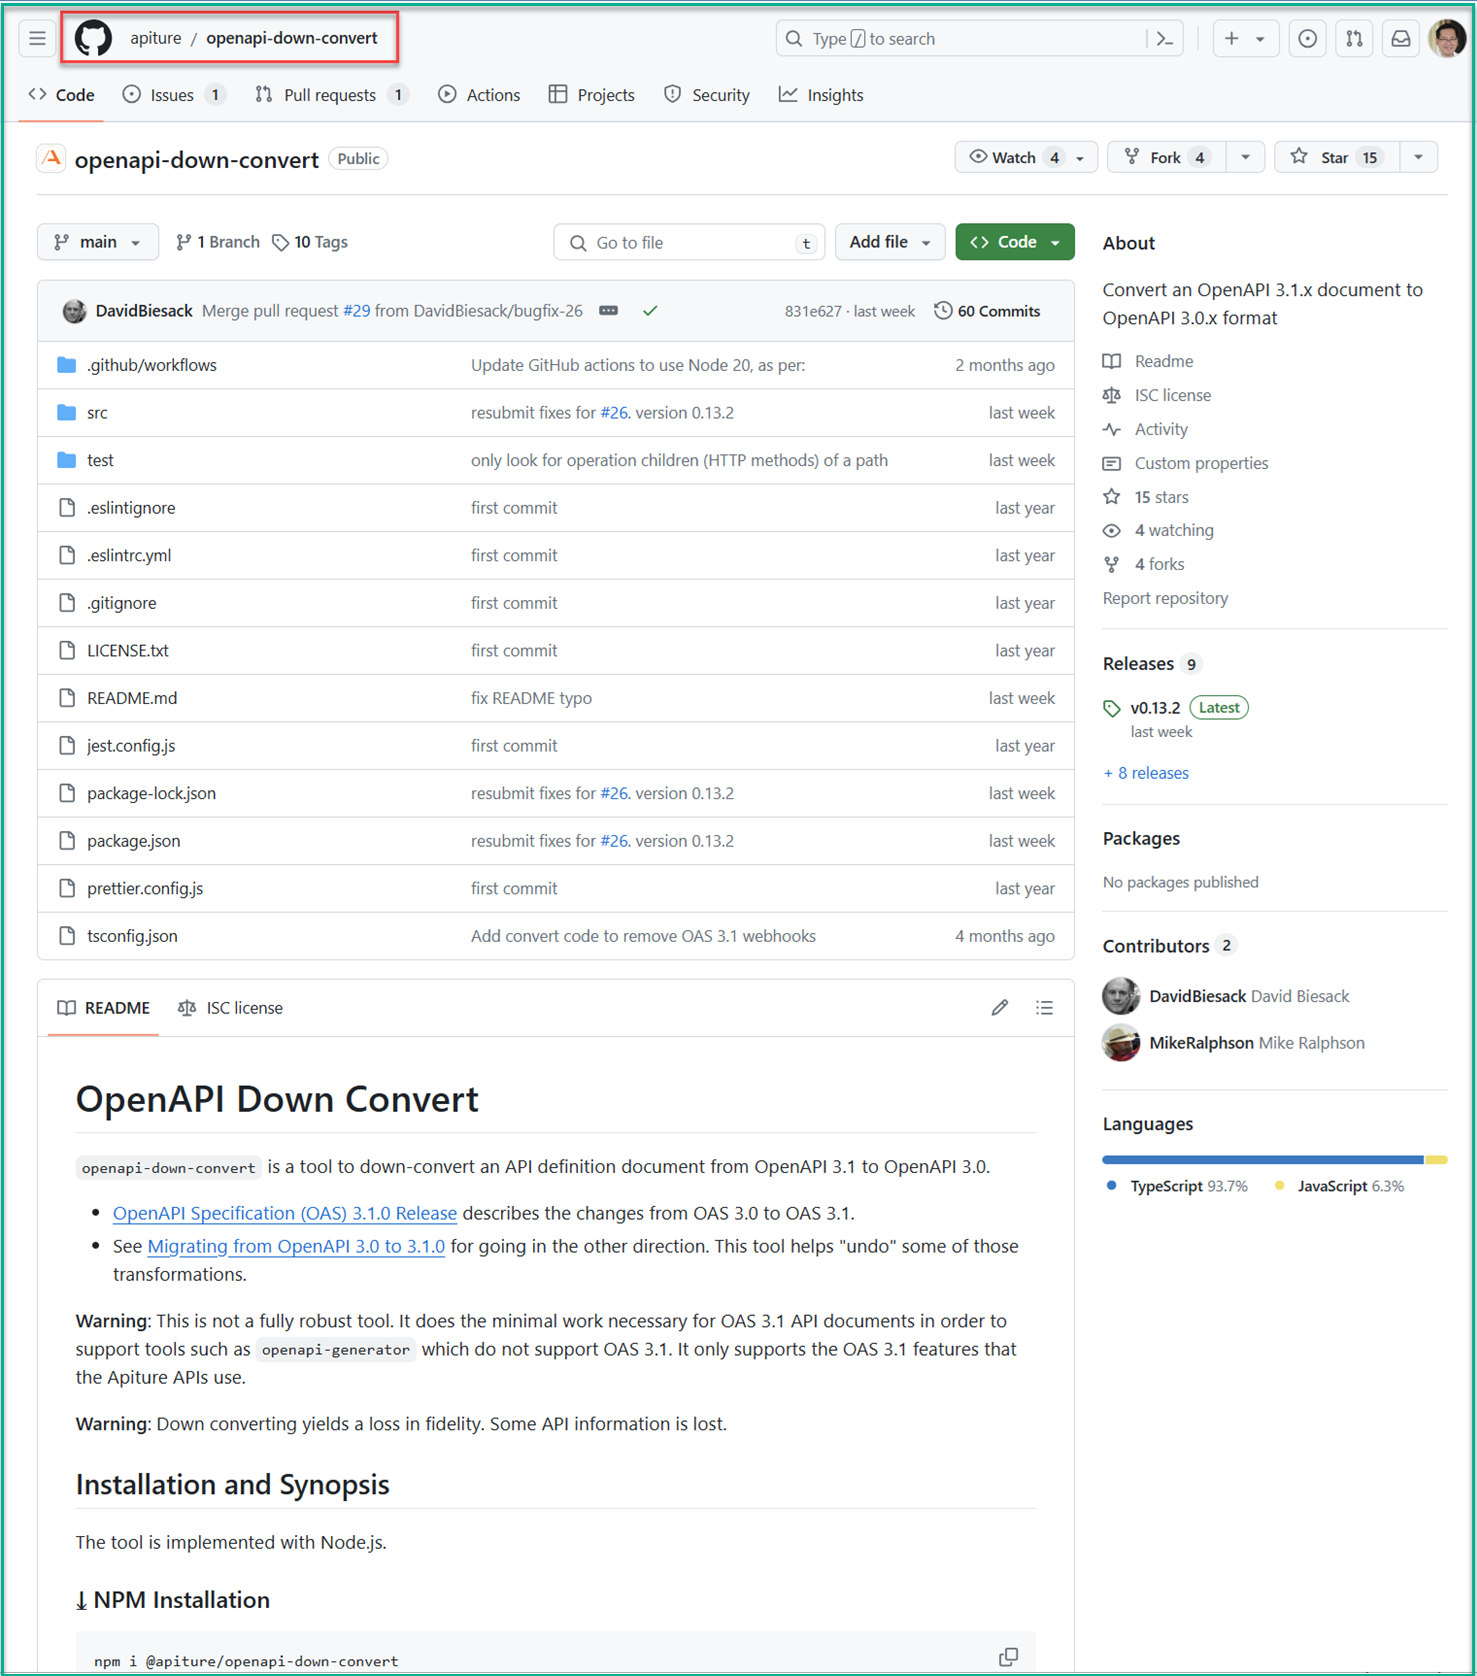
The above figure shows the GitHub website for the documentation of the openapi-down-convert.
To install this tool, follow the instructions on the GitHub README using the JavaScript package manager called the npm.
A lot of the tools used in this part of the blog post are easier to use with the npm (JavaScript) software deployment method. I used the following steps to deploy the npm for JavaScript package management into a Microsoft Windows desktop environment. After these steps, you can deploy the openapi-down-convert tool.
Before I started this, I made sure that my Microsoft Windows desktop had access to the internet and can connect to the websites that I provided in below steps. In some cases, you may need to define the internet proxy so that you can connect to these websites.
Additionally, prior to deploying this OpenJDK, I removed any older version of the Java SDK or JRE from my Microsoft Windows environment. This ensures that the correct Java version was used for all the following steps.
- First, I deployed the Java SDK library into my Microsoft Windows desktop. My recommendation is to deploy the Microsoft Build version of the OpenJDK available from the Microsoft website using the instructions provided.
- Afterward, I set the
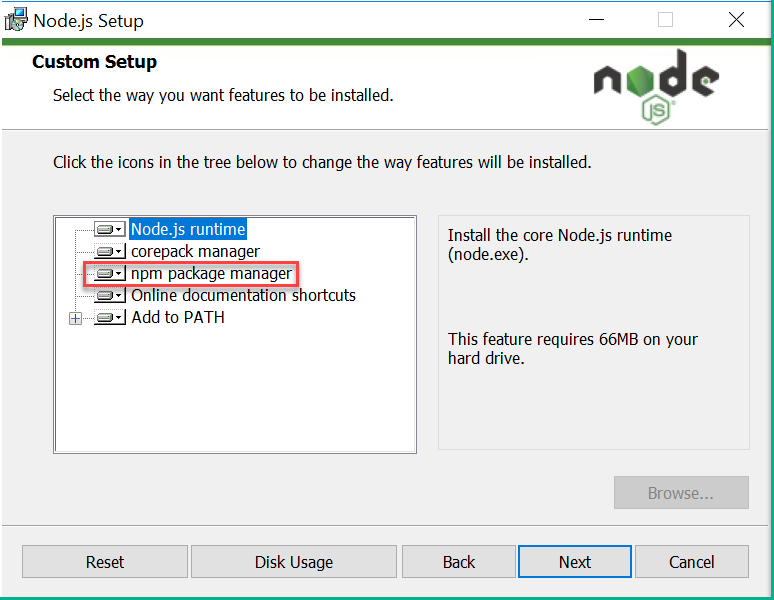
JAVA_HOMEsystem variable toC:\Program Files\Eclipse Adoptium\jdk-21.0.1.12-hotspotusing the following instruction. This step ensured that any applications that require Java would use the OpenJDK by default. - Following the steps on the NodeJS website, I deployed the NodeJS package into my Microsoft Windows environment downloaded from the nodejs.org website. I also ensured that I included the npm package manager option as shown in one of the steps from the NodeJS installation wizard as shown in figure below.
- After the deployment of NodeJS completed, I was able to use the npm CLI to install the
openapi-down-convertin the Microsoft Windows CLI as follows.
C:\>npm I -g @apiture/openapi-down-convert
added 5 packages in 4s
npm notice
npm notice New minor version of npm available! 10.5.0 -> 10.7.0
npm notice Changelog: https://github.com/npm/cli/releases/tag/v10.7.0
npm notice Run npm install -g npm@10.7.0 to update!
npm notice
C:\>
- After the preceding steps, I had the tool to convert any HPE GreenLake API spec files from OpenAPI Standard 3.1 to OpenAPI Standard 3.0.
Second tool of the day: deploying the openapi-generator-cli using the npm JavaScript
This time, I want to introduce a version of the openapi-generator that can be executed like any other CLI, @openapitools/openapi-generator-cli shared by the OpenAPI Initiative team. Because we have already deployed the npm package deployment tool, as described previously, I can proceed to deploy this tool quickly. These are steps that I took to deploy openapi-generator-cli:
- I opened a Microsoft Windows command line interface and issued the following npm CLI command:
C:\Users\Administrator>npm install -g @openapitools/openapi-generator-cli

added 116 packages in 36s

23 packages are looking for funding
  run `npm fund` for details

C:\Users\Administrator>
- Afterward, I tested the deployed openapi-generator-cli to validate the version of the generator that was used. The openapi-generator-cli would use the latest published version of the openapi-generator-cli engine as default. At the time of the publication of this blog post, the latest published version which was 7.5.0 as shown below:
   C:>openapi-generator-cli
   Download 7.5.0 ...
   Downloaded 7.5.0
   Did set selected version to 7.5.0
   Usage: openapi-generator-cli <command> [<args>]

Options:
  --openapitools <openapitools.json>  Use the specified openapi-generator-cli configuration file
  --custom-generator <generator>      Custom generator jar

Commands:
  version-manager                     Manage used / installed generator version
  author                              Utilities for authoring generators or customizing templates.
  batch                               Generate code in batch via external configs.
  config-help                         Config help for chosen lang
  generate \[options]                  Generate code with the specified generator.
  help                                Display help information about openapi-generator
  list                                Lists the available generators
  meta                                MetaGenerator. Generator for creating a new template set and configuration for
                                      Codegen.  The output will be based on the language you specify, and includes
                                      default templates to include.
  validate                            Validate specification
  version                             Show version information used in tooling

  C:>
- With that, I had the tool to convert any of the HPE GreenLake APIs in OpenAPI Standard 3.0 to a client library for the popular scripting or programming languages listed in the website.
But wait! What about converting those OpenAPI Standard 3.1 spec files to a client library?
Don't worry because I am not going to leave you stranded! 😊
Now we have the required tools to create a pipeline to convert from the OpenAPI Standard 3.1 spec files to the client library for the scripting language of choice. An overview of the process:
- Download the OpenAPI spec file from the HPE GreenLake developer website.
- Convert the spec file to OpenAPI Standard 3.0 spec file.
- Convert the 3.0 spec file to the client library.
Let me give you an example of converting the HPE GreenLake API for Data Services spec file to a PowerShell client library.
- I downloaded the HPE GreenLake API for Data Services OpenAPI Standard 3.1 spec file from the HPE GreenLake Developer website using the UI:
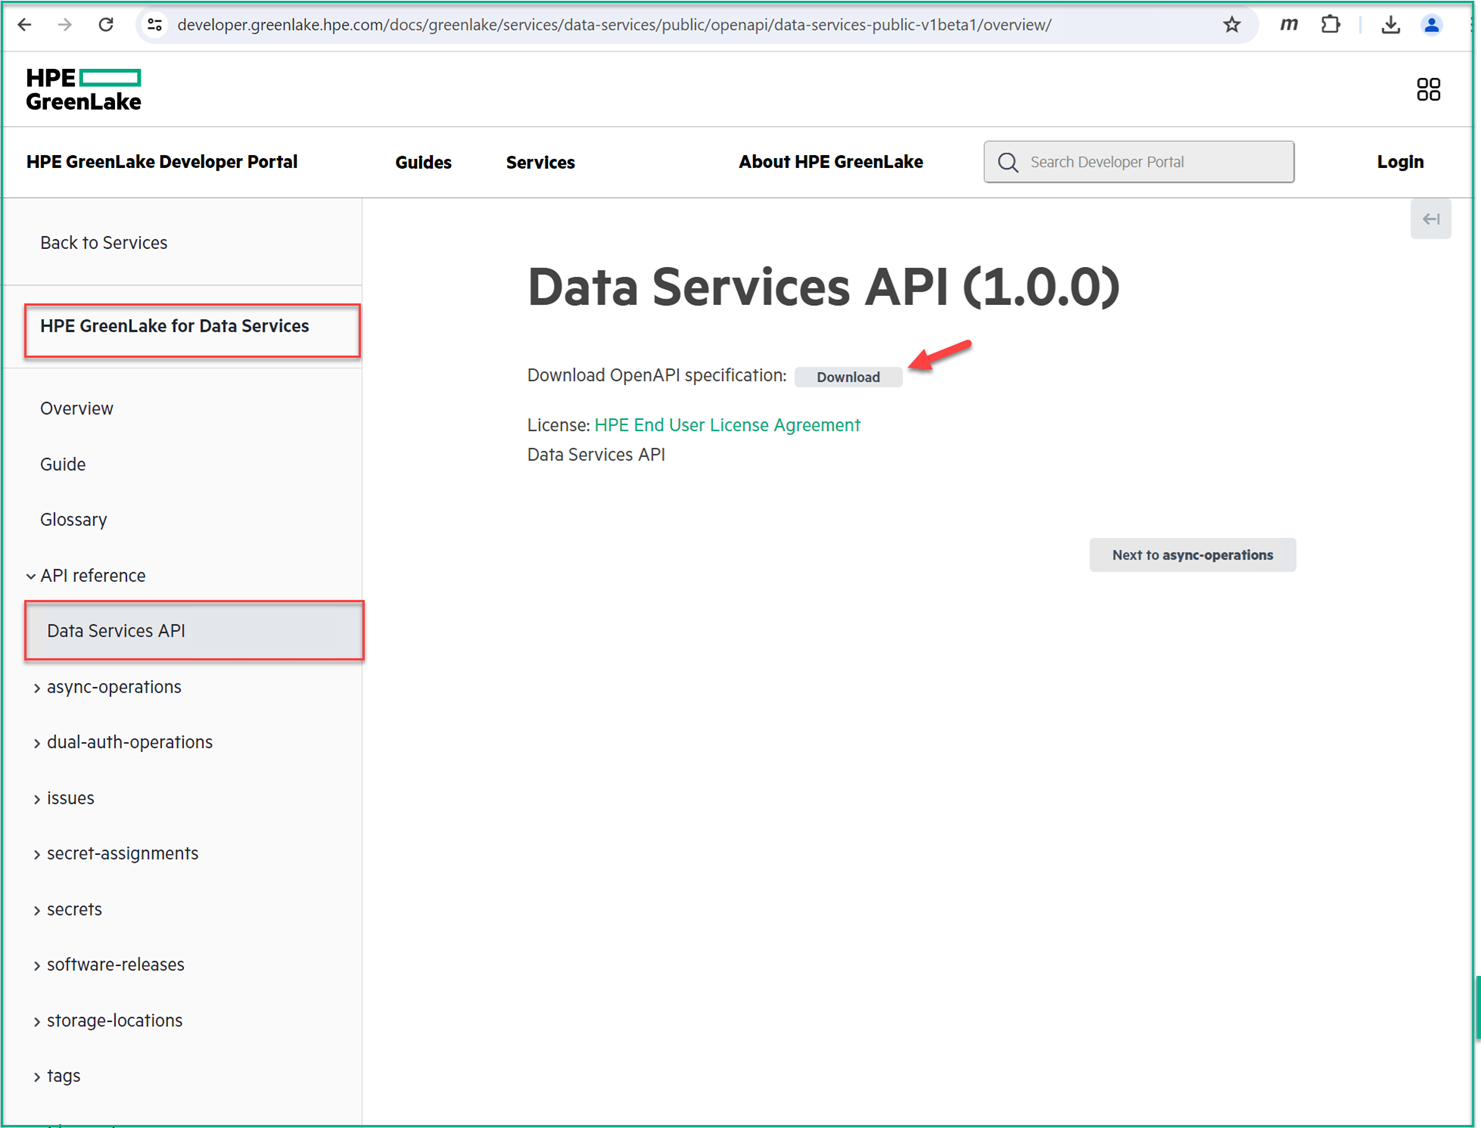
- Afterward, I changed the name of the downloaded file from
swagger.jsontoGL-dataservices-31.jsonso that I could recognize this OpenAPI Standard 3.1 spec file from HPE GreenLake APIs for Data Services. - After I renamed the JSON file, I followed by using the
openapi-down-converttool to convert the OpenAPI Standard 3.1 to OpenAPI Standard 3.0 using the following command shown below. I named the converted file asGL-dataservices-30.json.
   PS C:\Users\Administrator\Downloads> move .\swagger.json ..\Scripting\GL-dataservices-31.json
   PS C:\Users\Administrator\Downloads> cd ..\Scripting\
   PS C:\Users\Administrator\Scripting> dir
Mode                LastWriteTime         Length Name

- - -

-a----         5/2/2024   2:46 PM         171264 GL-dataservices-31.json

PS C:\Users\Administrator\Scripting> openapi-down-convert -i .\GL-dataservices-31.json -o .\GL-dataservices-30.json
PS C:\Users\Administrator\Scripting>
- Now it’s the time to convert this OpenAPI Standard 3.0 spec file to the PowerShell client library using the
openapi-generator tool. Additionally, I also changed the name of the generated package from the standard nameOpenAPIToolsto the specific nameGLdataservicesusing the special arguments.
PS C:\Users\Administrator\Scripting> openapi-generator-cli generate -g powershell --additional-properties="packageName"="GLdataservices" -i .\GL-dataservices-30.json -o Posh-GL-dataservices
- After the conversion was completed, I found a new folder named
Posh-GL-dataserviceswith some files in the folder as shown below. It looks like that I have a Markdown file calledREADME.md. I can use my favorite development editor, Microsoft Visual Studio Code, to investigate this generated PowerShell module.
Note: The information on how to install Microsoft Visual Studio Code is available at the Visual Studio Code website.
   PS C:\Users\Administrator\Scripting> cd .\Posh-GL-dataservices\
   PS C:\Users\Administrator\Scripting\Posh-GL-dataservices> dir
Mode                LastWriteTime         Length Name

- - -

d-----         5/2/2024   5:00 PM                .openapi-generator
d-----         5/2/2024   5:00 PM                docs
d-----         5/2/2024   5:40 PM                src
d-----         5/2/2024   5:00 PM                tests
-a----         5/2/2024   5:00 PM           1040 .openapi-generator-ignore
-a----         5/2/2024   5:40 PM           1224 appveyor.yml
-a----         5/2/2024   5:40 PM           2100 Build.ps1
-a----         5/2/2024   5:40 PM          12794 README.md

PS C:\Users\Administrator\Scripting\Posh-GL-dataservices>
- Using the Microsoft Visual Studio Code, I opened the folder where the modules were located. I could see the list of the files that were generated by the openapi-generator. The first file that I opened was the README.md, and using the keyboard command of
"CTRL + Left Shift + v", I was able to convert the README.md into a readable format. Further, I found out the instructions on installation, uninstallation, and detailed information on how to use this PowerShell module.
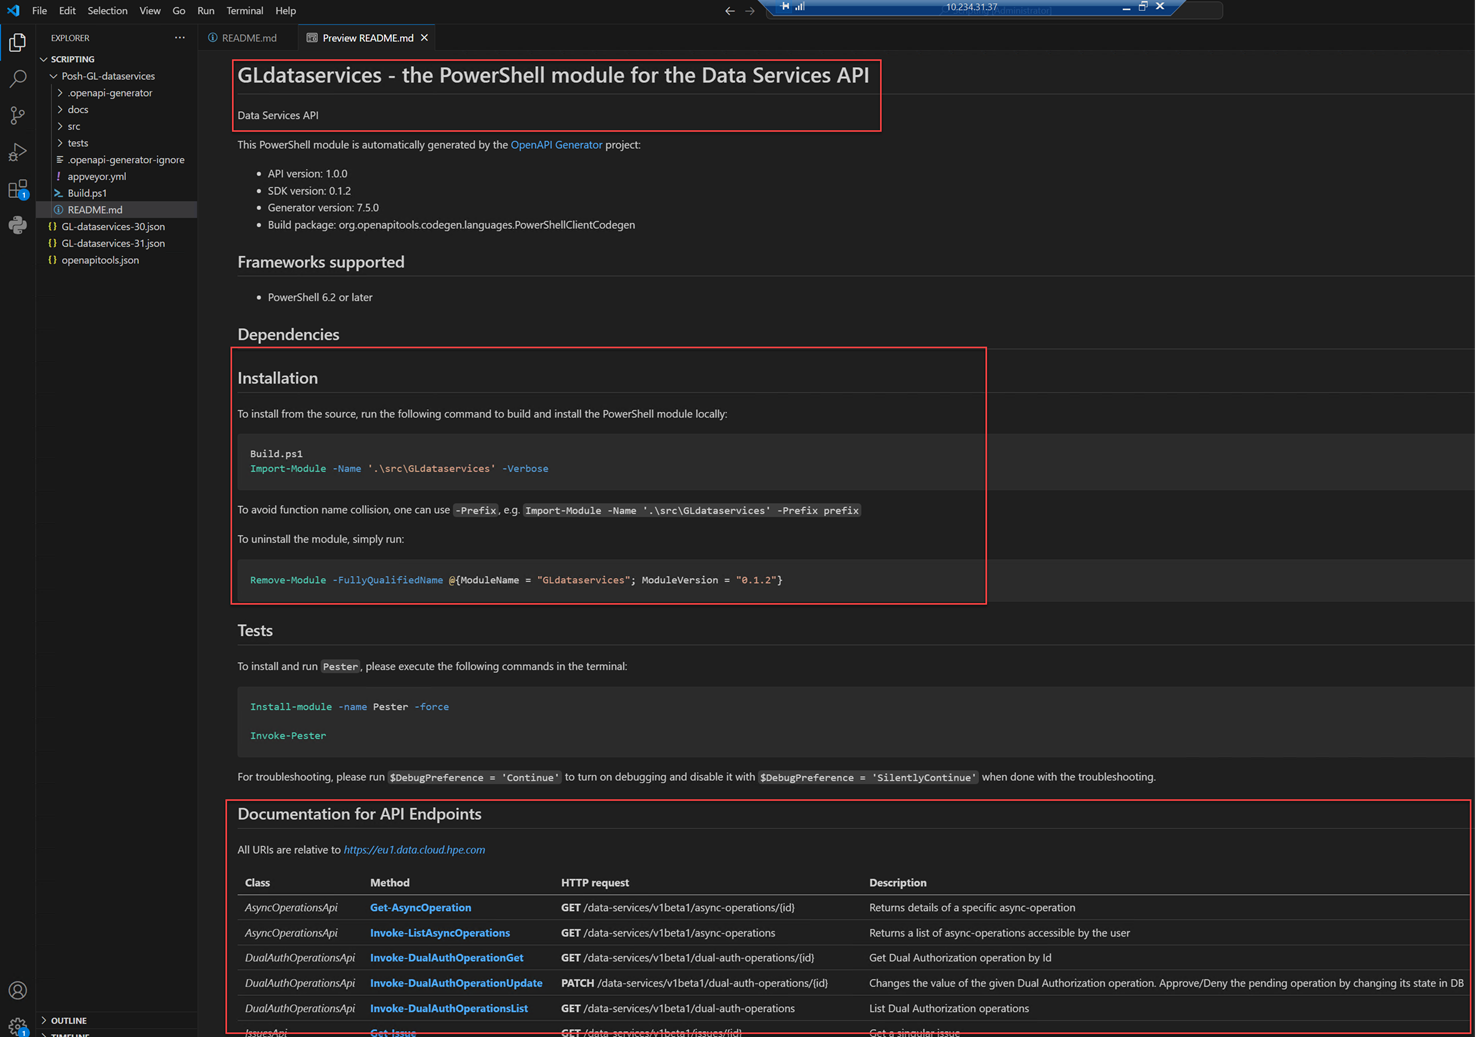
By following the guides in README.md, I knew to click
documentation for API Endpointsto display the information on how to use the API. For example, theInvoke-ListAsyncOperationsthat I decided to use for this blog post.
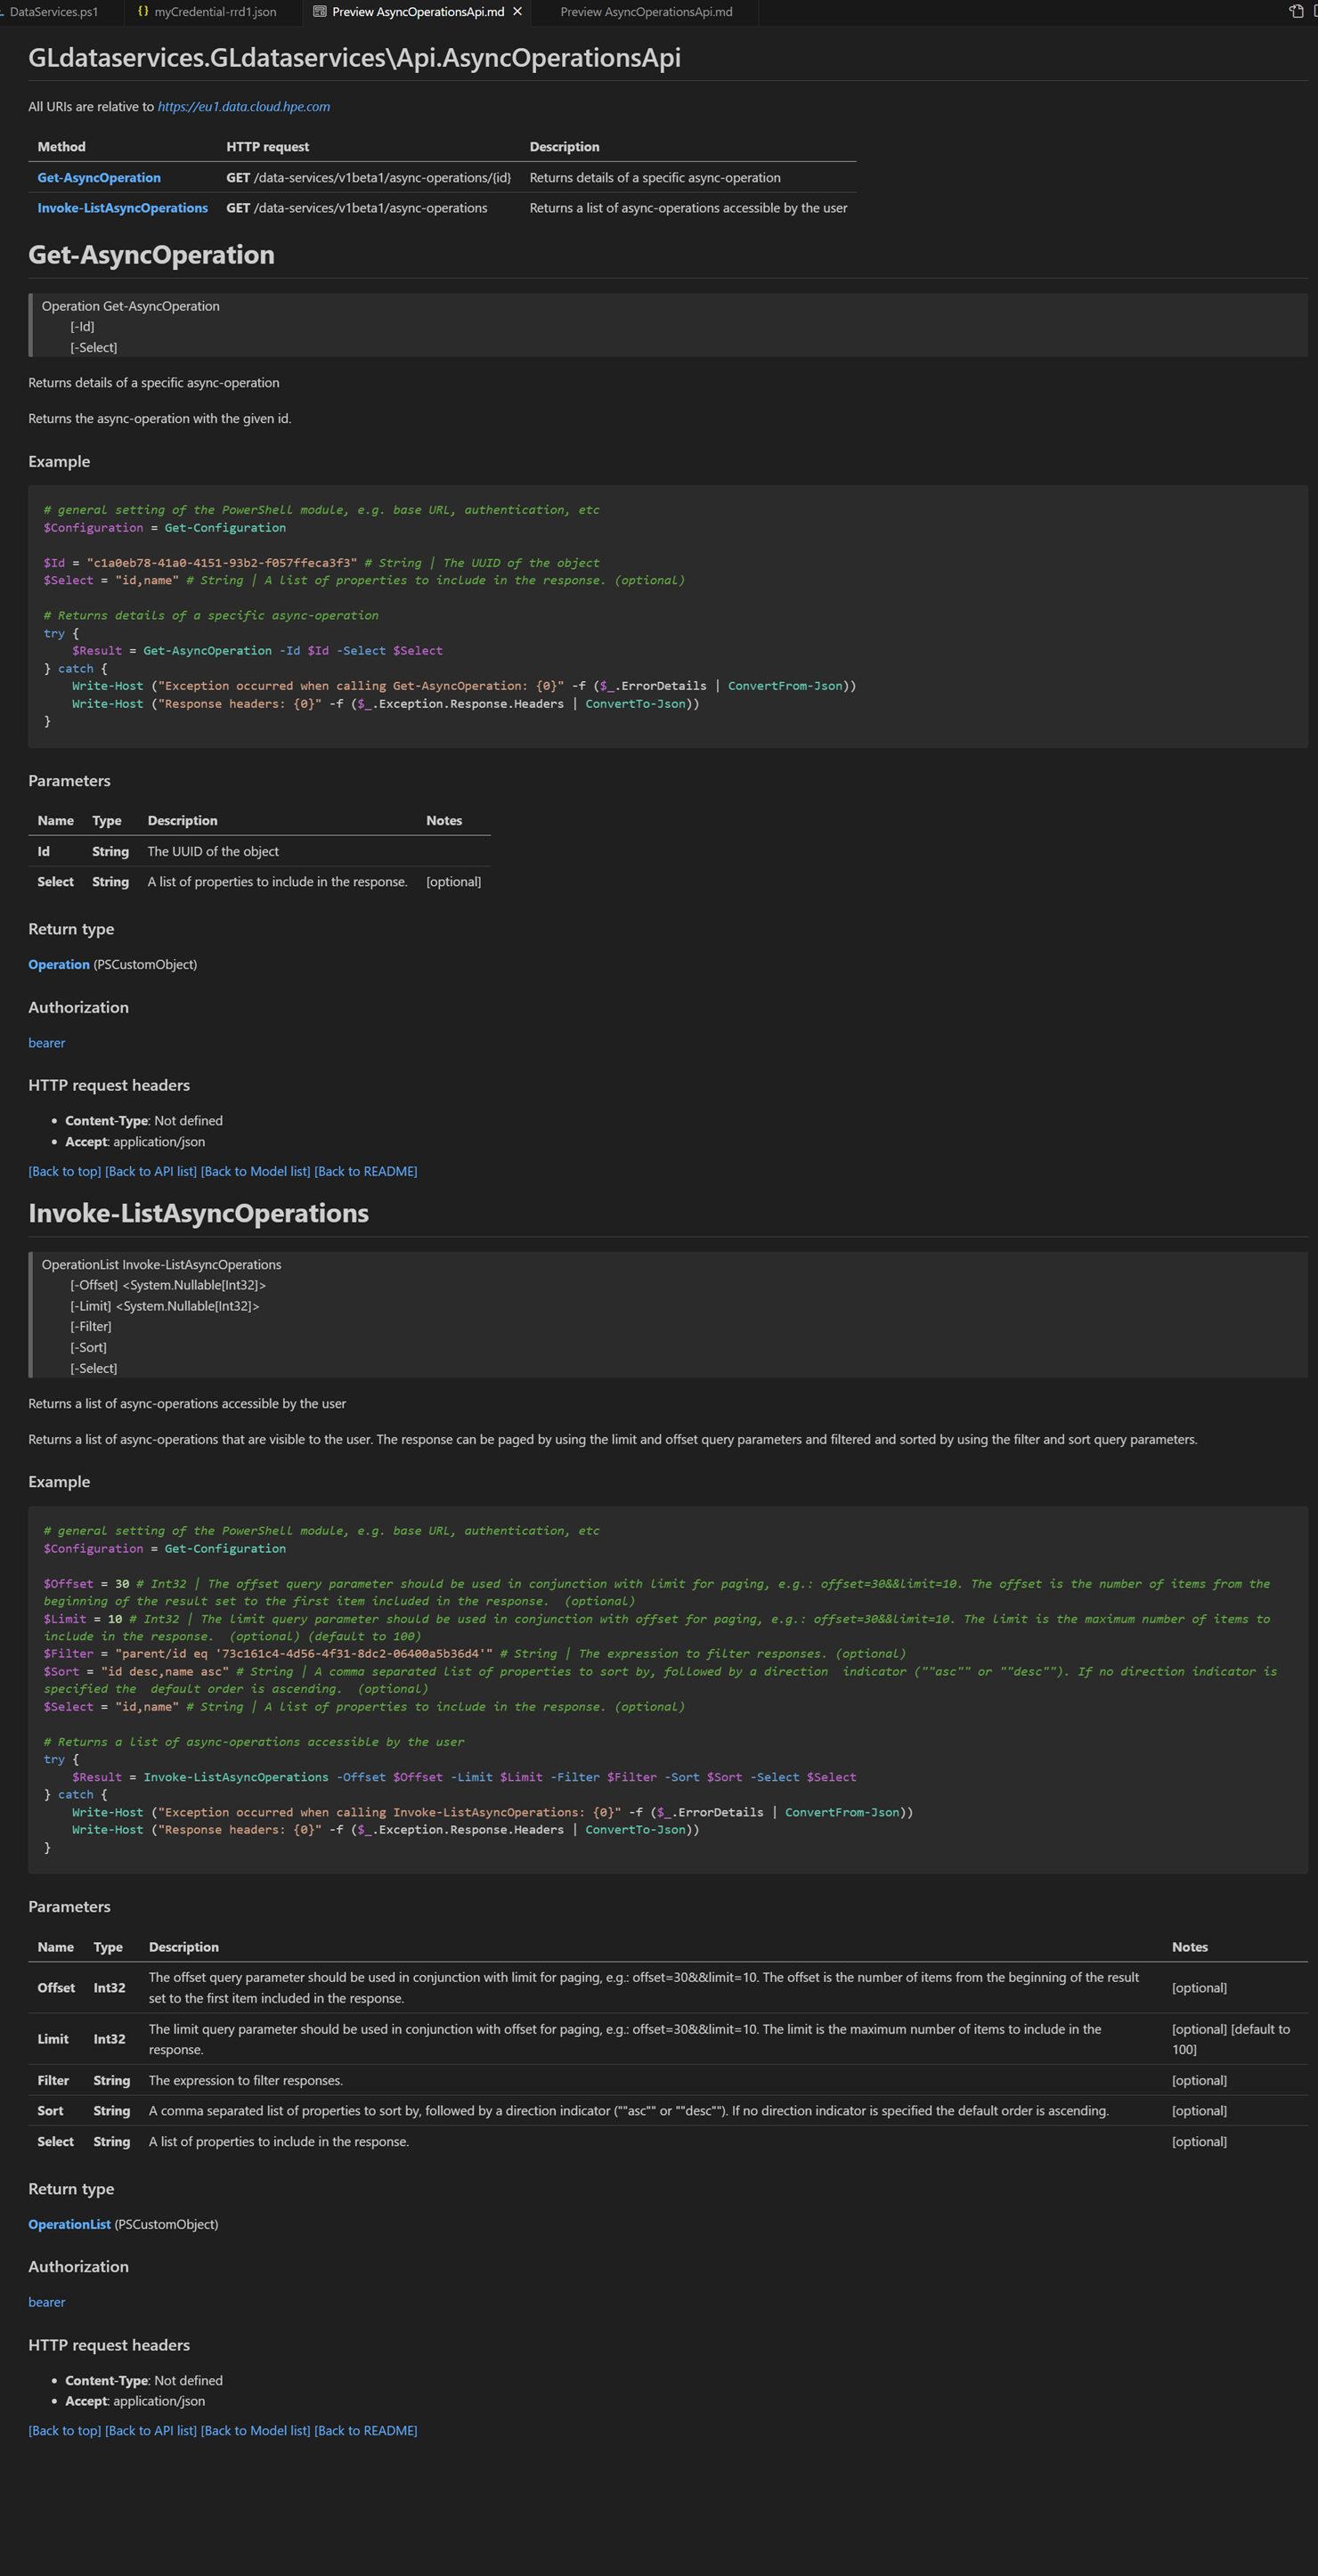
- To use this PowerShell client library so that I can call
Invoke-ListAsyncOperations, I followed the instructions to install the module into a PowerShell workstation as described in theREADME.mdfile.
To install from the source, run the following command to build and install the PowerShell module locally:
C:> Build.ps1
C:> Import-Module -Name '.\src\GLdataservices' -Verbose
- Once this module was loaded, I created a short script based on PowerShell to call
Invoke-ListAsyncOperationsand used that API to display a list of completed tasks.
$fileName = "..\myCredential-rrd1.json"
$secretFile = Get-Content -Path $fileName | ConvertFrom-Json

# general setting of the PowerShell module, e.g. base URL, authentication, etc
$Configuration = Get-Configuration
$Configuration.BaseUrl = "https://us1.data.cloud.hpe.com"
$Configuration.Username = $secretFile | select-object -ExpandProperty myId
$Configuration.Password = $secretFile | select-object -ExpandProperty mySecret
$token_url = "https://sso.common.cloud.hpe.com/as/token.oauth2"
$AuthenticationResult = Invoke-WebRequest $token_url -Method Post -Body @{
    grant_type = "client_credentials"
    client_id = $Configuration.Username
    client_secret = $Configuration.Password
}
$Configuration.AccessToken = $AuthenticationResult.Content | ConvertFrom-Json | select-object -ExpandProperty access_token

# general setting of the PowerShell module, e.g. base URL, authentication, etc
$Filter = "'backup-and-recovery' in services" # String | The UUID of the object
$Select = 'associatedResources,services,displayName,logMessages' # String | A list of properties to include in the response. (optional)

# Returns details of a specific async-operation
try {
    $Result = Invoke-ListAsyncOperations -Offset 0 -Limit 10 -Filter $Filter -Select $Select
} catch {
    Write-Host ("Exception occurred when calling Invoke-ListAsyncOperations: {0}" -f ($_.ErrorDetails | ConvertFrom-Json))
    Write-Host ("Response headers: {0}" -f ($_.Exception.Response.Headers | ConvertTo-Json))
}
$Result.items | ConvertTo-Json
Note: The preceding script read a separate
client-credentialsfile so that I could gain authorization to my HPE GreenLake workspace. That way, I didn't have to include myclient-secretsandclient-idinto this script file to ensure proper secure coding. This file calledmyCredentials-rrd1.jsonwhich contains the JSON structure shown below. For more information on providing this client-credentials information, please see the HPE GreenLake Developer website. There is also a blog post in HPE Developer Forum website that describes the process as well.
{
  "myWorkspace": "xxxxxxxxxx-yyyy-yyyy-yyyy-zzzzzzzzzzzz",
  "myId": "aaaaaaaa-bbbb-cccc-dddd-eeeeeeeeeeee",
  "mySecret": "06cffff699deeeee9f1d92f7gggggggg"
}
As expected, the execution of the above script completed successfully. The API response returned the list of tasks based on the filtering and selection properties from the example. These were task lists from my workspace created by the backup-and-recovery services in my workspace.
[
  {
    "associatedResources": [],
    "services": [
      "backup-and-recovery"
    ],
    "displayName": "Create_individual_file_backup",
    "logMessages": [
      "@{message=Performing incremental copy.; timestamp=04/27/2024 09:01:22}",
      "@{message=Resources acquired, volume copy preparation done.; timestamp=04/27/2024 09:01:23}",
      "@{message=Submitted all copy jobs to data mover.; timestamp=04/27/2024 09:02:31}",
      "@{message=Initiated Vmdk copy operation.; timestamp=04/27/2024 09:02:33}",
      "@{message=Failed with retryable error code: -3403. Retrying after 1 minutes.; timestamp=04/27/2024 09:07:17}",
      "@{message=Performing optimized copy since Invalid parent backup: Parent backup with id 61c86d49-2b7c-4e0a-9619-dc9bda08586d is in Reading state.; timestamp=04/27/2024 09:08:18}",
      "@{message=Resetting retries as data movement successfully progressed after previous failure.; timestamp=04/27/2024 09:21:55}",
      "@{message=Failed with retryable error code: -3403. Retrying after 15 minutes.; timestamp=04/27/2024 09:30:26}",
      "@{message=Allocation map collection took 0.002743 seconds with 1 threads.; timestamp=04/27/2024 10:58:21}",
      "@{message=Successfully completed copy operation; timestamp=04/27/2024 10:58:22}",
      "@{message=Backup operation completed.; timestamp=04/27/2024 10:58:23}"
    ]
  },
  {
    "associatedResources": [
      "@{name=0-VM-01-VVOL-DS; resourceUri=/hybrid-cloud/v1beta1/virtual-machines/1d1438c2-3ae2-52e0-b5a1-fa643903f526; type=hybrid-cloud/virtual-machine}"
    ],
    "services": [
      "backup-and-recovery"
    ],
    "displayName": "Delete backup [0-VM-01-VVOL-DS - 13/04/2024 03:48:59]",
    "logMessages": [
      "@{message=Job execution started.; timestamp=04/16/2024 08:03:26}",
      "@{message=Deleting local backup.; timestamp=04/16/2024 08:03:28}",
      "@{message=Deleting backup successful.; timestamp=04/16/2024 08:03:30}",
      "@{message=Job execution completed.; timestamp=04/16/2024 08:03:31}"
    ]
  },
  {
    "associatedResources": [],
    "services": [
      "backup-and-recovery"
    ],
    "displayName": "Delete MSSQL snapshot [Array_Snapshot_2024-04-27-21:35:19-K1cqhLAg - 2024-04-28T01:36:25.000Z]",
    "logMessages": [
      "@{message=Updating snapshot state; timestamp=04/30/2024 02:01:05}",
      "@{message=Deleting volume(s) snapshot.; timestamp=04/30/2024 02:01:06}",
      "@{message=Deleting snapshot; timestamp=04/30/2024 02:01:18}",
      "@{message=Job execution completed.; timestamp=04/30/2024 02:01:18}"
    ]
  },
Conclusion
With the introduction of new HPE GreenLake APIs on March 2024, HPE GreenLake APIs embraces OpenAPI Standard 3.1 for the specification files. Examples of the APIs released based on the OpenAPI Standard 3.1 include:
- Data Services
- Virtualization
- Backup and Recovery
- Private Cloud Business Edition
This blog post introduces the tools to enable any adopter to use the open-source software based openapi-generator to convert these spec files after the conversion from the OpenAPI Standard 3.1 to OpenAPI Standard 3.0. In this blog post, I provided an example on how to convert the HPE GreenLake API for Data Services into a PowerShell client library. Furthermore, I also provided an example on how to use this client library to display the list of the tasks from HPE GreenLake for Backup and Recovery from my workspace.
Note: that this conversion will not be required once the open-source tool such openapi-generator-cli eventually support OpenAPI 3.1 Standard spec in the future. For more information on the supported SDK conversion from OpenAPI Standard 3.1 using this open-source tool, please follow this update to issues. If you are using other (or commercial) OpenAPI SDK generator tool such as listed here, you may not be required to use the conversion tool as discussed in this blog.
Please don’t hesitate to explore the APIs for Data Services on the HPE GreenLake platform and see how you can improve your agility in managing your data. Any questions on HPE GreenLake Data Services Cloud Console API? Please join the HPE Developer Community Slack Workspace, and start a discussion in our #hpe-greenlake-data-services Slack channel.
Related
A guide to enabling a managed Istio service mesh in a Kubernetes cluster on HPE GreenLake for Private Cloud Enterprise
Feb 16, 2023
Using HPE GreenLake Console's API Gateway for Data Services Cloud Console
Nov 30, 2021Automate ITOps: announcing foundational APIs for the HPE GreenLake edge-to-cloud platform
Dec 1, 2023
Bare metal provisioning on HPE GreenLake using Terraform
Mar 20, 2023
Bulk onboarding of users in HPE GreenLake edge-to-cloud platform
Apr 24, 2024
Configuring Azure AD as the SAML IDP with HPE Greenlake Cloud Platform and Aruba Central
Jul 11, 2022How to implement a single sign-on solution to authenticate users onto the HPE GreenLake edge-to-cloud platform
Nov 29, 2023