

With the rise of virtual machine containerization, it’s imperative to familiarize ourselves with the different aspects of performing VM management on Kubernetes. From crude CLIs, to declarative GitOps patterns, and further extending to lush UIs where your next VM is just a right-click away, having a handle on each of these disciplines is essential for Kubernetes VM management regardless of which role you're in.
Whether you're a classic sysadmin, site reliability engineer (SRE) or have any kind of role in IT operations touching virtualization, the winds of change are catching up. Collectively we need to re-evaluate the VM estate, understand platform requirements for mission-critical applications and look for alternatives with the least amount of friction and resistance to ease migration.
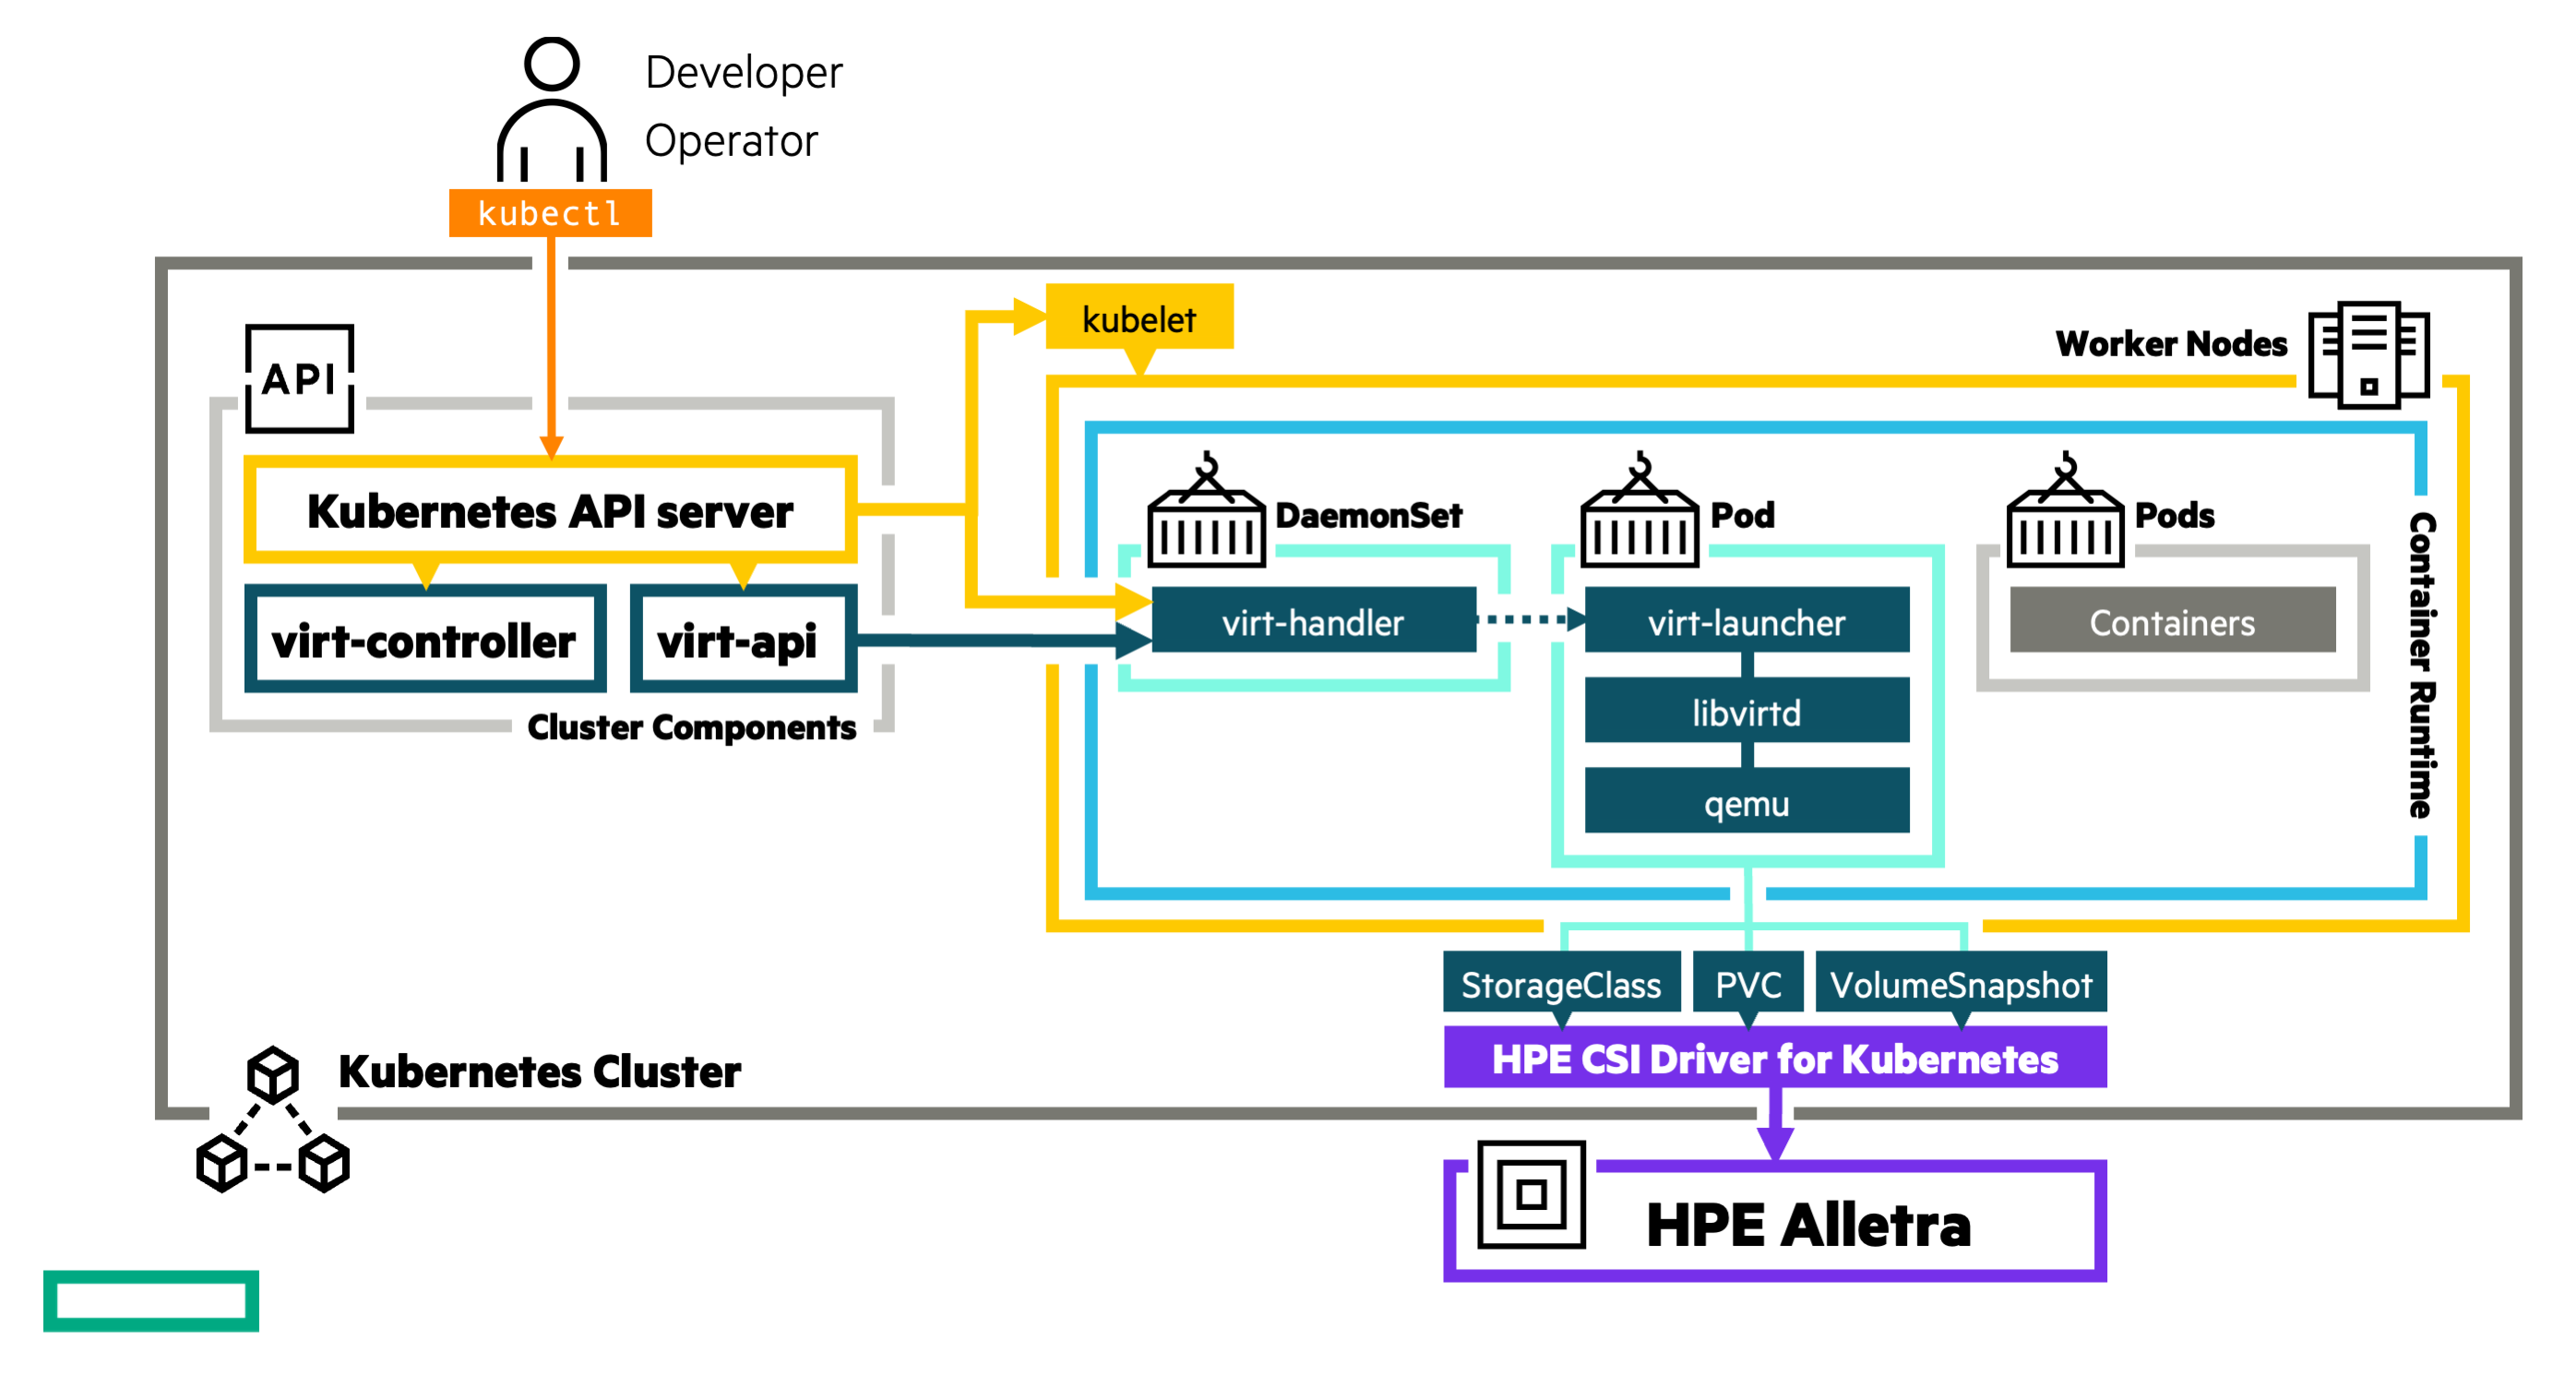
KubeVirt, an open source project governed by the Cloud-Native Computing Foundation (CNCF), is an add-on for Kubernetes that allows management of virtual machines alongside containers using a single API endpoint. KubeVirt is where a large chunk of the market is gravitating towards, whether the abstractions are disguised by a glossy frontend or deployed manually on existing Kubernetes clusters, KubeVirt needs to be considered for any new virtualization project.
This blog post brushes over the basics in VM management on KubeVirt covering the most common patterns to give you an idea of what tools and processes to adopt in your organization, like declarative CLIs, imperative GUIs or idempotent IT platform automation tools such as Ansible. There are strengths and weaknesses across the different interfaces but understanding how to operate them is fundamental for any VM management journey with KubeVirt.
But first, let me give you a brief introduction to KubeVirt.
A KubeVirt crash course
KubeVirt provides abstractions to Kubernetes users for Linux Kernel Virtual Machines (KVM). KVM has been around for about two decades now with several successful commercial hypervisors built around the implementation and is, at this point, considered mature.
KubeVirt itself does not have a user interface that most VM administrators are used to. The point of abstraction is through standard Kubernetes tools by manipulating API resources of different Kinds provided by CustomResourceDefinitions (CRDs).
The CRDs allow users to manage VM resources through a set of KubeVirt’s controllers.
Deploying KubeVirt on upstream Kubernetes and other distributions is straightforward. The official documentation walks through the different distributions and platform specific quirks that needs to be considered.
The examples below use KubeVirt provided by the KubeVirt HyperConverged Cluster Operator installed on OKD, the community distribution of Kubernetes that powers Red Hat OpenShift.
Most VM administrators connect VMs to existing networks that assign IP addresses and DNS names. Having the VM immediately reachable from your desktop computer or other already established infrastructure management tools makes the transition from legacy VM management platforms to KubeVirt much smoother.
As a prerequisite for this exercise and examples, the following resources have been created prior:
- An SSH public key has been created on the cluster as a
Secretto be injected into the VM instance during initialization. - A
NodeNetworkConfigurationPolicyusing the Kubernetes NMState Operator that creates a bridge on a NIC connected to the data center management network. - A
NetworkAttachmentDefinitionin my VM instanceNamespaceto connect virtual NICs to.
For the sake of completeness, this is what those resources look like:
apiVersion: v1
kind: Namespace
metadata:
  name: hpe-vmi
---
apiVersion: v1
kind: Secret
metadata:
  name: desktop
  namespace: hpe-vmi
stringData:
  key: ssh-rsa <public key string> you@yourdesktop
---
apiVersion: nmstate.io/v1
kind: NodeNetworkConfigurationPolicy
metadata:
  name: br0-ens224
spec:
  nodeSelector:
    node-role.kubernetes.io/worker: ""
  maxUnavailable: 3
  desiredState:
    interfaces:
      - name: br0
        type: linux-bridge
        state: up
        ipv4:
          enabled: false
        bridge:
          options:
            stp:
              enabled: false
          port:
            - name: ens224
---
apiVersion: "k8s.cni.cncf.io/v1"
kind: NetworkAttachmentDefinition
metadata:
  name: mgmt
  namespace: hpe-vmi
  annotations:
    k8s.v1.cni.cncf.io/resourceName: bridge.network.kubevirt.io/br0
spec:
  config: |
    {
      "cniVersion": "0.3.1",
      "name": "mgmt",
      "type": "cnv-bridge",
      "bridge": "br0",
      "ipam": {},
      "macspoofchk": true,
      "preserveDefaultVlan": false
    }
Another essential prerequisite is that a StorageClass exists on the cluster that supports KubeVirt. The examples below use the HPE CSI Driver for Kubernetes but that could be swapped out for any vendor or platform supporting the bare minimum requirements for KubeVirt (see the KubeVirt admin guide for details).
Now that the environment is primed, let’s provision a VM and take KubeVirt for a spin.
The command line interface
It is entirely possible to use kubectl out-of-the-box to deploy and manage VM resources. The virtctl CLI features a more rich experience with the ability to upload disk images, connect to the VM console and manage power states more easily. The most important task of virtctl is to render tedious manifests from just a few arguments to deploy new VMs.
Installing virtctl varies by platform and KubeVirt distribution. It’s advised at this point to have the same client and server version, which at the time of writing is 1.4.0. If using a Mac with Brew installed, it’s simply:
brew install virtctl
First we need to inform ourselves what DataSources are available on the cluster. Building new DataSources or importing new ones is out of scope for this blog post. VMs are cloned into new PersistentVolumeClaims (PVCs) from DataSources. List the existing the DataSources on the cluster:
$ kubectl get datasources -A
NAMESPACE            NAME             AGE
kubevirt-os-images   centos-stream8   13h
kubevirt-os-images   centos-stream9   13h
kubevirt-os-images   centos6          13h
kubevirt-os-images   centos7          13h
kubevirt-os-images   fedora           13h
kubevirt-os-images   opensuse         13h
kubevirt-os-images   rhel7            13h
kubevirt-os-images   rhel8            13h
kubevirt-os-images   rhel9            13h
kubevirt-os-images   ubuntu           13h
kubevirt-os-images   win10            13h
kubevirt-os-images   win11            13h
kubevirt-os-images   win2k16          13h
kubevirt-os-images   win2k19          13h
kubevirt-os-images   win2k22          13h
Not all DataSources are populated by default. On OKD, only “fedora” and “centos-stream9” are available. It can be checked by examining DataImportCrons.
$ kubectl get dataimportcrons -A
NAMESPACE            NAME                        FORMAT
kubevirt-os-images   centos-stream9-image-cron   pvc
kubevirt-os-images   fedora-image-cron           pvc
Let’s create a Fedora VM, assign the SSH public key and connect it to the management LAN, but first create a manifest named “my-network.yaml” to describe the network we want to connect the VM to.
spec:
  template:
    spec:
      domain:
        devices:
          interfaces:
            - bridge: {}
              model: virtio
              name: my-vnic-0
      networks:
        - multus:
            networkName: mgmt
          name: my-vnic-0
Now, create the VM and attach it to the network:
virtctl create vm --name my-vm-0 \
  --access-cred type:ssh,src:desktop,user:fedora \
  --volume-import=type:ds,src:kubevirt-os-images/fedora,size:64Gi \
| kubectl create -n hpe-vmi -f- && \
kubectl patch vm/my-vm-0 -n hpe-vmi --type=merge --patch-file my-network.yaml
Monitor the progress of the VM:
$ kubectl get vm -n hpe-vmi -w
NAME      AGE   STATUS         READY
my-vm-0   13s   Provisioning   False
my-vm-0   29s   Starting       False
my-vm-0   42s   Running        False
my-vm-0   42s   Running        True
Once the VM is running, it’s possible to login with the SSH identity and hostname given to the VM (assuming DHCP registers the hostname in DNS on the management network).
$ ssh fedora@my-vm-0
[fedora@my-vm-0 ~]$
So, what does the VM instance actually look like? Let’s install some tools and inspect.
$ sudo dnf install -yq fastfetch virt-what
$ sudo virt-what
redhat
kvm
$ fastfetch --pipe --localip-show-ipv4 false
             .',;::::;,'.                 fedora@my-vm-0
         .';:cccccccccccc:;,.             --------------
      .;cccccccccccccccccccccc;.          OS: Fedora Linux 41 (Cloud Edition) x86_64
    .:cccccccccccccccccccccccccc:.        Host: KubeVirt (RHEL-9.4.0 PC (Q35 + ICH9, 2009))
  .;ccccccccccccc;.:dddl:.;ccccccc;.      Kernel: Linux 6.11.4-301.fc41.x86_64
 .:ccccccccccccc;OWMKOOXMWd;ccccccc:.     Uptime: 7 mins
.:ccccccccccccc;KMMc;cc;xMMc;ccccccc:.    Packages: 550 (rpm)
,cccccccccccccc;MMM.;cc;;WW:;cccccccc,    Shell: bash 5.2.32
:cccccccccccccc;MMM.;cccccccccccccccc:    Terminal: /dev/pts/0
:ccccccc;oxOOOo;MMM000k.;cccccccccccc:    CPU: Intel Core (Haswell, no TSX, IBRS) @ 2.60 GHz
cccccc;0MMKxdd:;MMMkddc.;cccccccccccc;    GPU: Unknown Device 1111 (VGA compatible)
ccccc;XMO';cccc;MMM.;cccccccccccccccc'    Memory: 435.27 MiB / 3.80 GiB (11%)
ccccc;MMo;ccccc;MMW.;ccccccccccccccc;     Swap: 0 B / 3.80 GiB (0%)
ccccc;0MNc.ccc.xMMd;ccccccccccccccc;      Disk (/): 805.66 MiB / 62.92 GiB (1%) - btrfs
cccccc;dNMWXXXWM0:;cccccccccccccc:,       Locale: en_US.UTF-8
cccccccc;.:odl:.;cccccccccccccc:,.
ccccccccccccccccccccccccccccc:'.
:ccccccccccccccccccccccc:;,..
 ':cccccccccccccccc::;,.
Except for the “Host” hint, this looks like any VM instance on a KVM hypervisor.
With virtctl it’s possible to live migrate, pause/unpause, stop/start and restart the VM. Deleting the VM requires kubectl.
kubectl delete -n hpe-vmi vm/my-vm-0
This will remove all resources created with virtctl, including PVCs.
User experience with web user interfaces
KubeVirt does not have an official graphical user interface. That is a tall threshold for new users who are familiar with legacy VM management solutions where everything is a right-click away, structured in an intuitive manner. In a way, the KubeVirt project assumes that the user has a fundamental knowledge of KVM and can scrape through by managing Kubernetes resources through the CLI.
Fortunately, there are KubeVirt implementations that heavily focus on a graphical user experience and provide a great way to learn and explore the capabilities, very similar to legacy hypervisors.
Let's take a closer look at OKD, the upstream Kubernetes distribution of OpenShift, and Harvester, an Hyper Converged Infrastructure (HCI) solution built for VMs on KubeVirt with striking simplicity.

OKD is the upstream open source project of Red Hat OpenShift. Enabling virtualization is a two-click operation and considered the gold standard for managing VMs and containers with a unified control plane. KubeVirt has been part of OKD and OpenShift since 2020.

Harvester is an open source HCI solution primarily focused on running a highly opinionated stack of software and tools on Kubernetes designed solely for running VMs. Harvester can be consumed by Rancher to allow Rancher to deploy and manage Kubernetes clusters on Harvester in a symbiotic relationship.
Walking through the UIs are out of scope for this blog post but the same outcomes can be accomplished in a few clicks similar to using the CLI with virtctl and kubectl.
Ansible
Using CLIs and graphical UIs are great for exploratory administration and one-offs. They’re usually tedious and error prone when it comes to repeating the same set of tasks indefinitely. This is where Ansible comes it. Idempotent and declarative interfaces allow it to distill very complex tasks across multiple layers of infrastructure to gain full control all the way up to deploying the application. This kind of IT automation lends itself to GitOps and self-service patterns in large scale environments. Write once, delegate and reuse with ease, like cookie cutter templates.
Ansible has historically been well integrated with other KVM-based hypervisors such as oVirt/RHEV and provides VM management at scale quite elegantly.
Ansible can be installed on your desktop computer in a multitude of ways and will not be covered in this blog. Once Ansible is in place, install the KubeVirt collection:
ansible-galaxy collection install kubevirt.core
There are a couple of distinct patterns for managing cloud compute instances (VMs on KubeVirt in this case) with Ansible.
- Declaratively CRUD (Create, Read, Update Delete) the instances from a pre-rendered inventory, preferable templatized with Ansible, idempotent with desired parameters. Manage the OS and apps with playbooks using the rendered inventory.
- Imperatively CRUD the instances with some other tooling, either from the cloud provider directly or idempotent with something like OpenTofu. Employ dynamic inventory plugins to manage the OS and apps inside the instances.
- Imperatively CRUD the instances with Ansible playbooks and using a dynamic inventory plugin to manage OS and apps.
For the sake of simplicity and clarity the examples will imperatively CRUD the instances and showcase the dynamic inventory plugin with KubeVirt. In a production scenario where collaboration among engineers is required, the first option is the more elegant choice.
Create a playbook named “create_vm.yaml” or similar.
---
- hosts: localhost
  connection: local
  tasks:
  - name: Ensure VM name
    assert:
      that: vm is defined
  - name: Create a VM
    kubevirt.core.kubevirt_vm:
      state: present
      name: "{{ vm }}"
      namespace: hpe-vmi
      labels:
        app: my-example-label
      instancetype:
        name: u1.medium
      preference:
        name: fedora
      data_volume_templates:
        - metadata:
            name: "{{ vm }}-0"
          spec:
            sourceRef:
              kind: DataSource
              name: fedora
              namespace: kubevirt-os-images
            storage:
              resources:
                requests:
                  storage: 64Gi
      spec:
        domain:
          devices:
            interfaces:
            - name: mgmt
              bridge: {}
        networks:
        - name: mgmt
          multus:
            networkName: mgmt
        accessCredentials:
        - sshPublicKey:
            propagationMethod:
              qemuGuestAgent:
                users:
                - fedora
            source:
              secret:
                secretName: desktop
        volumes:
        - cloudInitConfigDrive:
            userData: |-
              #cloud-config
              # The default username is: fedora
              runcmd:
                - [ setsebool, -P, 'virt_qemu_ga_manage_ssh', 'on' ]
          name: cloudinitdisk
        - dataVolume:
            name: "{{ vm }}-0"
          name: "{{ vm }}-0"
      wait: yes
Many attributes have been hardcoded in this example but it illustrates the similarities of what virtctl outputs based on the parameters provided.
Use the playbook to create a VM:
ansible-playbook -e vm=my-vm-0 create_vm.yaml
It takes a minute or so for the VM to come up. When the prompt comes back, create a file named “hosts.kubevirt.yaml” (the “kubevirt.yaml” part of the filename is mandatory):
plugin: kubevirt.core.kubevirt
namespaces:
  - hpe-vmi
host_format: "{name}"
network_name: mgmt
label_selector: app=my-example-label
compose:
  ansible_user: "'fedora'"
It’s now possible to use the KubeVirt inventory plugin to manage the OS and apps in the VM. Let’s see if it connects:
ansible -i hosts.kubevirt.yaml -m ping my-vm-0
my-vm-0 | SUCCESS => {
    "ansible_facts": {
        "discovered_interpreter_python": "/usr/bin/python3.13"
    },
    "changed": false,
    "ping": "pong"
}
At this point it’s possible to manage the VM like any other host provisioned on any kind of server, hypervisor or cloud platform.
Summary
It doesn’t matter what your distinct VM management workflow looks like, KubeVirt serves all popular patterns. That said, current tools and processes will require an overhaul. Why not switch to idempotent VM management through GitOps while transitioning from your legacy hypervisor in the meantime? That's a topic for another day.
Connect with the HPE Developer Community via Slack or sign up for the Munch & Learn Technology Talks to immerse yourself in the latest breakthrough technologies from HPE, customers, and partners.
Related
Catch HPE at KubeCon NA 2022
Oct 4, 2022Containers, Kubernetes, and MapR: The Time is Now
Feb 5, 2021
Deploy stateful MongoDB applications on Kubernetes clusters in HPE GreenLake for Private Cloud Enterprise
Aug 16, 2022Deploying Cribl Stream Containers on HPE GreenLake for Private Cloud Enterprise
Jan 17, 2024Doryd: A Dynamic Provisioner for Docker Volume plugins
Dec 6, 2017