
Integrating Python 3 with FIPS enabled OpenSSL 3.1 on Microsoft Windows
April 23, 2023Introduction
Federal Information Processing Standard (FIPS) are a set of encryption algorithms and are mandatory in all the computer systems and software used by non-military American government agencies, government contractors, and the vendors who work with the agencies. Whenever new software is developed, it needs to be FIPS-compliant. Thus, there is a need to enable Python 3 with FIPS, but the default Python 3 binary package comes without FIPS, as shown in the screenshot below:

This blog will explain step-by-step how to integrate the Python 3 with the FIPS enabled OpenSSL 3.1 on Microsoft Windows so that any new software compiled out of it is FIPS-compliant.
Steps for Microsoft Windows
Step 1: Download the OpenSSL source from http://www.openssl.org and the Python 3 source from http://www.python.org.
Step 2: Install NASM and Perl Software and add to PATH
Step 3: Install these 2 Perl modules using the commands below.
cpan -i Text::Template
cpan -i Test::More
Step 4: Create a directory structure like what's shown below.
mkdir "C:\SSLout\SSL"
mkdir "C:\SSLout\DLL\x64\Release"
mkdir "C:\SSLout\Lib"
Step 5: Unzip the openssl-3.1.0.tar.gz file into C:\work\openssl-3.1.0
Step 6: Build the OpenSSL module using VC++ 2015 x64 the Native Tools Command prompt.
cd openssl-3.1.0
Perl Configure VC-WIN64A --prefix=C:\SSLout\DLL\x64\Release -openssldir=c:\SSLout\SSL enable-fips
nmake
nmake install_sw
nmake install_ssldirs
nmake install_docs
nmake install_fips
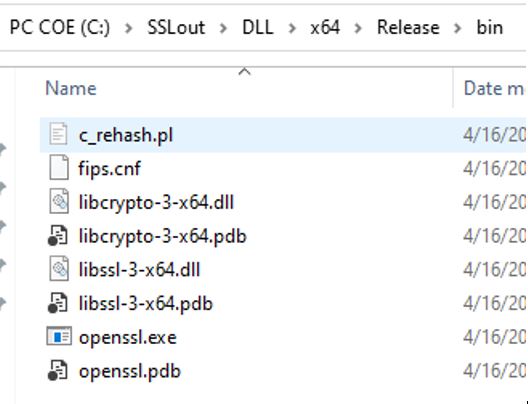
The OpenSSL 3.1 binaries are generated in the C:\SSLout\DLL\x64\Release\bin.
This is shown as shown below:
Step 7: Unzip the Python-3.11.2.tgz to C:\work\Python3.11.2 and go into
cd C:\work\Python3.11.2\PCBuild
Run the get_externals.bat file. This will fetch the dependencies from the internet into the externals directory.
get_externals.bat
Now create the openssl-bin-3.1.0 directory under the externals directory as shown below:
cd externals
mkdir openssl-bin-3.1.0
The directory structure will look like this as shown below:

Step 8: Under the externals directory, create an amd64 depending on the CPU architecture and copy the files to it as shown below:
copy C:\SSLout\DLL\x64\Release\lib\*.lib  C:\work\Python3.11.2\PCBuild\externals\openssl-bin-3.1.0\amd64
copy C:\SSLout\DLL\x64\Release\bin\*.* C:\work\Python3.11.2\PCBuild\externals\openssl-bin-3.1.0\amd64
copy C:\SSLout\DLL\x64\Release\include C:\work\Python3.11.2\PCBuild\externals\openssl-bin-3.1.0\amd64
copy C:\SSLout\DLL\x64\Release\include\openssl\applink.c  C:\work\Python3.11.2\PCBuild\externals\openssl-bin-3.1.0\amd64\include
copy C:\SSLout\DLL\x64\Release\lib\ossl-modules\*.* C:\work\Python3.11.2\PCBuild\externals\openssl-bin-3.1.0\amd64
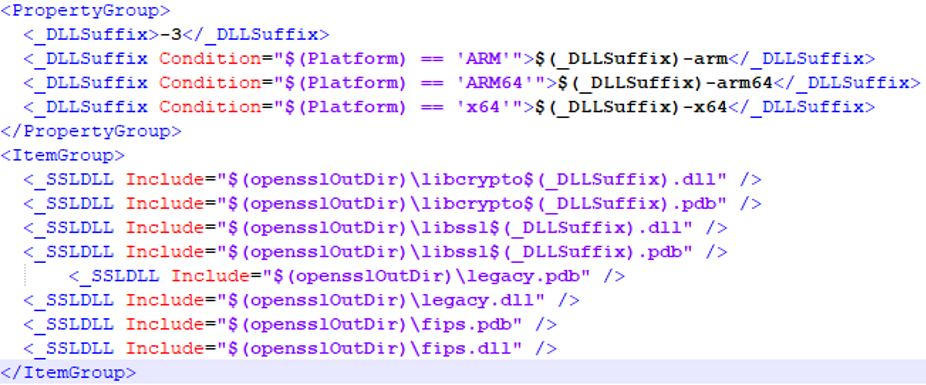
Step 9: Modify PCbuild/openssl.props as shown below:
Step 10: Open PCbuild/python.props and change the entries as shown below:

Step 11: Open the Python Solution under PCbuild/pcbuild.sln in VS 2015.
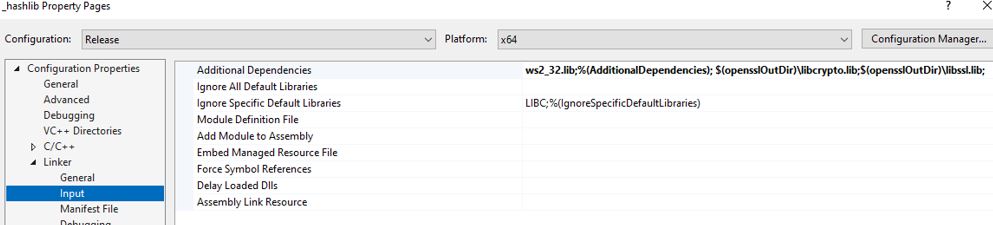
Change the Linker settings of _hashlib and _ssl projects as shown below:
Step 12: Now, build _hashlib.pyd and _ssl.pyd in VS 2015.
Step 13: Copy these built .pyd files from \PCbuild\amd64\ to the Python binary installation directory C:\python311\DLLs.
Step 14: Start Python binary installtion and use these commands to check the OpenSSL 3.1 version as shown below:

Step 15: Now, to run Python 3 with a FIPS enabled OpenSSL 3.1, create openssl.cnf and fipsmodule.cnf file using the below content in C:\Python311 directory. By using this config file, FIPS will be enabled by default.
openssl.cnf:
config_diagnostics = 1
openssl_conf = openssl_init
.include .\fipsmodule.cnf

[openssl_init]
providers = provider_sect
alg_section = algorithm_sect

[provider_sect]
fips = fips_sect
legacy = legacy_sect
base = base_sect
default = default_sect

[base_sect]
activate = 1

[legacy_sect]
activate = 1

[default_sect]
activate = 1

[algorithm_sect]
default_properties = fips=yes
fipsmodule.cnf:
[fips_sect]
activate = 1
conditional-errors = 1
security-checks = 1
module-mac = D4:64:00:E3:CE:34:EE:CE:58:32:12:08:21:6D:64:FD:E3:A6:D4:F0:E6:38:3D:2C:0C:40:1B:50:C8:8F:39:A3
Step 16: Now, open the command window as an Administrator and execute the following command as shown below:
set OPENSSL_CONF=C:\Python311\openssl.cnf
Step 17: To verify Python is enabled with FIPS, both the client and server need to be in FIPS mode. The client Windows OS needs to be enabled with FIPS using these 2 steps:
- Open
gpedit.mscon run menu and navigate toComputer Configuration\Windows Settings\Security Settings\Local Policies\Security Optionsand enable theSystem cryptography: Use FIPS compliant algorithms for encryption, hashing, and signingsetting.- Open
regediton run menu and go toHKLM\System\CurrentControlSet\Control\Lsa\FipsAlgorithmPolicy\Enabledand set Enabled to 1.
Step 18: To verify Python 3 is enabled with FIPS, run the following commands as shown below:

Note that the list of crypto algorithms available are more than the crypto algorithms guaranteed. But all the available algorithms can be used if the Server where the Client SSL is connecting to, is also configured in FIPS mode.
The living example for the OpenSSL Server is HPE iLO.
Voila!!... Now the Python 3.11 is integrated with the OpenSSL 3.1 which is enabled with FIPS in Windows Platform. This Python 3 installation can be used to develop the applications which are OpenSSL 3 and FIPS enabled!!
Summary
In this blog, I have covered the following steps regarding integrating Python 3 with FIPS enabled OpenSSL 3.1:
- Download the required packages.
- Compile OpenSSL 3 along with FIPS enabled.
- Make the required changes and compile the Python along with the OpenSSL 3.1 binaries copied as an external dependency.
- Copy the newly generated binaries to the Python 3 installation directory.
- Test the OpenSSL 3 version in Python 3 and also verify if it is FIPS enabled.
I hope this blog is useful to the entire developer community!! Make sure you check out our other blog posts on HPE DEV for more useful tutorials.
Related
Creating a Python version that enforces FIPS
Feb 15, 2018Updating Python and Openssl on OS X
Dec 18, 2017Managing Multiple Instances of Python in Microsoft Windows
Apr 6, 2021