Editor’s Note – NAME CHANGE: HPE GreenLake for Private Cloud is now part of HPE GreenLake for Private Cloud Enterprise.
The process of managing and provisioning computer data centers through machine-readable definition files, otherwise known as Infrastructure-as-Code (IaC), offers many significant benefits. It helps to increase operational agility, simplify management, reduce errors, and save cost. In this post, I’ll explore some of the benefits of using IaC on HPE GreenLake through the use of Terraform.
Let’s harness some of the benefits of Infrastructure as Code
One of the superpowers of IaC is its repeatability, the fact that you can set something up once and then use the same information in multiple ways. Implementing IaC allows organizations to store configuration files describing the desired infrastructure as a single source of truth. It also allows you to apply the DevOps methodology that’s already in place for application code directly to the infrastructure. For example, configuration files can be stored and managed through GitHub using the same way your DevOps team manages the application code. This concept is often called “Shifting Left”, as you are describing the infrastructure to host an application earlier (left) in the delivery pipeline of the application. This allows for easier and consistent deployments of infrastructure across the complete infrastructure landscape of an organization.
HPE GreenLake
HPE GreenLake is HPE’s edge-to-cloud platform. The HPE GreenLake platform provides a unified experience wherever your applications and its data are located on the edge, in colocations or in your own datacenter. This cloud experience everywhere includes the following capabilities:
- Self-service
- Infinite scalability
- Pay-as-you-go
- Managed for you
HPE GreenLake Cloud Services
The HPE GreenLake ecosystem provides solutions for several top workloads such as containers, Machine Learning, private cloud, virtual machines, SAP HANA, HPC, VDI and many more. This page on HPE GreenLake cloud services and ecosystem provides a complete list. The ecosystem also leverages many technologies from HPE partners such as Microsoft, VMware, SAP, Nutanix, Veeam and others.
HPE GreenLake for private cloud
One of the options provided by HPE GreenLake is to make it easy for customers to order and operate a private cloud with a mix of virtual machines, containers, and physical servers. This is exactly what the private cloud Service is all about. This service allows customers to point and click to create resources such as virtual machines. It also provides access via a public API, allowing developers to use an Infrastructure-as-Code type of tool to automate provisioning, for example using Terraform.
Terraform
Terraform is an open source Infrastructure-as-Code framework originally created by HashiCorp that is written in Go. It uses a declarative language (HashiCorp Configuration Language HCL or JSON more recently) to describe the desired state of the infrastructure in terms of cloud, virtual machines, networks, storage, and many other components. Terraform uses the concept of “providers” to integrate with all major public clouds. Terraform is a so-called idempotent system in the sense that it doesn’t generate any side effects if applied multiple times on an infrastructure already in its desired state. Terraform has gained quite the momentum in the last few years. Its main competition is Ansible, Amazon Cloud Formation, Puppet and Chef.
Readying for your Infrastructure-as-Code implementation
Terraform installation
Your first step is to get your system ready to run Terraform. In case this has not been done yet, this will include:
- Installing Terraform: follow these steps
- Verifying installation: terraform --help
At this point, you are ready to start building your infrastructure description file.
Building a Terraform configuration file from scratch
Let’s start building this TF file using your favorite editor.
Selecting a Terraform provider
The first section of the file will enumerate the “providers” you rely upon for building your infrastructure, and they could be multiple providers in a single TF file. In this case here, you will only have the HPE GreenLake provider referenced as hpe/hpegl in the official Terraform registry.
The first lines of your Terraform configuration file should look like this:
# Load HPE GreenLake terraform provider
terraform {
      required_providers {
         hpegl = {
            source  = "hpe/hpegl"
            version = "0.3.17"
         }
      }
   }
You can find out more about the HPE GreenLake Terraform provider from its Terraform Registry page.
This page also provides a link to the GitHub repository corresponding to this provider. The docs folder is your best source of information for using the different data sources and resources provided by the provider. If you navigate to the resources section, you will see that one resource you can manipulate with this provider is a VM instance. Let’s focus on this resource in this article.
Note: Because this is open source, don’t hesitate to open issues, or even a pull request, if you identify an issue.
Setting up the Terraform provider
Now that you have expressed the fact that the hpegl provider will be used, you need to setup some parameters for it. As explained on this page, you can either explicitly set those parameters in your TF file, or have them set in a series of environment variables, or a mix of both. I suggest the following two parameters be added in your TF file:
# Setup provider environment (location and space)
provider "hpegl" {
      vmaas {
         location   = "HPE"
         space_name = "TerraForm Space"
      }
}
And the rest (such as tenant id, user id and user secret key) can be placed in a RC file, which you can source before running your Terraform command.
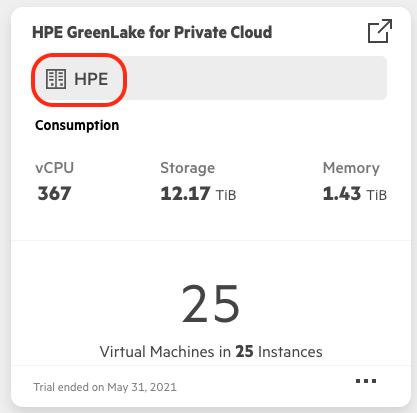
You can find your location and your space name from the HPE GreenLake user interface. In our example shown below, HPE is our location:

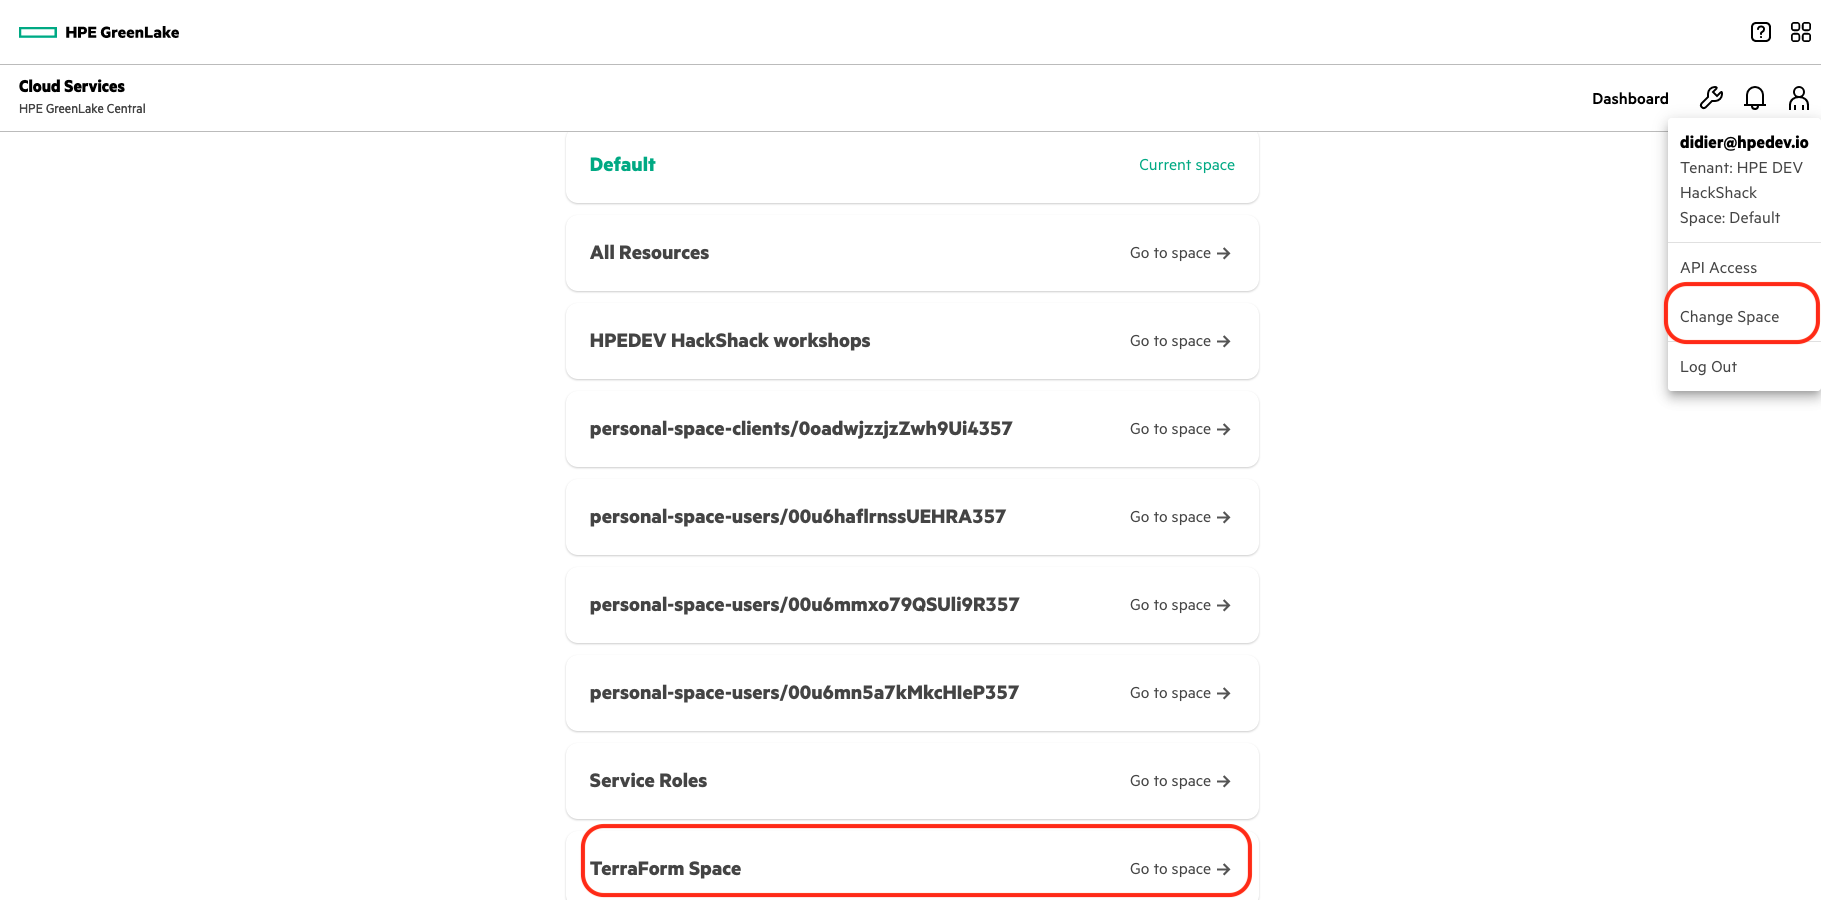
And in the capture below, Terraform Space is the space we have created for our work with Terraform. You can check your available Spaces from the HPE GreenLake console under your profile icon, Change space.

Setting up a API Client access
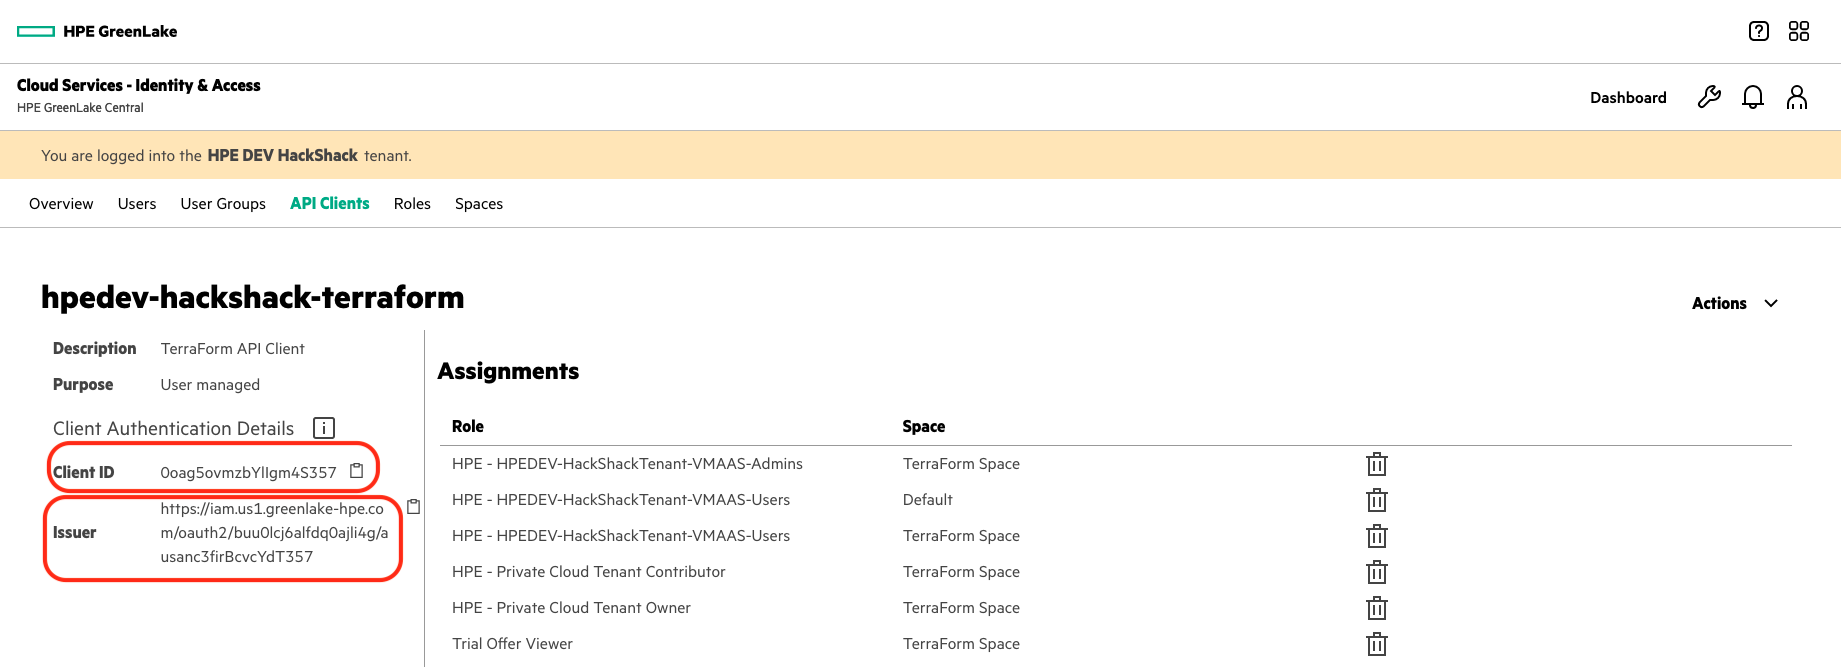
Next, you need to create a new API Client access dedicated to Terraform. You can do this from the HPE GreenLake console under your settings icon, Identity & Access and then the API Clients tab.

Create a new API Client (hpedev-hackshack-terraform in the screen capture above), and make sure the Tenant Contributor role is assigned on your space, better yet, create a new role from the default Tenant Contributor role for this API client access. Also take note of the client id and the Issuer URL as shown in capture below.
Notes: More details on GreenLake user roles can be found in the GreenLake documentation.

Note: You need to remember the API Client secret key, as it’s not displayed anymore after creation.
Finally, you’ll need your Tenant ID as shown from the HPE GreenLake console under your profile icon, API Access.

With this you can now build a resource file that defines the following environment variables:
export HPEGL_TENANT_ID=<Your Tenant ID>
export HPEGL_USER_ID=<Client ID of the API Client>
export HPEGL_USER_SECRET=<Secret Key displayed when you created the API Client>
export HPEGL_IAM_SERVICE_URL=<Issuer URL>
And execute it on your machine to set these environment variables.
Querying for infrastructure components
Your next step with the TF file is to query the HPE GreenLake provider to collect information needed to create your first VM instance. From the documentation, you can see that you need to gather the following information:
- Cloud ID
- Group ID
- Layout ID
- Plan ID
- Instance type code
- Network ID
- Resource Pool ID
- Template ID
- Folder Code
For this, you will use the Terraform data statements. For example, the following statement retrieves the Cloud ID and stores it (in variable called cloud), which we can later retrieve using: data.hpegl_vmaas_cloud.cloud.id
# Retrieve cloud id
data "hpegl_vmaas_cloud" "cloud" {
     name = "HPE GreenLake VMaaS Cloud-Trial4 "
   }
Using a similar technique, you can retrieve the rest of the data you need:
# And a few networks
data "hpegl_vmaas_network" "blue_net" {
     name = "Blue-Network"
   }
data "hpegl_vmaas_network" "green_net" {
     name = "Green-network"
   }

data "hpegl_vmaas_cloud_folder" "compute_folder" {
   cloud_id = data.hpegl_vmaas_cloud.cloud.id
   name     = "ComputeFolder"
   }

# Locate a resource pool
data "hpegl_vmaas_resource_pool" "cl_resource_pool" {
     cloud_id = data.hpegl_vmaas_cloud.cloud.id
     name = "ComputeResourcePool"
   }

# And a group
data "hpegl_vmaas_group" "default_group" {
  name = "HPEDEV-HackShackTenant-Group"
}

# Locate a plan
data "hpegl_vmaas_plan" "g1_small" {
     name = "G1-Small"
   }

# A layout
data "hpegl_vmaas_layout" "vmware" {
  name               = "VMware VM with vanilla CentOS"
  instance_type_code = "glhc-vanilla-centos"
}

# And a template
data "hpegl_vmaas_template" "vanilla" {
     name = "vanilla-centos7-x86_64-09072020"
   }
You can get information about each of the data statements supported by the hpegl provider from GitHub.
Creating a VM resource
The last step is to use a Terraform resource statement to request the creation of a new VM instance:
resource "hpegl_vmaas_instance" "DidierTest1" {
     name               = "DidierTest1"
     cloud_id           = data.hpegl_vmaas_cloud.cloud.id
     group_id           = data.hpegl_vmaas_group.default_group.id
     layout_id          = data.hpegl_vmaas_layout.vmware.id
     plan_id            = data.hpegl_vmaas_plan.g1_small.id
     instance_type_code = data.hpegl_vmaas_layout.vmware.instance_type_code

     network {
         id = data.hpegl_vmaas_network.green_net.id
     }

     volume {
         name         = "root_vol"
         size         = 15
         datastore_id = "auto"
     }

     config {
         resource_pool_id = data.hpegl_vmaas_resource_pool.cl_resource_pool.id
         template_id      = data.hpegl_vmaas_template.vanilla.id
         no_agent         = true
         asset_tag        = "vm_terraform"
         folder_code      = data.hpegl_vmaas_cloud_folder.compute_folder.code
     }

     power = "poweron"
   }
Note: You can get information about each of the resource statements supported by the hpegl provider from GitHub.
Terraform init
Before you can use Terraform, you will have to initialize it from the configuration file we have created. This is done with the following step: terraform init
$ terraform init

Initializing the backend...

Initializing provider plugins...
- Finding hpe/hpegl versions matching "0.1.7"...
- Installing hpe/hpegl v0.3.17...
- Installed hpe/hpegl v0.3.17 (signed by a HashiCorp partner, key ID D1F277A1AC66CE3D)

Partner and community providers are signed by their developers.
If you'd like to know more about provider signing, you can read about it here:
https://www.terraform.io/docs/cli/plugins/signing.html

Terraform has created a lock file .terraform.lock.hcl to record the provider
selections it made above. Include this file in your version control repository
so that Terraform can guarantee to make the same selections by default when
you run "terraform init" in the future.

Terraform has been successfully initialized!

You may now begin working with Terraform. Try running "terraform plan" to see
any changes that are required for your infrastructure. All Terraform commands
should now work.

If you ever set or change modules or backend configuration for Terraform,
rerun this command to reinitialize your working directory. If you forget, other
commands will detect it and remind you to do so if necessary.
Terraform ready to plan
To validate your configuration file, I recommend running the terraform validate command as you add sections to your file to track syntax errors. Once ready, the terraform plan command will provide information about what will be created when the terraform apply method is finally used.
$ terraform plan

Terraform used the selected providers to generate the following execution plan. Resource actions are
indicated with the following symbols:
  + create

Terraform will perform the following actions:

  # hpegl_vmaas_instance.DidierTest1 will be created
  + resource "hpegl_vmaas_instance" "DidierTest1" {
      + cloud_id           = 1
      + containers         = (known after apply)
      + group_id           = 3
      + history            = (known after apply)
      + hostname           = (known after apply)
      + id                 = (known after apply)
      + instance_type_code = "glhc-vanilla-centos"
      + layout_id          = 1159
      + name               = "DidierTest1"
      + plan_id            = 402
      + power              = "poweron"
      + server_id          = (known after apply)
      + status             = (known after apply)

      + config {
          + asset_tag        = "vm_terraform"
          + folder_code      = "1"
          + no_agent         = true
          + resource_pool_id = 1
          + template_id      = 573
        }

      + network {
          + id          = 6
          + internal_id = (known after apply)
          + is_primary  = (known after apply)
          + name        = (known after apply)
        }

      + volume {
          + datastore_id = "auto"
          + id           = (known after apply)
          + name         = "root_vol"
          + root         = true
          + size         = 10
        }
    }

Plan: 1 to add, 0 to change, 0 to destroy.
If you agree with the plan, and what is going to be created, you can move to the last step, i.e. applying the configuration.
Terraform ready to apply
The command you need to use is now: terraform apply. This will rerun the plan command, then prompt you to confirm before it starts building what’s in the plan:
Do you want to perform these actions?
  Terraform will perform the actions described above.
  Only 'yes' will be accepted to approve.

  Enter a value: yes

hpegl_vmaas_instance.DidierTest1: Creating...
hpegl_vmaas_instance.DidierTest1: Still creating... [10s elapsed]
hpegl_vmaas_instance.DidierTest1: Still creating... [20s elapsed]
hpegl_vmaas_instance.DidierTest1: Still creating... [30s elapsed]
hpegl_vmaas_instance.DidierTest1: Still creating... [40s elapsed]
hpegl_vmaas_instance.DidierTest1: Still creating... [50s elapsed]
hpegl_vmaas_instance.DidierTest1: Still creating... [1m0s elapsed]
hpegl_vmaas_instance.DidierTest1: Still creating... [1m10s elapsed]
hpegl_vmaas_instance.DidierTest1: Still creating... [1m20s elapsed]
hpegl_vmaas_instance.DidierTest1: Still creating... [1m30s elapsed]
hpegl_vmaas_instance.DidierTest1: Still creating... [1m40s elapsed]
hpegl_vmaas_instance.DidierTest1: Still creating... [1m50s elapsed]
hpegl_vmaas_instance.DidierTest1: Still creating... [2m0s elapsed]
hpegl_vmaas_instance.DidierTest1: Creation complete after 2m9s [id=145]

Apply complete! Resources: 1 added, 0 changed, 0 destroyed.
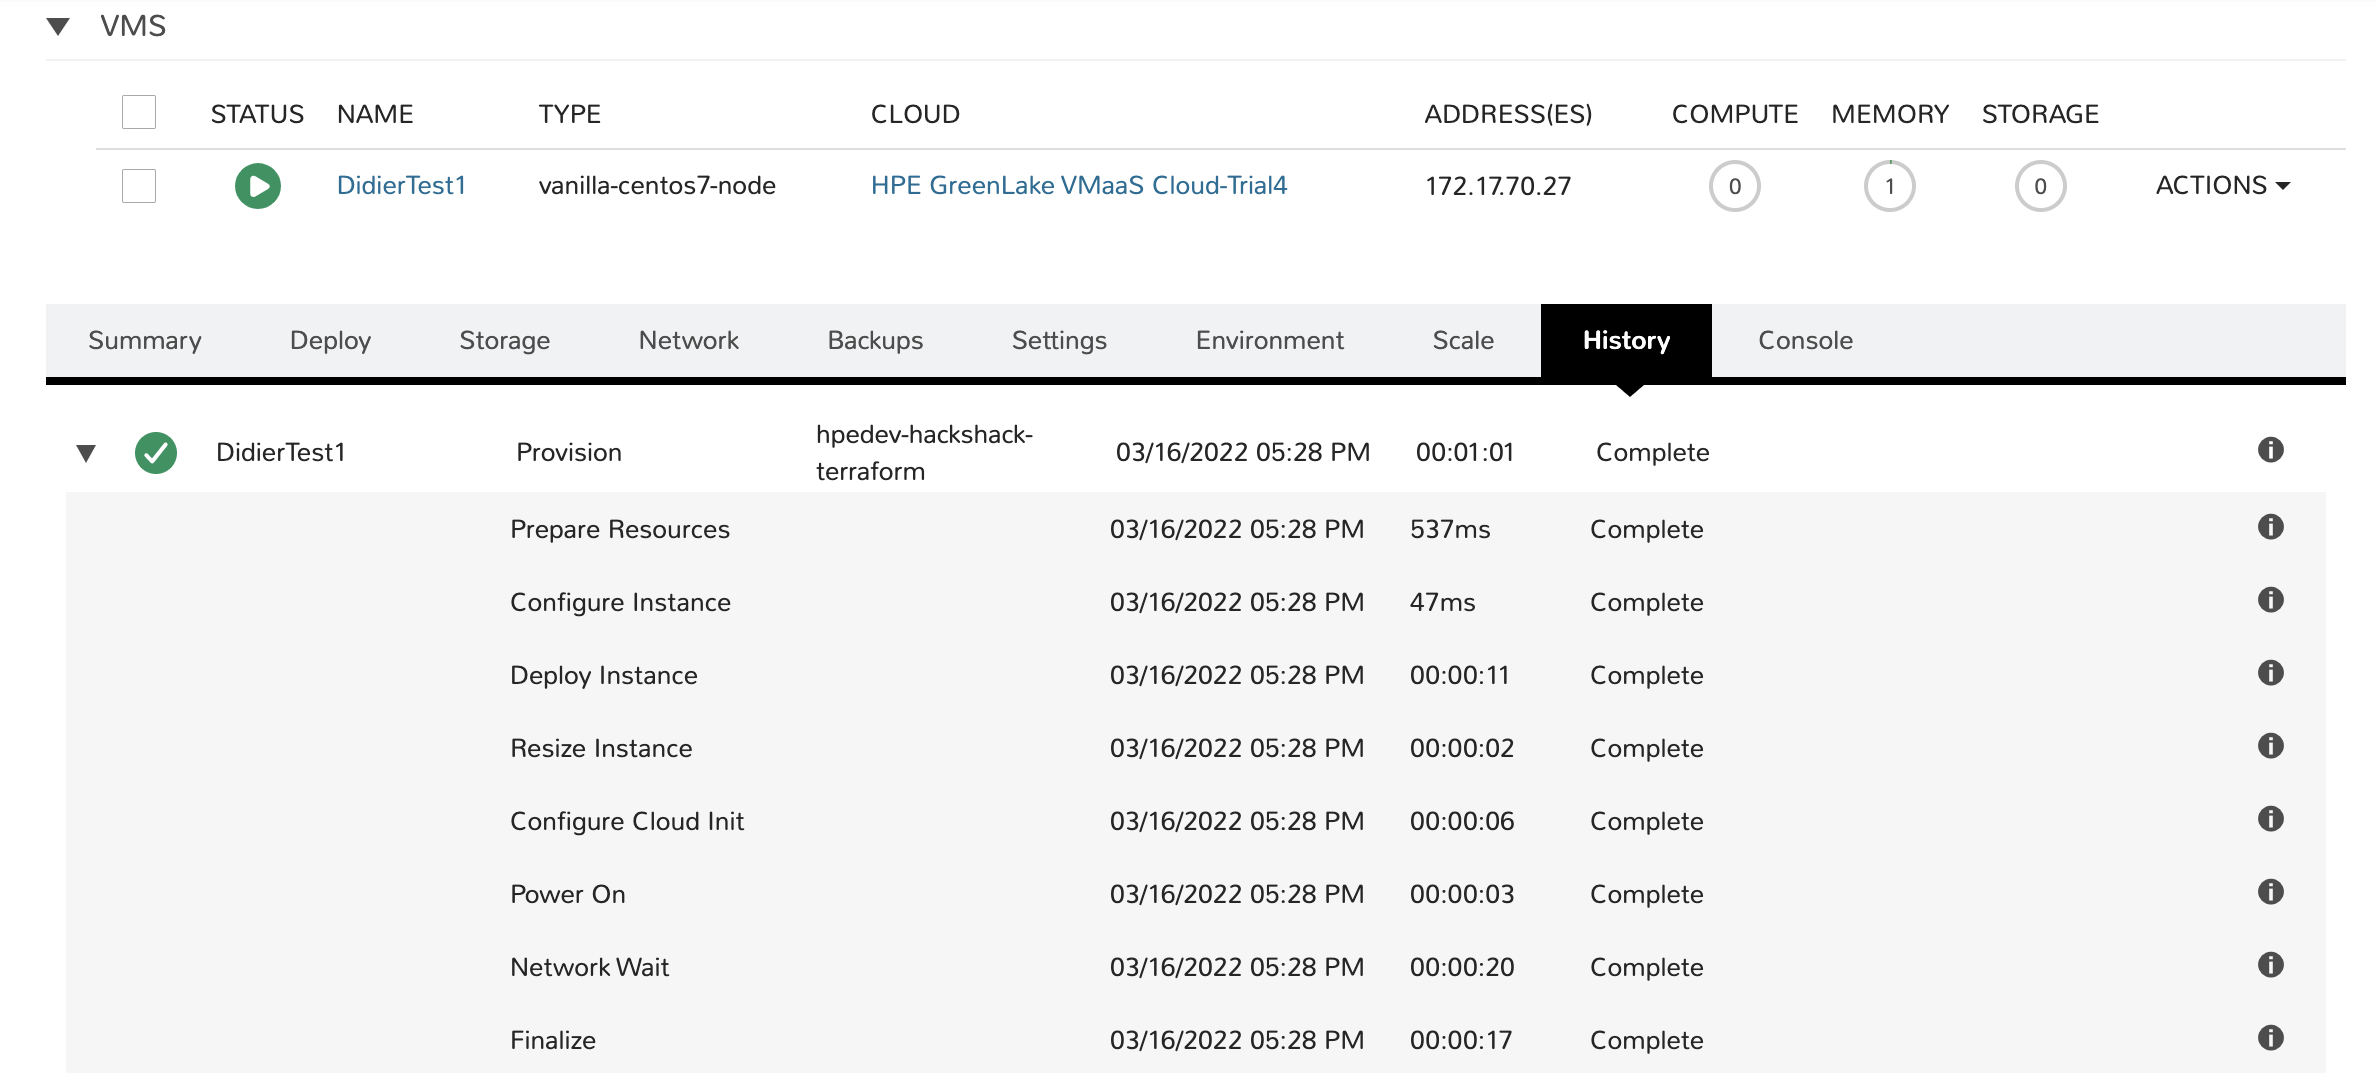
If you open your HPE GreenLake console to monitor the VM resources, you will see the effect of the terraform apply command:

Cleaning it all up
In Terraform, clean-up can be done using the destroy command. This will automatically use the HPE GreenLake provider to clean the infrastructure in HPE GreenLake.
$ terraform destroy
hpegl_vmaas_instance.DidierTest1: Refreshing state... [id=145]

Terraform used the selected providers to generate the following execution plan. Resource actions are indicated with the following symbols:
  - destroy

Terraform will perform the following actions:

  # hpegl_vmaas_instance.DidierTest1 will be destroyed
  - resource "hpegl_vmaas_instance" "DidierTest1" {
      - cloud_id           = 1 -> null
      - containers         = [
          - {
              - container_type = [
                  - {
                      - name = "vanilla-centos7-node"
                    },
                ]
              - external_fqdn  = "didiertest1.localdomain"
              - hostname       = "didiertest1"
              - id             = 145
              - ip             = "172.17.70.29"
              - max_cores      = 1
              - max_memory     = 4294967296
              - max_storage    = 16106127360
              - name           = "DidierTest1_145"
              - server         = [
                  - {
                      - compute_server_type = [
                          - {
                              - external_delete = true
                              - managed         = true
                              - name            = "VMware Linux VM"
                            },
                        ]
                      - date_created        = "2022-02-23T14:42:10Z"
                      - id                  = 151
                      - last_updated        = "2022-02-23T22:05:33Z"
                      - owner               = [
                          - {
                              - username = "hpedev-hackshack-terraform"
                            },
                        ]
                      - platform            = ""
                      - platform_version    = ""
                      - server_os           = [
                          - {
                              - name = "centOS 7 64-bit"
                            },
                        ]
                      - ssh_host            = "172.17.70.29"
                      - ssh_port            = 22
                      - visibility          = "private"
                    },
                ]
            },
        ] -> null
      - group_id           = 3 -> null
      - history            = [
          - {
              - account_id   = 2
              - created_by   = [
                  - {
                      - display_name = "hpedev-hackshack-terraform"
                      - username     = "hpedev-hackshack-terraform"
                    },
                ]
              - date_created = "2022-02-23T14:42:11Z"
              - display_name = "DidierTest1"
              - duration     = 54873
              - end_date     = "2022-02-23T14:43:06Z"
              - id           = 1191
              - instance_id  = 145
              - last_updated = "2022-02-23T14:43:06Z"
              - percent      = 100
              - process_type = [
                  - {
                      - code = "provision"
                      - name = "provision"
                    },
                ]
              - reason       = ""
              - start_date   = "2022-02-23T14:42:11Z"
              - status       = "complete"
              - status_eta   = 0
              - unique_id    = "dc48d7f7-f564-46b7-b60f-67eaf5193f38"
              - updated_by   = [
                  - {
                      - display_name = "hpedev-hackshack-terraform"
                      - username     = "hpedev-hackshack-terraform"
                    },
                ]
            },
        ] -> null
      - id                 = "145" -> null
      - instance_type_code = "glhc-vanilla-centos" -> null
      - layout_id          = 1159 -> null
      - name               = "DidierTest1" -> null
      - plan_id            = 402 -> null
      - power              = "poweron" -> null
      - server_id          = 151 -> null
      - status             = "running" -> null

      - config {
          - asset_tag        = "vm_terraform" -> null
          - create_user      = false -> null
          - folder_code      = "group-v41" -> null
          - no_agent         = true -> null
          - resource_pool_id = 2 -> null
          - template_id      = 573 -> null
        }

      - network {
          - id           = 7 -> null
          - interface_id = 0 -> null
          - internal_id  = 197 -> null
          - is_primary   = true -> null
          - name         = "eth0" -> null
        }

      - volume {
          - datastore_id = "auto" -> null
          - id           = 282 -> null
          - name         = "root_vol" -> null
          - root         = false -> null
          - size         = 15 -> null
        }
    }

Plan: 0 to add, 0 to change, 1 to destroy.

Do you really want to destroy all resources?
  Terraform will destroy all your managed infrastructure, as shown above.
  There is no undo. Only 'yes' will be accepted to confirm.

  Enter a value:

  Enter a value: yes

hpegl_vmaas_instance.DidierTest1: Destroying... [id=145]
hpegl_vmaas_instance.DidierTest1: Still destroying... [id=145, 10s elapsed]
hpegl_vmaas_instance.DidierTest1: Still destroying... [id=145, 20s elapsed]
hpegl_vmaas_instance.DidierTest1: Still destroying... [id=145, 30s elapsed]
hpegl_vmaas_instance.DidierTest1: Still destroying... [id=145, 40s elapsed]
hpegl_vmaas_instance.DidierTest1: Still destroying... [id=145, 50s elapsed]
hpegl_vmaas_instance.DidierTest1: Still destroying... [id=145, 1m0s elapsed]
hpegl_vmaas_instance.DidierTest1: Destruction complete after 1m7s

Destroy complete! Resources: 1 destroyed.
What’s next?
In this blog post, I covered how to get started with the Terraform provider for HPE GreenLake, explained how to collect data from the platform, and showed how to request the creation of a VM instance. In my next article, I will apply changes to infrastructure configuration file and demonstrate how the desired state is automatically tracked by Terraform and applied to HPE GreenLake.
- Learn more about Terraform
- Learn more about HPE GreenLake
- Learn more about the HPE GreenLake Terraform provider
Find other tutorials and articles on HPE GreenLake on the HPE DEV blog.
Tags
Related
A guide to enabling a managed Istio service mesh in a Kubernetes cluster on HPE GreenLake for Private Cloud Enterprise
Feb 16, 2023All HPE OneView Ecosystem SDKs now support OneView 5.3 automation
Sep 4, 2020Application Modernization with the Application Workbench
May 10, 2021Apps and Infrastructure as Code with Ansible using HPE Cloud Volumes and Amazon AWS
Nov 29, 2017Automating 3PAR provisioning with Chef
Apr 2, 2018