
Editor’s Note – NAME CHANGE: HPE GreenLake for Private Cloud is now part of HPE GreenLake for Private Cloud Enterprise.
The process of managing and provisioning computer data centers through machine-readable definition files, otherwise known as Infrastructure-as-Code (IaC), offers many significant benefits. It helps to increase operational agility, simplify management, reduce errors, and save cost. In this second post, I’ll explore how to extract more of the benefits of using IaC on HPE GreenLake through the use of Terraform.
Let’s recap
In my first blog, I covered HPE GreenLake with its Private Cloud Service and showed how to get started with Terraform and the Terraform provider for HPE GreenLake. In this post, I will start with the same VM configuration created in Part 1 and show you how to tap into more advanced functionality that’s provided by Terraform and the HPE GreenLake provider. If you’re coming in to this just now, you might want to follow the steps shown in my Part 1 blog post, up to the point (Terraform ready to apply) where the VM DidierTest1 is created in HPE GreenLake, as illustrated below:
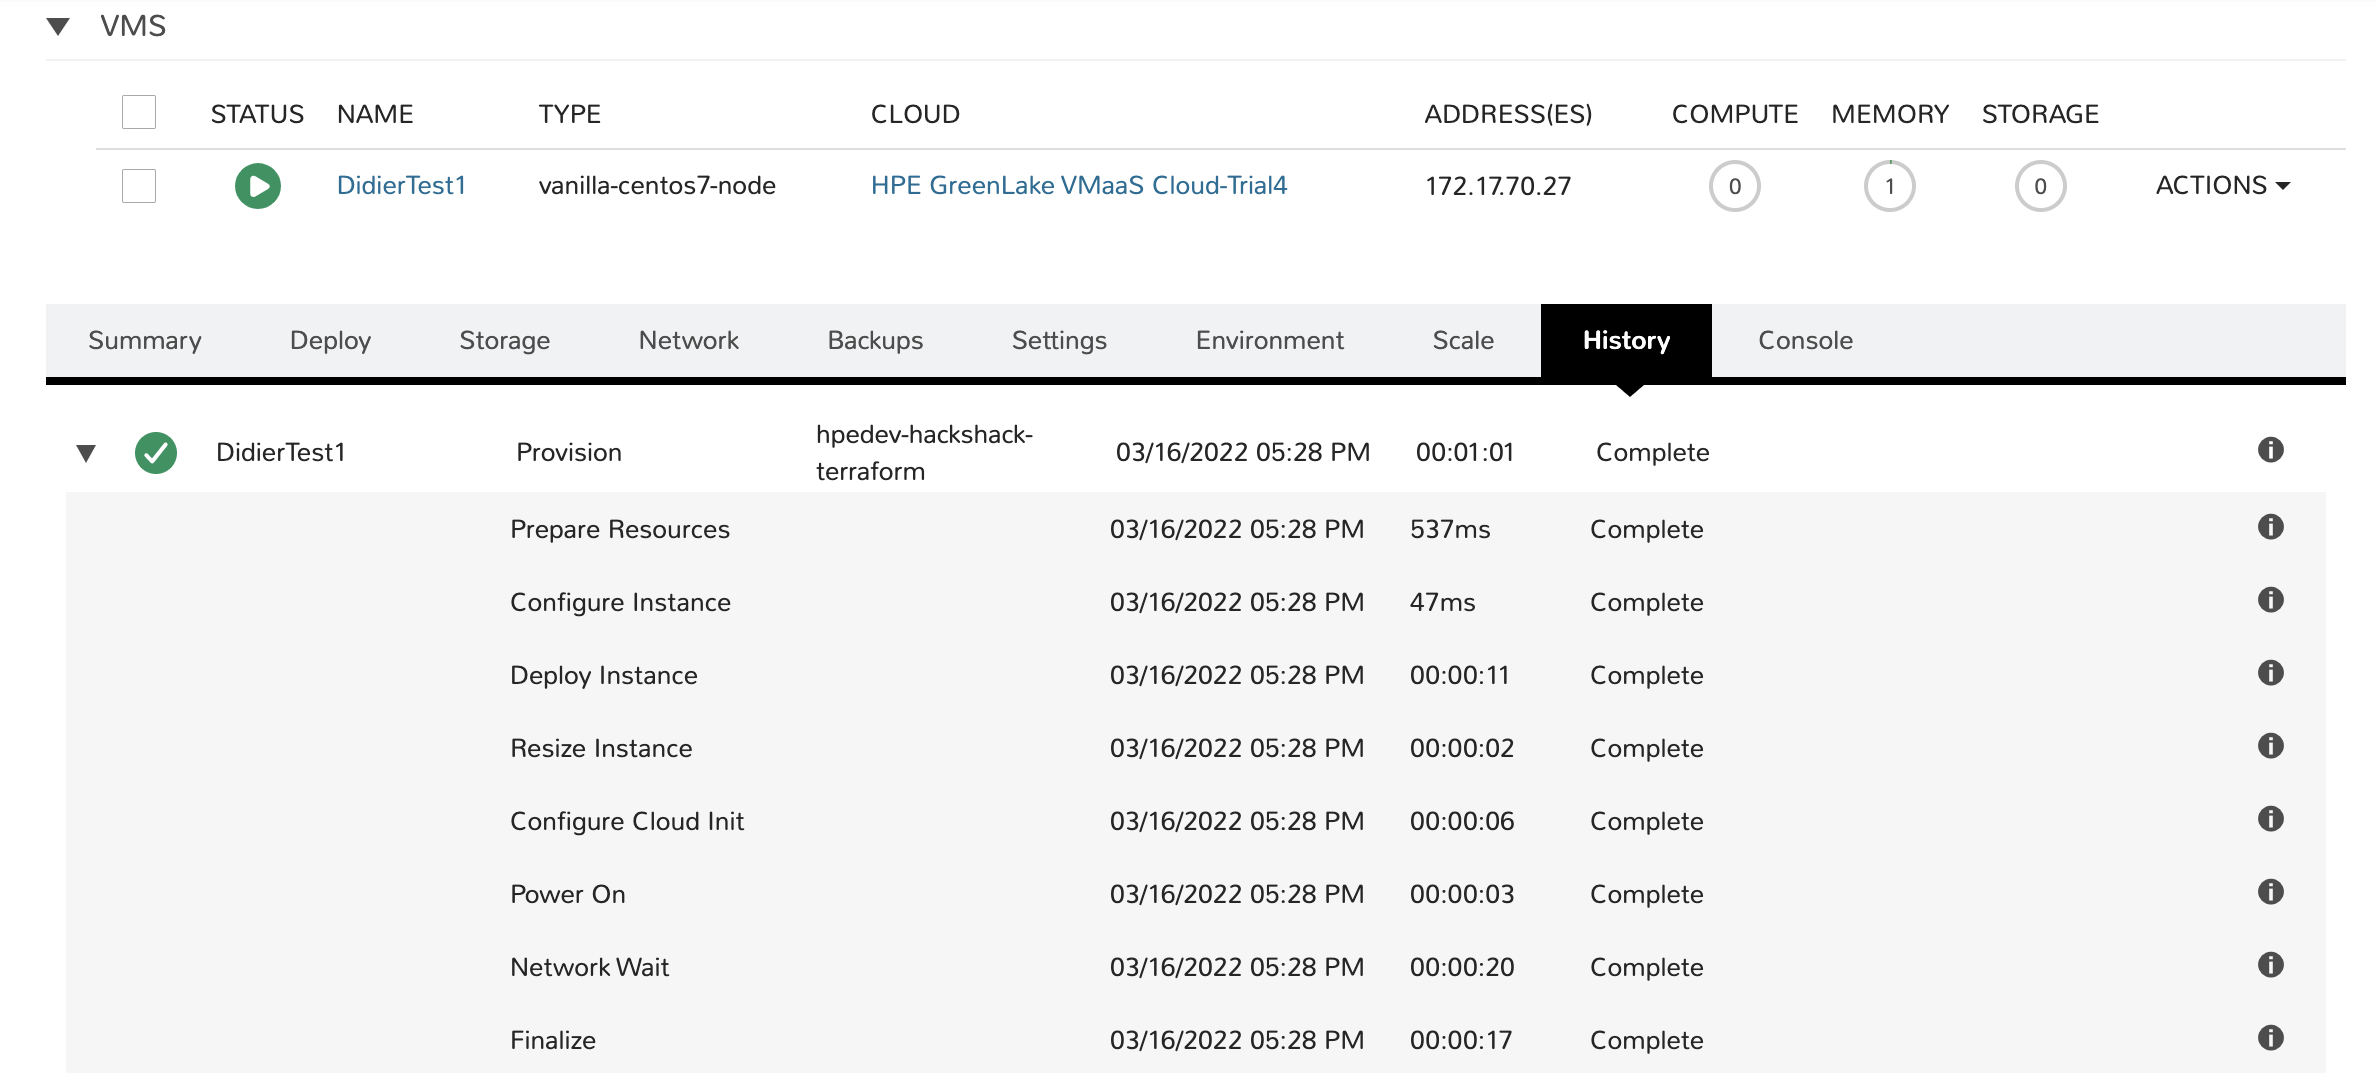
The corresponding Terraform configuration file showed the following:
# Load HPE GreenLake terraform provider
terraform {
      required_providers {
         hpegl = {
            source  = "hpe/hpegl"
            version = "0.3.17"
         }
      }
   }

# Setup provider environment (location and space)
provider "hpegl" {
      vmaas {
         location   = "HPE"
         space_name = "TerraForm Space"
      }
   }

# Start retrieving resources
# Retrieve a cloud
data "hpegl_vmaas_cloud" "cloud" {
     name = "HPE GreenLake VMaaS Cloud-Trial4 "
   }

# And a few networks
data "hpegl_vmaas_network" "blue_net" {
     name = "Blue-Network"
   }

data "hpegl_vmaas_network" "green_net" {
     name = "Green-network"
   }

data "hpegl_vmaas_cloud_folder" "compute_folder" {
   cloud_id = data.hpegl_vmaas_cloud.cloud.id
   name     = "ComputeFolder"
   }

# Locate a resource pool
data "hpegl_vmaas_resource_pool" "cl_resource_pool" {
     cloud_id = data.hpegl_vmaas_cloud.cloud.id
     name = "ComputeResourcePool"
   }

# And a group
data "hpegl_vmaas_group" "default_group" {
  name = "HPEDEV-HackShackTenant-Group"
}

# Locate a plan
data "hpegl_vmaas_plan" "g1_small" {
     name = "G1-Small"
   }

# A layout
data "hpegl_vmaas_layout" "vmware" {
  name               = "VMware VM with vanilla CentOS"
  instance_type_code = "glhc-vanilla-centos"
}

# And a template
data "hpegl_vmaas_template" "vanilla" {
     name = "vanilla-centos7-x86_64-09072020"
   }

resource "hpegl_vmaas_instance" "DidierTest1" {
     name               = "DidierTest1"
     cloud_id           = data.hpegl_vmaas_cloud.cloud.id
     group_id           = data.hpegl_vmaas_group.default_group.id
     layout_id          = data.hpegl_vmaas_layout.vmware.id
     plan_id            = data.hpegl_vmaas_plan.g1_small.id
     instance_type_code = data.hpegl_vmaas_layout.vmware.instance_type_code
     network {
         id = data.hpegl_vmaas_network.green_net.id
     }
     volume {
         name         = "root_vol"
         size         = 15
         datastore_id = "auto"
     }
     config {
         resource_pool_id = data.hpegl_vmaas_resource_pool.cl_resource_pool.id
         template_id      = data.hpegl_vmaas_template.vanilla.id
         no_agent         = true
         asset_tag        = "vm_terraform"
         folder_code      = data.hpegl_vmaas_cloud_folder.compute_folder.code
     }
     power = "poweron"
   }
Keeping things in-sync
To understand what the current state of our configuration file is, let’s run another terraform plan after the VM has materialized on HPE GreenLake.
terraform plan hpegl_vmaas_instance.DidierTest1: Refreshing state... [id=149] Note: Objects have changed outside of Terraform Terraform detected the following changes made outside of Terraform since the last "terraform apply": # hpegl_vmaas_instance.DidierTest1 has changed ~ resource "hpegl_vmaas_instance" "DidierTest1" { ~ containers = [ ~ { ~ server = [ - { - compute_server_type = [ - { - external_delete = true - managed = true - name = "VMware Linux VM" }, ] - date_created = "2022-03-16T16:28:08Z" - id = 155 - last_updated = "2022-03-16T16:29:11Z" - owner = [ - { - username = "hpedev-hackshack-terraform" }, ] - platform = "" - platform_version = "" - server_os = [] - ssh_host = "172.17.70.27" - ssh_port = 22 - visibility = "private" }, + { + compute_server_type = [ + { + external_delete = true + managed = true + name = "VMware Linux VM" }, ] + date_created = "2022-03-16T16:28:08Z" + id = 155 + last_updated = "2022-03-30T11:37:40Z" + owner = [ + { + username = "hpedev-hackshack-terraform" }, ] + platform = "" + platform_version = "" + server_os = [ + { + name = "centOS 7 64-bit" }, ] + ssh_host = "172.17.70.27" + ssh_port = 22 + visibility = "private" }, ] # (9 unchanged elements hidden) }, ] id = "149" name = "DidierTest1" # (9 unchanged attributes hidden) + config { + asset_tag = "vm_terraform" + create_user = false + folder_code = "group-v41" + no_agent = true + resource_pool_id = 2 + template_id = 573 } - config { - asset_tag = "vm_terraform" -> null - folder_code = "group-v41" -> null - no_agent = true -> null - resource_pool_id = 2 -> null - template_id = 573 -> null } # (2 unchanged blocks hidden) } Unless you have made equivalent changes to your configuration, or ignored the relevant attributes using ignore_changes, the following plan may include actions to undo or respond to these changes. ───────────────────────────────────────────────────────────────────────────────────────────────────��─────────────────────────────────────────────────────────────────────────────────────────────── No changes. Your infrastructure matches the configuration. Your configuration already matches the changes detected above. If you'd like to update the Terraform state to match, create and apply a refresh-only plan: terraform apply -refresh-only
Terraform has now detected that there are now additional configuration details (such as the IP address of the VM) that can be expressed concerning the infrastructure. It’s even proposing to synchronize it using a terraform apply -refresh-only command. We can follow the advice and bring our configuration state in sync with the backend environment.
This is a refresh-only plan, so Terraform will not take any actions to undo these.

If you were expecting these changes then you can apply this plan to record the

updated values in the Terraform state without changing any remote objects.

Would you like to update the Terraform state to reflect these detected changes?

  Terraform will write these changes to the state without modifying any real infrastructure.

  There is no undo. Only 'yes' will be accepted to confirm.

  Enter a value: yes

Apply complete! Resources: 0 added, 0 changed, 0 destroyed.
Infrastructure lifecycle management
Once your infrastructure is created, it will need to evolve over time in order to cope with any change of workload or to perform maintenance. Let’s look at a few scenarios.
Use case 1: Stop this VM
To start, let’s keep things simple. You might want to just turn off the VMs that are part of an infrastructure when you don’t need them to save cost or limit your carbon impact on the planet. If you paid attention to the current configuration file, you’ll see that we inserted a power statement when originally creating the VM. While poweron is the only valid option when creating a new resource of type hpegl_vmaas_instance, other values are available for lifecycle management, such as poweroff and suspend.
Locate the following section in your configuration file:
     }
     power = "poweron"
   }
And change it so that the power desired state is set to poweroff as shown below:
     }
     power = "poweroff"
   }
Save and run a terraform apply command, which will prompt you to accept the following change:
Terraform will perform the following actions:

# hpegl_vmaas_instance.DidierTest1 will be updated in-place
  ~ resource "hpegl_vmaas_instance" "DidierTest1" {
        id                 = "149"
        name               = "DidierTest1"
      ~ power              = "poweron" -> "poweroff"
Pretty soon afterwards, you can check out the HPE GreenLake console and see that the VM status was changed to stopped.

Use case 2: Setting up tags and labels
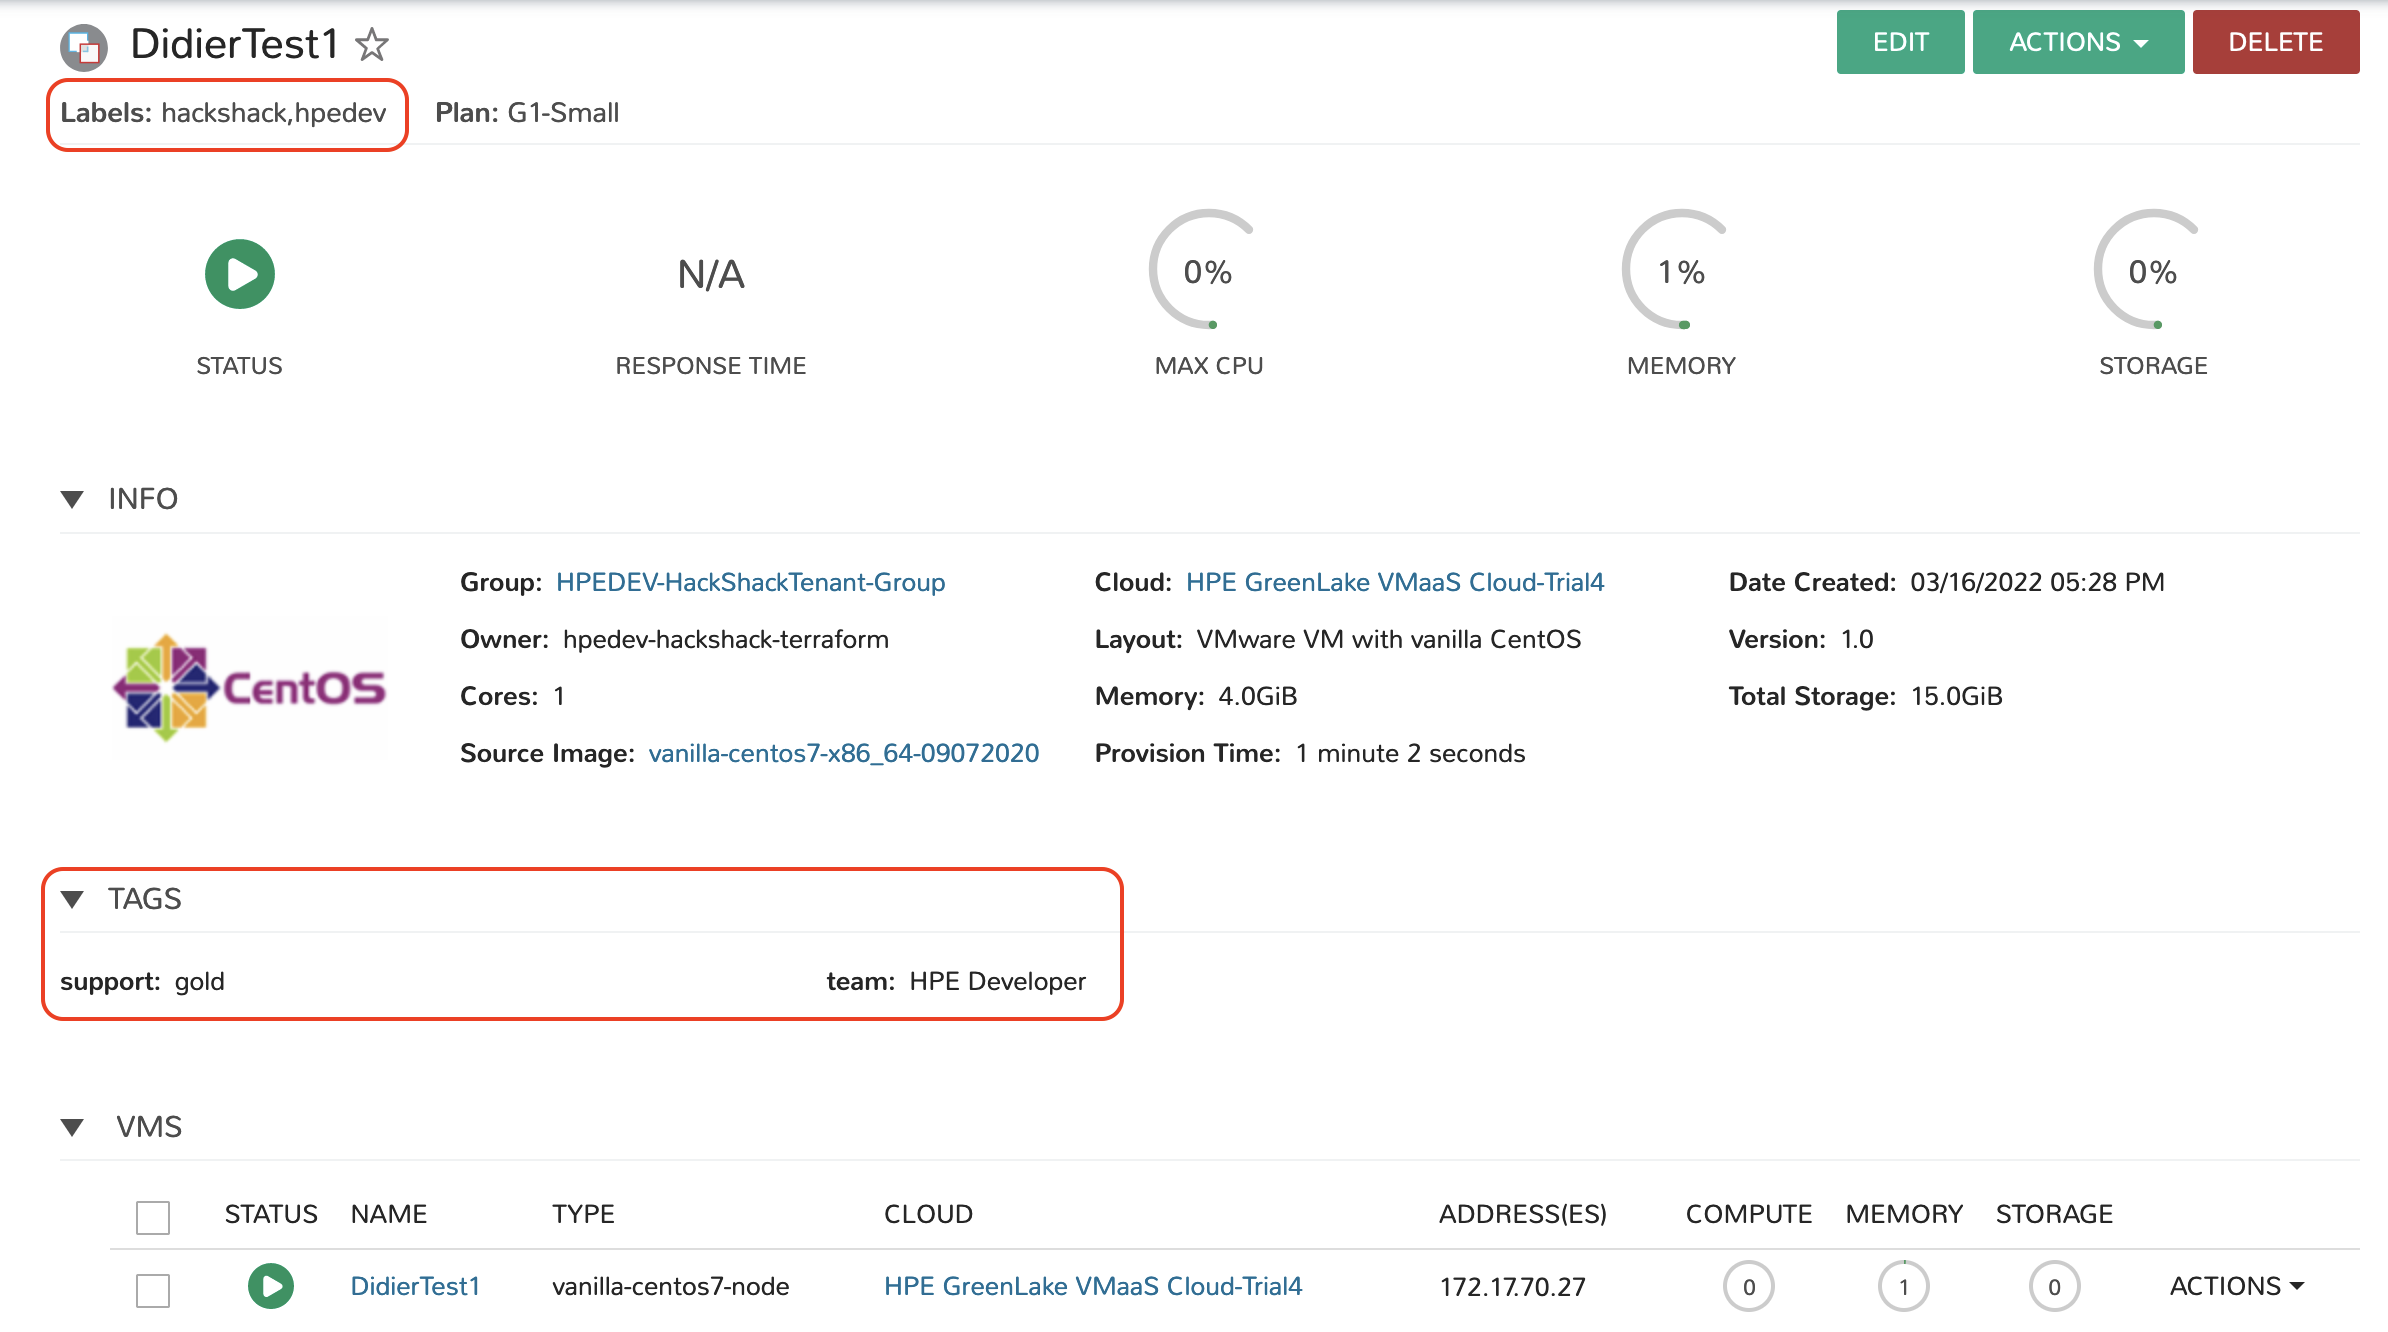
That was straight forward, right? Now, restart the VM and try something else. You might want to test out tabs and labels. As organizations scale their cloud environments, they often need to define methodologies for organizing resources. For this, they can leverage tags and labels. Tags consist of key/value pairs that make it easier to search for, or filter, your cloud resources based on categories relevant to the organization. Another option is to attach labels, which are simple values, to your VMs in order to keep track of what it’s used for or who it belongs to.
Why don’t you try adding metadata to the VM using tags and labels. According to the documentation, you can add labels using the following syntax in our configuration file:
# Using labels
labels = ["hackshack", "hpedev"]
And you can add tags by inserting the following code snippet in your configuration file:
# Using tags
tags = {
        team  = "HPE Developer"
        support = "gold"
  }
Save and apply those changes with terraform apply, wait a little and look at the VM details. You can see the labels and the tags in the capture below:
Use case 3: Get me more disk space
Another typical use case would be to add another disk to a VM, say a data volume for application usage. The syntax for this is the same as you used to create the VM with its root_vol, already visible in the Storage details of the VM:
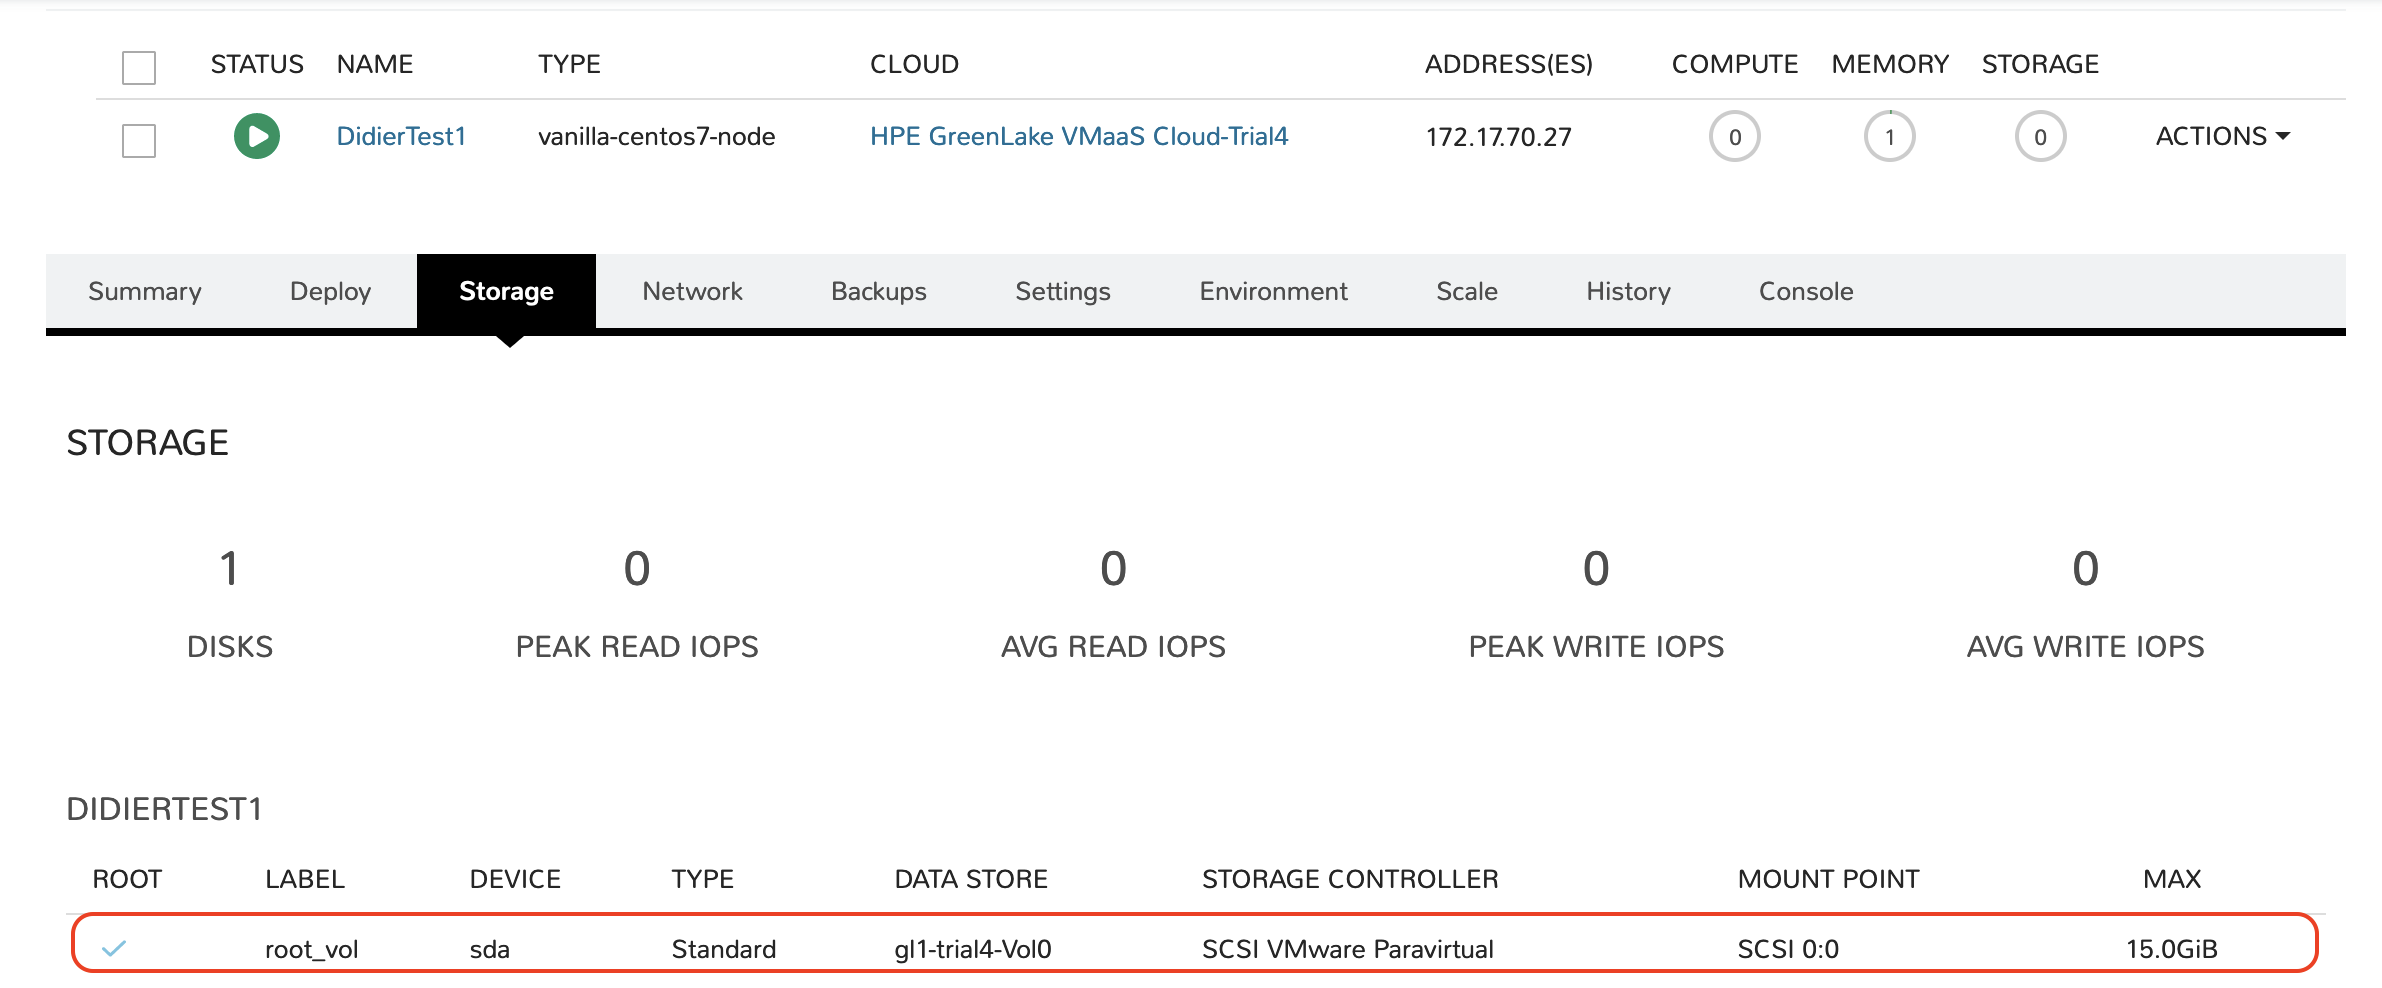
Go ahead and add the following code snippet to your configuration file:
  # Add another volume

  volume {
         name         = "data_vol"
         size         = 25
         datastore_id = "auto"
     }
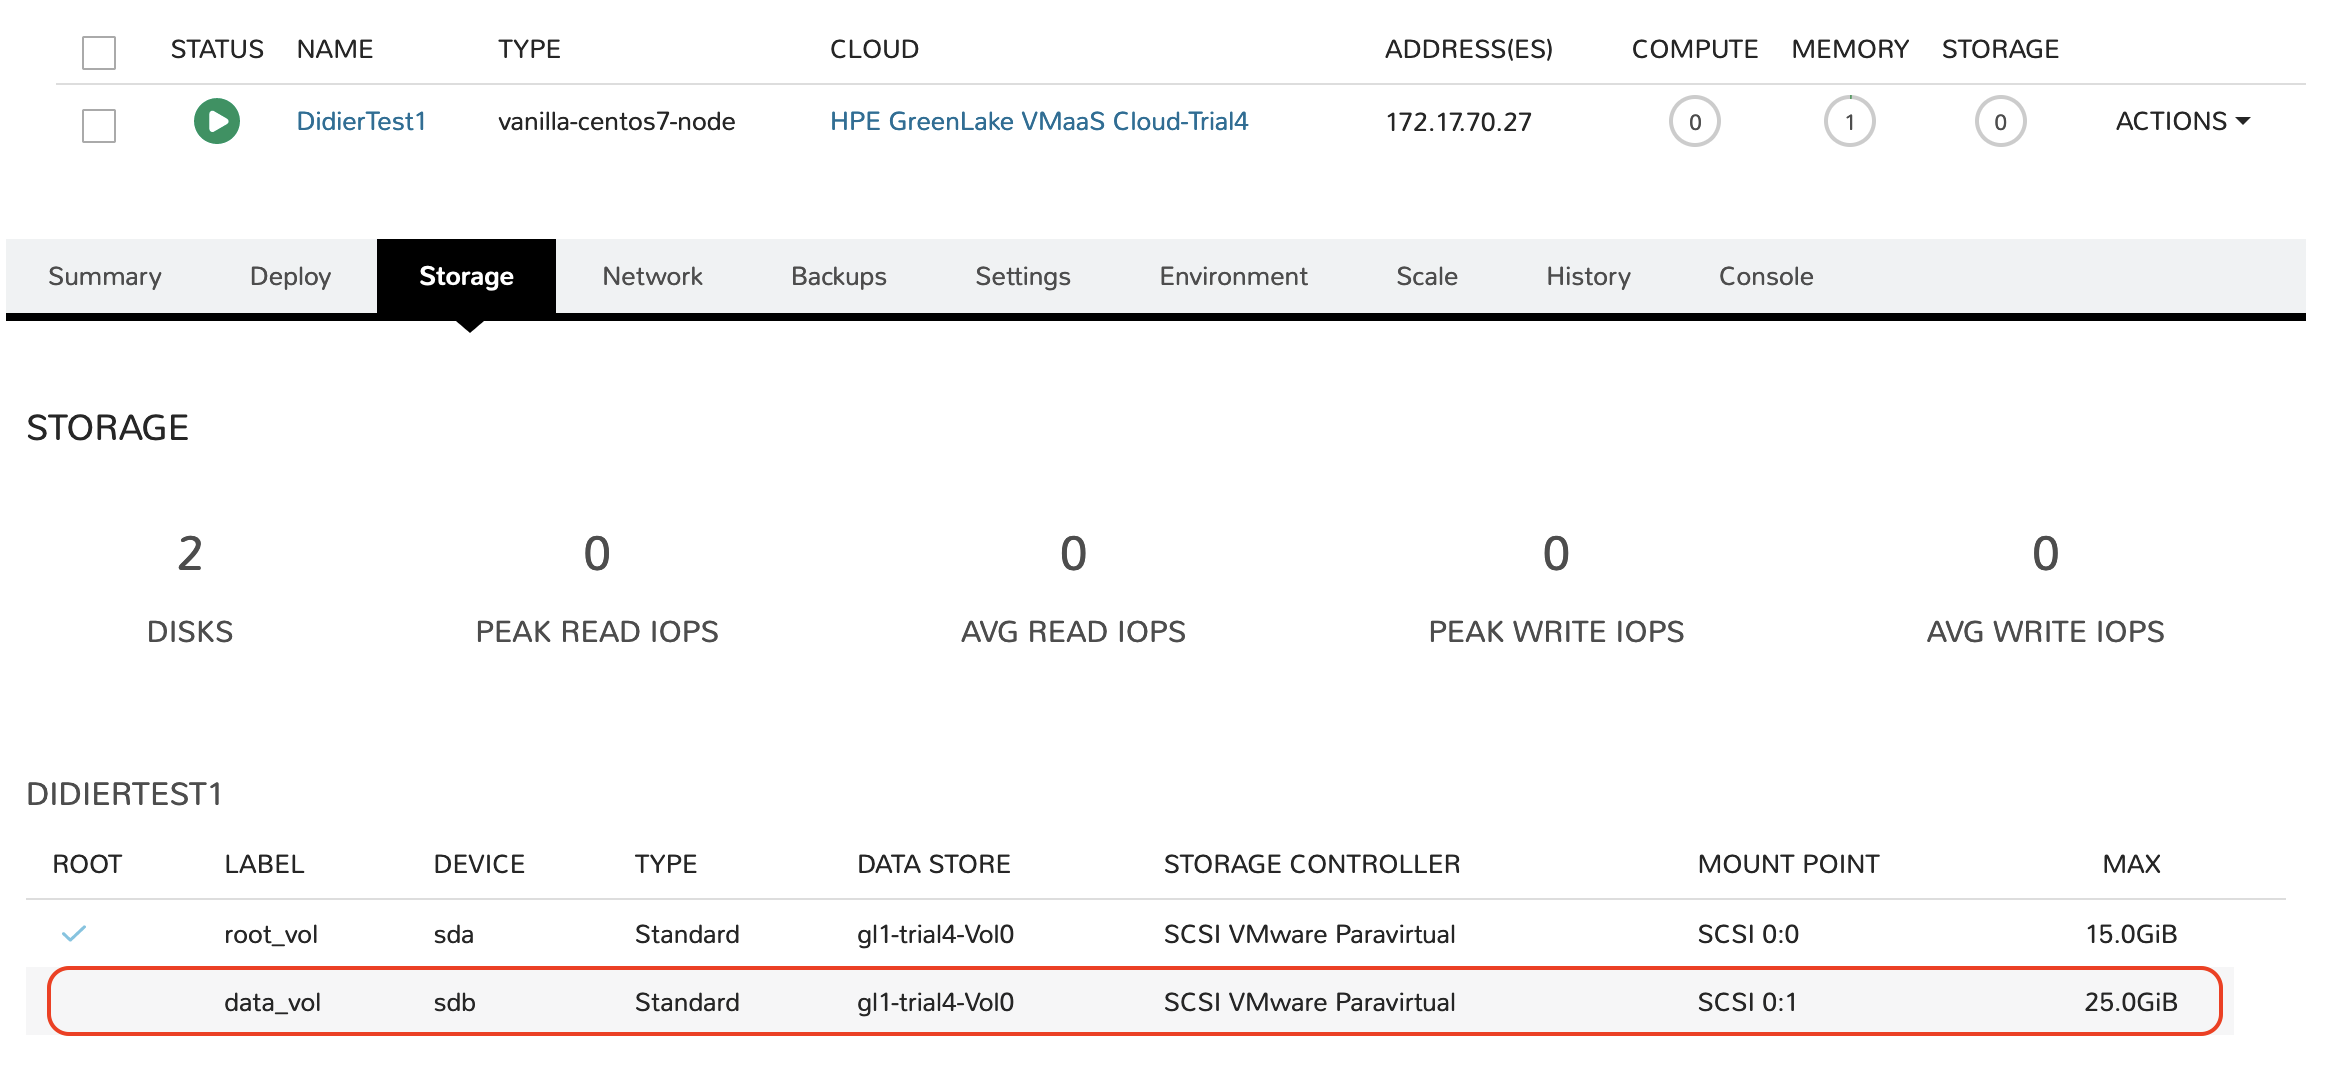
Save the file, apply those changes, wait a little and check the VM storage configuration again:
Use case 4: Please snap this VM
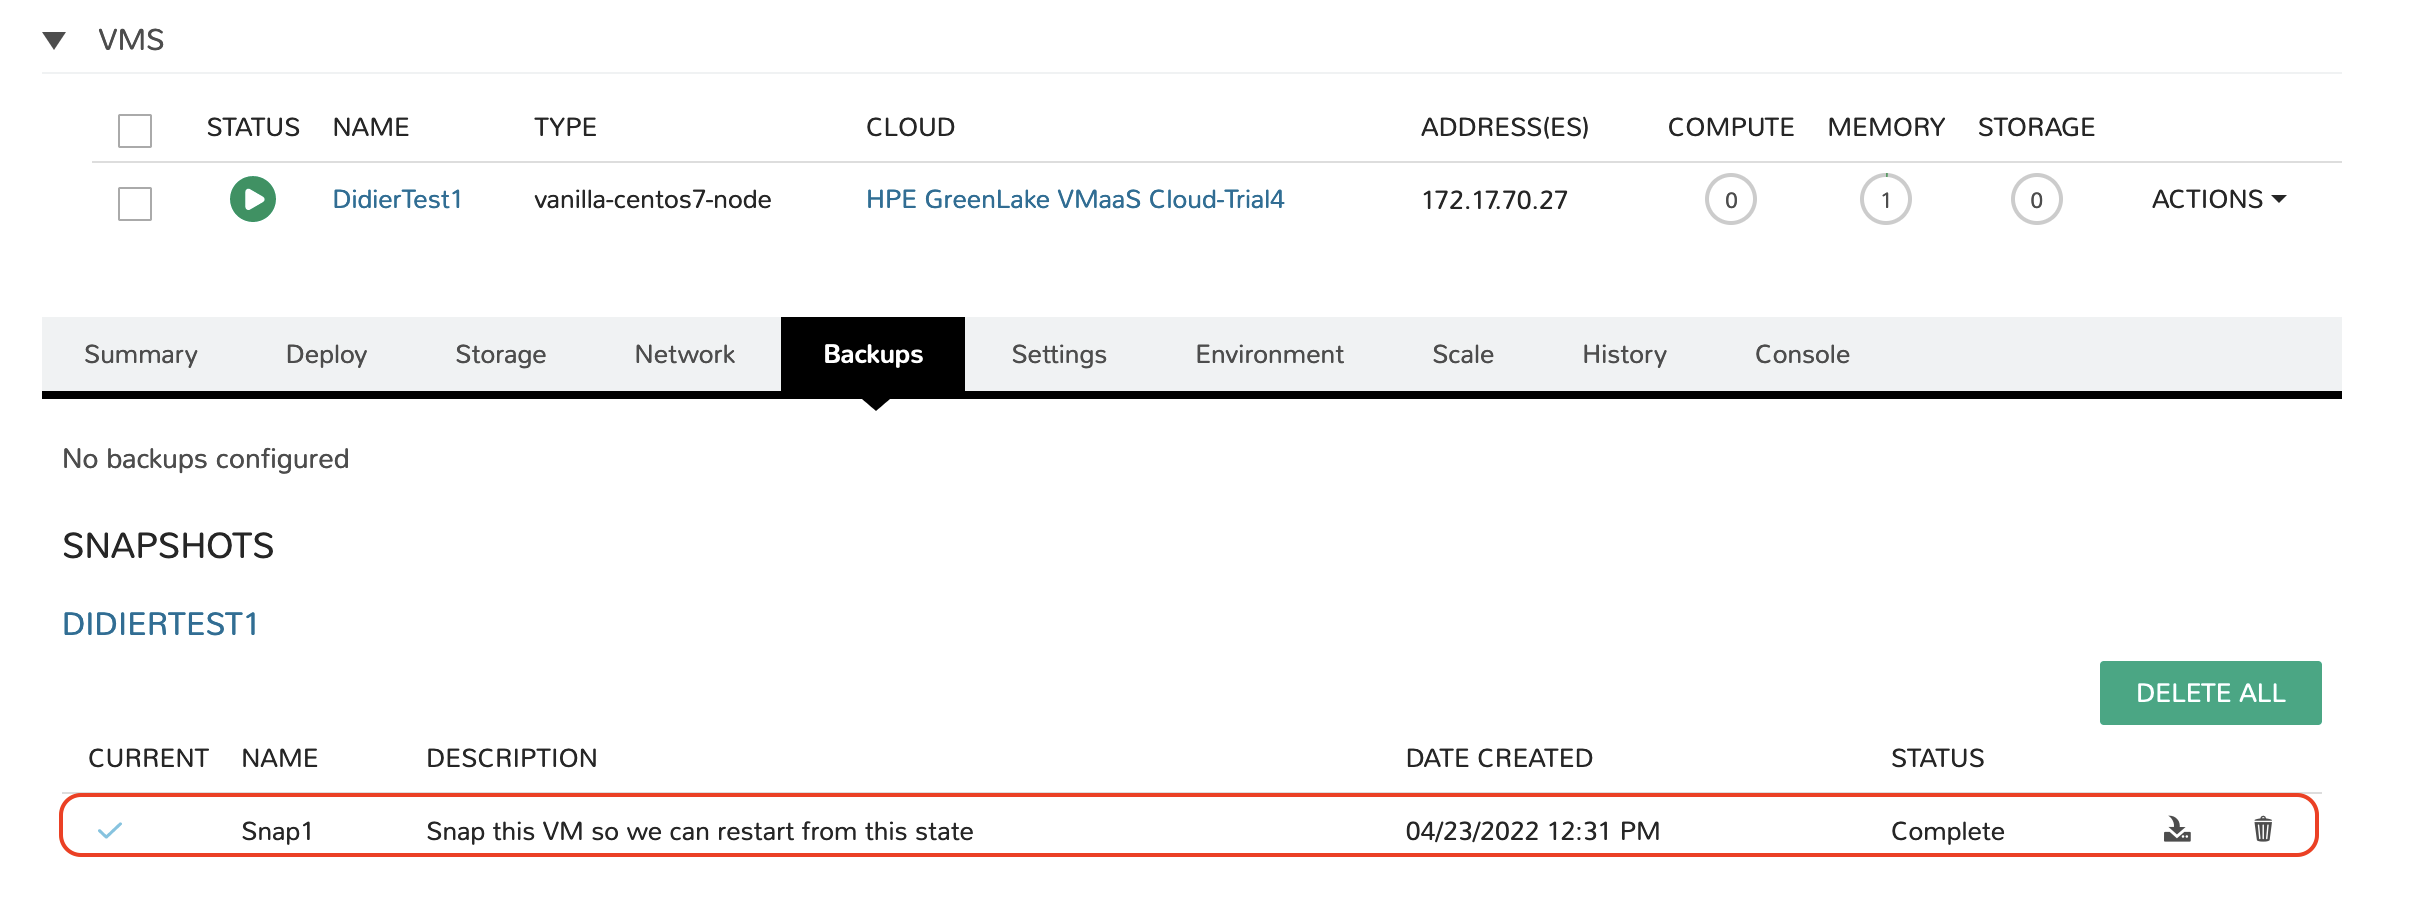
Here’s one last use case you can try, which consists of snapshotting the VM. You can do tis by adding the following Terraform code snippet in your configuration file:
   snapshot {
    name        = "Snap1
    description = "Snap this VM so we can restart from this state"
  }
Save the file, apply those changes, wait a little and check the details of the VM once again, in the Backups section:
Debugging when things go wrong
In this post, I’ve showed you how to make sure the Terraform configuration file is valid before applying changes using the terraform validate command. To see more details during an apply command, you can also enable Terraform debug by simply setting up the TF_LOG environment variable. I suggest setting it up to DEBUG but other supported values are: TRACE, INFO, WARN and ERROR.
export TF_LOG=DEBUG
What’s next?
In my first blog post, I covered how to get started with the Terraform provider for HPE GreenLake, I explained how to collect data from the platform and request the creation of a Virtual Machine instance. In this article, I showed you how to manage the lifecycle of a Virtual Machine using Terraform. I applied several changes to the Terraform infrastructure configuration file and observe how the desired state is automatically tracked by Terraform and applied to HPE GreenLake.
- Learn more about HPE GreenLake
- Learn more about the HPE GreenLake Terraform provider
Don’t forget, you can always find other tutorials and articles on HPE GreenLake on the HPE Developer blog.
Tags
Related
A guide to enabling a managed Istio service mesh in a Kubernetes cluster on HPE GreenLake for Private Cloud Enterprise
Feb 16, 2023Using HPE GreenLake Console's API Gateway for Data Services Cloud Console
Nov 30, 2021Automate ITOps: announcing foundational APIs for the HPE GreenLake edge-to-cloud platform
Dec 1, 2023
Bare metal provisioning on HPE GreenLake using Terraform
Mar 20, 2023
Bulk onboarding of users in HPE GreenLake edge-to-cloud platform
Apr 24, 2024
Configuring Azure AD as the SAML IDP with HPE Greenlake Cloud Platform and Aruba Central
Jul 11, 2022How to implement a single sign-on solution to authenticate users onto the HPE GreenLake edge-to-cloud platform
Nov 29, 2023