
How to backup and restore stateful applications on Kubernetes using Kasten K10 in HPE GreenLake for Private Cloud Enterprise
January 26, 2024Overview
HPE GreenLake for Private Cloud Enterprise: Containers, one of the HPE GreenLake cloud services available on the HPE GreenLake for Private Cloud Enterprise, allows customers to create a Kubernetes (K8s) cluster, view details about existing clusters, and deploy containerized applications to the cluster. It provides an enterprise-grade container management service using open source K8s.
In the blog post Getting started with volume snapshots on K8s cluster, I explained how to create a volume snapshot of a persistent volume in a MySQL database instance running on a K8s cluster deployed on HPE GreenLake for Private Cloud Enterprise. In this blog post, I will show you how to backup and restore the stateful applications deployed in a K8s cluster in HPE GreenLake for Private Cloud Enterprise using Kasten K10. Kasten K10 uses the volume snapshot capability in the HPE Container Storage Interface (CSI) driver for K8s to connect to different HPE storage systems and take volume snapshots of persistent volumes in K8s. It provides a user-friendly and intuitive interface and platform for easy and reliable backup and restore of the stateful applications running in the cluster.
Kasten K10
Kasten K10 is a data management platform purpose-built for K8s that was developed by Kasten. Following Veeam's acquisition of Kasten early in 2020, Kasten K10 is often referred to as Kasten by Veeam.
Kasten K10 has been named a Leader and Outperformer in GigaOm’s K8s Data Protection report for the third consecutive year. It offers an easy-to-use, scalable, and secure system for K8s backup/restore, disaster recovery and mobility of K8s applications.
Apart from direct integration with a number of storage providers, Kasten K10 supports invoking volume snapshots operations via the CSI driver for K8s. By using the volume snapshot capability in the CSI driver for K8s, Kasten K10 can access different types of storage systems that enable you to backup and restore persistent volumes of the stateful applications running on K8s.
HPE CSI driver for K8s
The CSI defines a standard interface that allows container orchestration systems, such as K8s, to access storage systems. The CSI driver for K8s is a software component that implements the CSI specification and enables K8s to communicate with external storage systems. K8s supports many CSI drivers. HPE CSI Driver for K8s is one of the CSI drivers developed by HPE that uses the CSI to perform data management operations on different HPE storage systems, such as Nimble Storage, 3PAR and Primera.
The K8s cluster provisioned in HPE GreenLake for Private Cloud Enterprise comes with the HPE CSI driver for K8s pre-installed and configured. The details of the HPE CSI driver for K8s deployed in the cluster under the namespace 'hpe-storage' are shown below:
$ kubectl get all -n hpe-storage
NAME                                       READY   STATUS    RESTARTS      AGE
pod/hpe-csi-controller-54cf448d85-g4w4c    9/9     Running   0             56d
pod/hpe-csi-node-5xtdb                     2/2     Running   0             56d
pod/nimble-csp-74d57f9487-qxwln            1/1     Running   0             56d
pod/primera3par-csp-59f5dfc499-hfghx       1/1     Running   0             56d
pod/snapshot-controller-5fd799f6b5-f6k7n   1/1     Running   6 (22d ago)   56d
pod/snapshot-controller-5fd799f6b5-z62dc   1/1     Running   2 (27d ago)   56d

NAME                          TYPE        CLUSTER-IP      EXTERNAL-IP   PORT(S)    AGE
service/alletra6000-csp-svc   ClusterIP   10.101.79.85    <none>        8080/TCP   56d
service/alletra9000-csp-svc   ClusterIP   10.97.147.230   <none>        8080/TCP   56d
service/nimble-csp-svc        ClusterIP   10.110.238.43   <none>        8080/TCP   56d
service/primera3par-csp-svc   ClusterIP   10.101.42.76    <none>        8080/TCP   56d

NAME                          DESIRED   CURRENT   READY   UP-TO-DATE   AVAILABLE   NODE SELECTOR   AGE
daemonset.apps/hpe-csi-node   1         1         1       1            1           <none>          56d

NAME                                  READY   UP-TO-DATE   AVAILABLE   AGE
deployment.apps/hpe-csi-controller    1/1     1            1           56d
deployment.apps/nimble-csp            1/1     1            1           56d
deployment.apps/primera3par-csp       1/1     1            1           56d
deployment.apps/snapshot-controller   2/2     2            2           56d

NAME                                             DESIRED   CURRENT   READY   AGE
replicaset.apps/hpe-csi-controller-54cf448d85    1         1         1       56d
replicaset.apps/nimble-csp-74d57f9487            1         1         1       56d
replicaset.apps/primera3par-csp-59f5dfc499       1         1         1       56d
replicaset.apps/snapshot-controller-5fd799f6b5   2         2         2       56d
HPE CSI driver for K8s supports both dynamic persistent volumes and volume snapshots. The following are the StorageClasses and the VolumeSnapshotClass that are configured in the cluster:
$ kubectl get storageclasses
NAME                                 PROVISIONER                    RECLAIMPOLICY   VOLUMEBINDINGMODE      ALLOWVOLUMEEXPANSION   AGE
gl-sbc-hpe                           csi.hpe.com                    Delete          Immediate              true                   56d
gl-sbp-frank-gl1-sstor01 (default)   csi.hpe.com                    Delete          Immediate              true                   56d
hpe-hdd-storage                      kubernetes.io/no-provisioner   Delete          WaitForFirstConsumer   false                  56d
hpe-nvme-storage                     kubernetes.io/no-provisioner   Delete          WaitForFirstConsumer   false                  56d
hpe-ssd-storage                      kubernetes.io/no-provisioner   Delete          WaitForFirstConsumer   false                  56d

$ kubectl  get volumesnapshotclasses
NAME                                 DRIVER        DELETIONPOLICY   AGE
gl-sbp-frank-gl1-sstor01             csi.hpe.com   Delete           56d
The joint partnership between HPE and Veeam supports HPE CSI driver for K8s and Kasten K10 as a data management solution for K8s backup and recovery. The following sections will show you how to install Kasten K10 on the cluster and how to use it with the HPE CSI driver for K8s to backup and restore the persistent volumes of the stateful applications running in the cluster using volume snapshots.
Prerequisites
Before starting, make sure you have the following:
- A K8s cluster, being provisioned in HPE GreenLake for Private Cloud Enterprise
- The kubectl CLI tool, together with the kubeconfig file for accessing the K8s cluster
- The Helm CLI tool, version 3.12.1 or later
- The optional mysql CLI tool, for accessing the deployed sample MySQL database service
Install Kasten K10
Kasten K10 can be deployed on K8s like any other application and it runs in its own namespace.
Following the Kasten K10 installation page, Kasten K10 can be installed to the cluster with the following commands using helm:
$ helm repo add kasten https://charts.kasten.io/
$ helm repo update

$ helm install k10 kasten/k10 --namespace=kasten-io --create-namespace
NAME: k10
LAST DEPLOYED: Thu Jan 18 22:34:17 2024
NAMESPACE: kasten-io
STATUS: deployed
REVISION: 1
TEST SUITE: None
NOTES:
Thank you for installing Kasten\u2019s K10 Data Management Platform 6.5.2!

Documentation can be found at https://docs.kasten.io/.

How to access the K10 Dashboard:

To establish a connection to it use the following `kubectl` command:

`kubectl --namespace kasten-io port-forward service/gateway 8080:8000`

The Kasten dashboard will be available at: `http://127.0.0.1:8080/k10/#/`
With the above commands, Kasten K10 is installed to the namespace 'kasten-io' in the cluster. To validate the installation, type the following command to watch the status of all Pods. Helm installs a list of Pods to the namespace. It takes a while before all those Pods start running.
$ kubectl  get pods -n kasten-io -w
NAME                                    READY   STATUS    RESTARTS   AGE
aggregatedapis-svc-6fc8fcf7bd-cdw8p     1/1     Running   0          15m
auth-svc-6fcb76d7df-pt748               1/1     Running   0          15m
catalog-svc-7c6f8b76fb-bsdqn            2/2     Running   0          15m
controllermanager-svc-5fffc97d7-b5whv   1/1     Running   0          15m
crypto-svc-8568584f9f-br8kn             4/4     Running   0          15m
dashboardbff-svc-b58b6d8cd-gnt5n        2/2     Running   0          15m
executor-svc-cb5fd4698-7zqjg            1/1     Running   0          15m
executor-svc-cb5fd4698-n27d5            1/1     Running   0          15m
executor-svc-cb5fd4698-rvj4v            1/1     Running   0          15m
frontend-svc-6c5677595b-9tsmj           1/1     Running   0          15m
gateway-54d778c955-n9wt5                1/1     Running   0          15m
jobs-svc-668b76cb86-q27nk               1/1     Running   0          15m
k10-grafana-889ff545b-g7px7             1/1     Running   0          15m
kanister-svc-76cdb967bd-hkhql           1/1     Running   0          15m
logging-svc-79599589f6-hdsp5            1/1     Running   0          15m
metering-svc-55f84f7766-rsm5f           1/1     Running   0          15m
prometheus-server-689ccf5f57-j9hpz      2/2     Running   0          15m
state-svc-b4b996d9b-jnbrl               3/3     Running   0          15m
After all the Pods are in running states, edit the service gateway to change its service type from ClusterIP to NodePort. This will generate a service port and expose the service via the configured gatway host name plus the generated port.
$ kubectl edit svc gateway -n kasten-io
…
spec:
  selector:
    service: gateway
  sessionAffinity: None
  type: NodePort
…
service/gateway edited
Type the following command to get the gateway service endpoint:
$ kubectl get svc gateway -n kasten-io -o jsonpath={.metadata.annotations.hpecp-internal-gateway/8000}
gl-tor-upc-cp-gw-node1.customer.yyz.gl-hpe.local:10021
The Kasten K10 service dashboard can now be accessed by pointing your browser to the URL 'http://gl-tor-upc-cp-gw-node1.customer.yyz.gl-hpe.local:10021/k10/#/' :
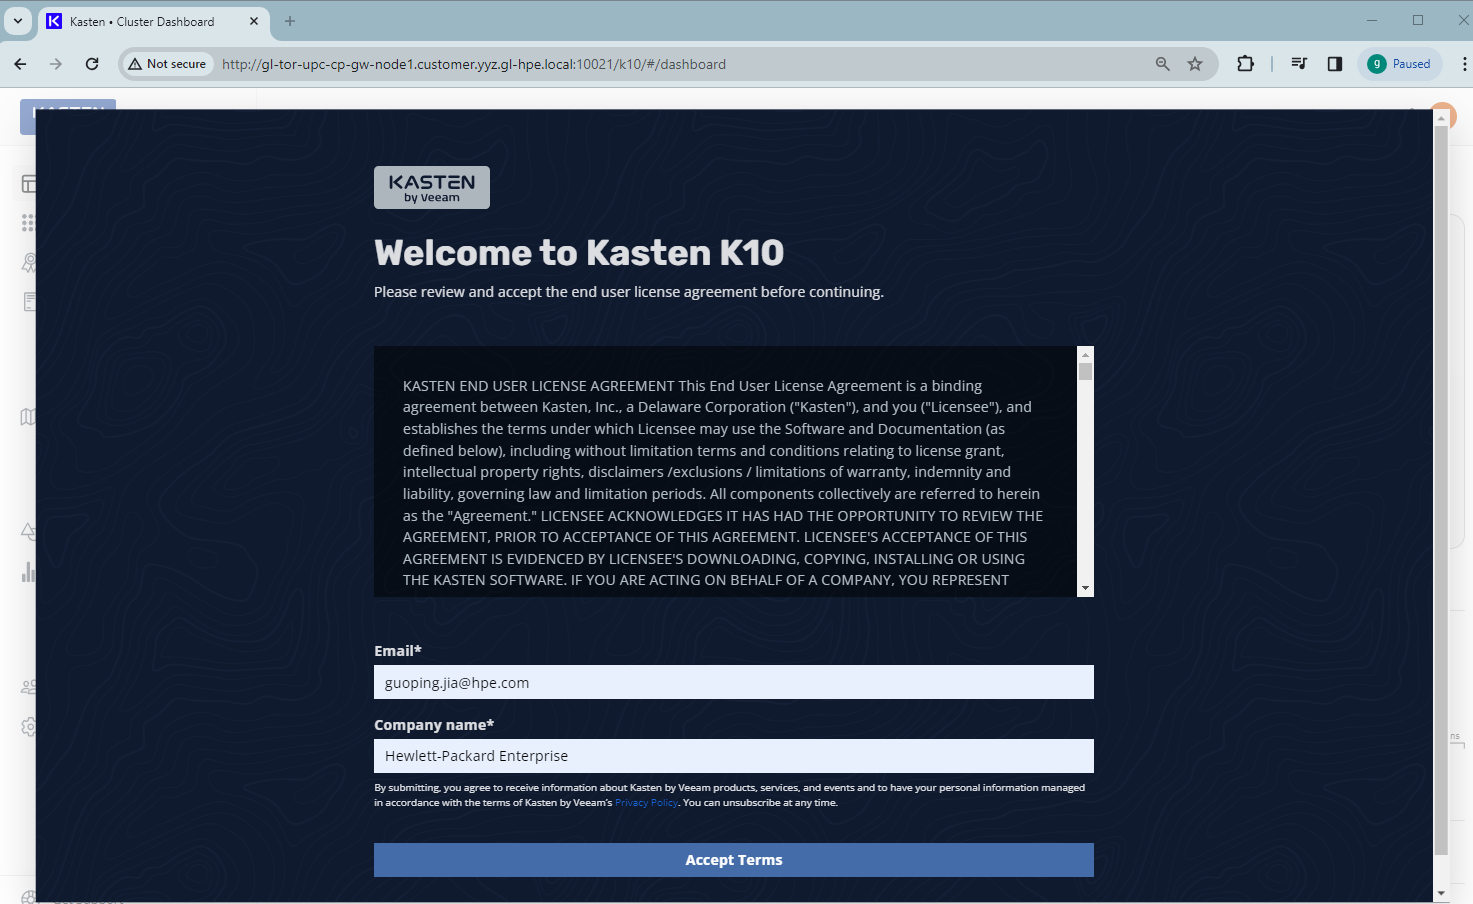
Click Accept Terms after specifying your email and company name. This will land you on the Kasten K10 dashboard:

Kasten K10 automatically discovers all the applications and their data across namespaces in the cluster. The K10 dashboard displays a list of applications that are mapped to namespaces. It also displays a summary of the cluster’s backup data footprint, showing 0.0 B when accessing the dashboard for the first time.
To use Kasten K10 with HPE CSI driver for K8s, you need to ensure the configured VolumeSnapshotClass in the cluster contains the K10 annotation k10.kasten.io/is-snapshot-class: "true". Typing the following command to add this required K10 annotation to the VolumeSnapshotClass:
$ kubectl get volumesnapshotclasses
NAME                                 DRIVER        DELETIONPOLICY   AGE
gl-sbp-frank-gl1-sstor01             csi.hpe.com   Delete           69d

$ kubectl annotate volumesnapshotclasses gl-sbp-frank-gl1-sstor01  k10.kasten.io/is-snapshot-class=true
volumesnapshotclasses.snapshot.storage.k8s.io/gl-sbp-frank-gl1-sstor01 annotated
Whenever Kasten K10 detects volumes that were provisioned via the CSI driver deployed in the cluster, it will look for a VolumeSnapshotClass with this K10 annotation for the identified CSI driver and use it to create snapshots.
Type the following command to verify the VolumeSnapshotClass has the required K10 annotation added:
$ kubectl get volumesnapshotclass gl-sbp-frank-gl1-sstor01 -o yaml -o jsonpath='{.metadata.annotations}' | jq . | grep kasten
  "k10.kasten.io/is-snapshot-class": "true",
Deploy MySQL database
In order to show backup and restore process, a MySQL database instance from my GitHub repo will be deployed as a sample stateful application to the cluster.
1. Install MySQL database
MySQL database requires a persistent volume to store data. Here is the PersistentVolumeClaim (PVC) YAML manifest file mysql-pvc.yaml in the repo's 'base' folder:
$ cat mysql-app/base/mysql-pvc.yaml
apiVersion: v1
kind: PersistentVolumeClaim
metadata:
  name: mysql-pvc
  namespace: mysql
  labels:
    app: mysql
spec:
  accessModes:
    - ReadWriteOnce
  resources:
    requests:
      storage: 1Gi
This PVC file, together with other YAML manifest files in the folder 'base', will be used to install the MySQL database instance using Kustomize.
$ tree mysql-app/base
mysql-app
/base
├── kustomization.yaml
├── mysql-deployment.yaml
└── mysql-pvc.yaml
The file kustomization.yaml lists all YAML files in its resources section, together with the secret generator for MySQL password:
$ cat mysql-app/base/kustomization.yaml
secretGenerator:
- name: mysql-pass
  namespace: wordpress
  literals:
  - password=CfeDemo@123
resources:
  - mysql-deployment.yaml
  - mysql-pvc.yaml
Type below command to install the MySQL database to the namespace 'mysql':
$ kubectl apply -k mysql-app/base
namespace/mysql created
secret/mysql-pass-m62cbhd9kf created
service/mysql created
persistentvolumeclaim/mysql-pvc created
deployment.apps/mysql created
Type the following command to check the MySQL database deployment state. The MySQL Pod should be in Running status:
$ kubectl get all -n mysql
NAME                         READY   STATUS    RESTARTS   AGE
pod/mysql-6974b58d48-wb8g5   1/1     Running   0          14s

NAME            TYPE        CLUSTER-IP   EXTERNAL-IP   PORT(S)    AGE
service/mysql   ClusterIP   None         <none>        3306/TCP   24s

NAME                    READY   UP-TO-DATE   AVAILABLE   AGE
deployment.apps/mysql   1/1     1            1           23s

NAME                               DESIRED   CURRENT   READY   AGE
replicaset.apps/mysql-6974b58d48   1         1         1       24s
You can check that the PersistentVolume (PV) and the PVC get provisioned as part of the MySQL database deployment:
$ kubectl get persistentvolumes
NAME                                       CAPACITY   ACCESS MODES   RECLAIM POLICY   STATUS   CLAIM                                                                                                                 STORAGECLASS               REASON   AGE

pvc-3e55e9b3-097f-4ddf-bdcb-60825a7905ec   1Gi        RWO            Delete           Bound    mysql/mysql-pvc

$ kubectl get persistentvolumeclaims -n mysql
NAME        STATUS   VOLUME                                     CAPACITY   ACCESS MODES   STORAGECLASS               AGE
mysql-pvc   Bound    pvc-3e55e9b3-097f-4ddf-bdcb-60825a7905ec   1Gi        RWO            gl-sbp-frank-gl1-sstor01   9m50s
2. Access MySQL database
In order to access MySQL database service using the mysql CLI, first set the port-forward of service/mysql:
$ kubectl port-forward service/mysql -n mysql 42281:3306
Forwarding from 127.0.0.1:42281 -> 3306
Forwarding from [::1]:42281 -> 3306
Handling connection for 42281
The deployed MySQL database service can be accessed by typing the following mysql command:
$ mysql -h 127.0.0.1 -uroot -pCfeDemo@123 -P 42281
Welcome to the MariaDB monitor.  Commands end with ; or \g.
Your MySQL connection id is 3
Server version: 5.6.51 MySQL Community Server (GPL)

Copyright (c) 2000, 2018, Oracle, MariaDB Corporation Ab and others.

Type 'help;' or '\h' for help. Type '\c' to clear the current input statement.

MySQL [(none)]> show databases;
+--------------------+
| Database           |
+--------------------+
| information_schema |
| mysql              |
| performance_schema |
+--------------------+
3 rows in set (0,282 sec)
3. Populate MySQL database
The MySQL application repo has a 'test' folder that contains a list of scripts for populating data records and testing the contents:
$ tree mysql-app/test
mysql-app/test
├── employees.sql
├── load_departments.dump
├── load_dept_emp.dump
├── load_dept_manager.dump
├── load_employees.dump
├── load_salaries1.dump
├── load_salaries2.dump
├── load_salaries3.dump
├── load_titles.dump
├── show_elapsed.sql
├── test_employees_md5.sql
└── test_employees_sha.sql
Type the following command to populate a sample employees data to the MySQL database:
$ cd mysql-app/test
$ mysql -h 127.0.0.1 -uroot -pCfeDemo@123 -P 42281 < employees.sql
INFO
CREATING DATABASE STRUCTURE
INFO
storage engine: InnoDB
INFO
LOADING departments
INFO
LOADING employees
INFO
LOADING dept_emp
INFO
LOADING dept_manager
INFO
LOADING titles
INFO
LOADING salaries
data_load_time_diff
NULL
The added sample data records called employees can be checked and verified by running the commands shown below:
$ mysql -h 127.0.0.1 -uroot -pCfeDemo@123 -P 42281
Welcome to the MariaDB monitor.  Commands end with ; or \g.
Your MySQL connection id is 3
Server version: 5.6.51 MySQL Community Server (GPL)

Copyright (c) 2000, 2018, Oracle, MariaDB Corporation Ab and others.

Type 'help;' or '\h' for help. Type '\c' to clear the current input statement.

MySQL [(none)]> show databases;
+--------------------+
| Database           |
+--------------------+
| information_schema |
| employees          |
| mysql              |
| performance_schema |
+--------------------+
4 rows in set (0,237 sec)

$ mysql -h 127.0.0.1 -uroot -pCfeDemo@123 -P 42281 -t < test_employees_sha.sql
+----------------------+
| INFO                 |
+----------------------+
| TESTING INSTALLATION |
+----------------------+
+--------------+------------------+------------------------------------------+
| table_name   | expected_records | expected_crc                             |
+--------------+------------------+------------------------------------------+
| departments  |                9 | 4b315afa0e35ca6649df897b958345bcb3d2b764 |
| dept_emp     |           331603 | d95ab9fe07df0865f592574b3b33b9c741d9fd1b |
| dept_manager |               24 | 9687a7d6f93ca8847388a42a6d8d93982a841c6c |
| employees    |           300024 | 4d4aa689914d8fd41db7e45c2168e7dcb9697359 |
| salaries     |          2844047 | b5a1785c27d75e33a4173aaa22ccf41ebd7d4a9f |
| titles       |           443308 | d12d5f746b88f07e69b9e36675b6067abb01b60e |
+--------------+------------------+------------------------------------------+
+--------------+------------------+------------------------------------------+
| table_name   | found_records    | found_crc                                |
+--------------+------------------+------------------------------------------+
| departments  |                9 | 4b315afa0e35ca6649df897b958345bcb3d2b764 |
| dept_emp     |           331603 | d95ab9fe07df0865f592574b3b33b9c741d9fd1b |
| dept_manager |               24 | 9687a7d6f93ca8847388a42a6d8d93982a841c6c |
| employees    |           300024 | 4d4aa689914d8fd41db7e45c2168e7dcb9697359 |
| salaries     |          2844047 | b5a1785c27d75e33a4173aaa22ccf41ebd7d4a9f |
| titles       |           443308 | d12d5f746b88f07e69b9e36675b6067abb01b60e |
+--------------+------------------+------------------------------------------+
+--------------+---------------+-----------+
| table_name   | records_match | crc_match |
+--------------+---------------+-----------+
| departments  | OK            | ok        |
| dept_emp     | OK            | ok        |
| dept_manager | OK            | ok        |
| employees    | OK            | ok        |
| salaries     | OK            | ok        |
| titles       | OK            | ok        |
+--------------+---------------+-----------+
+------------------+
| computation_time |
+------------------+
| 00:00:27         |
+------------------+
+---------+--------+
| summary | result |
+---------+--------+
| CRC     | OK     |
| count   | OK     |
+---------+--------+
Back up MySQL database
In order to back up the MySQL database, go to the Kasten K10 dashboard and click the Applications. Find the deployed MySQL database 'mysql' from the application list and expand its menu. Then click the Snapshot button.
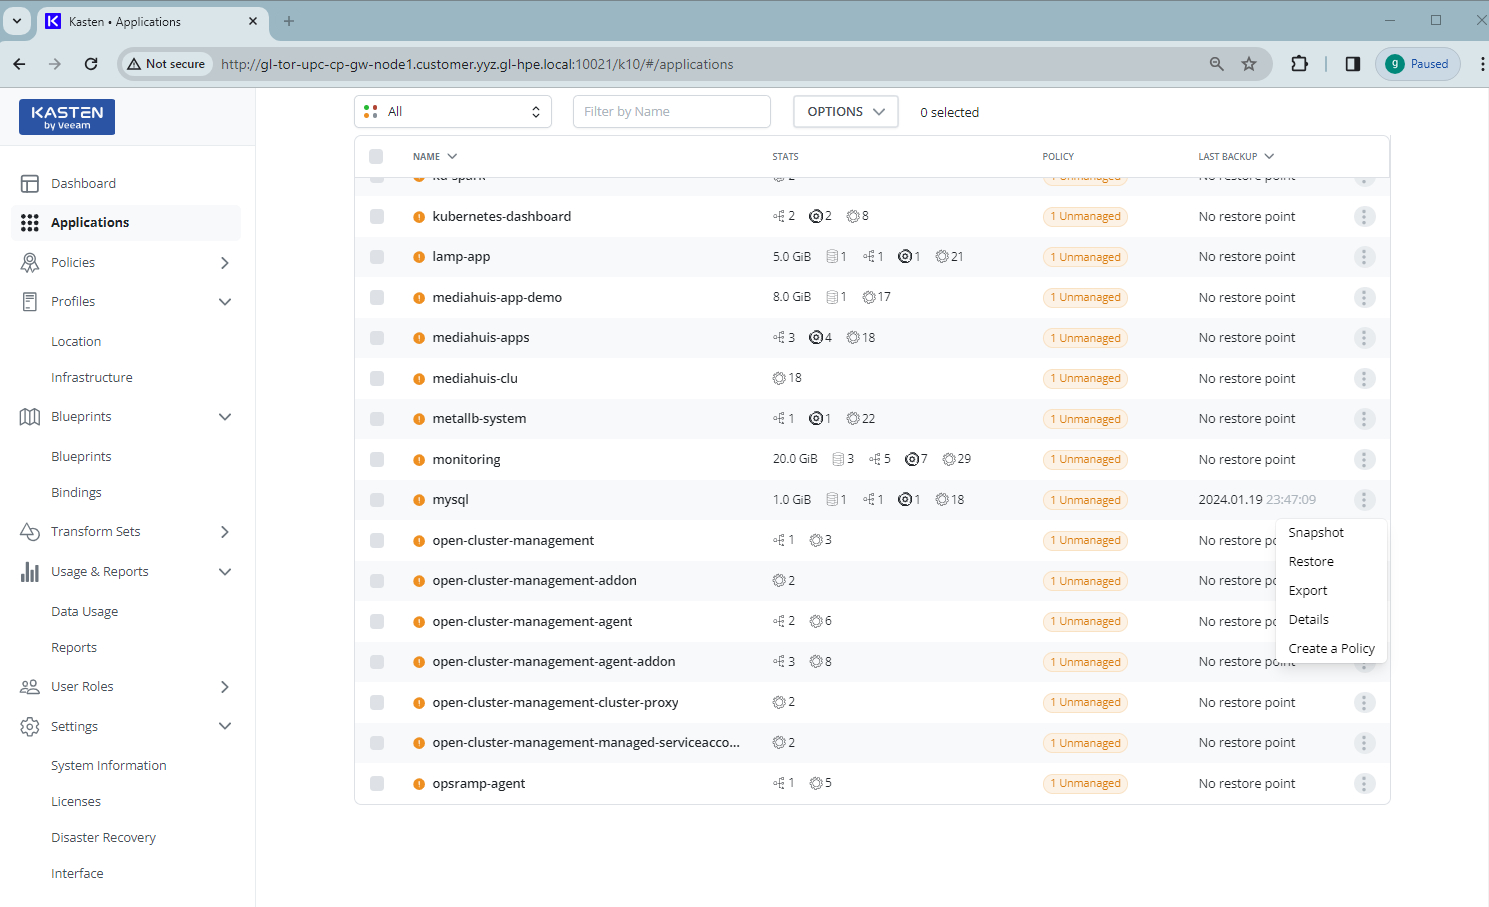
Using all the default options from Snapshot mysql, click Snapshot Application button:
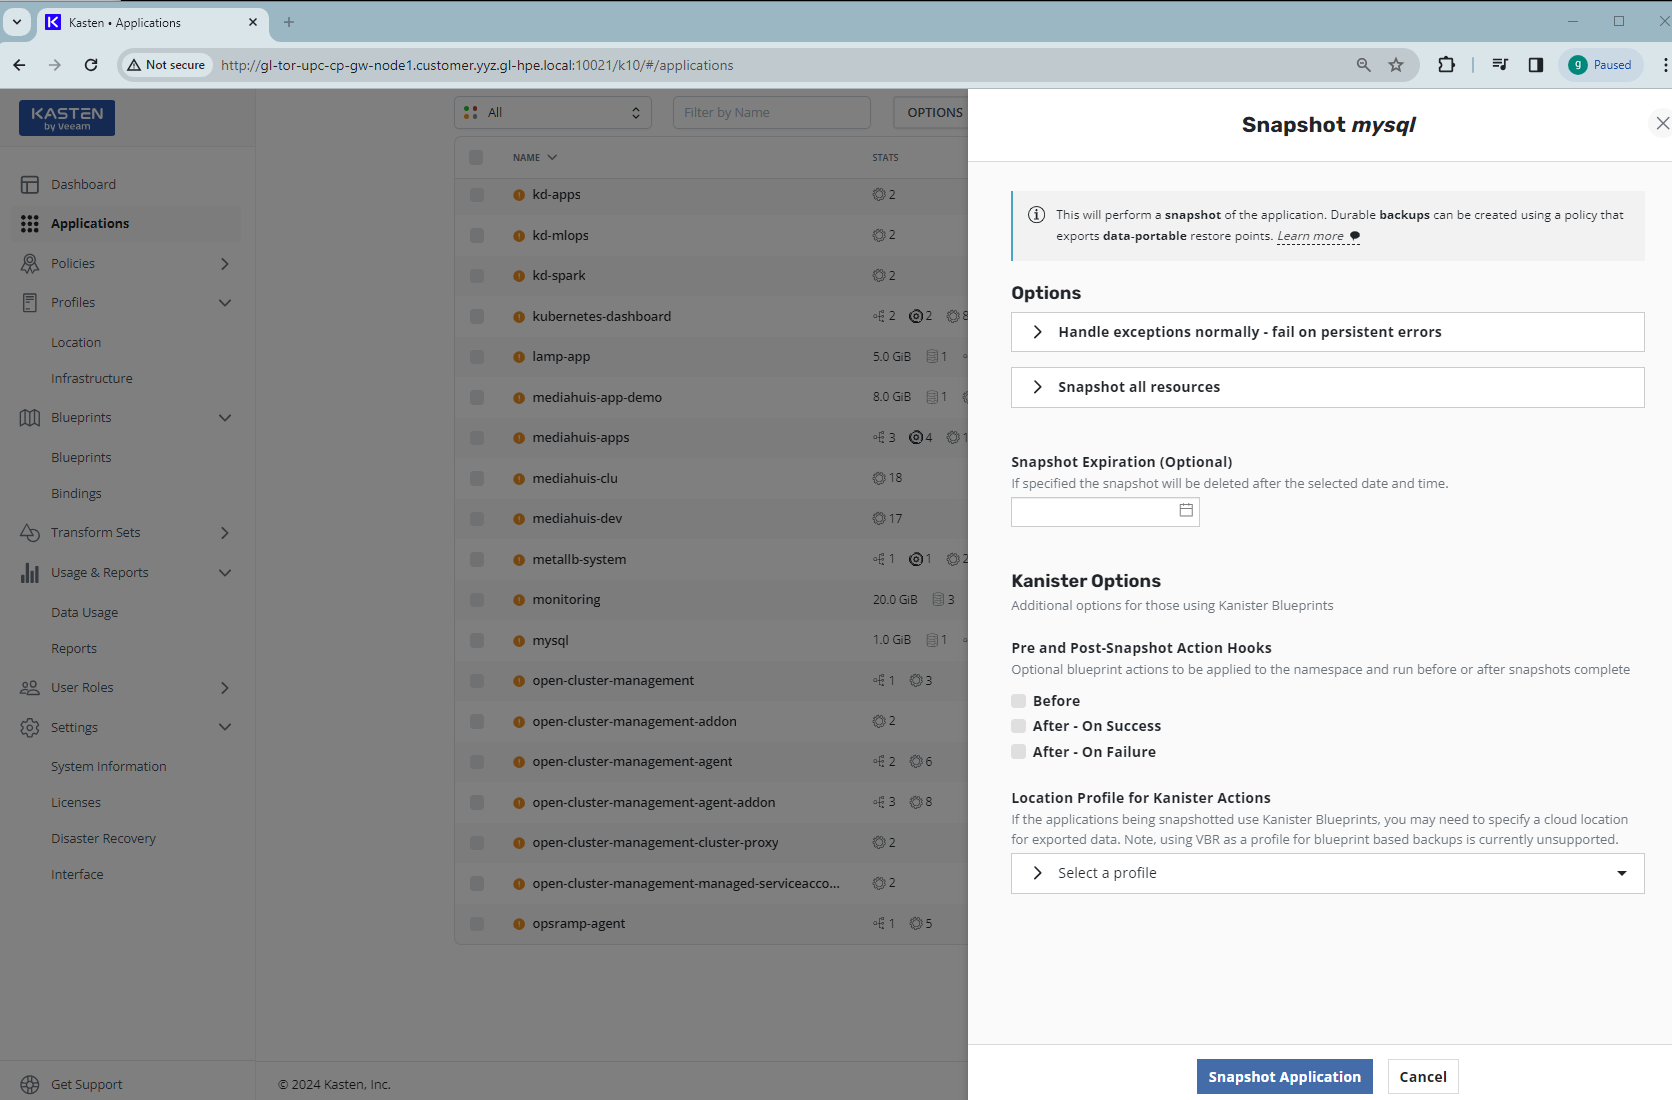
The snapshot of the MySQL database will be started. This takes a few seconds. When you go back to the K10 dashboard, you should see the completed Backup entry under Actions with protected object as mysql:

You can also check the Data Usage page to see the data used by database backups:
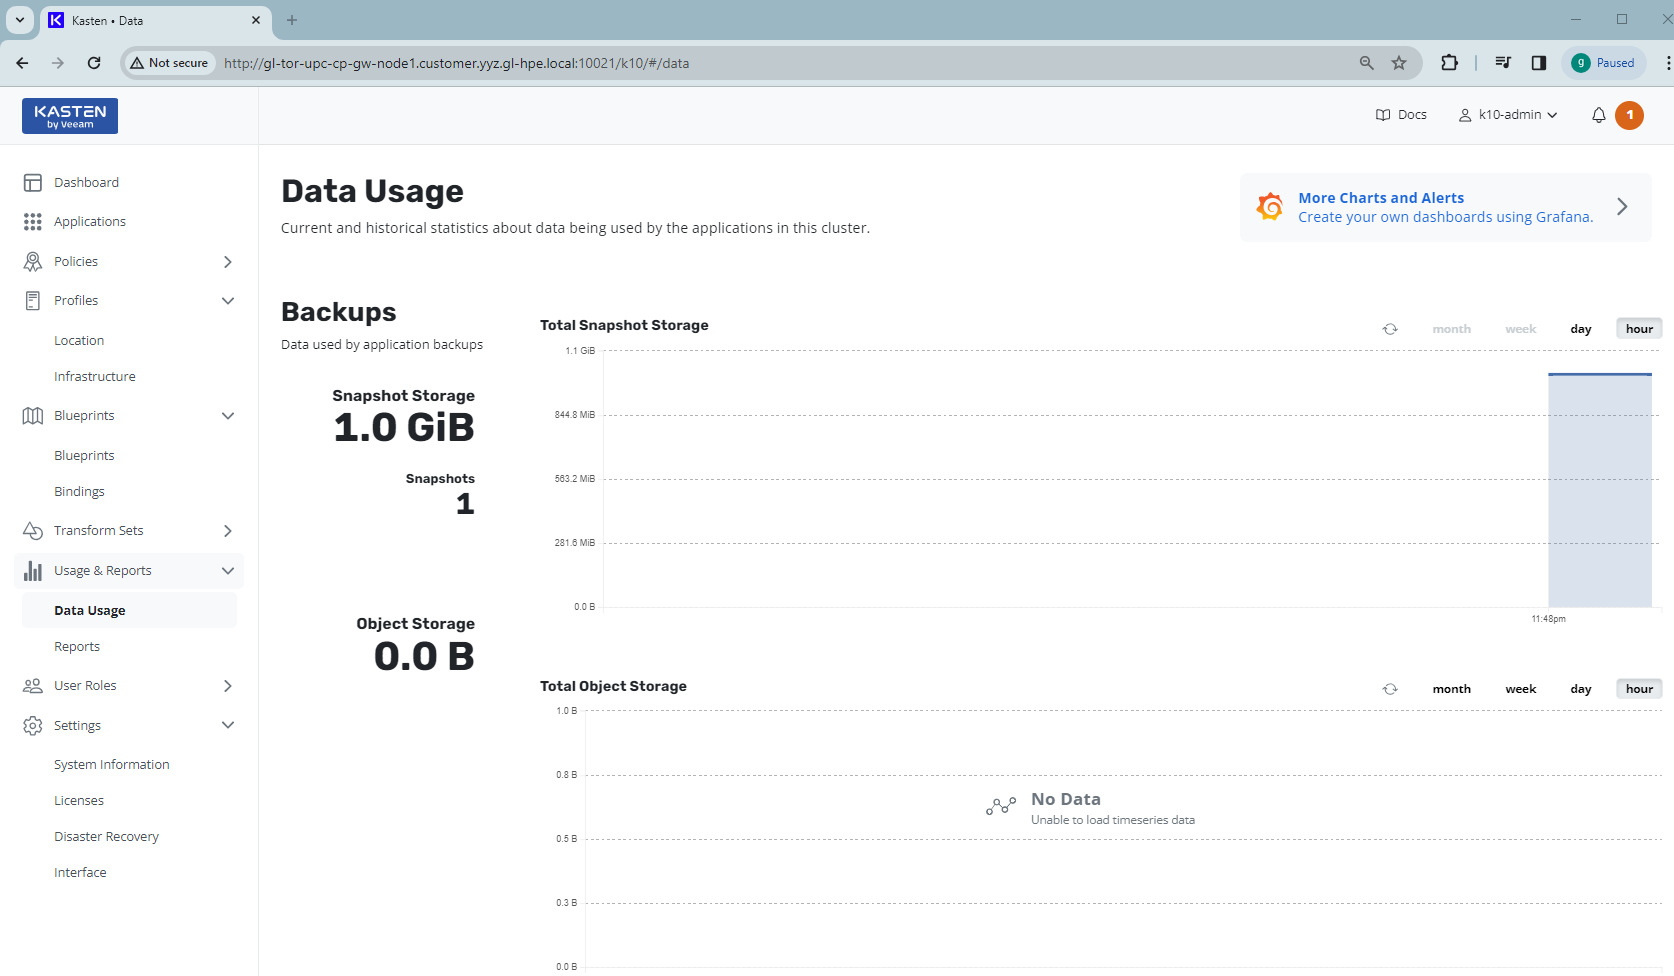
In the cluster, after snapshot of the MySQL database, you can check that there is a VolumeSnapshot 'k10-csi-snap-ltxzrwxgp6r5pwkp' created from the source PVC 'mysql-pvc' in the namespace mysql, together with a VolumeSnapshotContent object created at cluster level. The READYTOUSE of the VolumeSnapshot should show as true:
$ kubectl get volumesnapshot -n mysql
NAME                            READYTOUSE   SOURCEPVC   SOURCESNAPSHOTCONTENT   RESTORESIZE   SNAPSHOTCLASS              SNAPSHOTCONTENT                                    CREATIONTIME   AGE
k10-csi-snap-ltxzrwxgp6r5pwkp   true         mysql-pvc                           1Gi           gl-sbp-frank-gl1-sstor01   snapcontent-f3890356-d47f-4b36-a7e4-eb4c5792ec59   6d12h          6d12h

 $ kubectl get volumesnapshotcontents
NAME                                               READYTOUSE   RESTORESIZE   DELETIONPOLICY   DRIVER        VOLUMESNAPSHOTCLASS        VOLUMESNAPSHOT                  VOLUMESNAPSHOTNAMESPACE   AGE
snapcontent-f3890356-d47f-4b36-a7e4-eb4c5792ec59   true         1073741824    Delete           csi.hpe.com   gl-sbp-frank-gl1-sstor01   k10-csi-snap-ltxzrwxgp6r5pwkp   mysql                     6d12h
This volume snapshot can be used for MySQL database restore.
Restore MySQL database
Before showing the database restore, I will first delete a table from MySQL database to simulate a loss of data. Then, I will perform the database recovery using the Kasten K10.
1. Delete table
Delete data from the table 'departments' by typing the following commands:
$ mysql -h 127.0.0.1 -uroot -pCfeDemo@123 -P 42281 -Demployees
Reading table information for completion of table and column names
You can turn off this feature to get a quicker startup with -A

Welcome to the MariaDB monitor.  Commands end with ; or \g.
Your MySQL connection id is 15
Server version: 5.6.51 MySQL Community Server (GPL)

Copyright (c) 2000, 2018, Oracle, MariaDB Corporation Ab and others.

Type 'help;' or '\h' for help. Type '\c' to clear the current input statement.

MySQL [employees]> show tables;
+----------------------+
| Tables_in_employees  |
+----------------------+
| current_dept_emp     |
| departments          |
| dept_emp             |
| dept_emp_latest_date |
| dept_manager         |
| employees            |
| salaries             |
| titles               |
+----------------------+
8 rows in set (0,237 sec)

MySQL [employees]> delete from departments;
Query OK, 9 rows affected (1,523 sec)
If you rerun the testing script test_employees_sha.sql, it will show the failures of CRC and count, which indicate the loss of data in the MySQL database:
$ mysql -h 127.0.0.1 -uroot -pCfeDemo@123 -P 42281 -t <test_employees_sha.sql
+----------------------+
| INFO                 |
+----------------------+
| TESTING INSTALLATION |
+----------------------+
+--------------+------------------+------------------------------------------+
| table_name   | expected_records | expected_crc                             |
+--------------+------------------+------------------------------------------+
| departments  |                9 | 4b315afa0e35ca6649df897b958345bcb3d2b764 |
| dept_emp     |           331603 | d95ab9fe07df0865f592574b3b33b9c741d9fd1b |
| dept_manager |               24 | 9687a7d6f93ca8847388a42a6d8d93982a841c6c |
| employees    |           300024 | 4d4aa689914d8fd41db7e45c2168e7dcb9697359 |
| salaries     |          2844047 | b5a1785c27d75e33a4173aaa22ccf41ebd7d4a9f |
| titles       |           443308 | d12d5f746b88f07e69b9e36675b6067abb01b60e |
+--------------+------------------+------------------------------------------+
+--------------+------------------+------------------------------------------+
| table_name   | found_records    | found_crc                                |
+--------------+------------------+------------------------------------------+
| departments  |                0 |                                          |
| dept_emp     |                0 |                                          |
| dept_manager |                0 |                                          |
| employees    |           300024 | 4d4aa689914d8fd41db7e45c2168e7dcb9697359 |
| salaries     |          2844047 | b5a1785c27d75e33a4173aaa22ccf41ebd7d4a9f |
| titles       |           443308 | d12d5f746b88f07e69b9e36675b6067abb01b60e |
+--------------+------------------+------------------------------------------+
+--------------+---------------+-----------+
| table_name   | records_match | crc_match |
+--------------+---------------+-----------+
| departments  | not ok        | not ok    |
| dept_emp     | not ok        | not ok    |
| dept_manager | not ok        | not ok    |
| employees    | OK            | ok        |
| salaries     | OK            | ok        |
| titles       | OK            | ok        |
+--------------+---------------+-----------+
+------------------+
| computation_time |
+------------------+
| 00:00:24         |
+------------------+
+---------+--------+
| summary | result |
+---------+--------+
| CRC     | FAIL   |
| count   | FAIL   |
+---------+--------+
2. Perform MySQL database restore
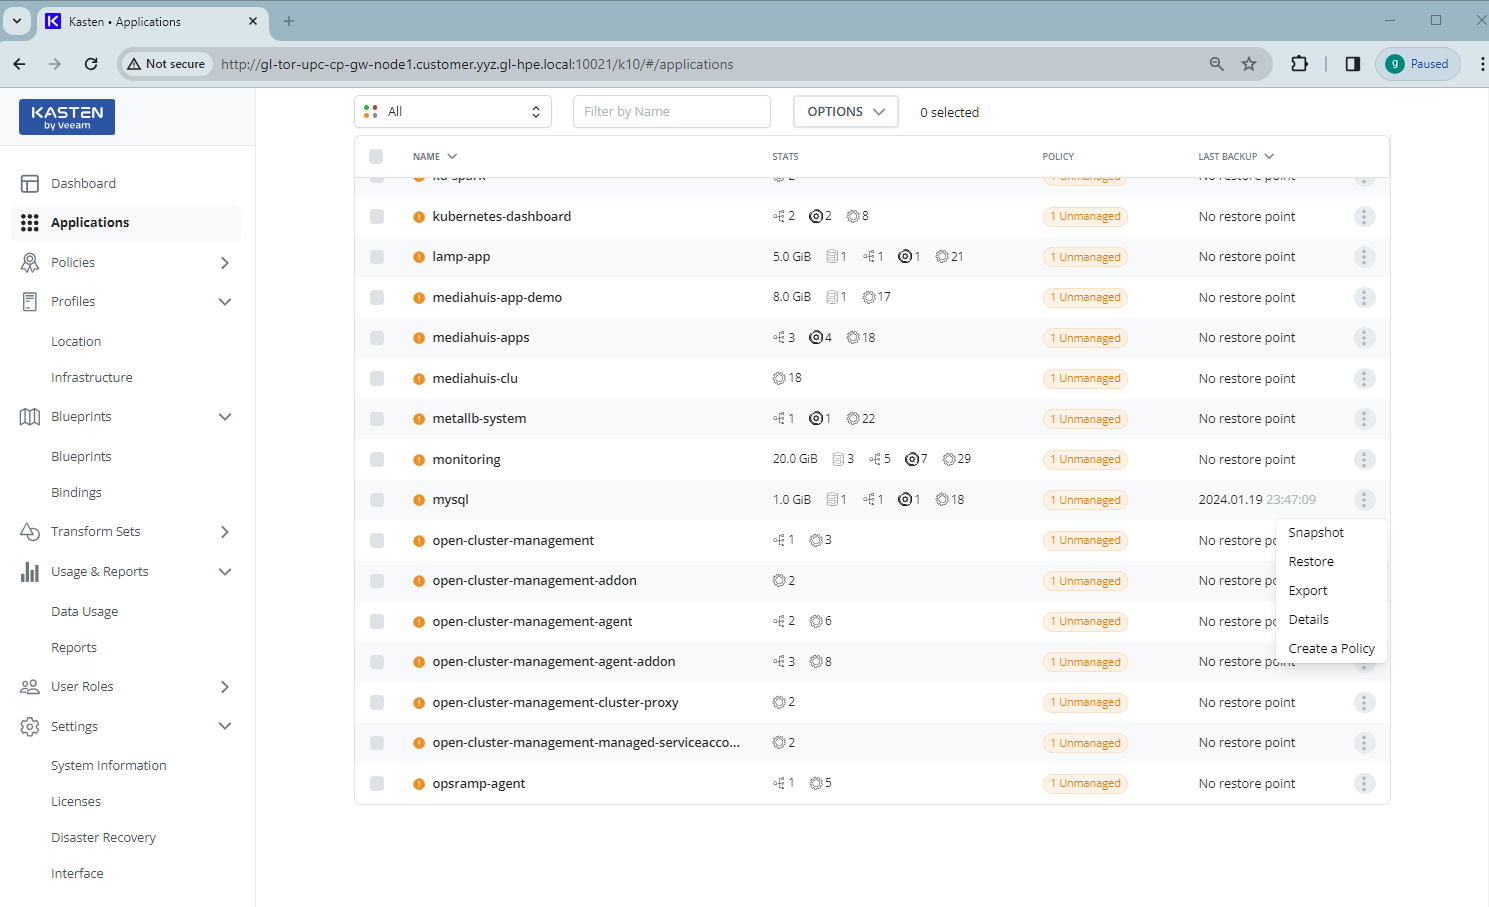
In order to restore the MySQL database, go to the Kasten K10 dashboard, locate the MySQL database 'mysql' from the application list, expand the menu of mysql, and then click the Restore button:
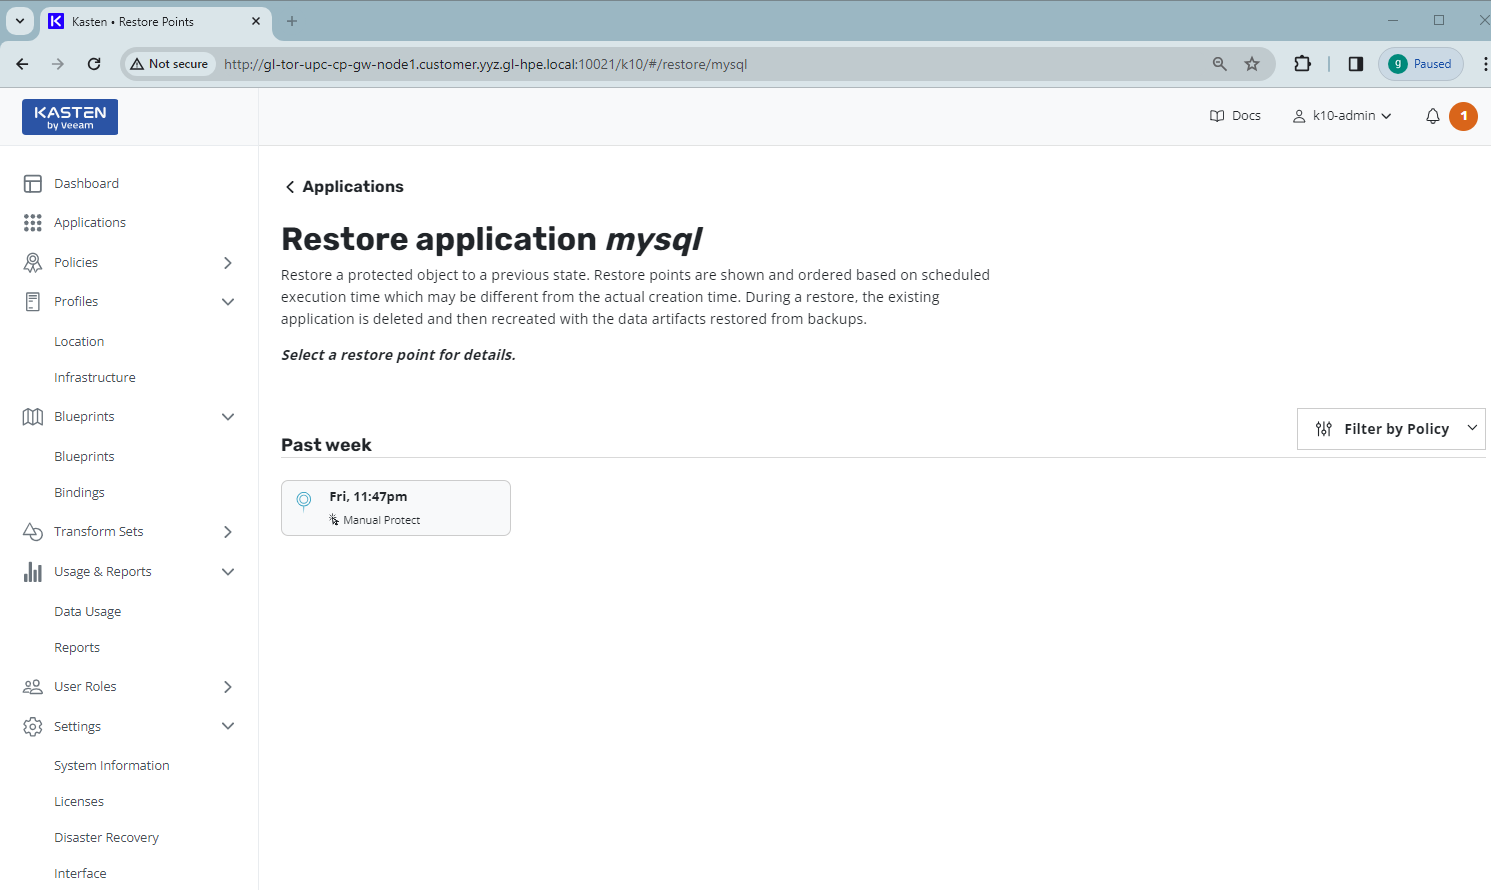
Select a restore point from the list and click it. The Restore Point page will show up:
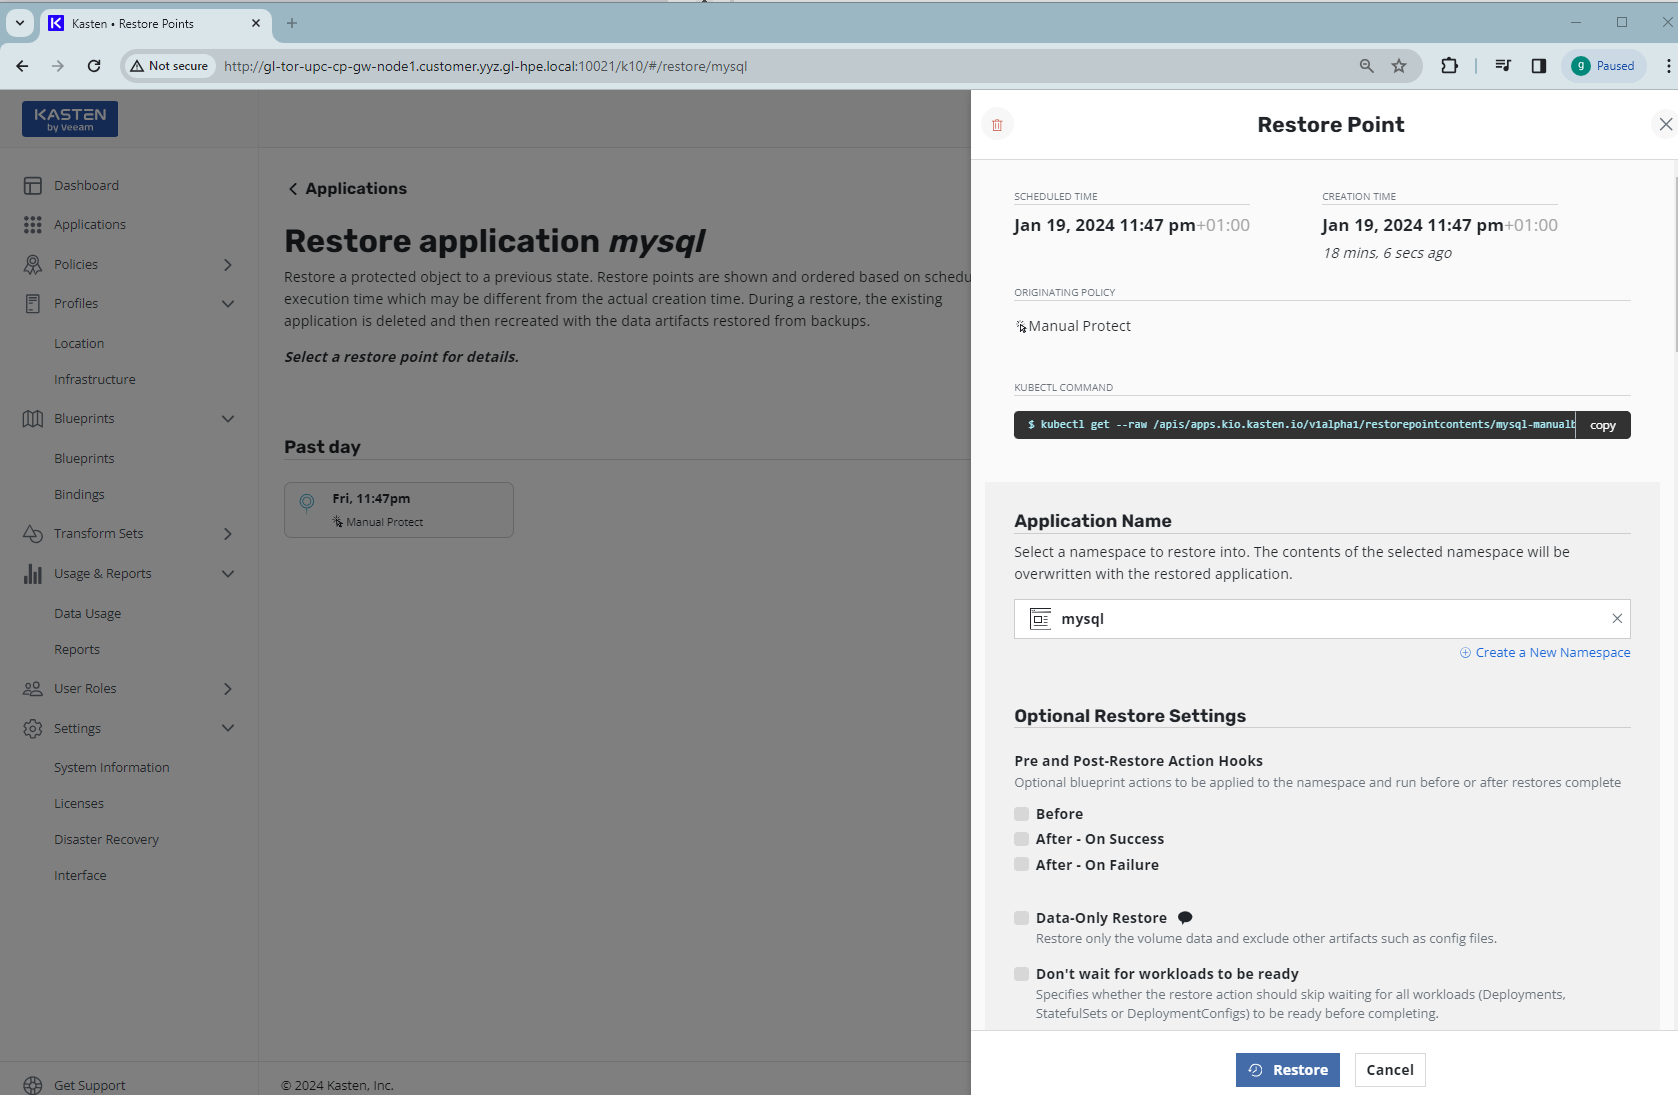
Use all the default options from Restore Point and click the Restore button:
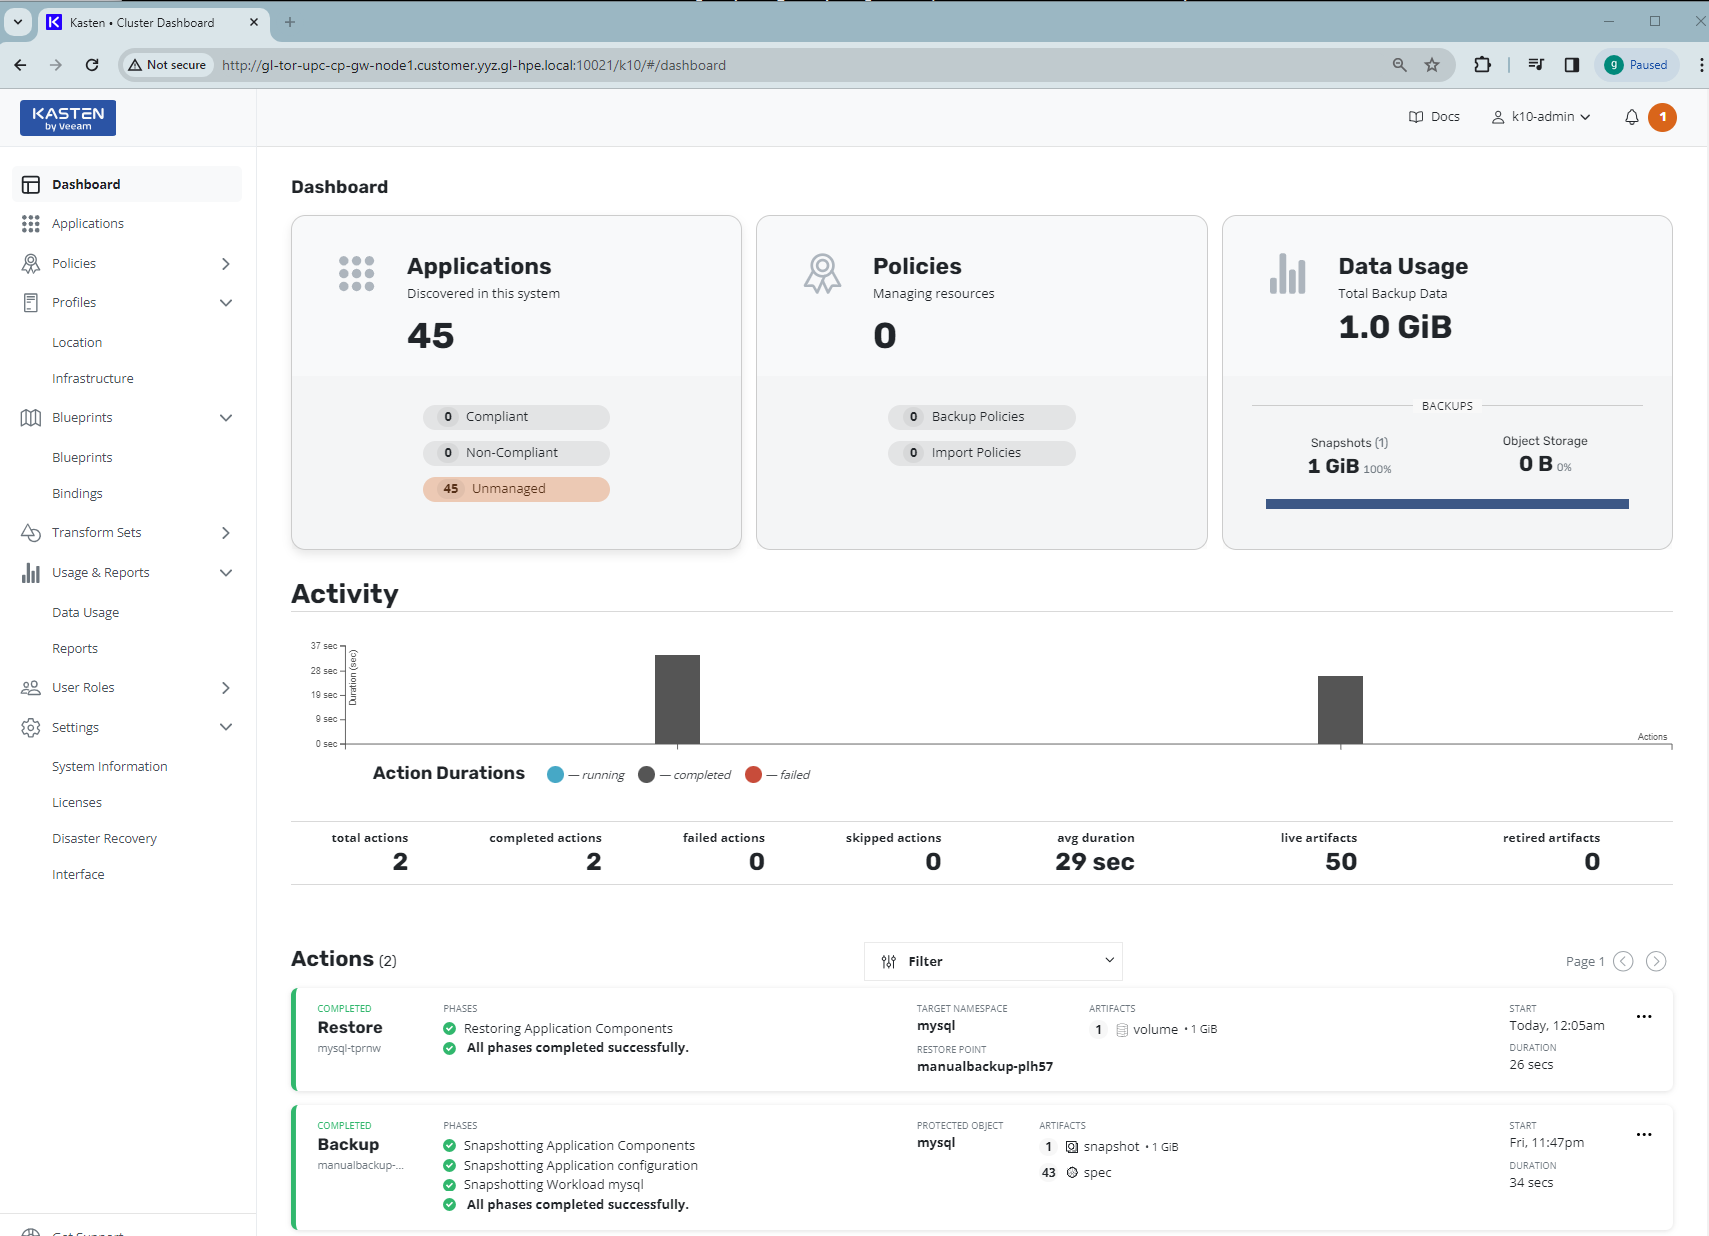
The restore of the MySQL database will be started from the selected restore point. It will take a few seconds. Go back to the Kasten K10 dashboard. You should see the completed Restore entry under Actions with target namespace as mysql:
3. Verify MySQL database
Connect to the MySQL database service and re-run the testing script test_employees_sha.sql. You should see the testing script now reports everything is OK:
$ mysql -h 127.0.0.1 -uroot -pCfeDemo@123 -P 42281 -t < test_employees_sha.sql
+----------------------+
| INFO                 |
+----------------------+
| TESTING INSTALLATION |
+----------------------+
+--------------+------------------+------------------------------------------+
| table_name   | expected_records | expected_crc                             |
+--------------+------------------+------------------------------------------+
| departments  |                9 | 4b315afa0e35ca6649df897b958345bcb3d2b764 |
| dept_emp     |           331603 | d95ab9fe07df0865f592574b3b33b9c741d9fd1b |
| dept_manager |               24 | 9687a7d6f93ca8847388a42a6d8d93982a841c6c |
| employees    |           300024 | 4d4aa689914d8fd41db7e45c2168e7dcb9697359 |
| salaries     |          2844047 | b5a1785c27d75e33a4173aaa22ccf41ebd7d4a9f |
| titles       |           443308 | d12d5f746b88f07e69b9e36675b6067abb01b60e |
+--------------+------------------+------------------------------------------+
+--------------+------------------+------------------------------------------+
| table_name   | found_records    | found_crc                                |
+--------------+------------------+------------------------------------------+
| departments  |                9 | 4b315afa0e35ca6649df897b958345bcb3d2b764 |
| dept_emp     |           331603 | d95ab9fe07df0865f592574b3b33b9c741d9fd1b |
| dept_manager |               24 | 9687a7d6f93ca8847388a42a6d8d93982a841c6c |
| employees    |           300024 | 4d4aa689914d8fd41db7e45c2168e7dcb9697359 |
| salaries     |          2844047 | b5a1785c27d75e33a4173aaa22ccf41ebd7d4a9f |
| titles       |           443308 | d12d5f746b88f07e69b9e36675b6067abb01b60e |
+--------------+------------------+------------------------------------------+
+--------------+---------------+-----------+
| table_name   | records_match | crc_match |
+--------------+---------------+-----------+
| departments  | OK            | ok        |
| dept_emp     | OK            | ok        |
| dept_manager | OK            | ok        |
| employees    | OK            | ok        |
| salaries     | OK            | ok        |
| titles       | OK            | ok        |
+--------------+---------------+-----------+
+------------------+
| computation_time |
+------------------+
+--------------+---------------+-----------+
| departments  | OK            | ok        |
| dept_emp     | OK            | ok        |
| dept_manager | OK            | ok        |
| employees    | OK            | ok        |
| salaries     | OK            | ok        |
| titles       | OK            | ok        |
+--------------+---------------+-----------+
+------------------+
| computation_time |
+------------------+
| 00:00:31         |
+------------------+
+---------+--------+
| summary | result |
+---------+--------+
| CRC     | OK     |
| count   | OK     |
+---------+--------+
This indicates the MySQL database has been recovered from its backup and the MySQL database data is back!
Summary
In this blog post, I explored the functionalities of Kasten K10 and HPE CSI driver for K8s. Using the volume snapshot capability in HPE CSI driver for K8s, I demonstrated how to use Kasten K10 to backup the persistent volume of a sample MySQL database deployed in the cluster in HPE GreenLake for Private Cloud Enterprise. I then illustrated how to restore the database from the backup. Kasten K10, with its user-friendly and intuitive interface, simplifies the backup and recovery of stateful applications running in the cluster. It enhances the efficiency and reliability of data management in a K8s cluster.
Please keep coming back to the HPE Developer Community blog to learn more about HPE GreenLake for Private Cloud Enterprise.
Tags
Related

Getting started with volume snapshots on a Kubernetes cluster in HPE GreenLake for Private Cloud Enterprise
Jan 23, 2024Accessing HPE Ezmeral Data Fabric Object Storage from Spring Boot S3 Micro Service deployed in K3s cluster
Sep 13, 2021Deep Learning Model Training – A First-Time User’s Experience with Determined - Part 1
Apr 14, 2022Deep Learning Model Training – A First-Time User’s Experience with Determined – Part 2
May 3, 2022
Exposing applications using Ingress and TLS termination on Kubernetes in HPE GreenLake for Private Cloud Enterprise
Mar 20, 2024
Generating self-signed certificates using cert-manager for Kubernetes in HPE GreenLake for Private Cloud Enterprise
Mar 11, 2024Kubernetes Application Containers: Managing Containers and Cluster Resources
Jul 10, 2020