

Introduction
Authors frequently need to capture additional information during the provisioning of workloads and services. This information is typically collected through user interface controls such as drop-down lists, often populated dynamically from external systems. Downstream, these selections are consumed by automation workflows that tailor deployments and integrate with ancillary systems such as CMDBs, IPAM platforms, or other operational tooling.
HPE Morpheus Enterprise provides extensive flexibility for customizing form elements across instance provisioning, workflows, and service catalog items. Drop-down Option Lists can be populated using a variety of Option Source types, including REST-based endpoints and plugin-backed integrations.
However, in real-world environments, form inputs are rarely independent. The selection made in one field often determines the valid values in another.
This is where cascading (interdependent) drop-down lists become essential.
By dynamically filtering or populating one field based on the selection of another, cascading drop-downs introduce context awareness into provisioning forms. This reduces user error, improves data integrity, and ensures that deployments align with environmental constraints and governance requirements.
This article demonstrates how to implement cascading drop-down lists in Morpheus using both REST-based and plugin-based Option Lists.
HPE Morpheus terms explained
Some of the terminology used in this article may be misleading or confusing due to its ubiquitous use across a wide range of products and technology domains, including ITSM, virtualization platforms, and service orchestration systems. This section explains the common terms used for HPE Morpheus Enterprise concepts throughout the article:
Option List
A list of name and value pairs used to populate UI controls such as drop-downs, radio lists, and type-ahead fields. In the HPE Morpheus Enterprise UI, Option Lists are defined under Library > Options > Option Lists.
Option Source
The underlying data source used to populate an Option List. The Option Source type may be static data (JSON or CSV), REST response data, LDAP query results, HPE Morpheus Enterprise API data, or a plugin-based provider. Option Sources are defined as part of creating Option Lists.
Input
A web UI control used in an HPE Morpheus Enterprise wizard. A wizard typically contains multiple Input controls, such as when provisioning a VM Instance. Input types include checkbox, hidden value, number, password, radio list, select list, text, text area, and type-ahead. Inputs are defined under Library > Options > Inputs
A select list Input is populated by a corresponding Option List. This article focuses exclusively on select list Inputs.
Forms
HPE Morpheus Forms are collections of Inputs organized in sections called Field Groups. Forms are used exclusively with Catalog Items in the HPE Morpheus Enterprise Service Catalog. Forms are created and configured under Library > Options > Forms in the UI. Forms will not be covered by this article.
HPE Morpheus Plugin
A compiled .jar file containing logic that extends the functionality of HPE Morpheus. Plugins are typically written in Groovy and compiled using the Java toolchain.
Option Source Provider
A plugin class responsible for retrieving and constructing the data used to populate Option Lists programmatically.
Wizard This article uses the term wizard to indicate a section of the web user interface where the end user provides input values. An example of this would be the input fields when a user provisions an instance. In this article an operational workflow wizard is used to show and test Input controls.
Demo environment
To illustrate how to reference external data sources on wizard drop-down Inputs, and then make them interdependent, this article makes use of two demo lab VMs. These include a JSON Server VM and an HPE Morpheus Enterprise appliance. This lab has been tested on HPE Morpheus Enterprise 8.0.
To demonstrate how a plugin can supply the data via custom integration, a development environment assumes plugin compile capability as described in the article A Beginner’s Guide to Building and Compiling HPE Morpheus Enterprise Plugins.
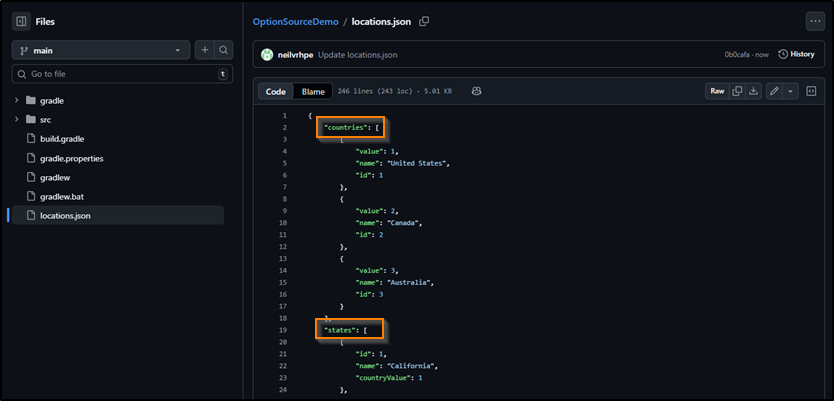
For the purposes of this article, the JSON Server was setup on a clean Debian 12 install, on the same network segment as the HPE Morpheus Enterprise appliance. Data for the JSON Server web endpoint below is supplied by a locations.json file. The content for this file can be found here.
JSON Server v1.0.0 was setup using the following commands:
apt update
apt install nodejs npm -y
npm install json-server
vi locations.json
npx json-server --host 0.0.0.0 --port 80 locations.json
(Bear in mind that minimal Debian doesn't install with the sudo command by default. Prepend sudo to administrative commands where appropriate on your OS distribution)
In this demo, the JSON Server web endpoint responds on http://demojsonserver and renders this:
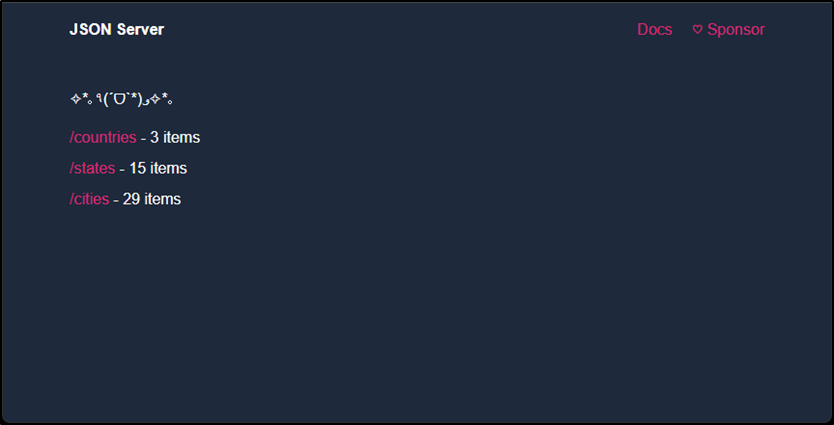
The 3 sub-pages: /countries, /states and /cities reflect the base objects in the locations.json file:
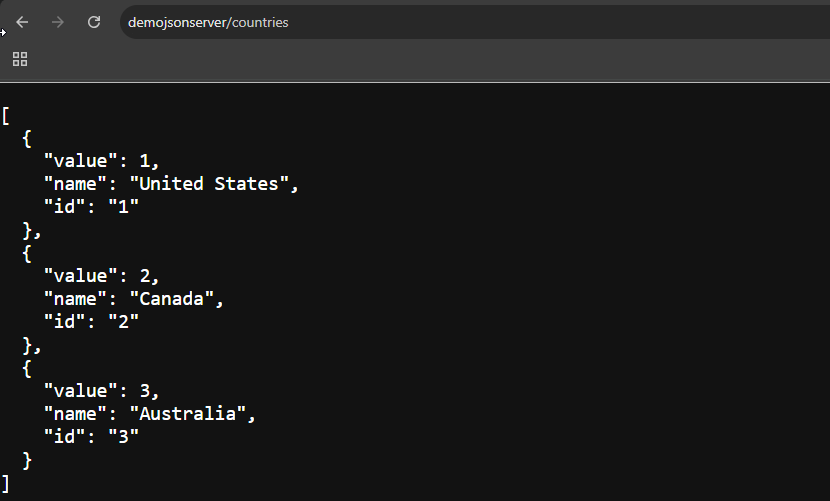
As you can see, the endpoint http://demojsonserver/countries provides the 3 countries in the locations.json file:
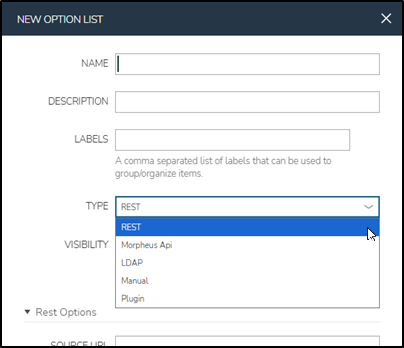
Option Source Types
There are several types of Option Lists. These represent the different ways by which an Option Source can populate the resulting drop-down control. Consider the TYPE input on the NEW OPTION LIST wizard:
REST: Web endpoint requests.
Morpheus Api: HPE Morpheus Enterprise platform elements like VMs or Networks directly.
LDAP: Use LDAP Search Filter syntax to populate Option Lists.
Manual: Define Option List data with CSV or JSON.
Plugin: OptionSourceProvider classes within uploaded plugins supply data in name / value pairs.
In this article, I am focusing on the REST Web endpoints and an OptionSourceProvider Plugin.
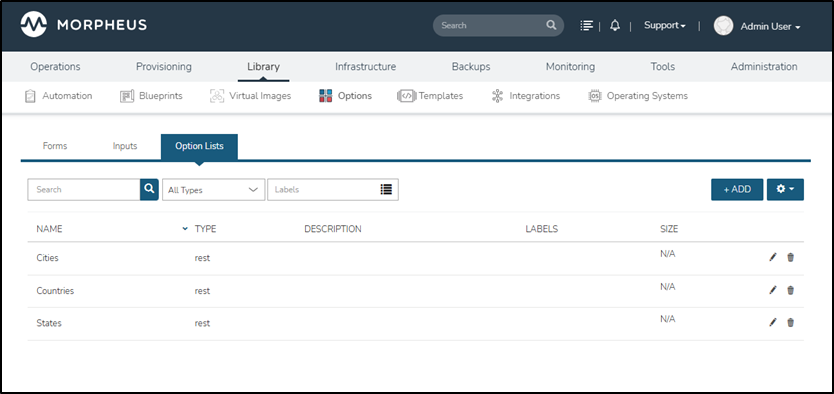
Creating the Option Lists
To create the Option Lists in HPE Morpheus Enterprise, navigate to Library > Options > Options Lists. Click Add. The following dialog will be displayed:
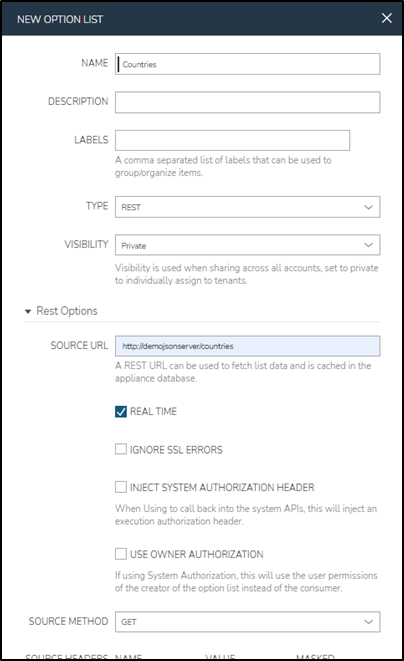
For you to obtain proper results, replace the URL hostname with the appropriate hostname or IP address of the JSON Server in your environment. Then create three Option Lists that reflect the values below:
| NAME: | Countries |
| TYPE: | REST |
| SOURCE URL: | http://demojsonserver/countries |
| SOURCE METHOD: | GET |
| REAL TIME: | Checked |
| NAME: | States |
| TYPE: | REST |
| SOURCE URL: | http://demojsonserver/states |
| SOURCE METHOD: | GET |
| REAL TIME: | Checked |
| NAME: | Cities |
| TYPE: | REST |
| SOURCE URL: | http://demojsonserver/cities |
| SOURCE METHOD: | GET |
| REAL TIME: | Checked |
Verify that the three Option Lists reflect the below:
Create the Inputs
On their own, Option Lists aren't useful as wizard inputs. To use the values in a UI control, the Option List is attached to a list-based Input Type. These include HTML drop-downs, option lists and type-ahead fields.
Inputs are also variables, with the fieldName property as the variable name. This means that an Input with a fieldName of country will have it's selected value stored as input.country. These variables will be used for filtering in the next section.
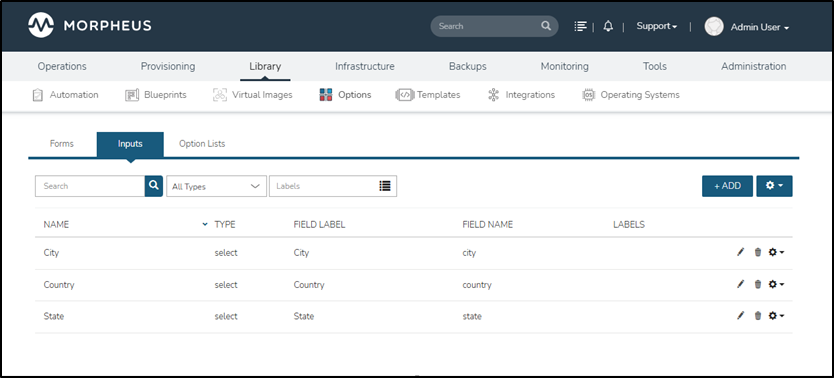
To create the wizard Inputs, navigate to Library > Options > Inputs. Click Add.
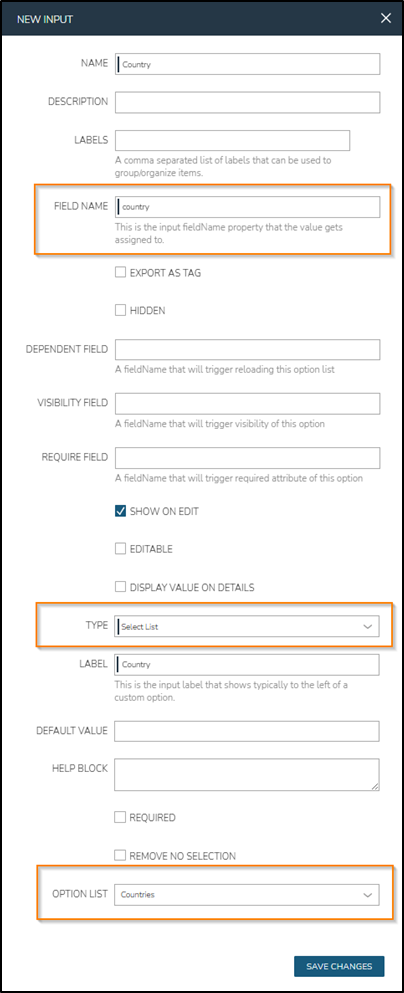
Create 3 Inputs that correspond to the Option Lists above, with the following values:
| NAME: | Country |
| FIELD NAME: | country |
| TYPE: | Select List |
| LABEL: | Country |
| OPTION LIST: | Countries |
| NAME: | State |
| FIELD NAME: | state |
| TYPE: | Select List |
| LABEL: | State |
| OPTION LIST: | States |
| NAME: | City |
| FIELD NAME: | city |
| TYPE: | Select List |
| LABEL: | City |
| OPTION LIST: | Cities |
Inputs should be created as shown below:
The rest of the available Input types are not driven by Option Source list data. These include HTML text, textarea, checkbox, hidden, number and password. Text based Inputs can be validated using regular expressions.
How to test Option List Inputs
A simple way to test Inputs in HPE Morpheus Enterprise is to create an Operational Workflow. These workflows can use Inputs as Workflow wizard Inputs. Navigate to Library > Automation > Workflows. Click Add > Operational Workflow. Provide Test Inputs as the Name and add Country, State and City to the type-ahead Inputs field:

Under Library > Automation > Workflows, click the name of the Test Inputs workflow. Click the EXECUTE button. Check that all three drop-downs contain data from the JSON Server endpoints:
Filtering data
When Option Lists are populated by Option Source data, the list items are stored against an inherent results object. This results construct consists of a list of name and value pairs.
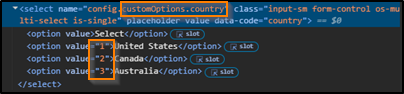
Consider the current country JSON data:
[
        {
            "value": 1,
            "name": "United States"
        },
        {
            "value": 2,
            "name": "Canada"
        },
        {
            "value": 3,
            "name": "Australia"
        }
]
If the JSON keys in the list are not exactly name and value, then the drop-down will not be correctly populated. Should the JSON keys be different, an additional step is needed to populate the values correctly. This step is covered in the next step.
When the Option List is populated, each entry in the JSON Option Source list will be added onto the results object, causing the corresponding HTML page select tag to be populated with option tags.
Navigate to Library > Automation > Workflows and click on the name of the Test Inputs workflow. Click the EXECUTE button. Using developer tools on your browser, inspect the country drop-down HTML element on the web UI page. This reveals that the drop-down control is populated with country name and value IDs.
Filter the state by country using a translation script
At this stage, the state drop-down contains all states in the data source, regardless of which country is selected. Similarly, cities also remain unfiltered, regardless of the selected country and state.
This section will look at the two available mechanisms for filtering Option List data based on the values of other UI wizard Inputs, Translation Scripts and Request Scripts.
Translation scripts use javascript syntax and consist of these components:
- An input object map that represents the selected values of other inputs on the same UI wizard
- A data list/array object that contains the raw data from the Option Source
- A results list/array object that the script needs to add name and value objects onto
- name and value objects that get added onto the results object. E.g., {"name": "USA", "value": 1}
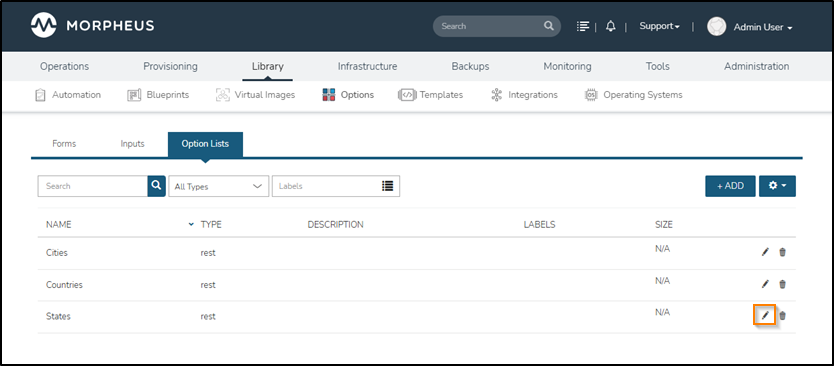
Navigate to Library > Options > Options Lists and edit the previously created States Option List using the corresponding pencil icon on the right:
Add the following code to the TRANSLATION SCRIPT field and click SAVE CHANGES:
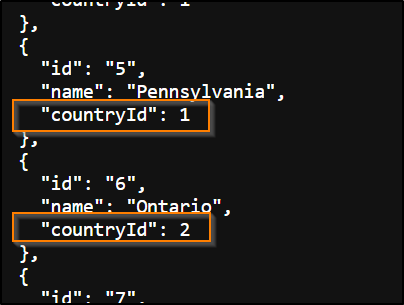
for (var i = 0; i < data.length; i++) {
  if (data[i].countryId == input.country) {
      results.push({"name": data[i].name, "value": data[i].id})
  }
}
![]()
The above script loops through the state data set and pushes entries onto the results list.
This time there is no value field in the data. The id field is used for the value instead. It is necessary to provide name and value objects via translation scripts if the JSON data doesn't specifically use name and value keys.
The conditional if statement ensures that the selected value of the country Input matches the countryId of the JSON list entry before it can be added to the results list:
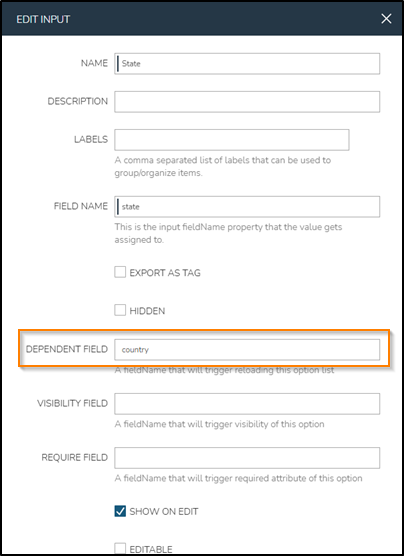
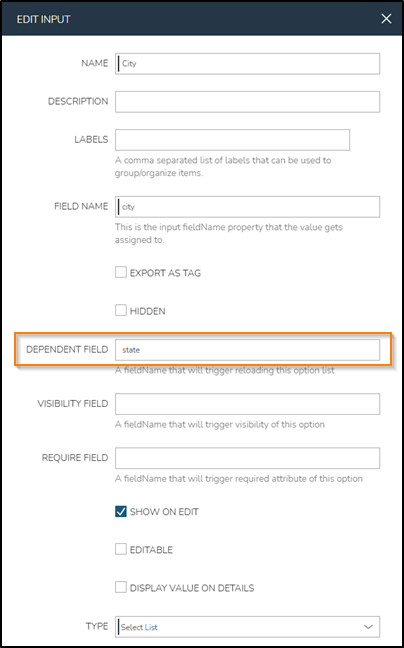
Inputs use DEPENDENT FIELD to trigger an Option List refresh when another field changes. Supply the FIELD NAME value of the other Input (country in this case) to trigger the refresh of the state Input.
To set up the refresh trigger of the state drop-down field, navigate to Library > Options > Inputs and edit the State Input. Set the value of the DEPENDENT FIELD input to country. Click SAVE CHANGES:
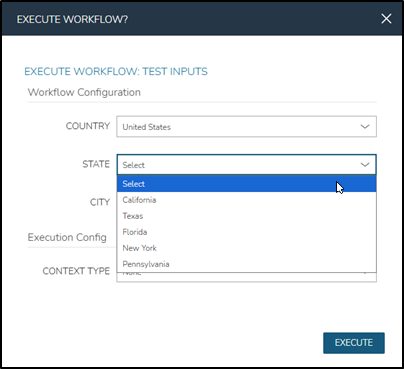
Navigate back to Library > Automation > Workflows and open the workflow execution dialog for the Test Inputs workflow again. This time, states are filtered by the selected country value:
Filter the city by state using a request script
Some REST web endpoints support filtering by URL parameters. As an example, consider the HPE Moprpheus Enterprise REST API endpoint for servers. Here is an example where the GET request URL is used to filter the list of servers on their parentServerId:
https://some.morpheus.appliance/api/servers?parentServerId=42
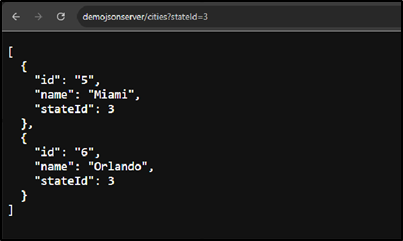
In this case you don't need to use a request script. For example, to filter cities by a state id of 3, the URL would look like this:
http://demojsonserver/cities?stateId=3
Here is the GET request result:
To implement URL request parameter filtering on the cities Option Source, navigate to Library > Options > Options Lists and edit the Cities Option Source. Populate the REQUEST SCRIPT text box with the below code:
results.push({ name: 'stateId', value: data.state || "NoState" });
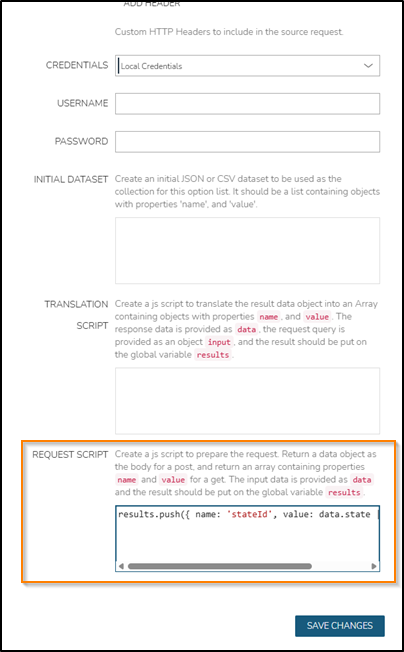
This line of code effectively sets the stateId request parameter to the value of the state Form Input, or to "NoState" if no state is selected. The reason for this is that a blank stateId request parameter value causes JSON Server to remove the filter entirely, thus showing all entries, instead of no entries.
To trigger the refresh of cities upon the selection of a state, navigate to Library > Options > Inputs and edit the State input using the pencil icon on the right. Set the value of the DEPENDENT FIELD to state. Click SAVE CHANGES:
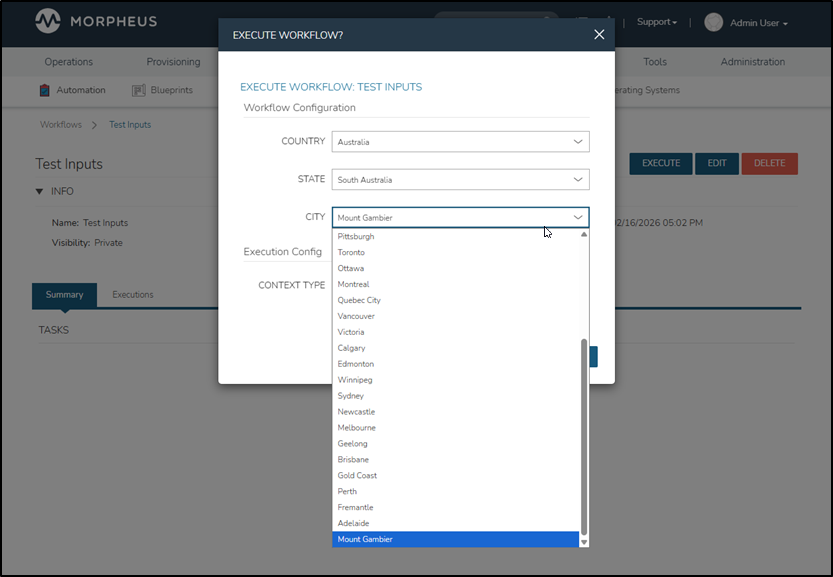
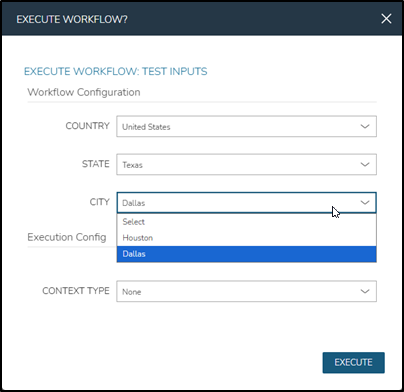
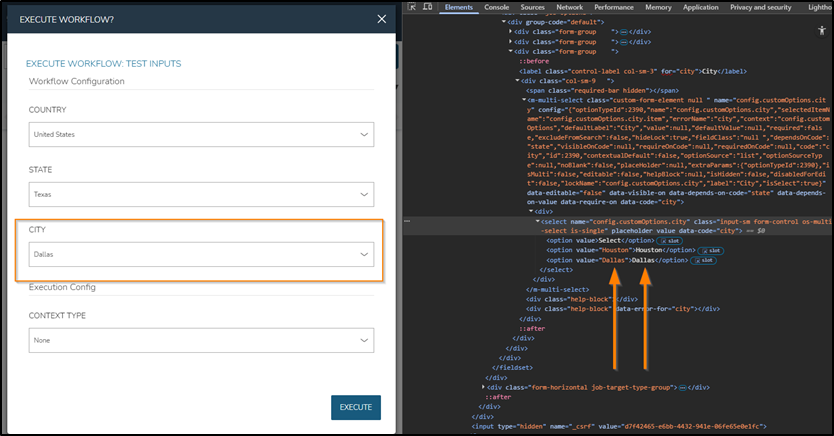
The selection of city is now based on state, which is based on the selected country. Navigate back to Library > Automation > Workflows and open the workflow execution dialog for the Test Inputs workflow again. This time, cities are filtered by the selected state value:
Explore, compile, and upload the Option Source plugin
HPE Morpheus Enterprise uses plugins to extend platform functionality, usually onto 3rd party platforms like hypervisors or IPAM systems. This is achieved through Groovy code projects that compile to java archives (.jar files). The .jar files are uploaded via the HPE Morpheus Enterprise UI or API. Plugins implement domain-specific class files called providers. To programmatically populate Option Lists from plugins, you need to implement an Option Source Provider.
This section explores an example of an Option Source plugin by adding zip codes to the above countries, states, cities example.
For more information pertaining to the anatomy of HPE Morpheus Enterprise Plugins, please refer to official plugin documentation at developer.morpheusdata.com or have a look at the blog article A Beginner’s Guide to Building and Compiling HPE Morpheus Enterprise Plugins.
Download or clone the plugin repository from https://github.com/neilvrhpe/OptionSourceDemo.
Open the project directory using a simple IDE, like Visual Studio code, or even a text editor tool. Expand the src > main > groovy > com > hpe > morpheus > demo directory. View the OptionsSourceDemoPlugin.groovy class file:
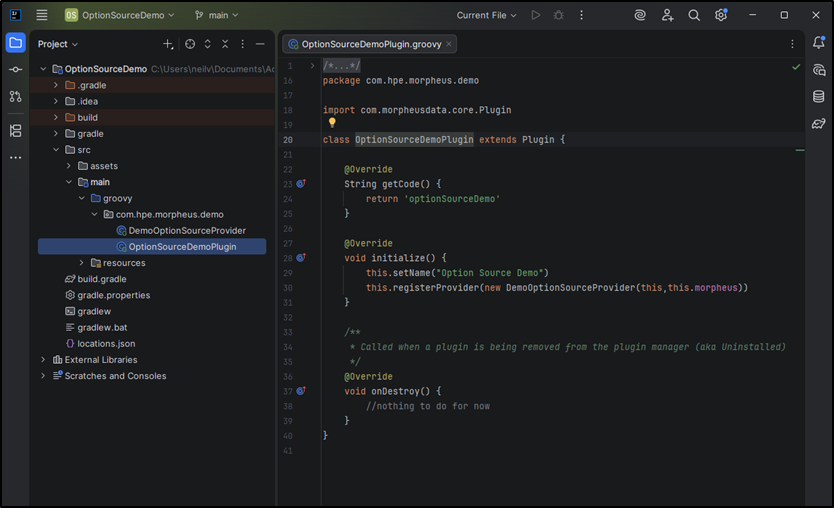
This file is the HPE Morpheus Enterprise appliance's entry point into the plugin. HPE Morpheus Enterprise plugins always register one or more provider classes. The provider classes supply the plugin functionality. The method call on line 30, this.registerProvider, registers the OptionSourceProvider, which will provide a list of zip codes to the ZipCodes Option List in the next section.
View the DemoOptionSourceProvider.groovy class file:
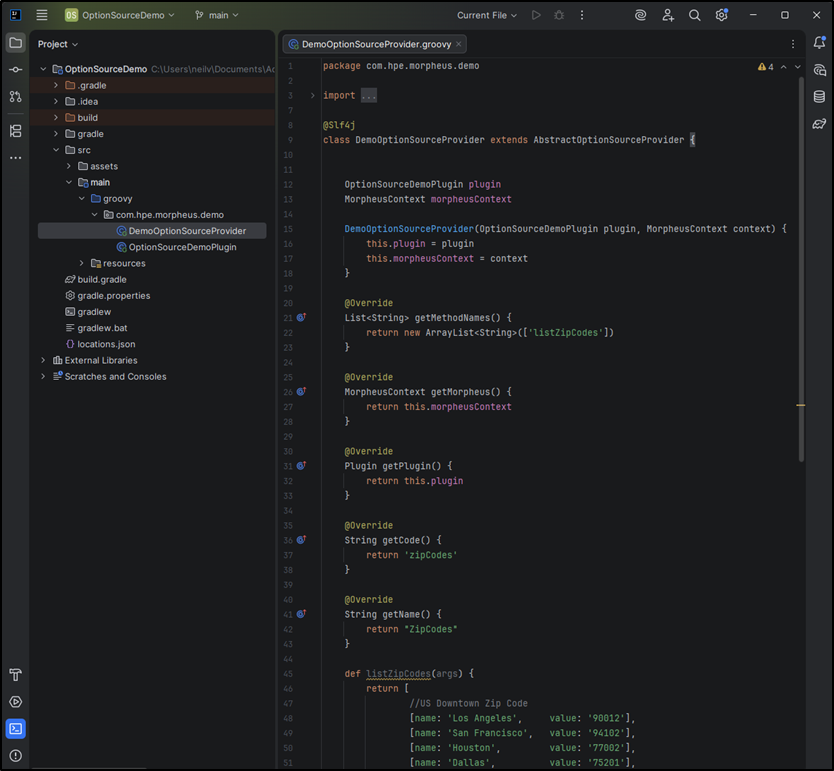
This class extends AbstractOptionSourceProvider, which enables the plugin to provide a list of name and value pairs for an Option List through a collection of methods. The methods are made available to the platform via the getMethodNames method (line 21). In this example, there is only one method called listZipCodes, which is defined on line 45. It returns static name and value pairs, although the plugin provides flexibility on how the list is built. Data can easily be retrieved from other systems via SDKs, APIs, or database connections.
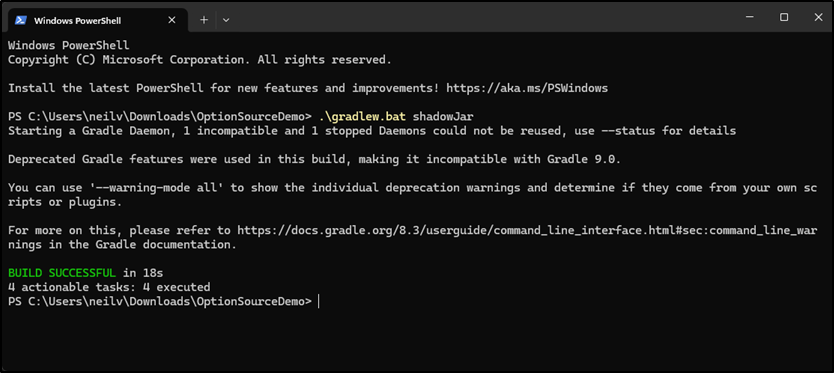
Open the project directory in a command line terminal and compile the plugin with the relevant gradlew(Linux) or gradlew.bat(Windows) script using the shadowJar argument:
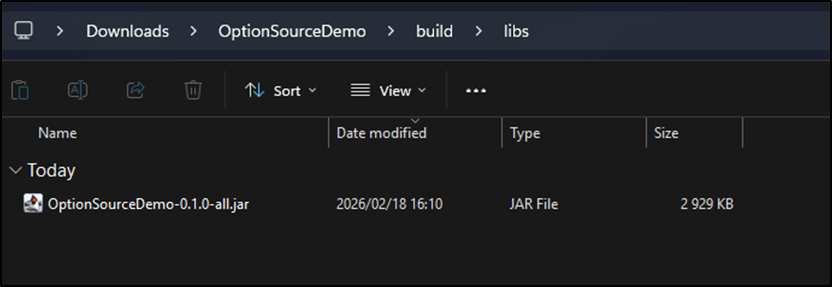
The compiled .jar file will be found in the build/libs subdirectory:
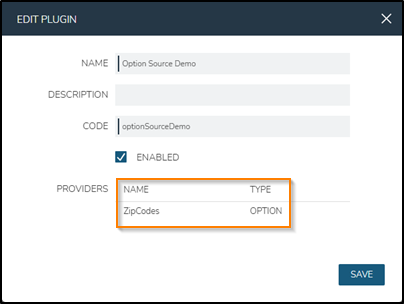
Upload the .jar file to the Administration > Integrations > Plugins > Add dialog. The plugin should appear in the list as shown below:
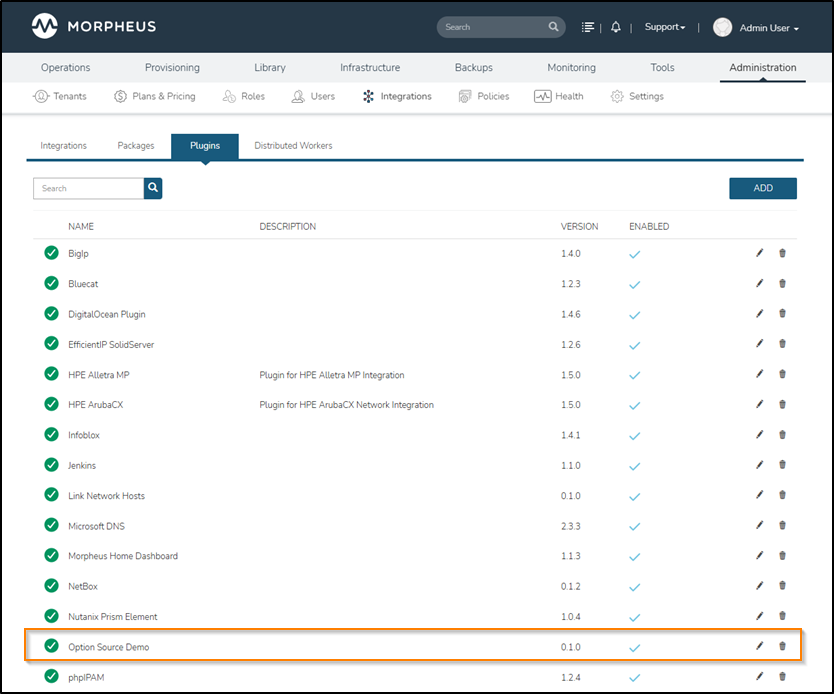
Edit the uploaded plugin using the pencil icon to confirm that the Option Source Provider is present:
Add the zip code Option List and Input
At this stage, only the name of the city is added to the City drop-down. This is due to the missing value property, as seen earlier with the state Option List.
Add the following code snippet to the cities Option List TRANSLATION SCRIPT field by navigating to Library > Options > Options Lists and clicking the corresponding pencil icon on the right:
for (var x = 0; x < data.length; x++) {
  results.push({"name": data[x].name,"value": data[x].name})
}
![]()
The above code sets the name property of a city to both the name and value of the city drop-down entry. You can verify this by opening the execution dialog of the Test Inputs workflow. Inspecting the HTML once a city is selected confirms this:
The listZipCodes method returns name and value pairs with the city name and the zip code value. As the Request Script will match using the city name, the value of the drop-down has to be the city name (not the city id).
Navigate to Library > Options > Option Lists and click Add. Supply the field values as shown below:
| NAME: | ZipCodes |
| TYPE: | Plugin |
| OPTION LIST: | Option Source Demo: listZipCodes |
TRANSLATION SCRIPT:
for (var i = 0; i < data.length; i++) {
  if (data[i].name == input.city) {
      results.push({"name": data[i].value, "value": data[i].value})
  }
}
The above populates the ZipCodes Option List with the zip code as both the name and value (the drop-down label and value). Click SAVE CHANGES

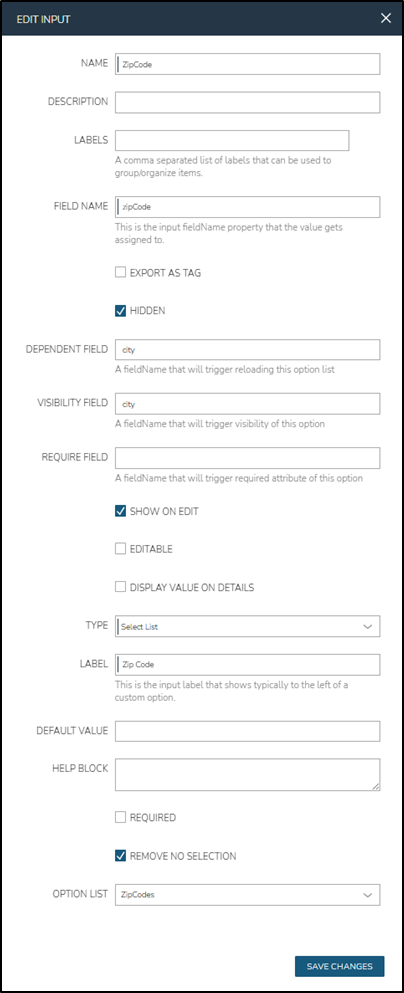
Navigate to Library > Options > Inputs and click Add. Use the below field values:
| NAME: | ZipCode |
| FIELD NAME: | zipCode |
| DEPENDENT FIELD: | city |
| VISIBILITY FIELD: | city |
| TYPE: | Select List |
| LABEL: | Zip Code |
| OPTION LIST: | ZipCodes |
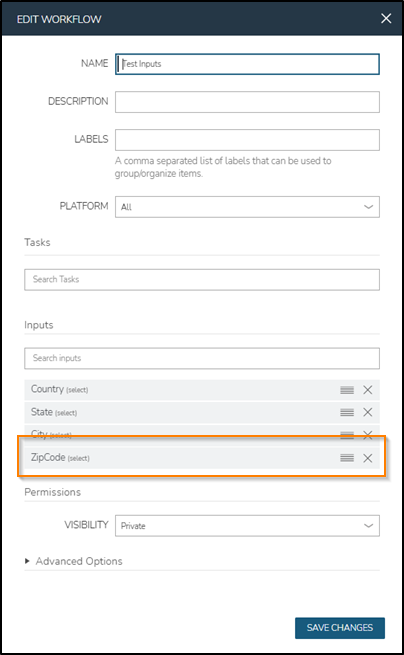
Navigate to Library > Automation > Workflows and edit the Test Inputs workflow. As before, add the ZipCode Input to the workflow and save.
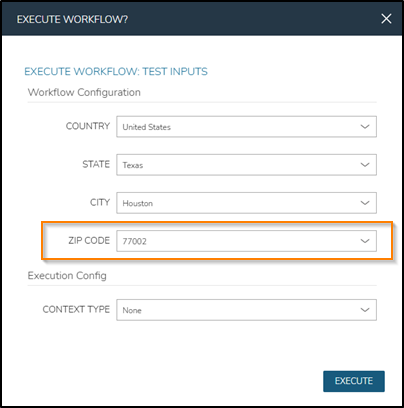
Click the name of the Test Inputs workflow and click EXECUTE. The Zip Code drop-down now appears in the workflow execution dialog, once the city is selected:
To implement cascading visibility, set the corresponding VISIBILITY FIELD values on the other inputs to make the visibility of each subsequent drop-down depend on the one before. State to country, and city to state.
Summary
This post only explores HPE Morpheus Enterprise Inputs and Option lists and Option Source Provider Plugins. Under Library > Options > Forms, you can find more advanced Forms as collections of inputs. These form controls enrich functionality on UI forms and enable the customization of the inputs for workloads and services.
At the more advanced end of the spectrum are other Plugin Provider Types that model core infrastructure components. These include integrations for Clouds, Networks, Storage systems, and many others. Such Providers tend to be more complex because they interact deeply with HPE Morpheus Enterprise’s provisioning, synchronization, and lifecycle management layers. Understanding how these Provider Types fit together is key to building powerful, production-grade Plugins.
Explore the following resources for more information on the different Plugin/Provider types:
https://developer.morpheusdata.com (The official plugin documentation)
https://share.morpheusdata.com (Follow the repository link under the details page of a plugin to see the corresponding source code)
https://github.com/hewlettpackard (Several repositories with source code for various plugins and automation code samples)
https://youtu.be/1twoNvPoEV4?si=elUEzCYGo88TIffX (Plugin code generator demo video)
Related

Streamlining hybrid cloud: Announcing the unified HPE/hpe Terraform provider v1.1.0
Apr 2, 2026
HPE Morpheus Enterprise case study: Fix network pool links via a Custom Task Plugin
Dec 18, 2025
Bulk onboarding of users in HPE GreenLake edge-to-cloud platform
Apr 24, 2024
Get started with the foundational APIs for the HPE GreenLake platform – Part 3: Tracking activities and monitoring health
Feb 2, 2024
Getting started with HPE GreenLake APIs for Data Services
Apr 2, 2024
Getting started with the HPE GreenLake Developer Portal
Mar 8, 2024
HPE GreenLake API - How to fetch and analyze Audit Logs in Python
Jul 26, 2024