
A bit of background
The Workshops-on-Demand program has been an important asset for the HPE Developer Community for the last 2 years. If you are interested in learning more on the genesis of the project, check the following blog.
This program allows us to deliver free hands-on workshops. We use these during HPE sponsored events, like HPE Discover and HPE Technical Symposium Summit, as well as open source events, like Open Source Summit and KubeCon, to promote API/automation-driven solutions along with some 101-level coding courses. By the end of 2022, more than 4000 had registered for our workshops.
If you are interested in creating your own training architecture to deliver workshops, this project is definitely for you. It would allow you to create, manage content and deliver it in an automated and very efficient way. Once ready, the infrastructure can deliver workshops in matter of minutes!
Trying to build a similar architecture on your own is obviously possible, but we integrated so much automation around the different components like the JupyterHub server deployment along with multiple pre installed kernels, user management and much more. When leveraging our project, one can actually get a proper public-based environment in 2 hours.
This very first article will set the stage for the following blog articles where I will explain how to setup your own Workshops-on-Demand infrastructure.
Why would we consider open sourcing our Workshops-on-Demand?
Firstly, if you read carefully the messaging on our homepage , you will find words like sharing and collaborating. This is part of the HPE Developer team's DNA.
Secondly, the project is based on open source technologies like Jupyter and Ansible. It felt natural that the work we did leveraging these should also benefit the open source community.
We have, actually, shared the fundamentals of the project thoughout the HPE Developer Community, and to a wider extent, the Open Source Community through different internal and external events. And the feedback has always been positive. Some people found the project very appealing. Originally, and long before even thinking of open sourcing the project, when we really started the project development, people were mainly interested in the content and not necessarily in the infrastructure. The students wanted to be able to reuse some of the notebooks. And in a few cases, they also asked for details about the infrastructure itself, asking about the notebooks delivery mechanism and other subjects like the procmail API.
Early last year, we were contacted by an HPE colleague who was willing to replicate our setup in order to deliver notebooks to its AI/ML engineers. His aim was to provide a simple, central point from which he could deliver Jupyter Notebooks, that would later be published on the Workshops-on-Demand infrastructure frontend portal, allowing content to be reused and shared amongst engineers. While, over time, we had worked a lot on automating content delivery and some parts of the infrastructure setup, we needed now to rework and package the overall solution to make it completely open source and reusable by others.
As a result of our work on that project, over the course of 2022 we started to open source the Workshops-on-Demand program. As a project developed within the confiines of Hewlett Packard Enterprise (HPE), we had a number of technical, branding, and legal hurdles we needed to overcome in order to achieve this.
Legal side of things
From a legal standpoint, we needed to go through the HPE OSRB (Open Source Review Board) to present the project that we wanted to open source. We were asked to follow a process that consisted of four steps:
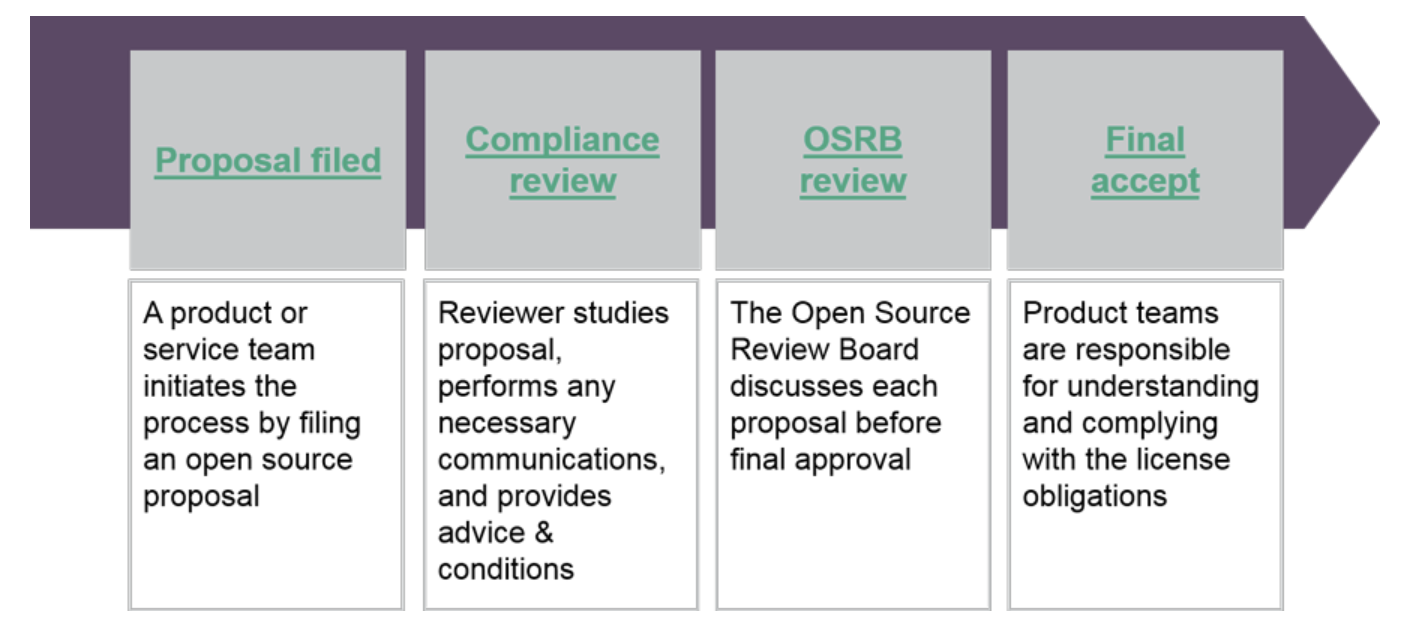
As the project did not contain any HPE proprietary software, as it is based on open source technologies like Ansible and Jupyter, the process was quite straightforward. Besides, HPE did not want to exploit commercially the generated intellectual property. We explained to the OSRB that the new architecture of the solution would allow the administrator of the project to separate public content from private content, with private content being a proprietary technology.
This had a huge influence on the future architecture of the project that originally did not allow it. In our case, for instance, any workshop related to an HPE technology like HPE Ezmeral, would fall into the private part of the project, and therefore, would not appear on the public github repository that we had to create for the overall project distribution.
Technical side of things
From a technical standpoint, as mentioned above, we had to make sure to separate the public only content from any possible private content. We started by sorting the different workshops (public vs private based). We also had to sort the related scripts that come along with the workshops. Going through this process, we found out that some of the global scripts had to be reworked as well to support any future split of public and private content. Similarly, we had to address any brand specifics, parameterizing instead of hardcoding variables as it was in the first version.
This took us a few months and we are now ready to share with you the result of this work. In this first blog, I will focus on the architecture side of the Workshops-on-Demand project.
Further blog articles will help you setup your own architecture.
The How
Understand the architecture first
The Workshops-on-Demand concept is fairly simple. The following picture gives you a general idea of how the process works.
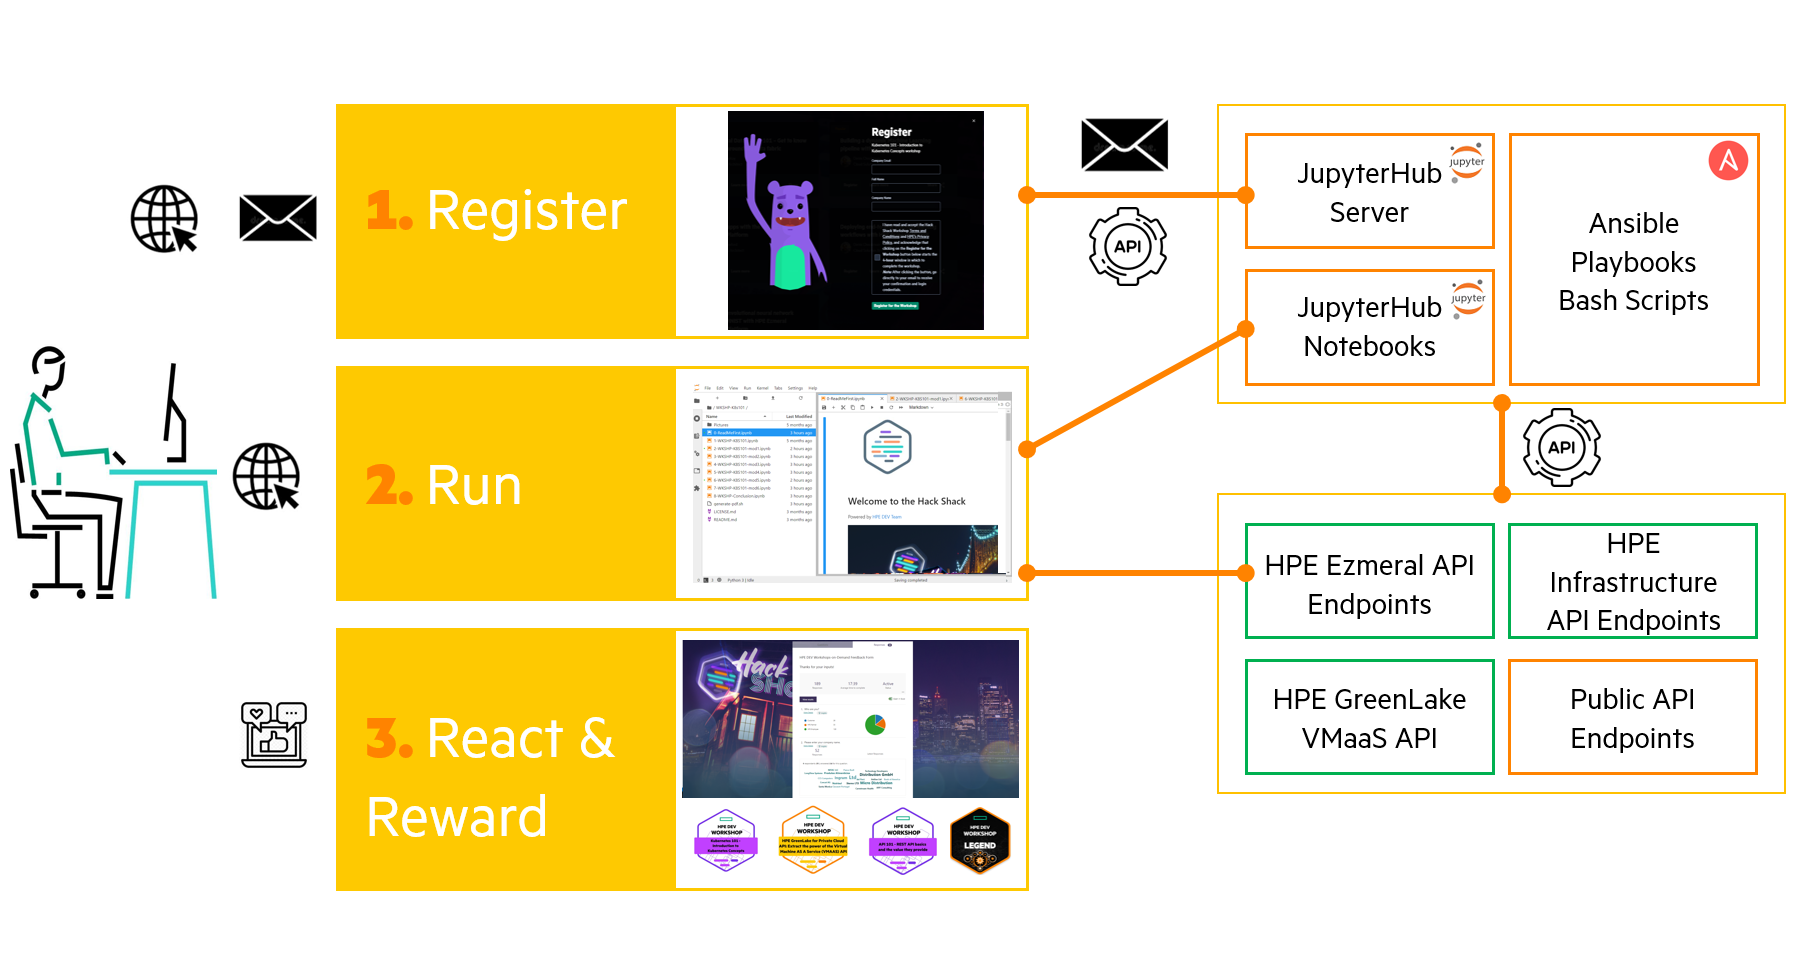
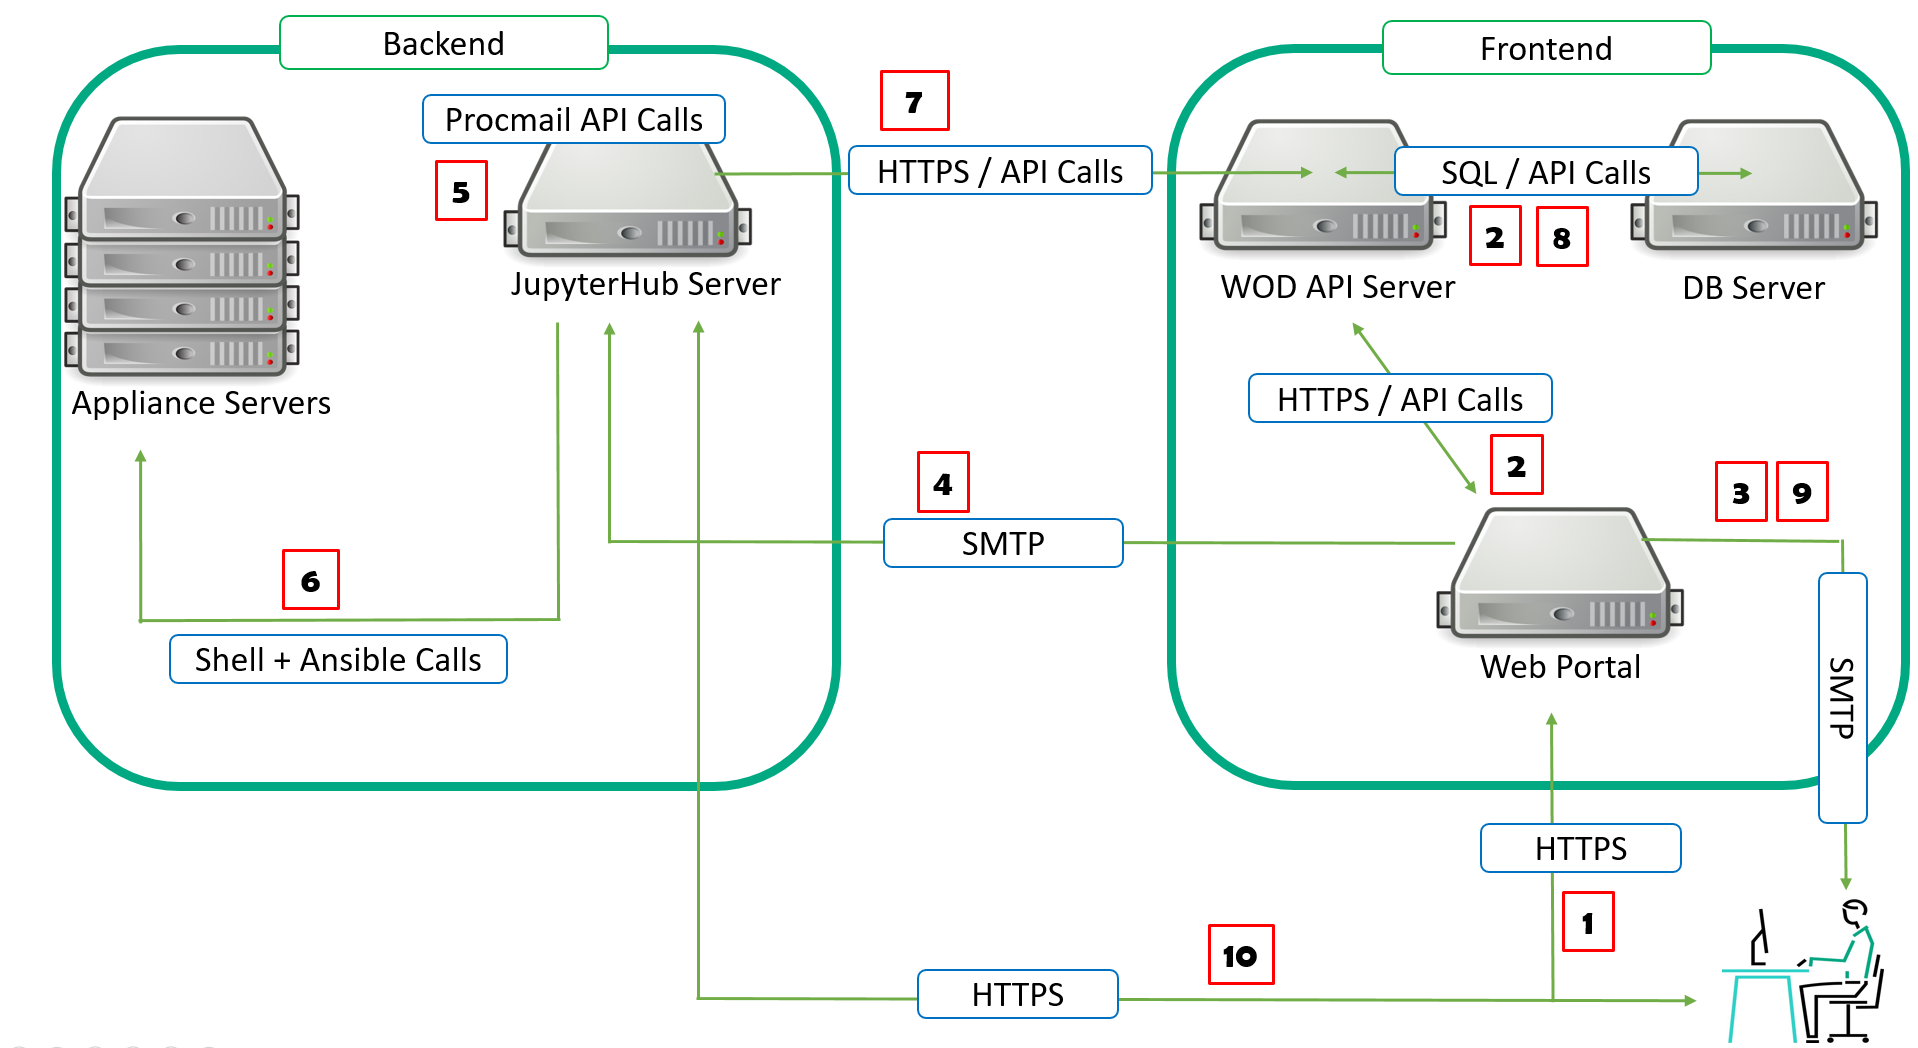
Now that you understand the basic principle, let's look at the details. The image below shows what happens at each stage from a protocol standpoint.
The Register Phase
1. Participants start by browsing a frontend web server that presents the catalog of available workshops. They then select one and register for it by entering their email address, first and last names, as well as their company name. Finally, they accept the terms and conditions and hit the register button.
As the register button is clicked, the frontend server performs a series of actions.
2. Assigns a student (i.e student401) from the dedicated workshop range to the participant. Every workshop has a dedicated range of students assigned to it.
Here is a screenshot of the workshop table present in the frontend database server showing API 101 workshops details.
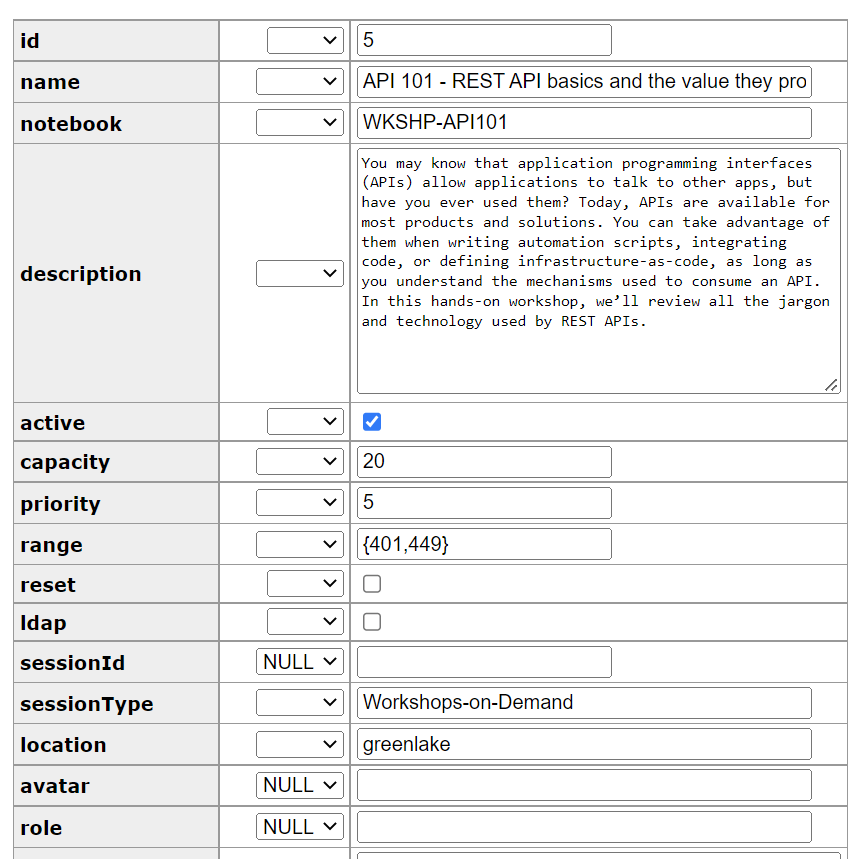
Frederic Passeron gets assigned a studentid "student397" for workshop "API101".
Here are the details of the participant info when registered to a given workshop.
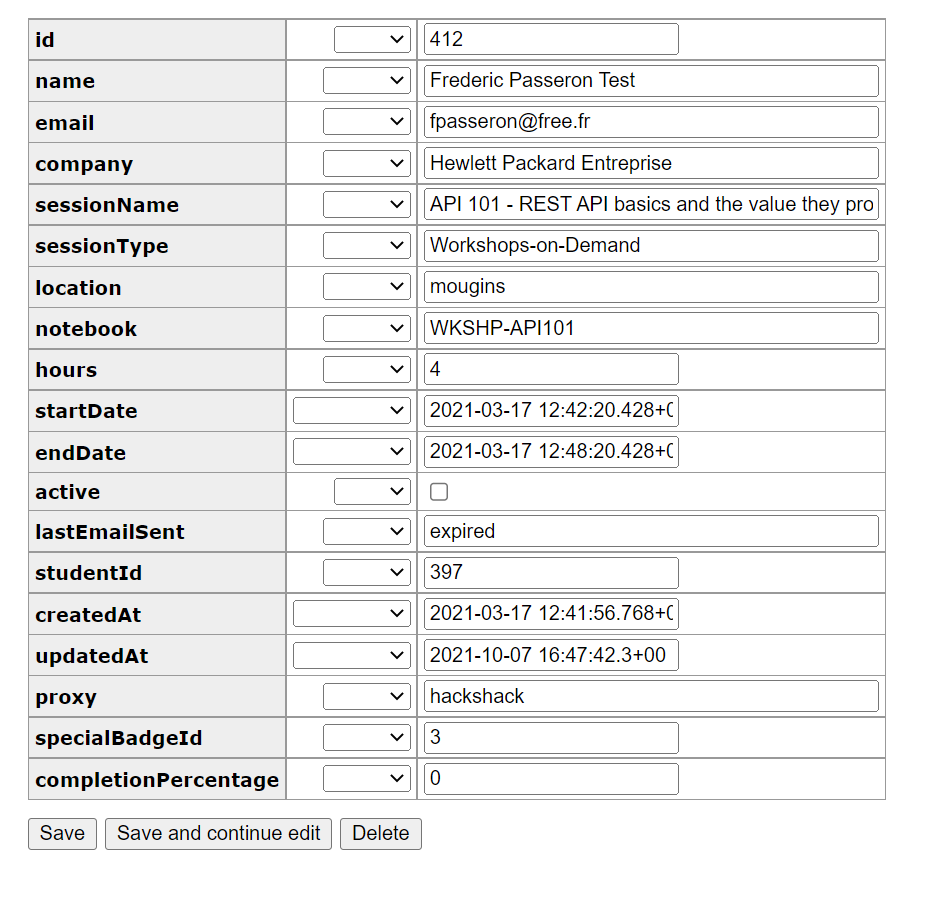
3. An initial email is sent to participants from the frontend server welcoming them to the workshop and informing them that the deployment is ongoing and that a second email will arrive shortly providing the necessary information required to log onto the workshop environment.
4. At the same time, the frontend server sends the necessary orders through a procmail API call to the backend server. The mail sent to the backend server contains the following details:
- Action Type ( CREATE, CLEANUP, RESET)
- Workshop ID
- Student ID
5. The backend server recieves the order and processes it by parsing the email recieved using the procmail API. the procmail API automates the management of the workshops.
Like any API, it uses verbs to perform tasks.
- CREATE to deploy a workshop
- CLEANUP to delete a workshop
- RESET to reset associated workshop's resource
CREATE subtasks:
- 6. It prepares any infrastructure that might be required for the workshop (Virtual Appliance, Virtual Machine, Docker Container, LDAP config, etc.).
- It generates a random Password for the allocated student.
- It deploys the workshop content on the jupyterhub server in the dedicated student home directory (Notebooks files necessary for the workshops).
- 7. It sends back the confirmation of the deployment of the workshop, along with the student's required details (i.e password), through API Calls to the frontend server.
8. The frontend server tables will be updated in the following manner:
- The customers table shows an active status for the participant row. The password field has been updated.
- The workshop table also gets updated. The capacity field decrements the number of available seats.
- The student tables gets updated as well by setting the allocated student to active
9. The frontend server sends the second email to each participant providing them with the details to connect to the workshop environment.
The Run Phase
10. From the email, the particpant clicks on the start button. it will open up a browser to the JupyterHub server and directly open the readme first notebook, presenting the workshop's flow.
Participants will go through the different steps and labs of the workshop connecting to the necessary endpoints and leveraging the different kernels available on the JupyterHub server.
Meanwhile, the frontend server will perform regular checks on how much time has passed. Depending on the time allocation (from 2 to 4 hours) associated with the workshop, the frontend server will send a reminder email usually a hour before the end of the time allocated. The time count actually starts when participants hit the register for the workshop button. It is mentioned in the terms and conditions.
Finally, when the time is up, the frontend server sends a new order to the backend to perform either CLEANUP or RESET action for the dedicated studentid.
RESET subtasks:
- It resets any infrastructure that was required for the workshop (Virtual Appliance, Virtual Machine, Docker Container, LDAP config, etc..).
- It generates a random password for the allocated student.
- It deletes the workshop content on the JupyterHub server in the dedicated student home directory (Notebooks files necessary for the workshop).
- It sends back the confirmation of the CLEANUP or RESET of the workshop along with the student details (i.e password) through API Calls to the frontend server.
The frontend server tables will be updated in the following manner:
- The customers table will show an inactive status for the participant row. The password field has been updated.
- The Workshop table gets also updated. The capacity field increment the number of available seats.
- The student tables gets updated as well by setting the allocated student to inactive.
- The frontend sends the final email to the participant.
The React and Reward Phase:
A final email thanks the students for their participation. It provides a link to an external survey and encourages the participants to share their achievement badge on social media like linkedin or twitter.
With this very first article, I wanted to set the stage for the following articles where I will explain how to setup your own Workshops-on-Demand infrastructure. We will start by looking at the "JupyterHub" side of things. I will detail how to set it up depending on your use case (Public only vs Public and Private). Then, I will move to the workshop development part; from the notebook development to the automation that needs to come along with it in order to be properly integraged into the overall solution. Finally, the last article will cover the frontend's side. It will show you how to deploy it and more. I may also cover the appliance management aspect in another dedicated article.
Please be sure to drop back at HPE DEV for a follow up on this. Check out also the Hack Shack for new workshops! We are currently working on different subjects like Data Visualization 101 or HPE GreenLake for Compute Operations Management API 101. Stay tuned!
Related

10 Myths About Scalable Parallel Programming Languages (Redux), Part 1: Productivity and Performance
Apr 30, 2025
10 Myths About Scalable Parallel Programming Languages (Redux), Part 2: Past Failures and Future Attempts
Jun 2, 2025
10 Myths About Scalable Parallel Programming Languages (Redux), Part 3: New Languages vs. Language Extensions
Jun 26, 2025
10 Myths About Scalable Parallel Programming Languages (Redux), Part 4: Syntax Matters
Jul 23, 2025
10 Myths About Scalable Parallel Programming Languages (Redux), Part 5: Productivity and Magic Compilers
Aug 21, 2025
10 Myths About Scalable Parallel Programming Languages (Redux), Part 6: Performance of Higher-Level Languages
Sep 18, 2025
10 Myths About Scalable Parallel Programming Languages (Redux), Part 7: Minimalist Language Designs
Oct 15, 2025