Using the 3PAR SSMC/CLI & HPE 3PAR Ansible Module to Create and Manage Virtual Domains in a Multi-Tenant Scenario
This guide walks through the steps to create and manage Virtual Domains within a 3PAR using a mixture of the SSMC or CLI and the Ansible module for 3PAR. This guide targets those who want to setup and manage multi-tenancy on a 3PAR using configuration management tools like Ansible.
You can also find this content over at:
https://github.com/hpe-storage/hpe3par-examples
Assumptions
- HPE 3PAR configured and zoned correctly
- WSAPI enabled
- Super user access to 3PAR
- Ansible installed on workstation
- Knowledge of Ansible and playbooks
Configuring Virtual Domains in SSMC
Domains allow an administrator to create up to 1,024 domains, or spaces, within a system, where each domain is dedicated to a specific application. A subset of the system users has assigned rights over the domains. Domains can be useful in scenarios where a single system is used to manage data from several different independent applications. For more information, refer to the HPE 3PAR Storeserv Storage Concepts Guide.
The first steps to setting up your 3PAR for multi-tenancy is to create a new virtual domain. Currently the configuration of Domains/Users can only done within the SSMC or via the 3PAR CLI (using createdomain <domain>, createuser <username> <domainname> <role> ). The example shown below will be done within the SSMC.
- Login into the SSMC with Super user access.

- In the mega menu, click Show All > Domains

- Click Create domain
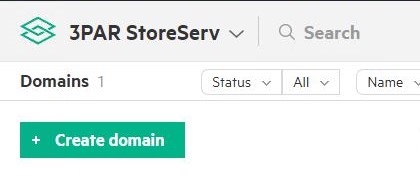
- Enter the name of the domain. In this example,
bob_domain. Then click Add systems. Specify the 3PAR where the domain will be created. Once complete, click Create.
You may ask why I am using Bob, because everyone knows Bob is cool!

- In the mega menu, click Show All > Users
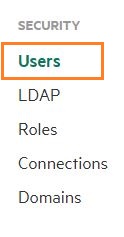
- Click Create User

- Specify the NEW user name and password

- Click Add Authorizations, choose the domain created previously (
bob_domainon virt-3par system). Choose the edit Role for the user. Click Add.

Repeat these steps as necessary to configure additional Domains and Users within your 3PAR.
If you want to use Ansible to configure the domains and users, Ansible can pass CLI commands to the 3PAR using the shell module.
For example:
---
- name: Create 3PAR Domain & Users
  hosts: localhost
  tasks:
    - name: install sshpass
      package:
        name: sshpass
        state: present
      become: yes

    - name: Create Domain
      shell: /usr/bin/sshpass -p 3pardata ssh -oStrictHostKeyChecking=no 3paradm@192.168.1.50 "createdomain bob_domain"
      register: domain

    - name: print domain
      debug:
        msg: "{{ domain }}"

    - name: Create Users
      shell: /usr/bin/sshpass -p 3pardata ssh -oStrictHostKeyChecking=no 3paradm@192.168.1.50 "createuser -c Password1 bob_user bob_domain edit"
      register: users

    - name: print users
      debug:
        msg: "{{ users }}"
Using Ansible to configure CPGs, Hosts, Volumes and more
The following section demonstrates the process to configure resources like CPGs, 3PAR hosts, etc. and assign them to the newly created domain(s). Remember that the domain users are only be able to view/edit resources they have access to and are be unable to view/edit resources from other domains unless authorized to do so.
Also everything else from this point is done via the HPE 3PAR Ansible Storage Module on a Linux (RHEL, CentOS, Ubuntu) system with Ansible (ver. 2.5 or later) installed.
## Storage Admin Perspective
Let's get started.
First, we need to make sure we have the 3PAR storage module for Ansible downloaded.
- Clone the HPE 3PAR Ansible Storage Modules
https://github.com/HewlettPackard/hpe3par_ansible_module- Install the HPE 3PAR Python SDK
pip install hpe3par_sdkNow, clone the hpe3par-examples repo to get access to the Virtual Domain demo.
https://github.com/hpe-storage/hpe3par-examplesGeneric Ansible housekeeping
- Configure
ansible.cfgto know about the 3PAR Ansible Storage Modules.
If you have other modules already installed on this system, you can move the Modules folder from this repo to that directory.
vi /etc/ansible/ansible.cfg- Under the
[defaults]section, editlibraryto point to your Modules directory.
[defaults]

# some basic default values...

inventory      = /etc/ansible/hosts
library        = /root/workspace/hpe3par_ansible_module/Modules
Understanding the 3PAR Ansible playbooks
Navigate to the hpe3par_examples/automation_tools/ansible/demo/virtual_domains folder. Here we find two Ansible playbooks and the properties/ folder.
- virtual_domains_demo_3par_admin.yml
- virtual_domains_demo_3par_user.yml
- properties/storage_system_properties.yml (This is configuration files containing the 3PAR IP address, Storage admin username and password for the 3PAR array)
- properties/storage_system_properties_bob.yml (This is configuration files containing the 3PAR IP address, Domain user username and password for the 3PAR array)
cd ~/workspace/hpe3par_examples/automation_tools/ansible/

[root@ansible-host virtual_domains]# ls -la
total 12
drwxr-xr-x. 4 root root  137 Sep 26 13:00 .
drwxr-xr-x. 3 root root   29 Sep 26 09:23 ..
drwxr-xr-x. 2 root root  254 Sep 26 13:00 img
drwxr-xr-x. 2 root root  116 Sep 26 09:23 properties
-rw-r--r--. 1 root root 2219 Sep 26 13:00 README.md
-rw-r--r--. 1 root root 2065 Sep 26 09:23 virtual_domains_demo_3par_admin.yml
-rw-r--r--. 1 root root 2065 Sep 26 09:23 virtual_domains_demo_3par_create-domain-users_cli.yml
-rw-r--r--. 1 root root 1847 Sep 26 09:23 virtual_domains_demo_3par_user.yml
Configuring Storage System Property files
- Lets configure the
properties/storage_system_properties.ymland add the 3PAR IP address. Enter the Storage Admin username and password. Save the file.
vi **properties/storage_system_properties.yml**storage_system_ip: "192.168.1.50"
storage_system_username: "3paradm"
storage_system_password: "3pardata"- Edit the
properties/storage_system_properties_bob.ymland configure the 3PAR IP address. Enter the bob_user username and password. Save the file.
vi **properties/storage_system_properties_bob.yml**storage_system_ip: "192.168.1.50"
storage_system_username: "bob_user"
storage_system_password: "Password"Configuring Ansible Vault - encrypt/decrypt
Ansible Vault is a feature of ansible that allows you to keep sensitive data such as passwords or keys in encrypted files, rather than as plaintext in playbooks or roles.
- Run
ansible-vault encrypton each of the properties files. Enter a unique password for each file.
ansible-vault encrypt properties/storage_system_properties.yml

ansible-vault encrypt properties/storage_system_properties_bob.yml- Check to verify they are encrypted. You should see something similar to below.
$ head -2 properties/storage_system_properties.yml
$ANSIBLE_VAULT;1.1;AES256
33636137356335
Note: If you need to edit the encrypted file, you can run
ansible-vault edit file.yml, enter the vault password and perform the edits. Alternatively, if you need to decrypt the file, runansible-vault decrypt file.ymland enter the vault password.
Now let's get on to the fun stuff
We will be working in the virtual_domains_demo_3par_admin.yml playbook. This playbook is ran by the Storage Admin to create CPGs and assign Hosts to the domain we created previously.
Note: These are very simple examples to help you understand the capabilities of the Virtual Domains within the HPE 3PAR system. You can expand these to add multiple CPGs and multiple Hosts within the same playbook without ever having to log into the SSMC. This is the power automating the configuration of the HPE 3PAR Storage System using the Ansible Storage Modules.
When we open the file, we see multiple sections. Again we are assuming that you are familiar with YAML and Ansible playbooks to understand the layout and structure.
---
- name: Virtual Domains on 3PAR Ansible Demo playbook - Admin
  hosts: localhost
  become: no

  vars:
    cpg_name: 'bob_cpg_FC_r6'
    host_name: 'scom.virtware.co'
    domain: 'bob_domain'
    iscsi_names: 'iqn.1991-05.com.microsoft:scom.virtware.co'

  tasks:
    - name: Load Storage System Vars
      include_vars: 'properties/storage_system_properties.yml'

    - name: Create CPG "{{ cpg_name }}"
      hpe3par_cpg:
        # 3PAR CPG options found here: https://github.com/HewlettPackard/hpe3par_ansible_module#modules
        storage_system_ip: "{{ storage_system_ip }}"
        storage_system_username: "{{ storage_system_username }}"
        storage_system_password: "{{ storage_system_password }}"
        state: present
        domain: "{{ domain }}"
        cpg_name: "{{ cpg_name }}"
        growth_increment: 32.5
        growth_increment_unit: GiB
        growth_limit: 100
        growth_limit_unit: GiB
        growth_warning: 90
        growth_warning_unit: GiB
        raid_type: R6
        set_size: 6
        high_availability: MAG
        disk_type: FC

    - name: Create Host "{{ host_name }}"
      hpe3par_host:
        # 3PAR Host options found here: https://github.com/HewlettPackard/hpe3par_ansible_module#modules
        storage_system_ip: "{{ storage_system_ip }}"
        storage_system_username: "{{ storage_system_username }}"
        storage_system_password: "{{ storage_system_password }}"
        state: present
        host_name: "{{ host_name }}"
        host_domain: "{{ domain }}"
        host_persona: WINDOWS_SERVER

    - name: Add iSCSI paths to Host "{{ host_name }}"
      hpe3par_host:
        storage_system_ip: "{{ storage_system_ip }}"
        storage_system_username: "{{ storage_system_username }}"
        storage_system_password: "{{ storage_system_password }}"
        state: add_iscsi_path_to_host
        host_name: "{{ host_name }}"
        host_iscsi_names: "{{ iscsi_names }}"
Configuring Variables section
There are several sections where you can specify variables allowing maximum flexibility when creating playbooks. They can be specified at the playbook level (Global), in external file (properties/storage_system_properties.yml), or at the task level.
In the vars section, you can modify the CPG/Host names to be added to the bob_domain.
Note: In order to assign the new CPGs and Hosts to the domain, you must specify a domain in the domain: 'bob_domain' variable. This variable is then used within each of the tasks (domain: and host_domain:), where required, to assign the CPG or Host to the domain. If the domain is not specified, the CPG or Host is not assigned to a domain and is not accessible to the Domain user when they log into the array.
Modify the host_name and iscsi_names to match a host and iSCSI iqns you want to add from your environment.
In the tasks section, for example in the Create CPG task, you can add/modify the variables (growth_limit, raid_type, etc) in the tasks as well move them into vars section if needed.
In the case of Multi-Tenancy, creating growth limits, defining disk characteristics on CPGs in critical in order to enforce boundaries per tenant (this prevents one tenant from consuming the entire storage array), as well as to ensure all tenants get the appropriate resources and performance per their needs. In the playbook above, we specified a 100GB growth limit (with a 90GB warning) on the CPG, therefore restricting the users within the
bob_domainfrom using more than 100GB of storage space on the array. All of this is configurable by the Storage Admin.
Also you can specify an external variables file like the storage_system_properties.yml. This gives us the ability to encrypt the external file without affecting the main playbook.
Configuring Tasks sections
We have 4 main tasks in this example.
These tasks are taken from the main (CPG, Host, Volume, etc) playbooks found in the 3PAR Storage Module here: https://github.com/HewlettPackard/hpe3par_ansible_module/tree/master/playbooks.
Please refer to the Modules README for detailed information on each Module including required/optional parameters.
- Load Storage System Vars (load the encrypted storage system IP, username/password)
- Create CPG (create CPGs per the provided specifications)
- Create Host (create a basic 3PAR host)
- Add iSCSI paths to Host (modify the host and add iSCSI IQNs or FC WWNs) ---
Running the Playbook
Now that we know what is going on within the admin playbook, we can run it in order to create the CPGs, Host resources within the bob_domain.
We run this playbook with the ansible-playbook --ask-vault-pass option in order to decrypt the storage_system_properties.yml file.
$ ansible-playbook --ask-vault-pass virtual_domains_demo_3par_admin.yml
Vault password:

PLAY [Virtual Domains on 3PAR Ansible Demo playbook - Admin] **************************

TASK [Gathering Facts] ****************************************************************
ok: [localhost]

TASK [Load Storage System Vars] *******************************************************
ok: [localhost]

TASK [Create CPG "bob_cpg_FC_r6"] *****************************************************
ok: [localhost]

TASK [Create Host "scom.virtware.co"] *************************************************
ok: [localhost]

TASK [Add iSCSI paths to Host "scom.virtware.co"] ***************************************************************************************
ok: [localhost]

PLAY RECAP ****************************************************************************
localhost                  : ok=5    changed=0    unreachable=0    failed=0
Success.
This sample playbook demonstrates how a Storage Admin can quickly and programmatically configure Domains, Users, and storage resources using a combination of the SSMC and Ansible playbooks.
## Storage User Perspective
Now that we have finished configuring a Domain, Users, created CPGs and added hosts into the Domain, lets cover how a user can consume the 3PAR using Ansible playbooks while still being bound to the limits placed on the domain by the Storage Admin.
This section follows closely to my other blog post about using the Ansible modules to provision storage on an HPE 3PAR. Storage Provisioning using Ansible with HPE 3PAR Storage
Assumptions
- Domains/users have been created
- CPGs and Hosts have been assigned to the domain
- Reviewed Generic Ansible housekeeping section
- Vault password to unlock the properties/storage_system_properties_bob.yml file. Check out the Vault section for more info.
Let's get started
Let's take a look at our Ansible playbooks again. Since we have everything ready for us on the array, it is very simple to run the playbooks as a user. The example playbook is a simple demonstration on how you can turn your Infrastructure into Code.
- Navigate to the hpe3par_examples/automation_tools/ansible/demo/virtual_domains folder.
cd hpe3par_examples/automation_tools/ansible/demo/virtual_domainsHere we find the virtual_domains_demo_3par_user.yml playbook and the properties/storage_system_properties_bob.yml (This file contains the 3PAR IP address, 3PAR Domain user username/password).
[root@ansible-host virtual_domains]# ls -la
total 12
drwxr-xr-x. 4 root root  137 Sep 26 13:00 .
drwxr-xr-x. 3 root root   29 Sep 26 09:23 ..
drwxr-xr-x. 2 root root  254 Sep 26 13:00 img
drwxr-xr-x. 2 root root  116 Sep 26 09:23 properties
-rw-r--r--. 1 root root 2219 Sep 26 13:00 README.md
-rw-r--r--. 1 root root 2065 Sep 26 09:23 virtual_domains_demo_3par_admin.yml
-rw-r--r--. 1 root root 2065 Sep 26 09:23 virtual_domains_demo_3par_create-domain-users_cli.yml
-rw-r--r--. 1 root root 1847 Sep 26 09:23 virtual_domains_demo_3par_user.yml
Before we go much further, make sure you have configured the properties/storage_system_properties_bob.yml with the appropriate 3PAR array information. Please review Storage System Property Files for more info.
Let's look at the 'virtual_domains_demo_3par_user.yml' playbook.
vi virtual_domains_demo_3par_user.yamlWhen we open the file, we see multiple sections. Again we are assuming that you are familiar with YAML and Ansible playbooks to understand the layout and structure.
---
- name: Virtual Domains on 3PAR Ansible Demo playbook - Bob User
  hosts: localhost

  vars:
    volume_name: 'bob_demo_volume'
    cpg_name: 'bob_cpg_FC_r6'
    host_name: 'scom.virtware.co'
    domain: 'bob_domain'
    vol_size: 10
    vol_size_unit: 'GiB'
    autolun: False
    lunid: 110

  tasks:
    - name: Load Storage System Vars
      include_vars: 'properties/storage_system_properties_bob.yml'

    - name: Load VolumeSet Vars
      include_vars: 'properties/volumeset_properties.yml'

    - name: Create Volume "{{ volume_name }}"
      hpe3par_volume:
        storage_system_ip: "{{ storage_system_ip }}"
        storage_system_username: "{{ storage_system_username }}"
        storage_system_password: "{{ storage_system_password }}"
        state: present
        volume_name: "{{ item }}"
        cpg: "{{ cpg_name }}"
        size: "{{ vol_size }}"
        size_unit: "{{ vol_size_unit }}"
      with_items: "{{ ['volume_bob_1', 'volume_bob_2', 'volume_bob_3'] }}"

    - name: Create volume set "{{ volumeset_name }}"
      hpe3par_volumeset:
        storage_system_ip: "{{ storage_system_ip }}"
        storage_system_username: "{{ storage_system_username }}"
        storage_system_password: "{{ storage_system_password }}"
        state: present
        volumeset_name: "{{ volumeset_name }}"
        setmembers: "{{ add_vol_setmembers }}"

    - name: Create VLUN
      hpe3par_vlun:
        storage_system_ip: "{{ storage_system_ip }}"
        storage_system_username: "{{ storage_system_username }}"
        storage_system_password: "{{ storage_system_password }}"
        state: export_volumeset_to_host
        volume_set_name: "{{ volumeset_name }}"
        host_name: "{{ host_name }}"
        lunid: "{{ lunid }}"
        autolun: "{{ autolun }}"
The sections within the user playbook are very similar to the one used by the admin user. From this playbook, you are able to provision volumes from the CPGs and resources specified by the Storage Admin (100GB limit) and exporting the volumes to hosts. The main difference here is that you are authenticating to the 3PAR with a 3PAR Domain user (bob_user) rather than a 3PAR Super user.
The 3PAR Domain user is specified in the properties/storage_system_properties_bob.yml file. This is covered in the Storage System Property Files section.
Configuring Variables section - User
A quick review on variables. There are several sections where you can specify variables allowing maximum flexibility when creating playbooks. They can be specified at the playbook level (Global), in external file (properties/storage_system_properties.yml), or at the task level.
In the vars section, you can modify the Volume, CPG, 3PAR Host, Volume Size, etc. to meet your needs.
Be aware, if you exceed the 100GB limit on the CPG (as defined by the Storage Admin in our demo), by either creating a volume larger than 100GB or multiple volumes that exceed a cumulative 100GB in size, the playbook fails with an error that the allocation is larger than the limit.
Note: Since we are logged into the bob_domain as the bob_user, we don't have to explicitly define the domain when creating Volumes, Volume Sets, etc. because the domain is inherited from the User's domain.
In the tasks section, for example in the Create Volume task, you can use the with_items option (with_items functions as a loop in Ansible) to create multiple volumes during runtime rather creating multiple tasks to create individual volumes.
Configuring Tasks sections - User
We have 4 main tasks in this example.
These tasks are taken from the main (CPG, Host, Volume, etc) playbooks found in the 3PAR Storage Module here: https://github.com/HewlettPackard/hpe3par_ansible_module/tree/master/playbooks.
Please refer to the Modules README for detailed information on each Module including optional parameters.
- Load Storage System Vars (load the encrypted storage system IP, username/password)
- Load VolumeSet Variables
- Create Volume (create 3 Volumes as defined)
- Create VolumeSet (create a VolumeSet for the 3 Volumes)
- Create VLUN (Export the VolumeSet to the 3PAR Host (i.e. scom.virtware.co)) ---
Running the Playbook - User
Now that we have configured our playbook, we can run it in order to create the Volumes, VolumeSet all within the bob_domain.
We run this playbook with the ansible-playbook --ask-vault-pass option in order to decrypt the storage_system_properties_bob.yml file.
$ ansible-playbook --ask-vault-pass virtual_domains_demo_3par_user.yml
Vault password:

PLAY [Virtual Domains on 3PAR Ansible Demo playbook - Bob User] *************************

TASK [Gathering Facts] ******************************************************************
ok: [localhost]

TASK [Load Storage System Vars] *********************************************************
ok: [localhost]

TASK [Load VolumeSet Vars] **************************************************************
ok: [localhost]

TASK [Create Volume "bob_demo_volume"] **************************************************
ok: [localhost] => (item=volume_bob_1)
ok: [localhost] => (item=volume_bob_2)
ok: [localhost] => (item=volume_bob_3)

TASK [Create volume set "bob_volumeset"]*************************************************
ok: [localhost]

TASK [Create VLUN] **********************************************************************
ok: [localhost]

PLAY RECAP ******************************************************************************
localhost                  : ok=6    changed=0    unreachable=0    failed=0
Success.
This sample playbook demonstrates how a Storage User can quickly and programmatically provision storage and manage those storage resources within their Domain while still being under the control of the Storage Admin.
Now let's verify that these volumes have been exported to the Host.
Log into the SSMC as
bob_userClick on Virtual Volumes. You should see 3 volumes and also see that they are successfully exported to scom.virtware.co

Now let's check scom.virtware.co
You may need to perform a Rescan Disks to see the new volumes.
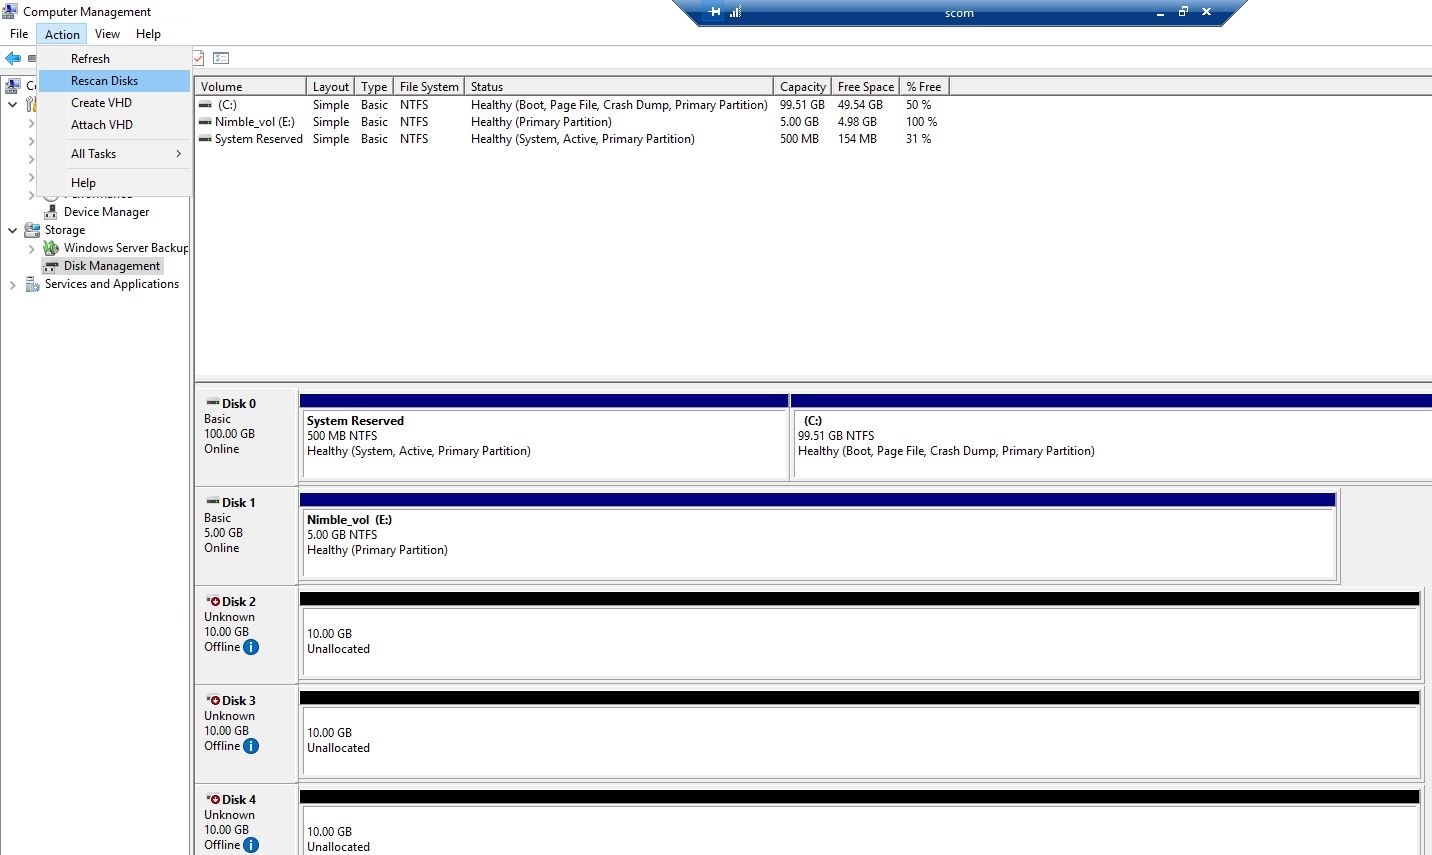
You should be able to see all of the volumes available to the Windows Server.
This concludes this demo. With this information, you will be able to create Multiple Domains, Users, and manage the resources that are available to each. You also will understand how to apply the appropriate controls around CPGs and your domains in order to facilitate multi-tenancy storage domain.
Related
Automating 3PAR provisioning with Chef
Apr 2, 2018
Get started with Prometheus and Grafana on Docker with HPE Storage Array Exporter
Jan 26, 2022
Host-based Volume Encryption with HPE CSI Driver for Kubernetes
Jun 15, 2021Introducing an NFS Server Provisioner for the HPE CSI Driver for Kubernetes
Jun 20, 2020Introducing a multi-vendor CSI driver for Kubernetes
Aug 30, 2019Introducing HPE Storage Container Orchestrator Documentation
Apr 20, 2020Introducing Kubernetes CSI Sidecar Containers from HPE
Aug 25, 2020