
The process of managing and provisioning computer data centers through machine-readable definition files, also known as Infrastructure-as-Code (IaC), offers many significant benefits. It helps to increase operational agility, simplify management, reduce errors, and save cost.
In this post, I will explore options to declare and scale Kubernetes clusters on HPE GreenLake using the HPE GreenLake Terraform Provider.
Prerequisite
Before starting this tutorial, it is recommended that you read the blog post Kubernetes Cluster as Code - Part 1, which includes steps for creating a Kubernetes cluster. This post expands upon that scenario by examining how to scale a cluster.
Verify existing Kubernetes cluster
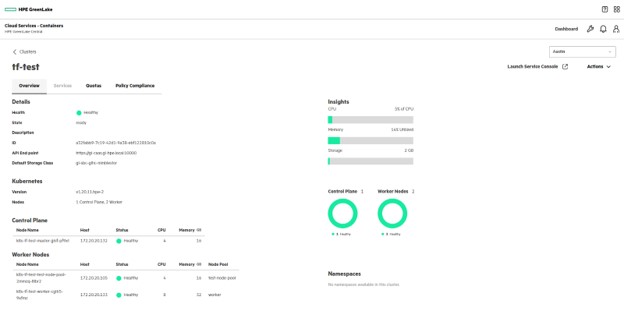
After the cluster is created following the instructions found in the Kubernetes Cluster as Code - Part 1 blog post, launch HPE GreenLake Central console and verify that the cluster is present under the appropriate tenant.
You should see the tf-test cluster present under Dashboard -> Manage your Private Cloud -> Containers.

Below is the reference Terraform configuration file for the existing cluster.
terraform {
  required_providers {
    hpegl = {
      source  = "hpe/hpegl"
      version = ">= 0.2.2"
    }
  }
}

provider hpegl {
  caas {
  }
}

variable "HPEGL_SPACE" {
  type = string
}

data "hpegl_caas_site" "blr" {
  name = "BLR"
  space_id = var.HPEGL_SPACE
 }

data "hpegl_caas_cluster_blueprint" "bp" {
  name = "demo"
  site_id = data.hpegl_caas_site.blr.id
}

resource hpegl_caas_cluster test {
  name         = "tf-test"
  blueprint_id = data.hpegl_caas_cluster_blueprint.bp.id
  site_id      = data.hpegl_caas_site.blr.id
  space_id     = var.HPEGL_SPACE
}
Add worker node to Kubernetes cluster resource
You can scale the cluster by adding a worker node. The following worker-node attributes are specified to add or modify node pools in the declared Kubernetes cluster resource.
- name: Fill in the name that would ideally represent each node pool.
- machine_blueprint_id: Fill in the ID for the machine blueprint that is already present in HPE GreenLake Central for your tenant. Use the machine blueprint data source to retrieve the machine blueprint ID.
- min_size: Add the number of minimum nodes to be present as part of this node pool. The autoscaler will not scale the nodepool below this number.
max_size: Add the number of maximum nodes to be present as part of this node pool. The autoscaler will not scale the nodepool above this number.
Below is the reference Terraform configuration for creating the cluster with additional nodes.
terraform {
  required_providers {
    hpegl = {
      source  = "hpe/hpegl"
      version = ">= 0.2.2"
    }
  }
}

provider hpegl {
  caas {
  }
}

variable "HPEGL_SPACE" {
  type = string
}

data "hpegl_caas_site" "blr" {
  name = "BLR"
  space_id = var.HPEGL_SPACE
 }

data "hpegl_caas_cluster_blueprint" "bp" {
  name = "demo"
  site_id = data.hpegl_caas_site.blr.id
}

data "hpegl_caas_machine_blueprint" "standard_worker" {
  name = "standard-worker"
  site_id = data.hpegl_caas_site.blr.id
}

resource hpegl_caas_cluster test {
  name         = "tf-test"
  blueprint_id = data.hpegl_caas_cluster_blueprint.bp.id
  site_id      = data.hpegl_caas_site.blr.id
  space_id     = var.HPEGL_SPACE

  worker_nodes {
    name = "test-node-pool"
    machine_blueprint_id = data.hpegl_caas_machine_blueprint.standard_worker.id
    min_size = "1"
    max_size = "2"
  }
}
Note: Machine blueprints are used to define the infrastructure details for the worker nodes used in a cluster. A machine blueprint includes the following:
- Machine provider
- Operating system image and version
- Number of vCPU cores and amount of memory in the node
Ready to Terraform plan
Terraform plan is a dry run that lets you preview the changes that Terraform plans to make to your infrastructure based on the data you provide in your Terraform file. To see this, run terraform plan
$ terraform plan

hpegl_caas_cluster.test: Refreshing state... [id=a32fabb9-7c19-42d1-9a38-ebf122810c0a]

Terraform used the selected providers to generate the following execution plan. Resource actions are indicated with the following symbols:
  ~ update in-place

Terraform will perform the following actions:

  # hpegl_caas_cluster.test will be updated in-place
  ~ resource "hpegl_caas_cluster" "test" {
        id                    = "a32fabb9-7c19-42d1-9a38-ebf122810c0a"
        name                  = "tf-test"
        # (17 unchanged attributes hidden)

      + worker_nodes {
          + min_size             = "1"
          + max_size             = "2"
          + machine_blueprint_id = "0ac21c99-2fdb-491d-a590-a5016690b80b"
          + name                 = "test-node-pool"
        }
    }

Plan: 0 to add, 1 to change, 0 to destroy.

──────────────────────────────────────────────────────────────────────────────────────────────────────────────────────────────────────────────────────────────────────────────────────────────────────────

Note: You didn't use the -out option to save this plan, so Terraform can't guarantee to take exactly these actions if you run "terraform apply" now.
Ready to Terraform apply
Terraform apply executes the actions proposed in the Terraform plan and updates the resources. Run the command terraform apply and type yes when asked to Enter a value.
$ terraform apply

hpegl_caas_cluster.test: Refreshing state... [id=a32fabb9-7c19-42d1-9a38-ebf122810c0a]

Terraform used the selected providers to generate the following execution plan. Resource actions are indicated with the following symbols:
  ~ update in-place

Terraform will perform the following actions:

  # hpegl_caas_cluster.test will be updated in-place
  ~ resource "hpegl_caas_cluster" "test" {
        id                    = "a32fabb9-7c19-42d1-9a38-ebf122810c0a"
        name                  = "tf-test"
        # (17 unchanged attributes hidden)

      + worker_nodes {
          + min_size             = "1"
          + max_size             = "2"
          + machine_blueprint_id = "0ac21c99-2fdb-491d-a590-a5016690b80b"
          + name                 = "test-node-pool"
        }
    }

Plan: 0 to add, 1 to change, 0 to destroy.

Do you want to perform these actions?
  Terraform will perform the actions described above.
  Only 'yes' will be accepted to approve.

  Enter a value: yes

hpegl_caas_cluster.test: Modifying... [id=a32fabb9-7c19-42d1-9a38-ebf122810c0a]
hpegl_caas_cluster.test: Still modifying... [id=a32fabb9-7c19-42d1-9a38-ebf122810c0a, 10s elapsed]
hpegl_caas_cluster.test: Still modifying... [id=a32fabb9-7c19-42d1-9a38-ebf122810c0a, 1m10s elapsed]
hpegl_caas_cluster.test: Still modifying... [id=a32fabb9-7c19-42d1-9a38-ebf122810c0a, 3m10s elapsed]
hpegl_caas_cluster.test: Still modifying... [id=a32fabb9-7c19-42d1-9a38-ebf122810c0a, 5m10s elapsed]
hpegl_caas_cluster.test: Still modifying... [id=a32fabb9-7c19-42d1-9a38-ebf122810c0a, 7m10s elapsed]
hpegl_caas_cluster.test: Still modifying... [id=a32fabb9-7c19-42d1-9a38-ebf122810c0a, 9m10s elapsed]
hpegl_caas_cluster.test: Still modifying... [id=a32fabb9-7c19-42d1-9a38-ebf122810c0a, 11m10s elapsed]
hpegl_caas_cluster.test: Still modifying... [id=a32fabb9-7c19-42d1-9a38-ebf122810c0a, 13m10s elapsed]
hpegl_caas_cluster.test: Still modifying... [id=a32fabb9-7c19-42d1-9a38-ebf122810c0a, 15m10s elapsed]
hpegl_caas_cluster.test: Still modifying... [id=a32fabb9-7c19-42d1-9a38-ebf122810c0a, 17m10s elapsed]
hpegl_caas_cluster.test: Still modifying... [id=a32fabb9-7c19-42d1-9a38-ebf122810c0a, 19m10s elapsed]
hpegl_caas_cluster.test: Modifications complete after 19m18s [id=a32fabb9-7c19-42d1-9a38-ebf122810c0a]

Apply complete! Resources: 0 added, 1 changed, 0 destroyed.
From the HPE GreenLake edge-to-cloud platform, launch the HPE GreenLake Central console. Navigate to Dashboard -> Manage your Private Cloud -> Containers and select the tf-test cluster created. You will see additional nodes with Node Pool name as "test-node-pool" being created successfully.
Scale Options with Auto Scaler
Cluster Autoscaler is a tool that automatically adjusts the size of the Kubernetes cluster nodepool within the min_size and max_size value. It increases the size of the cluster when there are pods that failed to schedule due to insufficient resources and decreases the size of the cluster when some nodes are consistently unneeded for a significant amount of time.
The above example is specifically for adding a single worker node pool to an existing cluster. Below are all the possible options available for auto scaling.
- Add worker node pools: You can add multiple node pools by simply declaring corresponding worker_nodes in the same cluster resource.
- Reduce worker node pools: Remove worker_nodes associated with a specific node pool from the cluster resource.
- Scaling up/down worker node: Updating the min_size and max_size field increases(scale up) or decreases(scale down) the number of nodes under each node pool. If both the values are same, auto scaling will be disabled. In any case, min_size cannot be greater than max_size.
- Increase/decrease default worker node count: Every cluster by default has a worker node even if worker_nodes are not declared in the Terraform configuration. This originally comes from what's declared in the cluster blueprint. You can override and update the min_size, max_size and machine blueprint for this default worker by declaring worker_nodes with the default worker node name.
Note: If you remove the default node pool (worker_nodes with the default worker node name) in your configuration file, the default configuration coming from the cluster blueprint shall be retained.
Summary
In this blog, I covered how to scale Kubernetes clusters with Terraform provider for HPE GreenLake. I showed you how to update an existing cluster with additional worker nodes. I also discussed several options available to increase or reduce worker nodes across different node pools for Kubernetes clusters.
I hope you found this information interesting and useful while considering the scale of Kubernetes cluster with HPE GreenLake Terraform provider. Use the following links to understand more about Terraform and HPE GreenLake Terraform Provider.
- Learn more about HPE GreenLake
- Learn more about the HPE GreenLake Terraform provider
Don’t forget, you can always find other tutorials and articles on HPE GreenLake on the HPE Developer blog.
Tags
Related
A guide to enabling a managed Istio service mesh in a Kubernetes cluster on HPE GreenLake for Private Cloud Enterprise
Feb 16, 2023
Using HPE GreenLake Console's API Gateway for Data Services Cloud Console
Nov 30, 2021Automate ITOps: announcing foundational APIs for the HPE GreenLake edge-to-cloud platform
Dec 1, 2023
Bare metal provisioning on HPE GreenLake using Terraform
Mar 20, 2023
Bulk onboarding of users in HPE GreenLake edge-to-cloud platform
Apr 24, 2024
Configuring Azure AD as the SAML IDP with HPE Greenlake Cloud Platform and Aruba Central
Jul 11, 2022How to implement a single sign-on solution to authenticate users onto the HPE GreenLake edge-to-cloud platform
Nov 29, 2023