Hello World! In this tutorial, I will show you how Python can execute queries on the HPE NonStop SQL/MX Database using pyodbc and the NonStop SQL/MX ODBC driver.
This tutorial assumes that NonStop ODBC 3.x Unicode driver has already been installed. Check out the NonStop ODBC/MX Client Drivers User Guide for more information on the driver.
This tutorial also assumes that on your host, NonStop SQL/MX has been installed, MXCS is running, and a MXCS data source has been added and started. Check with your administrator for the IP address, port number etc. (If you’re the administrator check out this manual.)
Let’s get started!
Getting Started
Python and pip
First, download Python, if you have not already done so. You can check to see if your machine already has Python installed by running the command below in the Windows command prompt. It should return Python with its version number, if it has been installed properly.
C:\> python --version
Python 3.9.0
C:\>
Next, install pip (pip is the Python package manager that we will be using). Download get-pip.py on your laptop. Navigate to the folder containing the file and run the following command.
C:\Downloads> python get-pip.py
Once it’s complete, double check to see if pip has been installed by running the following command in Windows.
C:\> py -m pip --version
pip 20.3.1 from C:\Miniconda3\lib\site-packages\pip (python 3.9)
C:\>
Installing pyodbc
pyodbc is an open source Python module that makes it simple to access ODBC databases. It implements the DB API 2.0 specification (the standard interfaces for Python to access a database), but is packed with even more Pythonic convenience. TLDR; it helps you to access the databases that use ODBC drivers.
You can read more about pyodbc on its Github wiki page.
Use pip to install pyodbc.
C:\> pip install pyodbcConfiguring your ODBC
In order for pyodbc to recognize the ODBC driver and data source to use, it will check with the ODBC Data Source Administrator on your Windows machine. Here’s how you can configure a new data source that will use the HPE NonStop SQL/MX ODBC driver.
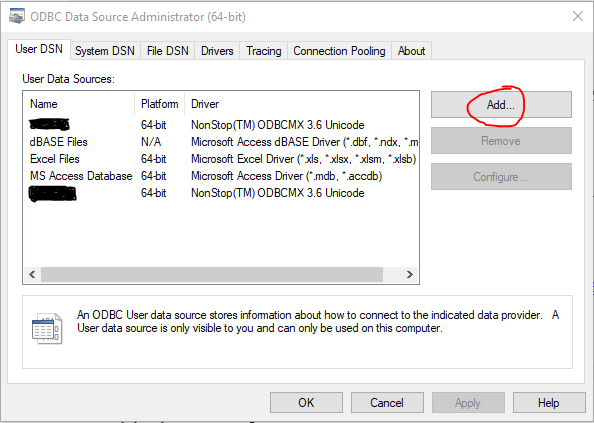
- Search and open the ODBC Data Source Administrator on your machine.
- Select the “Add” button to create a new data source.

ODBC Data Source Administrator
- Select the HPE NonStop™ ODBCMX 3.x Unicode driver, and click “Finish”.
ODBC Data Source Administrator — Create New Data Source
- A new window should pop up. Write a Data Source Name for this data source that you want to connect to. Note: The data source names must match between those defined to MXCS on the database server and the client PCs; otherwise the connection will FAIL.

Data Source Name and Description
- Insert the IP address of the NonStop SQL/MX database, as well as the port number that has been opened up for connections.

IP address and Port number
- Insert the catalog and schema that you want to connect to.

Catalog and Schema
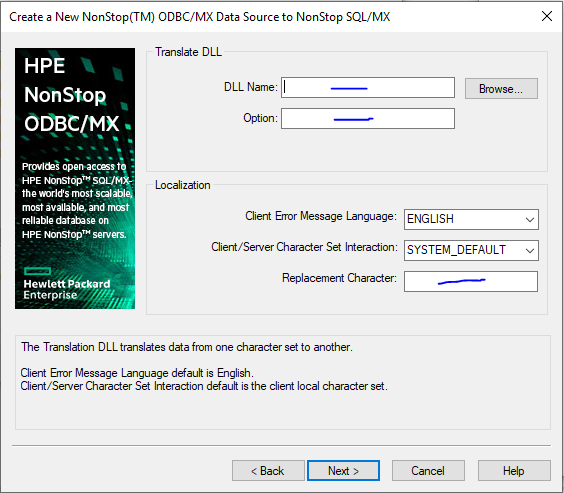
- Leave the “Translate DLL” portion (DLL Name and Option), and the Localization (Replacement Character) blank for now.

Leave blank
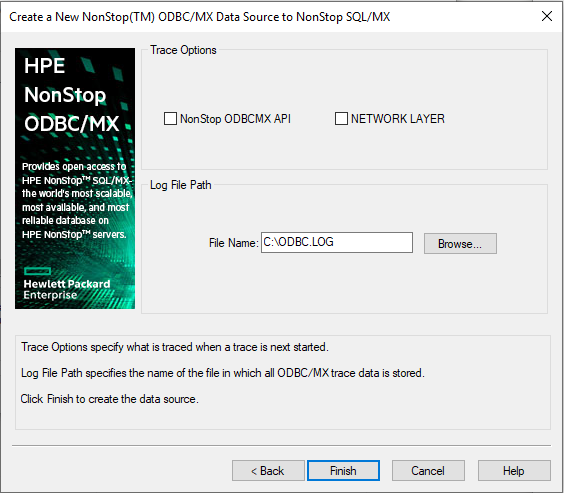
- We will not be doing any tracing in this data source, so leave the settings as the default, and click finish.

Test the connection, and click “OK”. You should see that the data source has been added to the list.
Alright, now it’s time to code!
The code:
The setup
Create a new .py file in any of your favourite text editors — mine is VSCode.
Import the Python package into the script.
Add your Data Source Name, UID (User ID) and Password (PWD) in the fields.
Finally, set the decoding and encoding parameters for the connection. These are database specific. NonStop SQL/MX supports “iso-8859–1”, but this varies with the database you’re using. (We set this up for good measure — so copy/paste the parameters from the code below for NonStop SQL/MX.)
This is what you should have so far.
import pyodbc
conn = pyodbc.connect('DSN=[DATA SOURCE NAME];UID=[USER];PWD=[PASSWORD]')
conn.setdecoding(pyodbc.SQL_CHAR, encoding='iso-8859-1')
conn.setdecoding(pyodbc.SQL_WCHAR, encoding='iso-8859-1')
conn.setencoding(encoding='iso-8859-1')
Now onto executing an SQL query in the database.
Create a cursor variable and execute the SQL statement that you would like to have in your database.
Note that YOU HAVE TO COMMIT THE TRANSACTION if you make an insert or update a table statement in the Python script. You can insert the commit at the end of the set of updates or inserts.
The act of committing the transactions is how we make sure that the set of transactions / executions are properly executed, and data integrity is maintained.
cursor = conn.cursor()
cursor.execute('INSERT INTO CATALOG.SCHEMA.TABLE VALUES (VALUE1, VALUE2)')
# makes sure that insert statement is a committed transaction in NonStop SQL/MX database
conn.commit()
Seeing the result / select statement
You can execute the select statement using the cursor and print the values in the cursor.
# prints table to make sure that data was updated
cursor.execute('SELECT * FROM CATALOG.SCHEMA.TABLE')
for row in cursor:
    print(row)
And there you have it!
The Python script should be able to insert, update, create, and select. Alright, that’s it for now. I hope you’ll have fun coding with the NonStop SQL/MX database using information you learned in this tutorial!
For more interesting posts and tutorials, keep checking back on the HPE DEV blog.
Related
Creating a Python version that enforces FIPS
Feb 15, 2018
Integrating Python 3 with FIPS enabled OpenSSL 3.1 on Microsoft Windows
Apr 23, 2023Managing Multiple Instances of Python in Microsoft Windows
Apr 6, 2021Updating Python and Openssl on OS X
Dec 18, 2017