
In the previous article of this series, I explained how to deploy the backend server of our Workshops-on-Demand infrastructure.
In this article, I will dig into details on the backend server. I will cover the inner workings of the registration process, explaining how a workshop is deployed on the backend server. Even though it takes only a few minutes for the backend server to deploy a workshop, there are many processes taking place in the background, which I will cover here.
As a reminder, here is a diagram showing the different parts of the Workshops-on-Demand infrastructure. In this article, I will once again focus on the backend server side and, more precisely, on the JupyterHub server, where all the automation takes place.
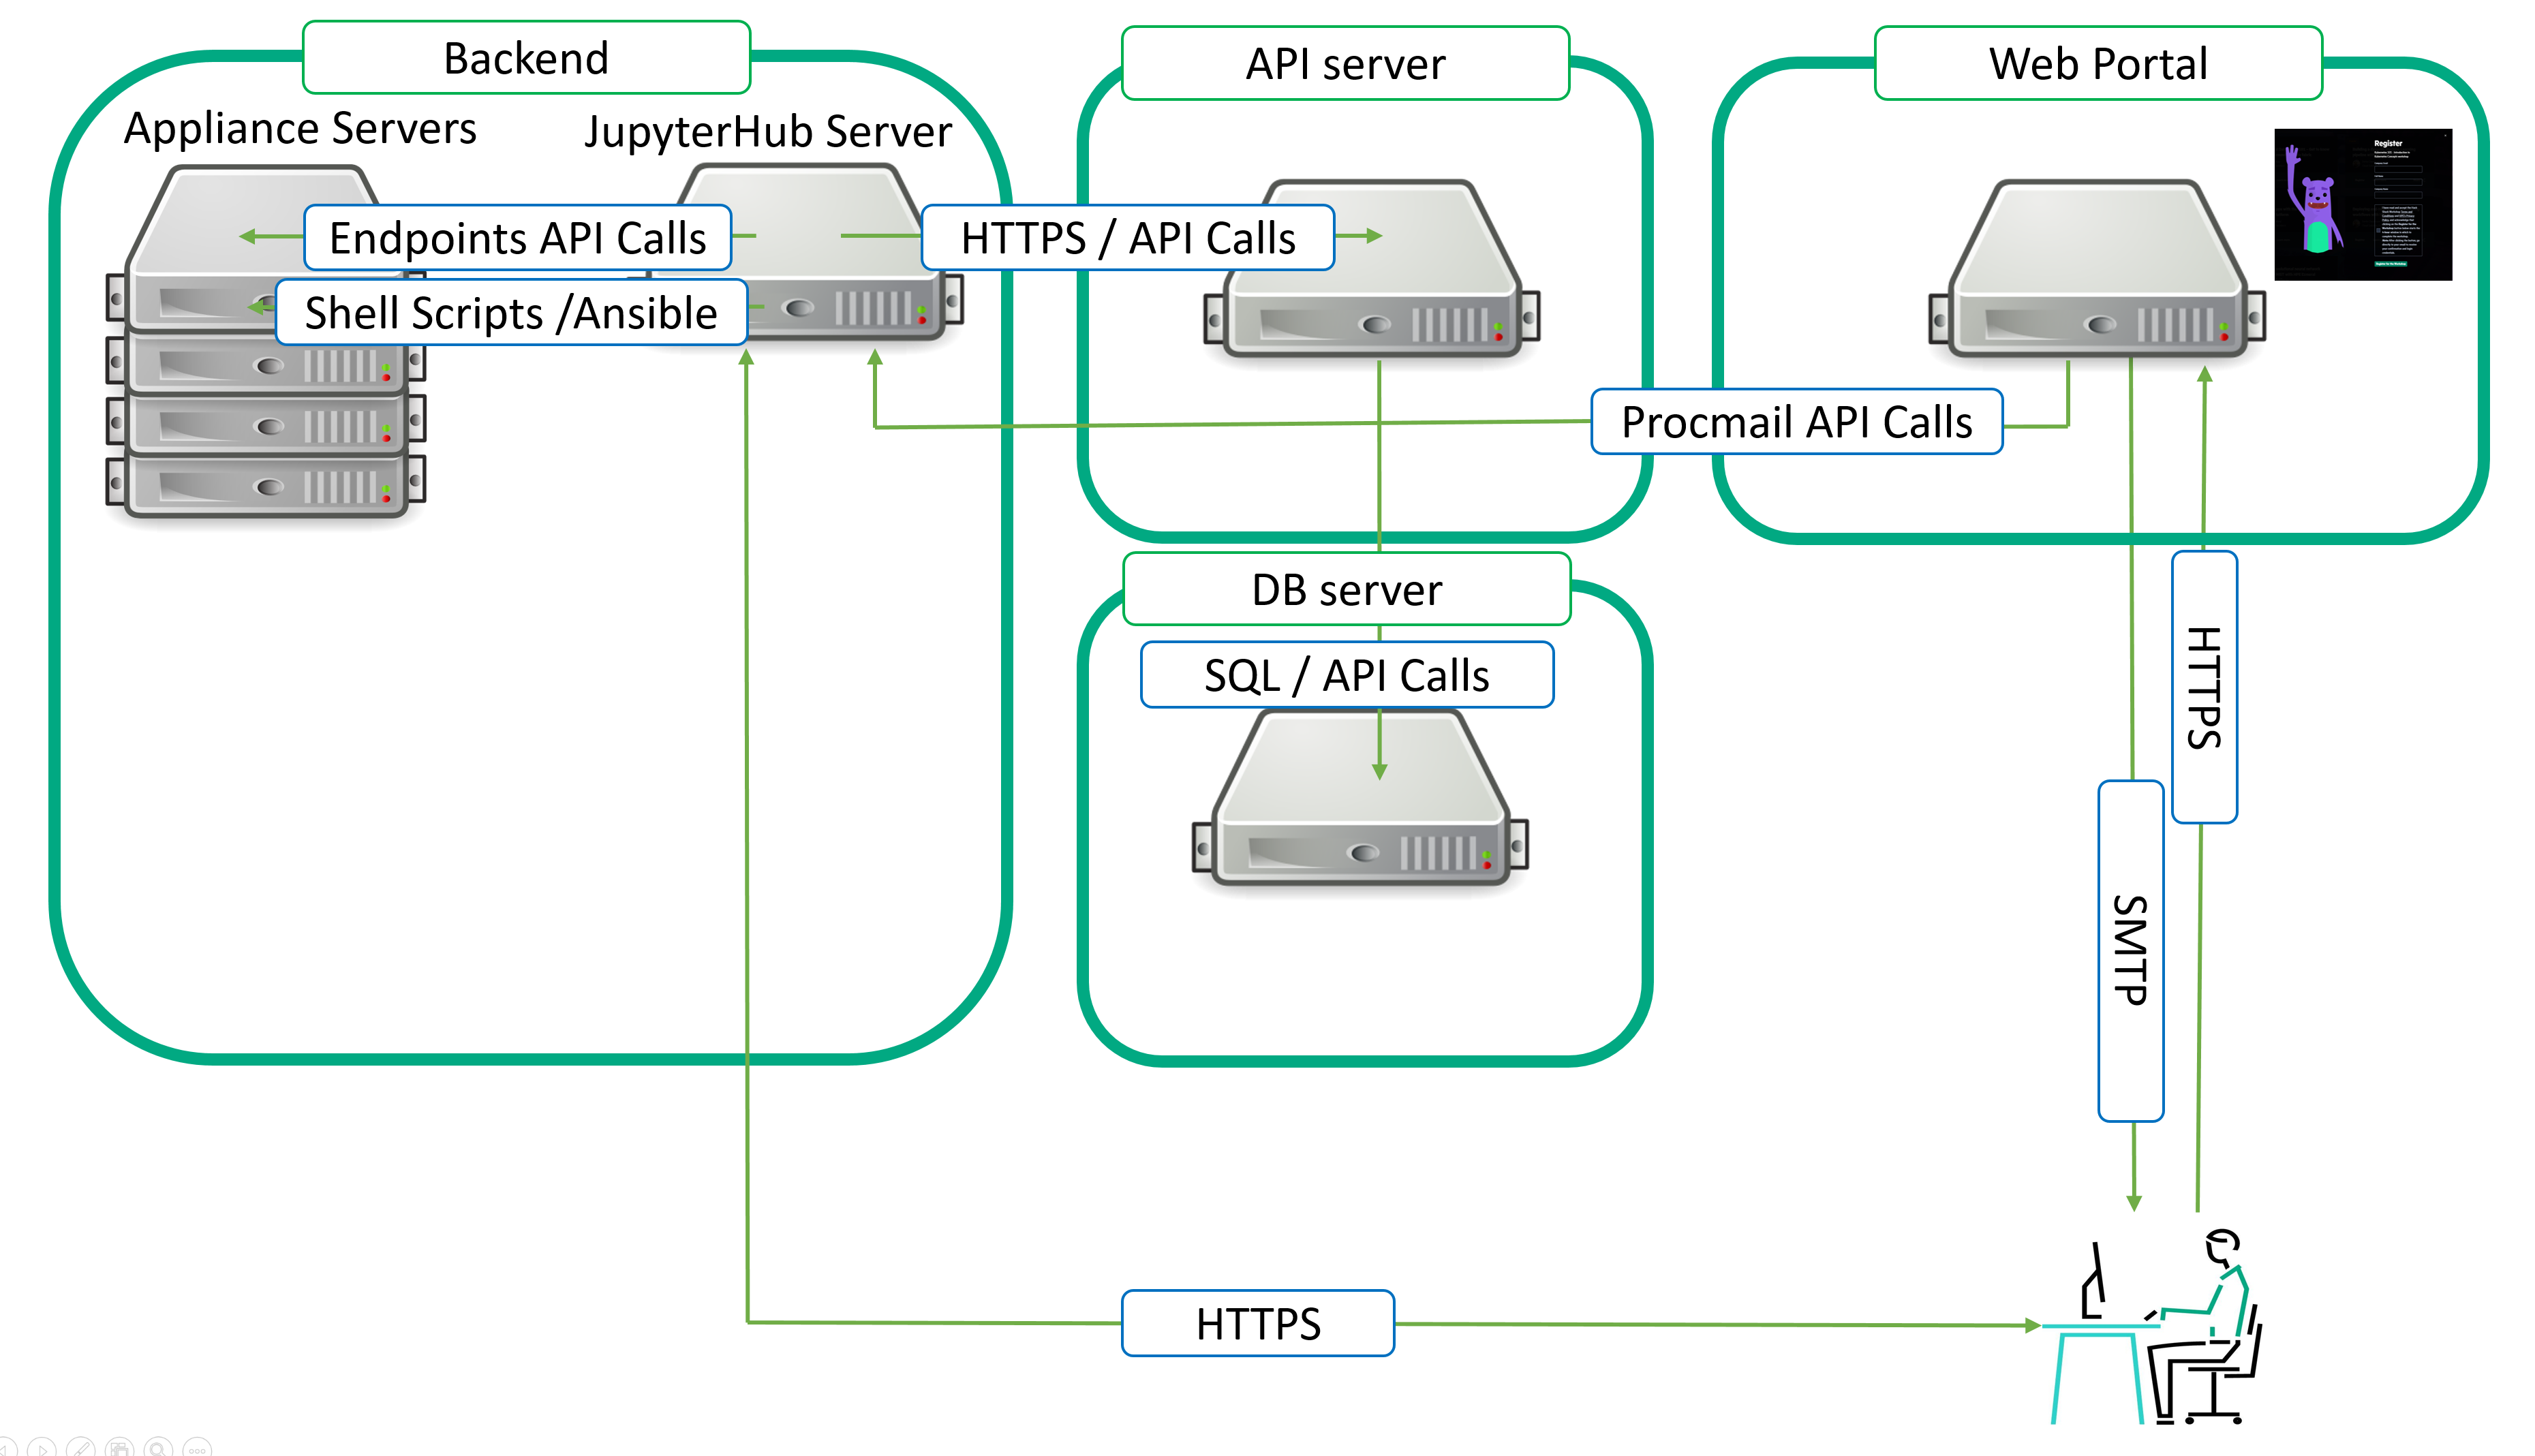
Backend server / workshops deployment lifecycle
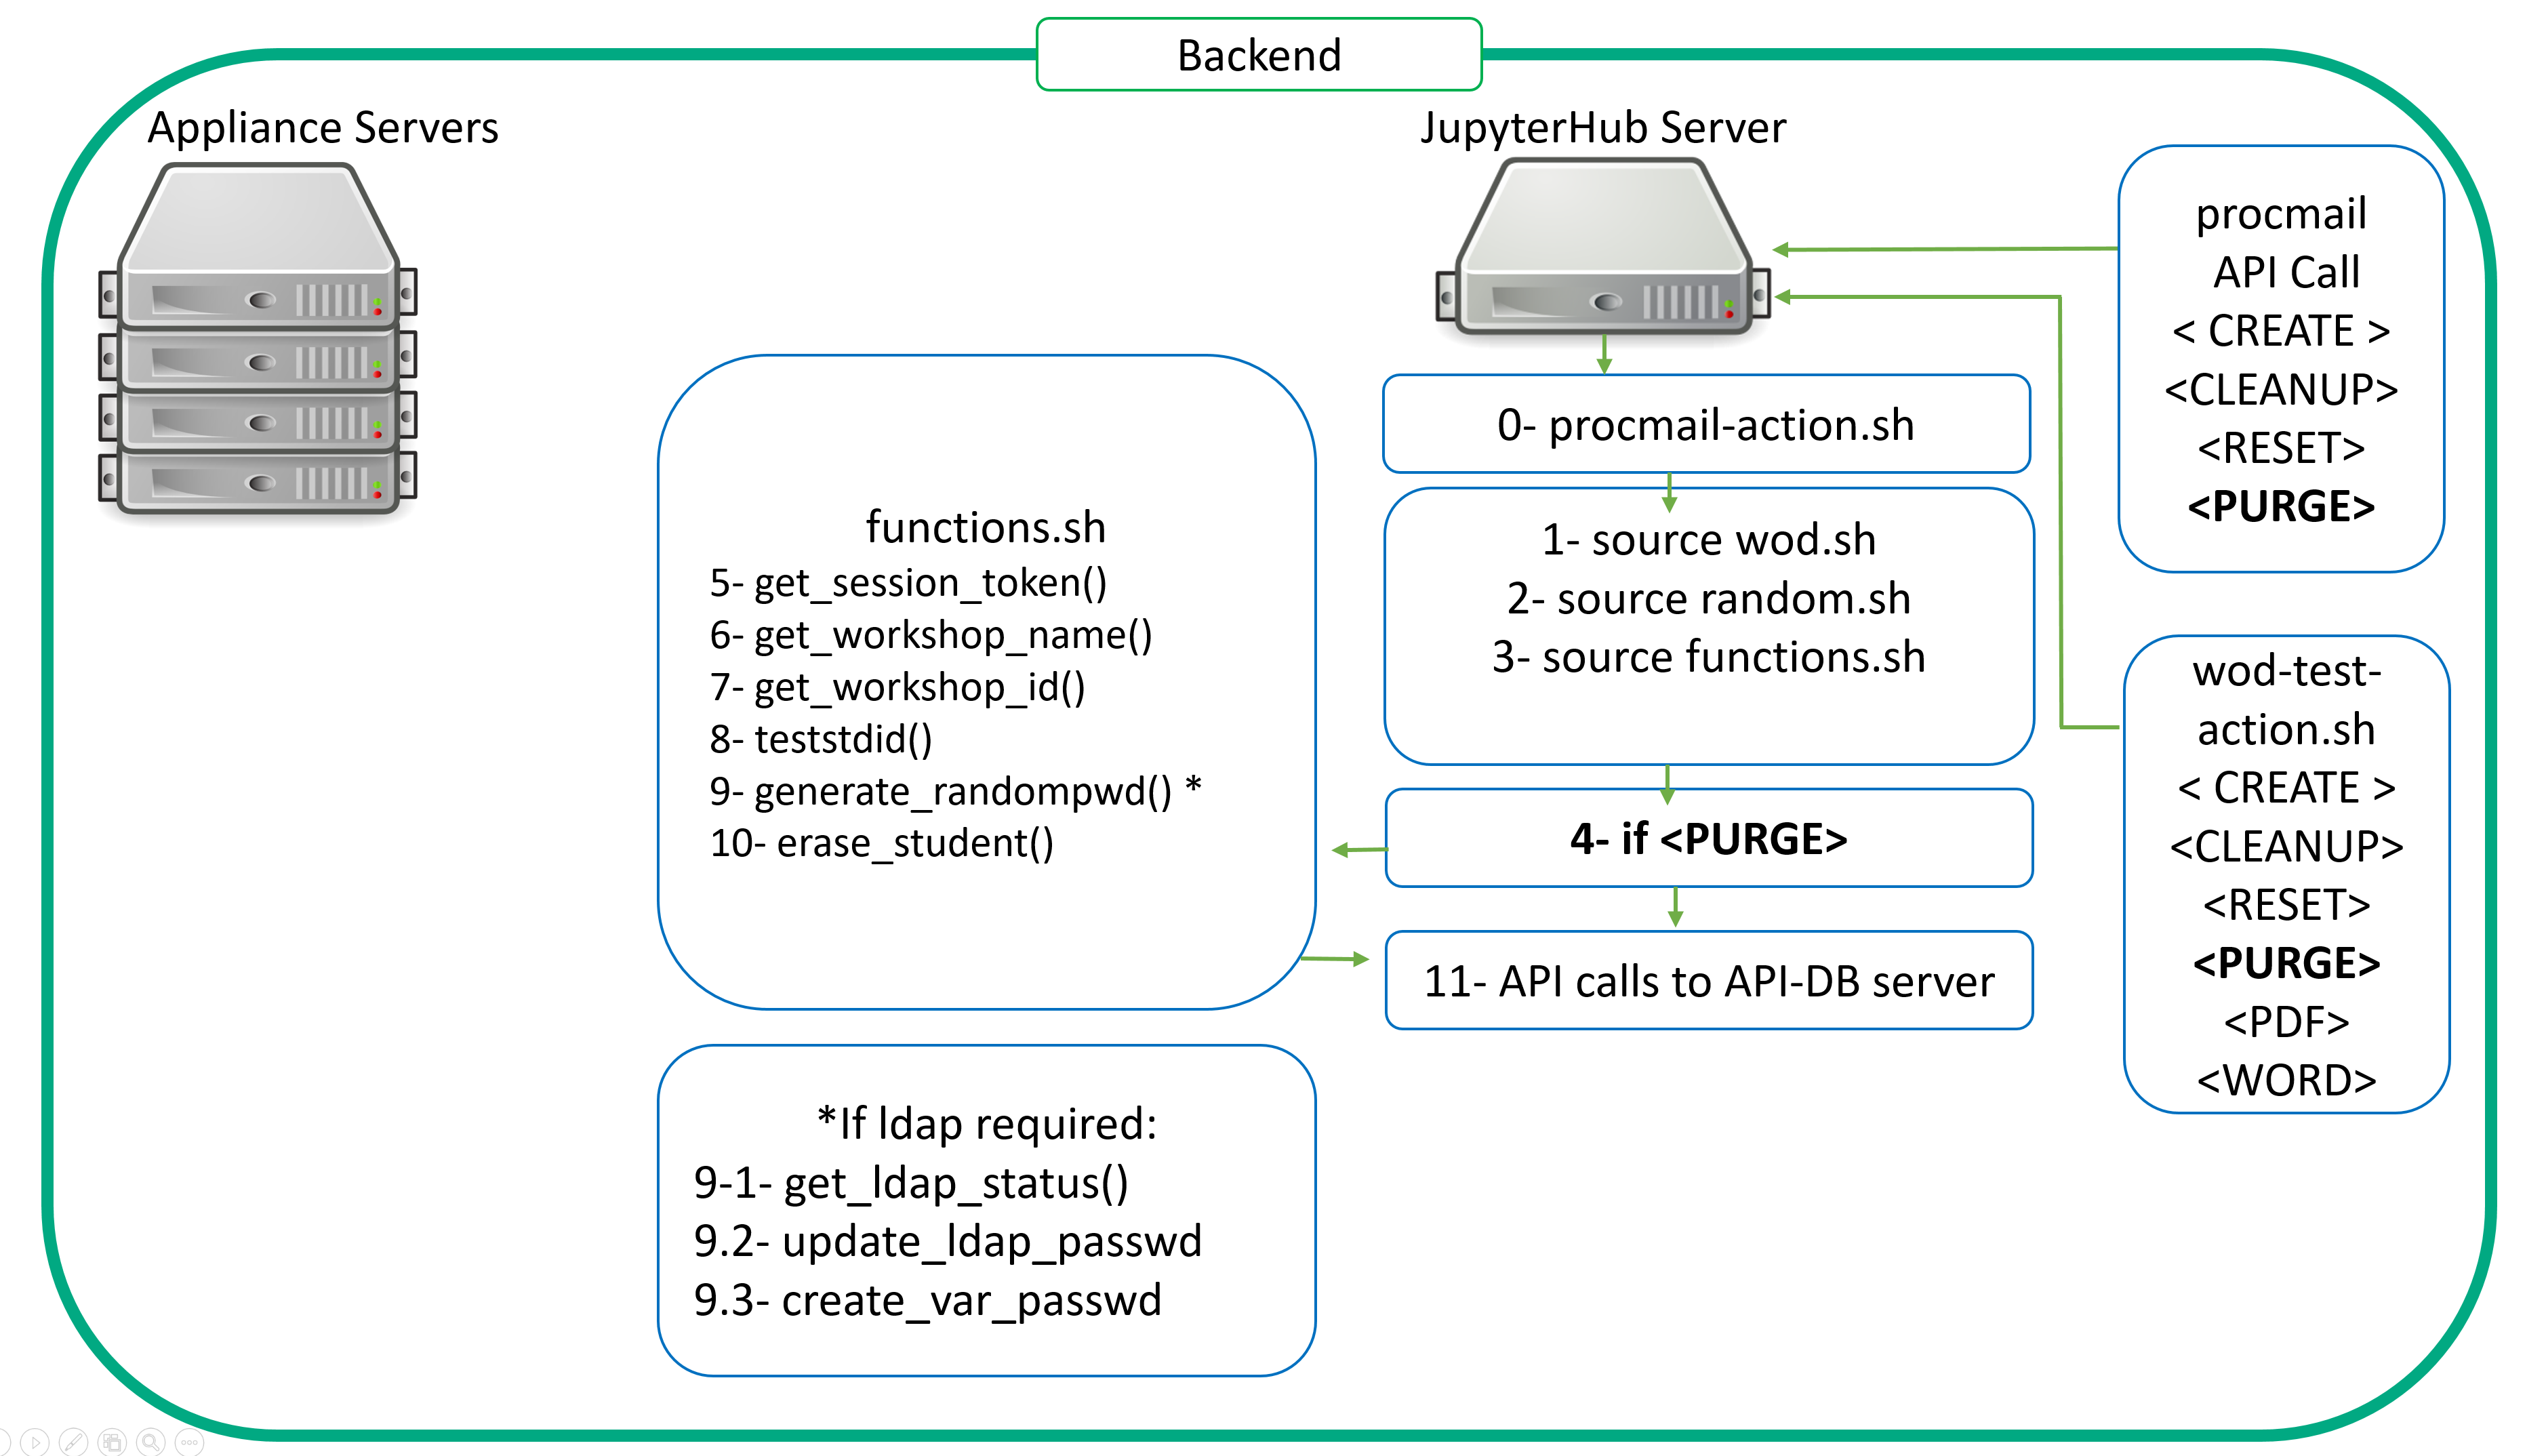
The following picture depicts what happens on the backend server when a participant registers for a workshop. If you remember from the first article, upon registration the frontend sends instructions to the backend server through a procmail API call so the latter can proceed with the workshop preparation and deployment. Once these tasks are completed, it provides the API-DB server with the relevant information
Let's now look in details what is really happening on the backend server's side:
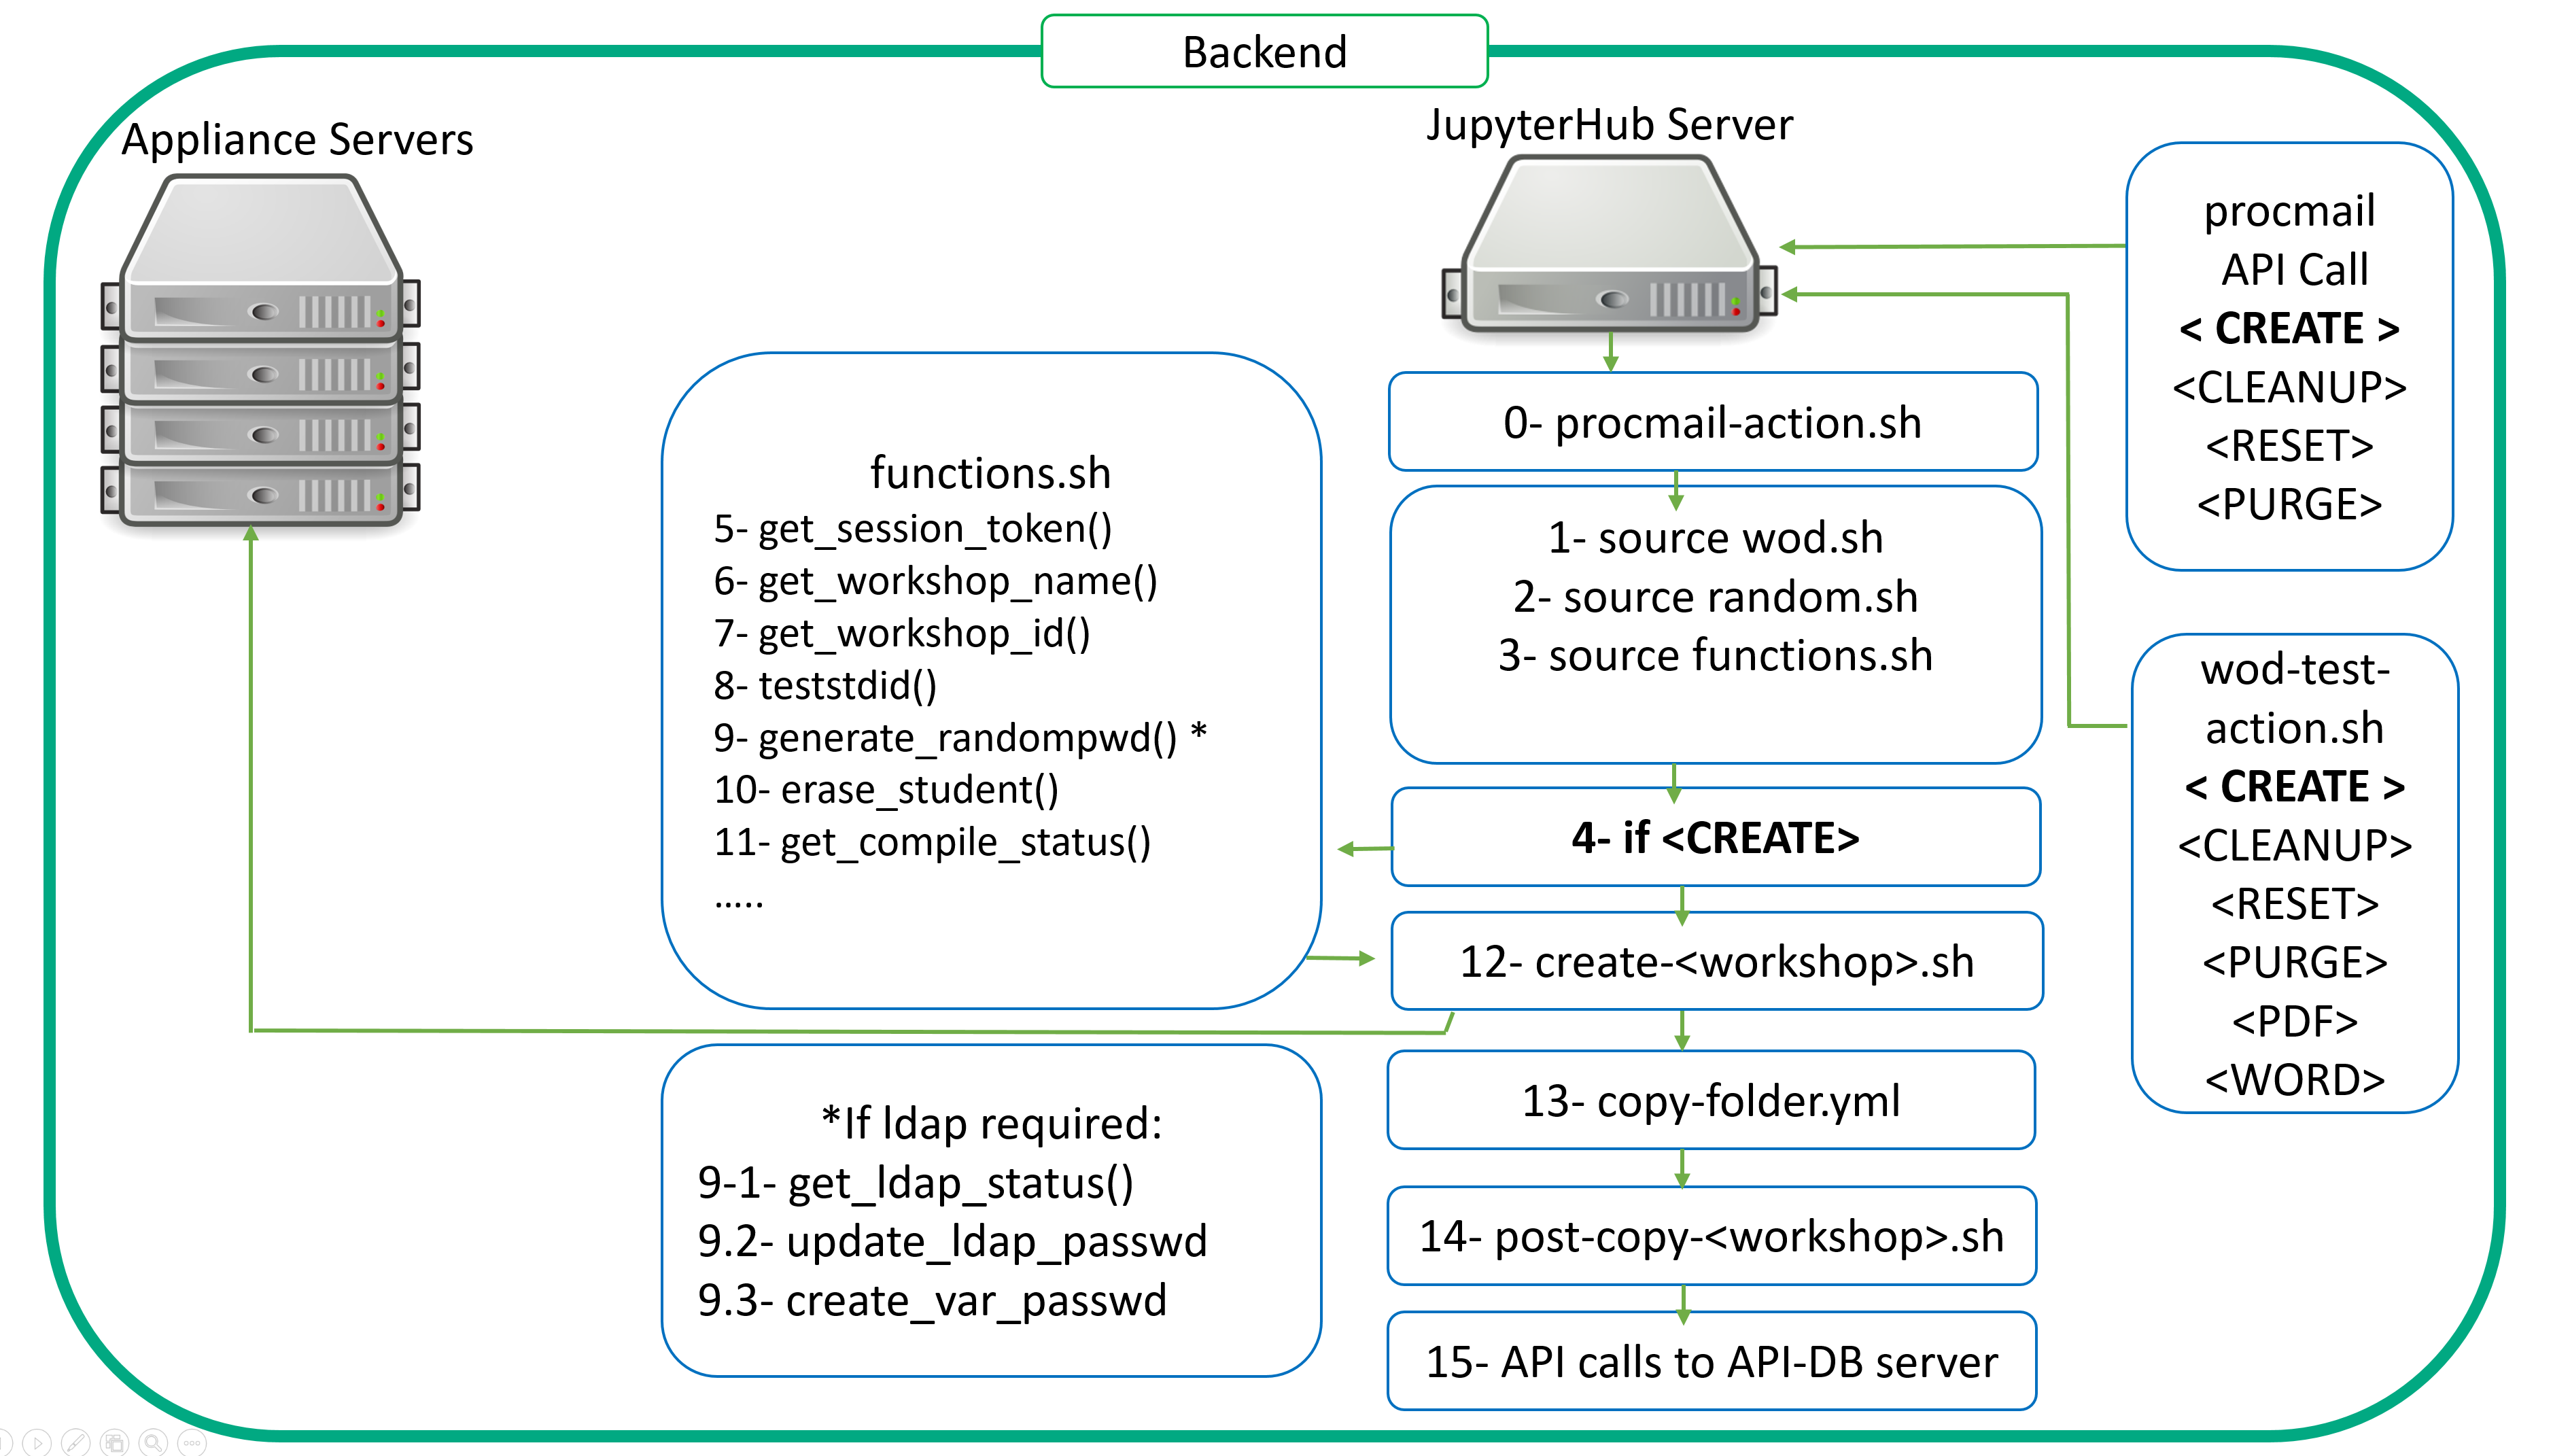
0- The procmail API: This is a mail parsing process allowing the backend server to retrieve the relevant information in order to perform appropriate actions. As with any API, it uses verbs to perform actions. In our case, we leverage CREATE, CLEANUP, RESET and PURGE.
If you need more info on procmail usage, check this page.
Take a look at the following template of the .procmailrc file that will be expanded at setup time.
MAILDIR=$HOME/.mail      # You'd better make sure it exists
DEFAULT=$MAILDIR/mbox
LOGFILE=$MAILDIR/from

:0b
#* ^From.*{{ WODSENDER }}.*
# \/ defines what will be matched in $MATCH
* ^Subject: *CREATE \/[1-9]+.*
| {{ SCRIPTDIR }}/procmail-action.sh CREATE $MATCH

:0b
#* ^From.*{{ WODSENDER }}.*
# \/ defines what will be matched in $MATCH
* ^Subject: *CLEANUP \/[1-9]+.*
| {{ SCRIPTDIR }}/procmail-action.sh CLEANUP $MATCH

:0b
#* ^From.*{{ WODSENDER }}.*
# \/ defines what will be matched in $MATCH
* ^Subject: *RESET \/[1-9]+.*
| {{ SCRIPTDIR }}/procmail-action.sh RESET $MATCH

:0b
#* ^From.*{{ WODSENDER }}.*
# \/ defines what will be matched in $MATCH
* ^Subject: *PURGE student\/[1-9]+.*
| {{ SCRIPTDIR }}/procmail-action.sh PURGE $MATCH
The From: is important as .procmailrc checks that the sender is the configured one from the frontend server. During the install process, the WODSENDER parameter ID referring to this. Any mail from any other sender but the configured one is not processed.
This API is actually based on a script procmail-action.sh. This script defines the different actions linked to the verbs passed through the API calls via .procmailrc
Let's start with a CREATE scenario looking at the very first lines of the procmail log file.
From xyz@hpe.com  Wed Mar  1 15:10:41 2023
Subject: CREATE 401 825 frederic.passeron@hpe.com
Folder: /home/wodadmin/wod-backend/scripts/procmail-action.sh CREATE       14
In Subject:, look for the API verb CREATE followed by student id, participant id and finally the registered participant email.
Here are the values respectively:
- student id: 401
- participant id: 825
- participant email: frederic.passeron@hpe.com
In order to work properly, procmail-action.sh needs to source 3 files:
1- wod.sh
2- random.sh
3- functions.sh
wod.sh sets a large number of variables: This script is generated at install time as it leverages variables defined at setup time.
# This is the wod.sh script, generated at install
#
# Name of the admin user
export WODUSER=wodadmin

# Name of the WoD machine type (backend, api-db, frontend, appliance)
export WODTYPE=backend

# This main dir is computed and is the backend main dir
export WODBEDIR=/home/wodadmin/wod-backend

# BACKEND PART
# The backend dir has some fixed subdirs
# wod-backend (WODBEDIR)
#    |---------- ansible (ANSIBLEDIR)
#    |---------- scripts (SCRIPTDIR defined in all.yml not here to allow overloading)
#    |---------- sys (SYSDIR)
#    |---------- install
#    |---------- conf
#    |---------- skel
#
export ANSIBLEDIR=$WODBEDIR/ansible
export SYSDIR=$WODBEDIR/sys

# PRIVATE PART
# These 3 dirs have fixed names by default that you can change in this file
# they are placed as sister dirs wrt WODBEDIR
# This is the predefined structure for a private repo
# wod-private (WODPRIVDIR)
#    |---------- ansible (ANSIBLEPRIVDIR)
#    |---------- notebooks (WODPRIVNOBO)
#    |---------- scripts (SCRIPTPRIVDIR)
#
PWODBEDIR=`dirname $WODBEDIR`
export WODPRIVDIR=$PWODBEDIR/wod-private
export ANSIBLEPRIVDIR=$WODPRIVDIR/ansible
export SCRIPTPRIVDIR=$WODPRIVDIR/scripts
export SYSPRIVDIR=$WODPRIVDIR/sys
export WODPRIVNOBO=$WODPRIVDIR/notebooks
WODPRIVINV=""
# Manages private inventory if any
if [ -f $WODPRIVDIR/ansible/inventory ]; then
        WODPRIVINV="-i $WODPRIVDIR/ansible/inventory"
        export WODPRIVINV
fi

# AIP-DB PART
export WODAPIDBDIR=$PWODBEDIR/wod-api-db

# FRONTEND PART
export WODFEDIR=$PWODBEDIR/wod-frontend

# These dirs are also fixed by default and can be changed as needed
export WODNOBO=$PWODBEDIR/wod-notebooks
export STUDDIR=/student
#
export ANSPLAYOPT="-e PBKDIR=staging -e WODUSER=wodadmin -e WODBEDIR=/home/wodadmin/wod-backend -e WODNOBO=/home/wodadmin/wod-notebooks -e WODPRIVNOBO=/home/wodadmin/wod-private/notebooks -e WODPRIVDIR=/home/wodadmin/wod-private -e WODAPIDBDIR=/home/wodadmin/wod-api-db -e WODFEDIR=/home/wodadmin/wod-frontend -e STUDDIR=/student -e ANSIBLEDIR=/home/wodadmin/wod-backend/ansible -e ANSIBLEPRIVDIR=/home/wodadmin/wod-private/ansible -e SCRIPTPRIVDIR=/home/wodadmin/wod-private/scripts -e SYSDIR=/home/wodadmin/wod-backend/sys -e SYSPRIVDIR=/home/wodadmin/wod-private/sys"
export ANSPRIVOPT=" -e @/home/wodadmin/wod-private/ansible/group_vars/all.yml -e @/home/wodadmin/wod-private/ansible/group_vars/staging"
random.sh Exports the randomly generated password.
functions.sh Is a library of shell functions used by many scripts, among which can be found procmail-action.sh. Details are shown below.
4- procmail-action.sh Calls the necessary functions and scripts to perform the CREATE operation.
5- get_session_token() This function retrieves the necessary token to make an API call to the api-db server.
6- get_workshop_name() This function extracts the workshop name from the mail body. In the body, one will find the workshop name. For example, WKSHP-API101
7- get_workshop_id() From the workshop name, the function get_workshop_id() will get the workshop's ID from the api-db server.
This ID will be used later to get some of the workshop's specifics through additional API calls to the api-db server.
- Does the workshop require the use of the student password as a variable?
- Does the workshop require LDAP authentication?
- Does the workshop require a compiled script?
8- teststdid() This function checks the student ID provided by procmail API is valid: For each workshop, a dedicated student range is allocated. This function exits when the student ID is not in the correct range.
9- generate_randompwd() This function creates a random password for a user. It is used both for local and LDAP users' passwords. If the workshop requires an LDAP authentication (get_ldap_status() functions will return this information) then another function is used to update the LDAP server with the password for the given student (update_ldap_passwd())
The generated password will be sent back to the api-db server so that the frontend server can then send an email to allow participant to connect to the workshop.
10- erase_student() This function erases all the content from the allocated student's home directory. You want to make sure that the home directory is not compromised. You want to start clean.
11- get_compile_status() This function will check if the workshop needs some scripts to be compiled. For instance, if you need to authenticate against a private cloud portal and you don't want your participants to see the credentials, make sure to check the relevant box in the workshop table of the database. This compile feature will compile the authentication scripts into an executable that cannot be edited.
12- If an appliance is needed for the workshop, then the following script is called: create-<WKSHP>.sh .This will prepare the appliance (deploying a docker image on it for instance) and setup user env on the appliance accordingly (ssh keys, skeletons)
For instance, create-WKSHP-ML101.sh will perform the following tasks in order to prepare the appliance for the workshop: It will start by reseting the appliance with the reset-<WKSHP>.sh script. Then, it calls a second script aiming at preparing a generic appliance create-appliance.sh. Once done with these two, it moves on with the proper customization of the appliance for the given student.
See details below.
#!/bin/bash

set -x

source {{ SCRIPTDIR }}/functions.sh

export RTARGET={{ hostvars[inventory_hostname]['IP-WKSHP-ML101'] }}
# Start by cleaning up stuff - do it early as after we setup .ssh content
{{ SCRIPTDIR }}/reset-$ws.sh
{{ SCRIPTDIR }}/create-appliance.sh

NAME=mllab
TMPDIR=/tmp/$NAME.$stdid


mkdir -p $TMPDIR

# Define local variables
echo wid=$wid
APPMIN=`get_range_min $wid`
echo stdid=$stdid
echo APPMIN=$APPMIN
mlport=$(($stdid-$APPMIN+{{ hostvars[inventory_hostname]['MLPORT-WKSHP-ML101'] }}))
mlport2=$(($stdid-$APPMIN+{{ hostvars[inventory_hostname]['MLPORT2-WKSHP-ML101'] }}))
httpport=$(($stdid-$APPMIN+{{ hostvars[inventory_hostname]['HTTPPORT-WKSHP-ML101'] }}))

cat > $TMPDIR/dockerd-entrypoint.sh << EOF
export HTTPPORT
tini -g -- start-notebook.sh &
sleep 3
jupyter lab list | tail -1 | cut -d'=' -f2 | cut -d' ' -f1 > {{ STUDDIR }}/student$stdid/mltoken
sleep infinity
EOF

cat > $TMPDIR/Dockerfile << EOF
FROM ${NAME}:latest
USER root
COPY dockerd-entrypoint.sh /usr/local/bin/
ENTRYPOINT /usr/local/bin/dockerd-entrypoint.sh
RUN mkdir -p {{ STUDDIR }}/student$stdid
RUN useradd student$stdid -u $stdid -g 100 -d {{ STUDDIR }}/student$stdid
RUN chown student$stdid:users {{ STUDDIR }}/student$stdid
# Unlock the account
RUN perl -pi -e "s|^student$stdid:!:|student$stdid:\$6\$rl1WNGdr\$qHyKDW/prwoj5qQckWh13UH3uE9Sp7w43jPzUI9mEV6Y1gZ3MbDDMUX/1sP7ZRnItnGgBEklmsD8vAKgMszkY.:|" /etc/shadow
# In case we need sudo
#RUN echo "student$stdid   ALL=(ALL)       NOPASSWD: ALL" >> /etc/sudoers
WORKDIR {{ STUDDIR }}/student$stdid
USER student$stdid
ENV NB_USER student$stdid
ENV NB_UID $stdid
ENV HTTPPORT $httpport
RUN git clone https://github.com/snowch/ml-101 {{ STUDDIR }}/student$stdid/
RUN /opt/conda/bin/jupyter-nbconvert --clear-output --inplace {{ STUDDIR }}/student$stdid/*.ipynb
EOF


# Look at https://stackoverflow.com/questions/34264348/docker-inside-docker-container
# and http://jpetazzo.github.io/2015/09/03/do-not-use-docker-in-docker-for-ci/
# For security consider using https://github.com/nestybox/sysbox
cat > $TMPDIR/docker-compose.yml << EOF
version: '3.5'
services:
  $NAME$stdid:
    image: $NAME$stdid
    build: .
    #privileged: true
    ports:
      - "$httpport:8888"
      - "$mlport:4040"
      - "$mlport2:4041"
#    volumes:
#      - /var/run/docker.sock:/var/run/docker.sock
EOF
cat > $TMPDIR/launch-$NAME << EOF
#!/bin/bash
cd $TMPDIR
docker-compose up --build -d
EOF
13- The copy_folder yml playbook is now executed to deploy the notebooks and scripts necessary for the participant to run the workshop. Remember that the participant got a student (with a dedicated student id. For instance: student41) allocated to him/her at the time of the registration. This student id is picked from a range that is allocated for the workshop. The admin decides on the maximum capacity it allocates to a given workshop. copy_folder.yml: This is historically one of very first playbooks we used and therefore a very important one. It performs the necessary actions to deploy and personnalize (by substituting Ansible variables) the selected notebook to the appropriate student home folder
14- In the certain cases, some post deployment actions are needed. For instance, you may want to git clone some repository to leverage some data stored there. This can only occur when done with the deployment. Therefore, a post-copy-<WKSHP.sh is called.
15- Finally, the workshop is now ready to be used by the participant. The backend therefore, needs to inform the frontend of this. To do so, it will perform two API calls:
- The first API call will update the password data for the participant's allocated student.
- The second API call will update the participant's allocated student's status to active.
These changes will trigger the frontend web portal application to send a second email to the participant. This email will contain the necessary information for the participant to connect to its notebooks environment. The participant will then run the workshop. For each workshop, a dedicated time window is allocated. Some workshops will take longer to be run than others. The time windows varies from 2 to 4 hours maximum.The system knows how to set it up so that it will time out. This means that once the participant hits the register button on the frontend web portal, the clock starts ticking.
Some background checks take place on the web portal to verify time spent since the registration to a given workshop. As a consequence, a reminder email is sent an hour before the workshop times out. When the bell rings at the end of the class, a new procmail API call is made to the backend server ordering a CLEANUP action. The participant can also trigger this action by registering to a new workshop before the end of the current one. He/She will have to provide the necessary information to the frontend web portal in order to end the current workshop.
Let's see what is happening on the backend server to perform this CLEANUP scenario.
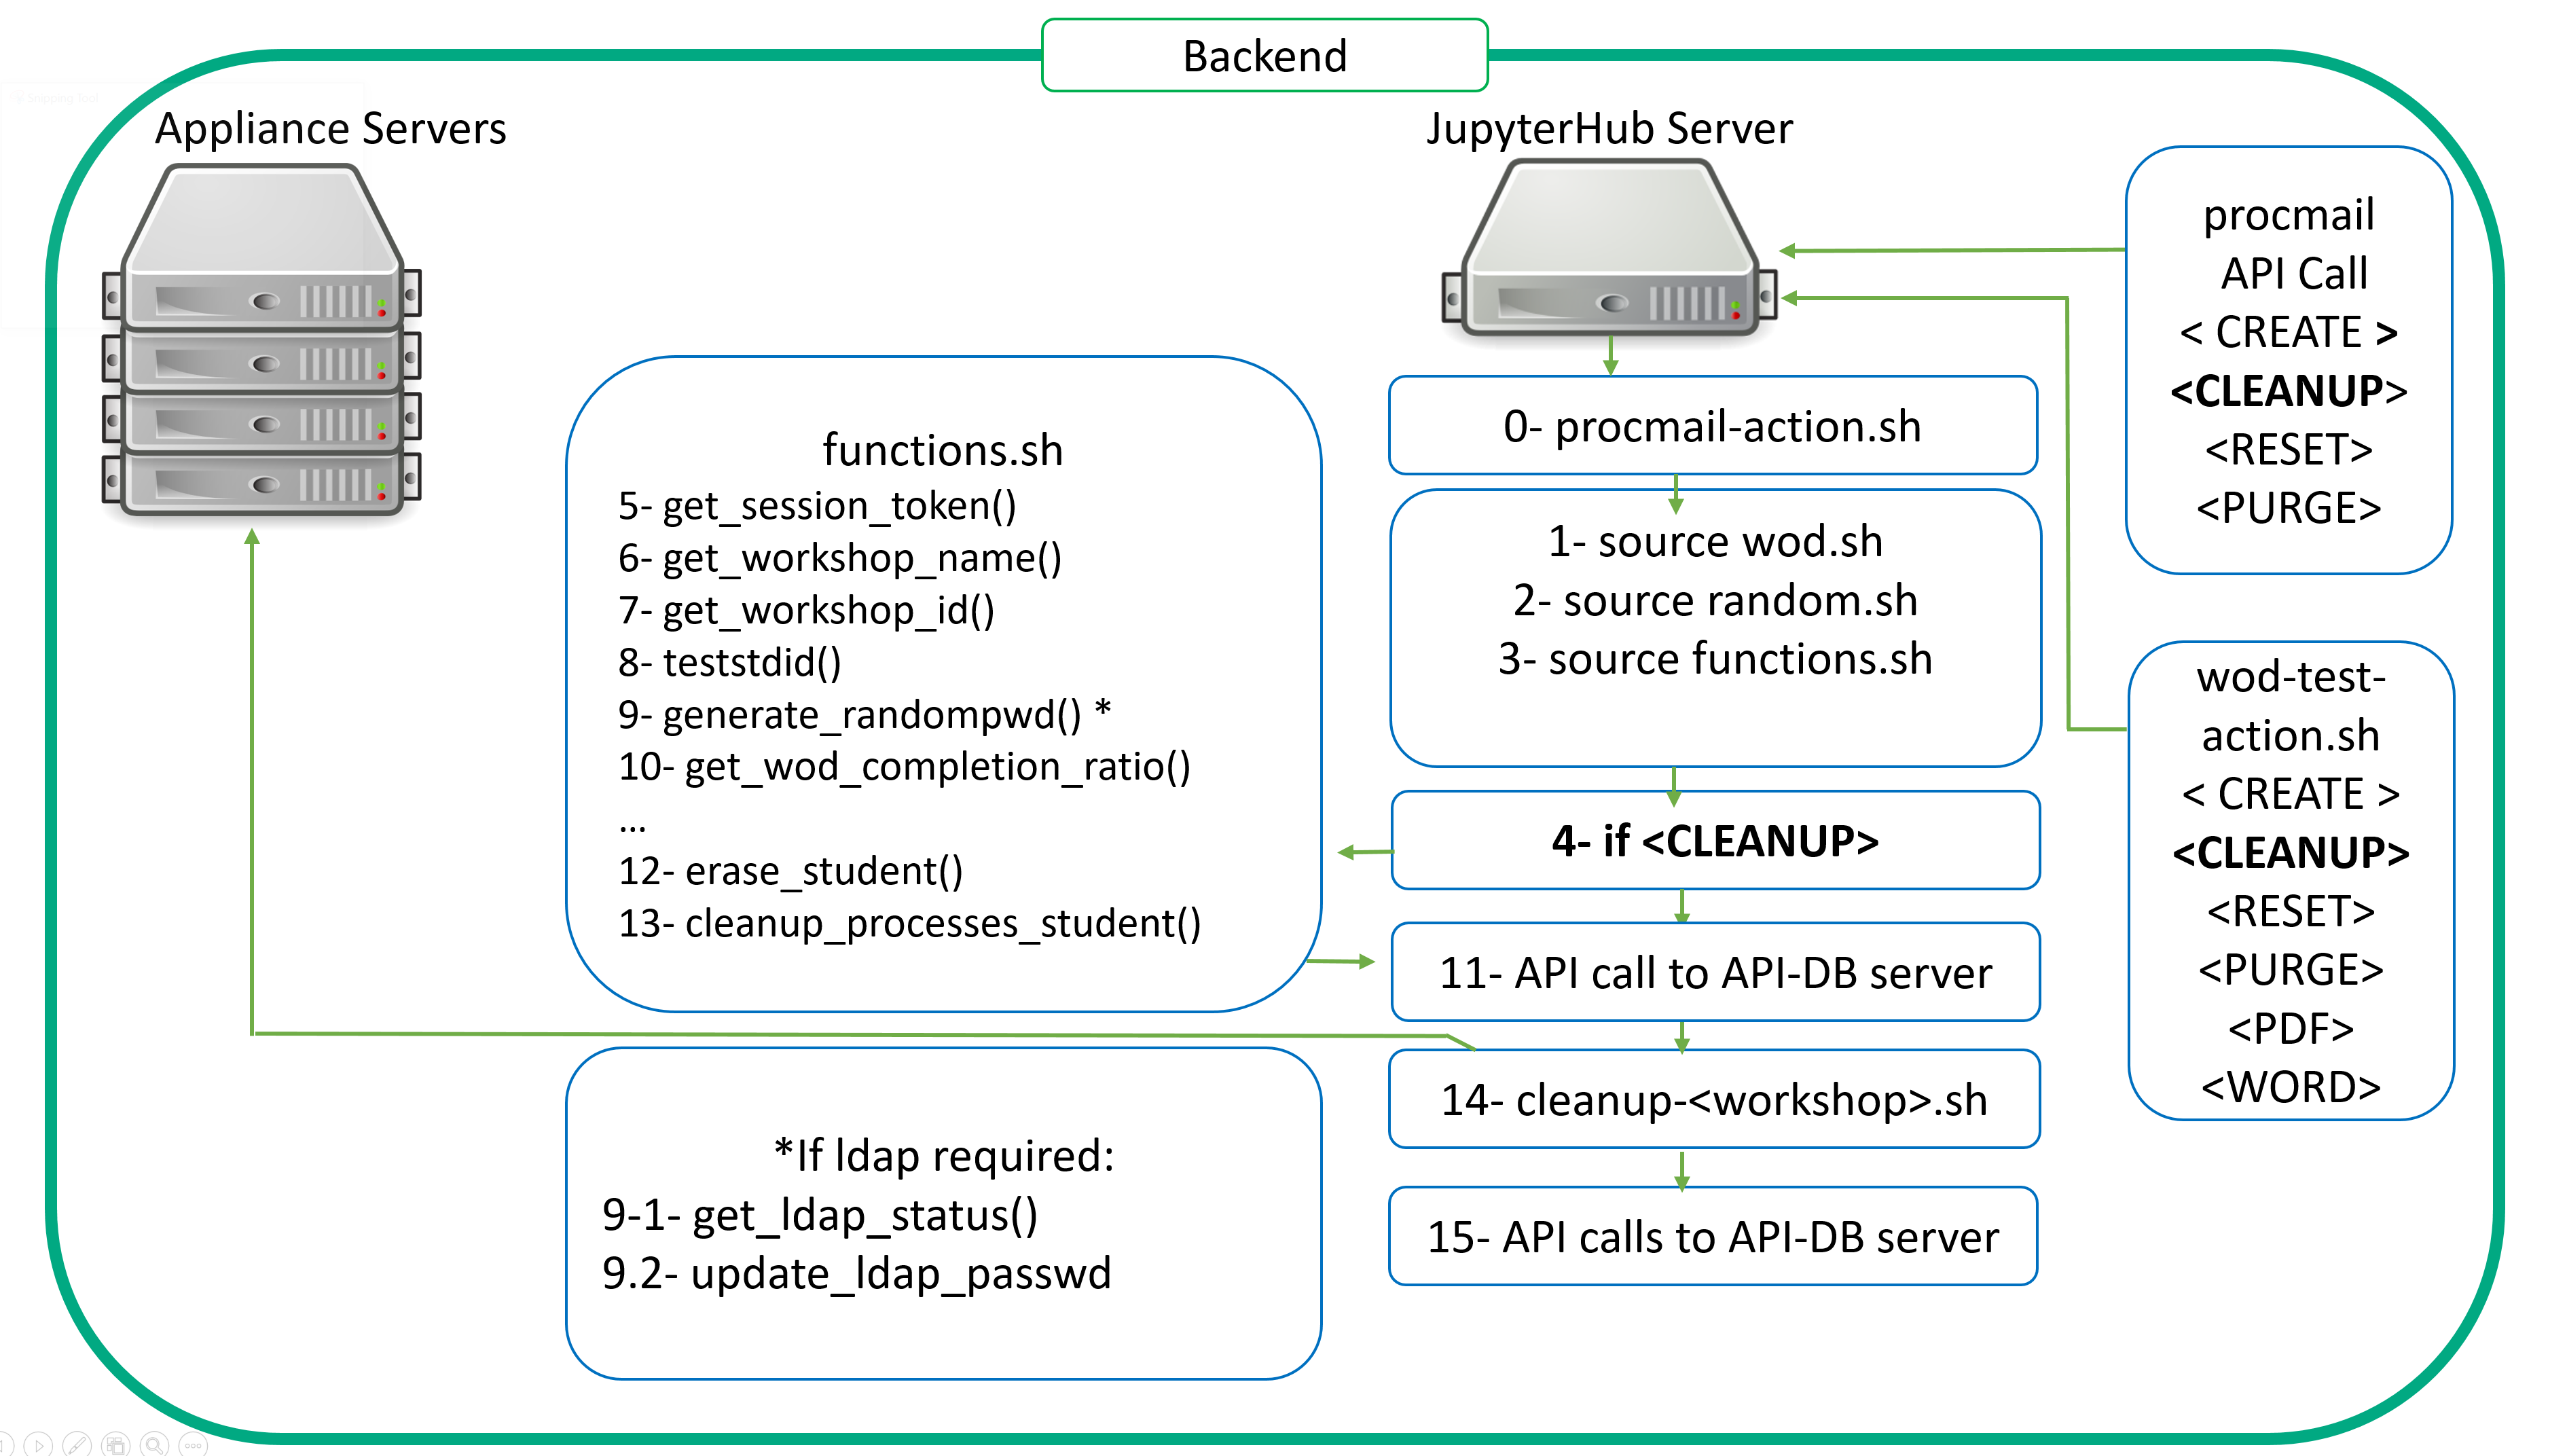
As you can see, it does not differ much from the CREATE. We still need to gather data to interact with the proper workshop from the right student. The .procmail.rc is providing us with this information. Then, the automation kicks in through the procmail-action-sh script.
The verb is now CLEANUP. As a consequence, step 4 is now CLEANUP.
Nothing changes from 5 to 9.
10- get_wod_completion_ratio() Allows us to retrieve information through a simple computing of the numbers of notebooks cells executed thoughout the different exercices of the workshop a ratio. This enables us to see how much of the workshop is actually run. Participants are asked to fill out a form in a conclusion notebook which is present in every student's workshop's folder.
This completion ratio script provides us this data and we store it in our database.
11- API call to send the completion ratio figure to the database. This can be later queried to build up a nice reporting dashboard as explained here by my colleague Didier Lalli, in the following article.
12- erase-student(): Now that we have extracted the necessary data from the student's notebooks, we can perform a cleanup of the student folder.
13- cleanup_processes_student(): On top of cleaning up the student folder, we also kill all the allocated student's processes.
14- cleanup-<workshop>.sh: If any appliance is involved, this task will perform the necessary cleanup processes on the appliance.
15- Finally, just like for the creation of a workshop process, we need to tell the frontend that the cleanup is now done. Therefore, several API calls are made to update tables in the database. The new student password is recorded. We also generate a new password at the cleanup phase to prevent unregistered logins. The student status is set to inactive. The capacity figure is incremented by one to make the seat available again.
As for the CREATE phase, the regular checks occuring on the frontent web portal will get these data and trigger the final email to the participant thanking him for his particpation.
Now let's look at the RESET scenario.
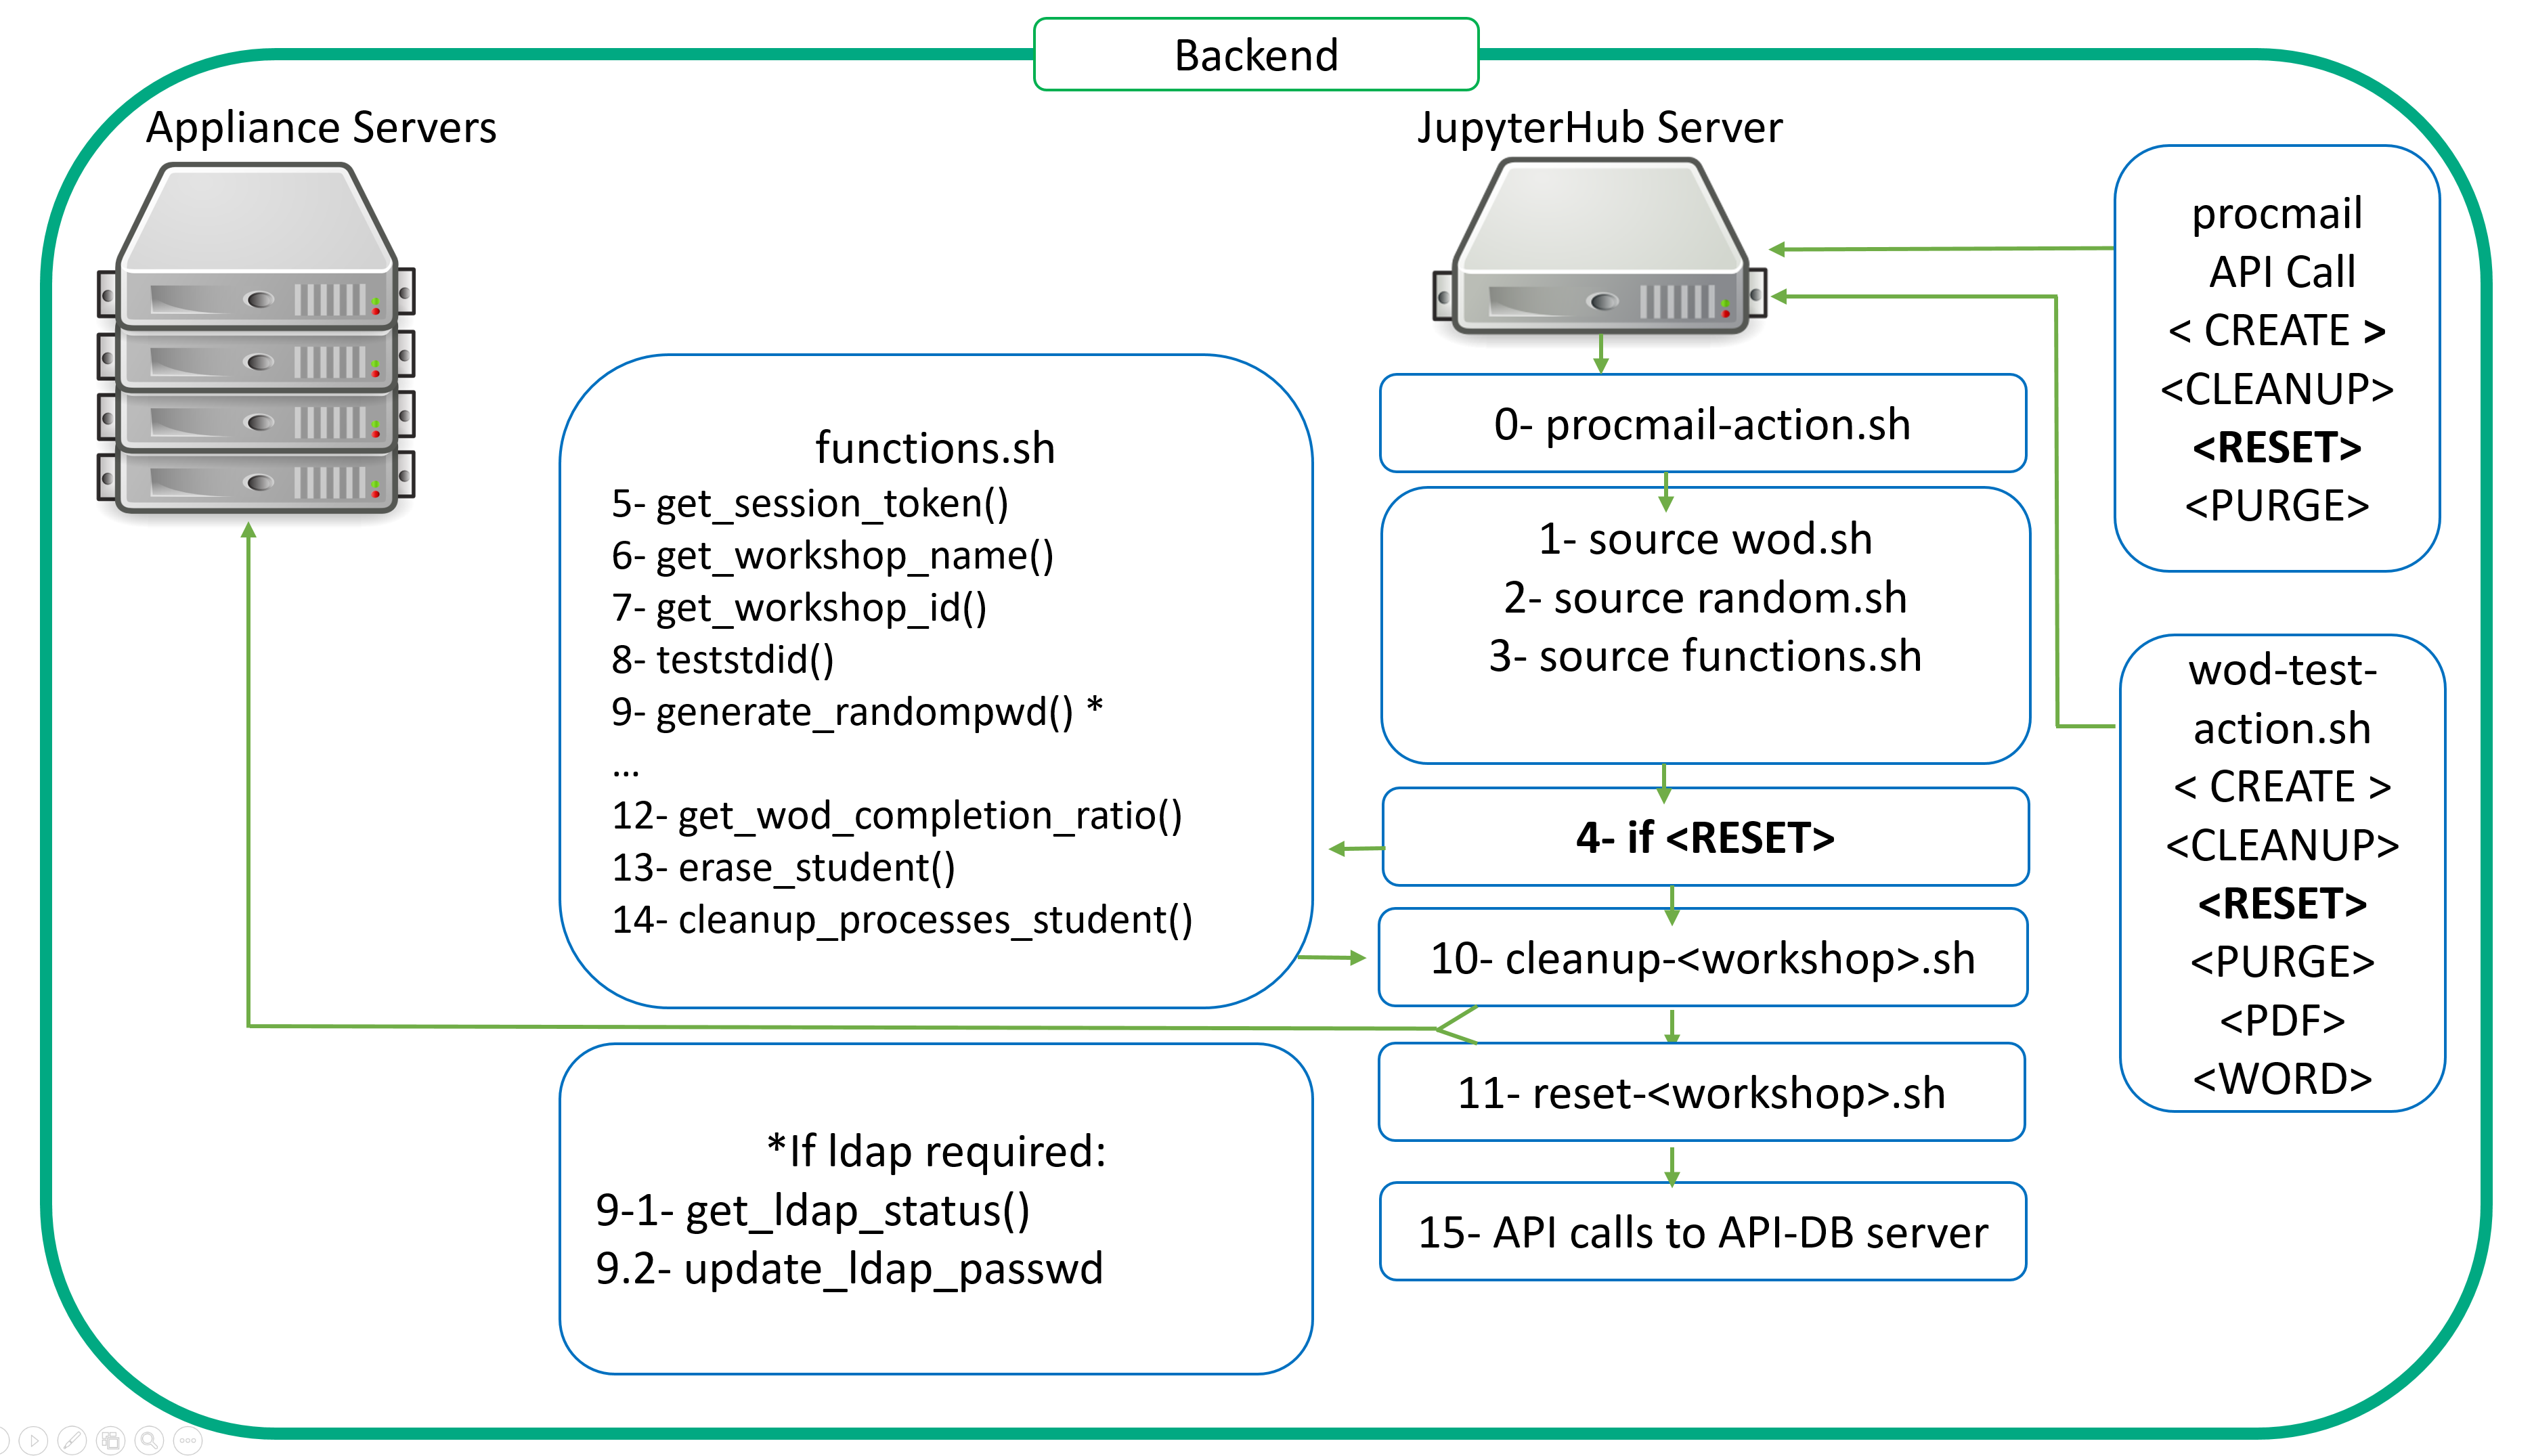
You may wonder about the differences between CLEANUP and RESET. CLEANUP only takes care of students whereas RESET takes care of a larger scope. Let me explain...CLEANUP only takes care of student whereas RESET takes care of a larger scope.
When a CLEANUP occurs, it deals with the participant's student workshop and home directory (the workshop directory belonging to the home directory). It cleans up workshop content, ssh keys, skeletons. The RESET will delete leftovers from the workshop's exercices. For instance, when one runs the Kubernetes 101 workshop, he is creating microservices, he's scaling them, and should at the end of the workshop run some kubectl delete commands to clean up everything. However, some participants may forget to run these clean up steps. And the admin needs to make sure that the next participant who will be assigned the same student environment gets a fresh one. Therefore, some measures have to be taken. These measures take place when a reset flag is associated to the workshop in the database.
During the CLEANUP phase, a check is actually performed to test the presence of this flag through a simple API call on the frontend API-DB server. If the workshop has a reset flag then a dedicated reset-WKSHP.sh script is called and performs the necessary tasks. In the case of Kubernetes 101, it will wipe out any leftovers from the student. In some other cases, it will launch a revert to snapshot script on a virtual machine.
Finally, let's consider the PURGE scenario.
In a perfect world, we would have covered here what one would somehow expect from any kind of API (GET, PUT, DELETE = CREATE, CLEANUP and RESET). But, this is unfortunately not the case. Even though we did our best to harden the deployment automation, failures might occur. Issues could occur at many different levels. From a backhoe loader cutting an internet line on the very morning of a starting event (preventing you from accessing your remote labs) to unplanned power cuts, or misconfigured power redundancy in pdus assignment, there are many examples possible of human factor related issues. As a result, the Jupyterhub server or an appliance might become unreachable, and the automation of the workshop's deployment might fail.
In these very cases, you need to be able to cleanup the mess quickly.
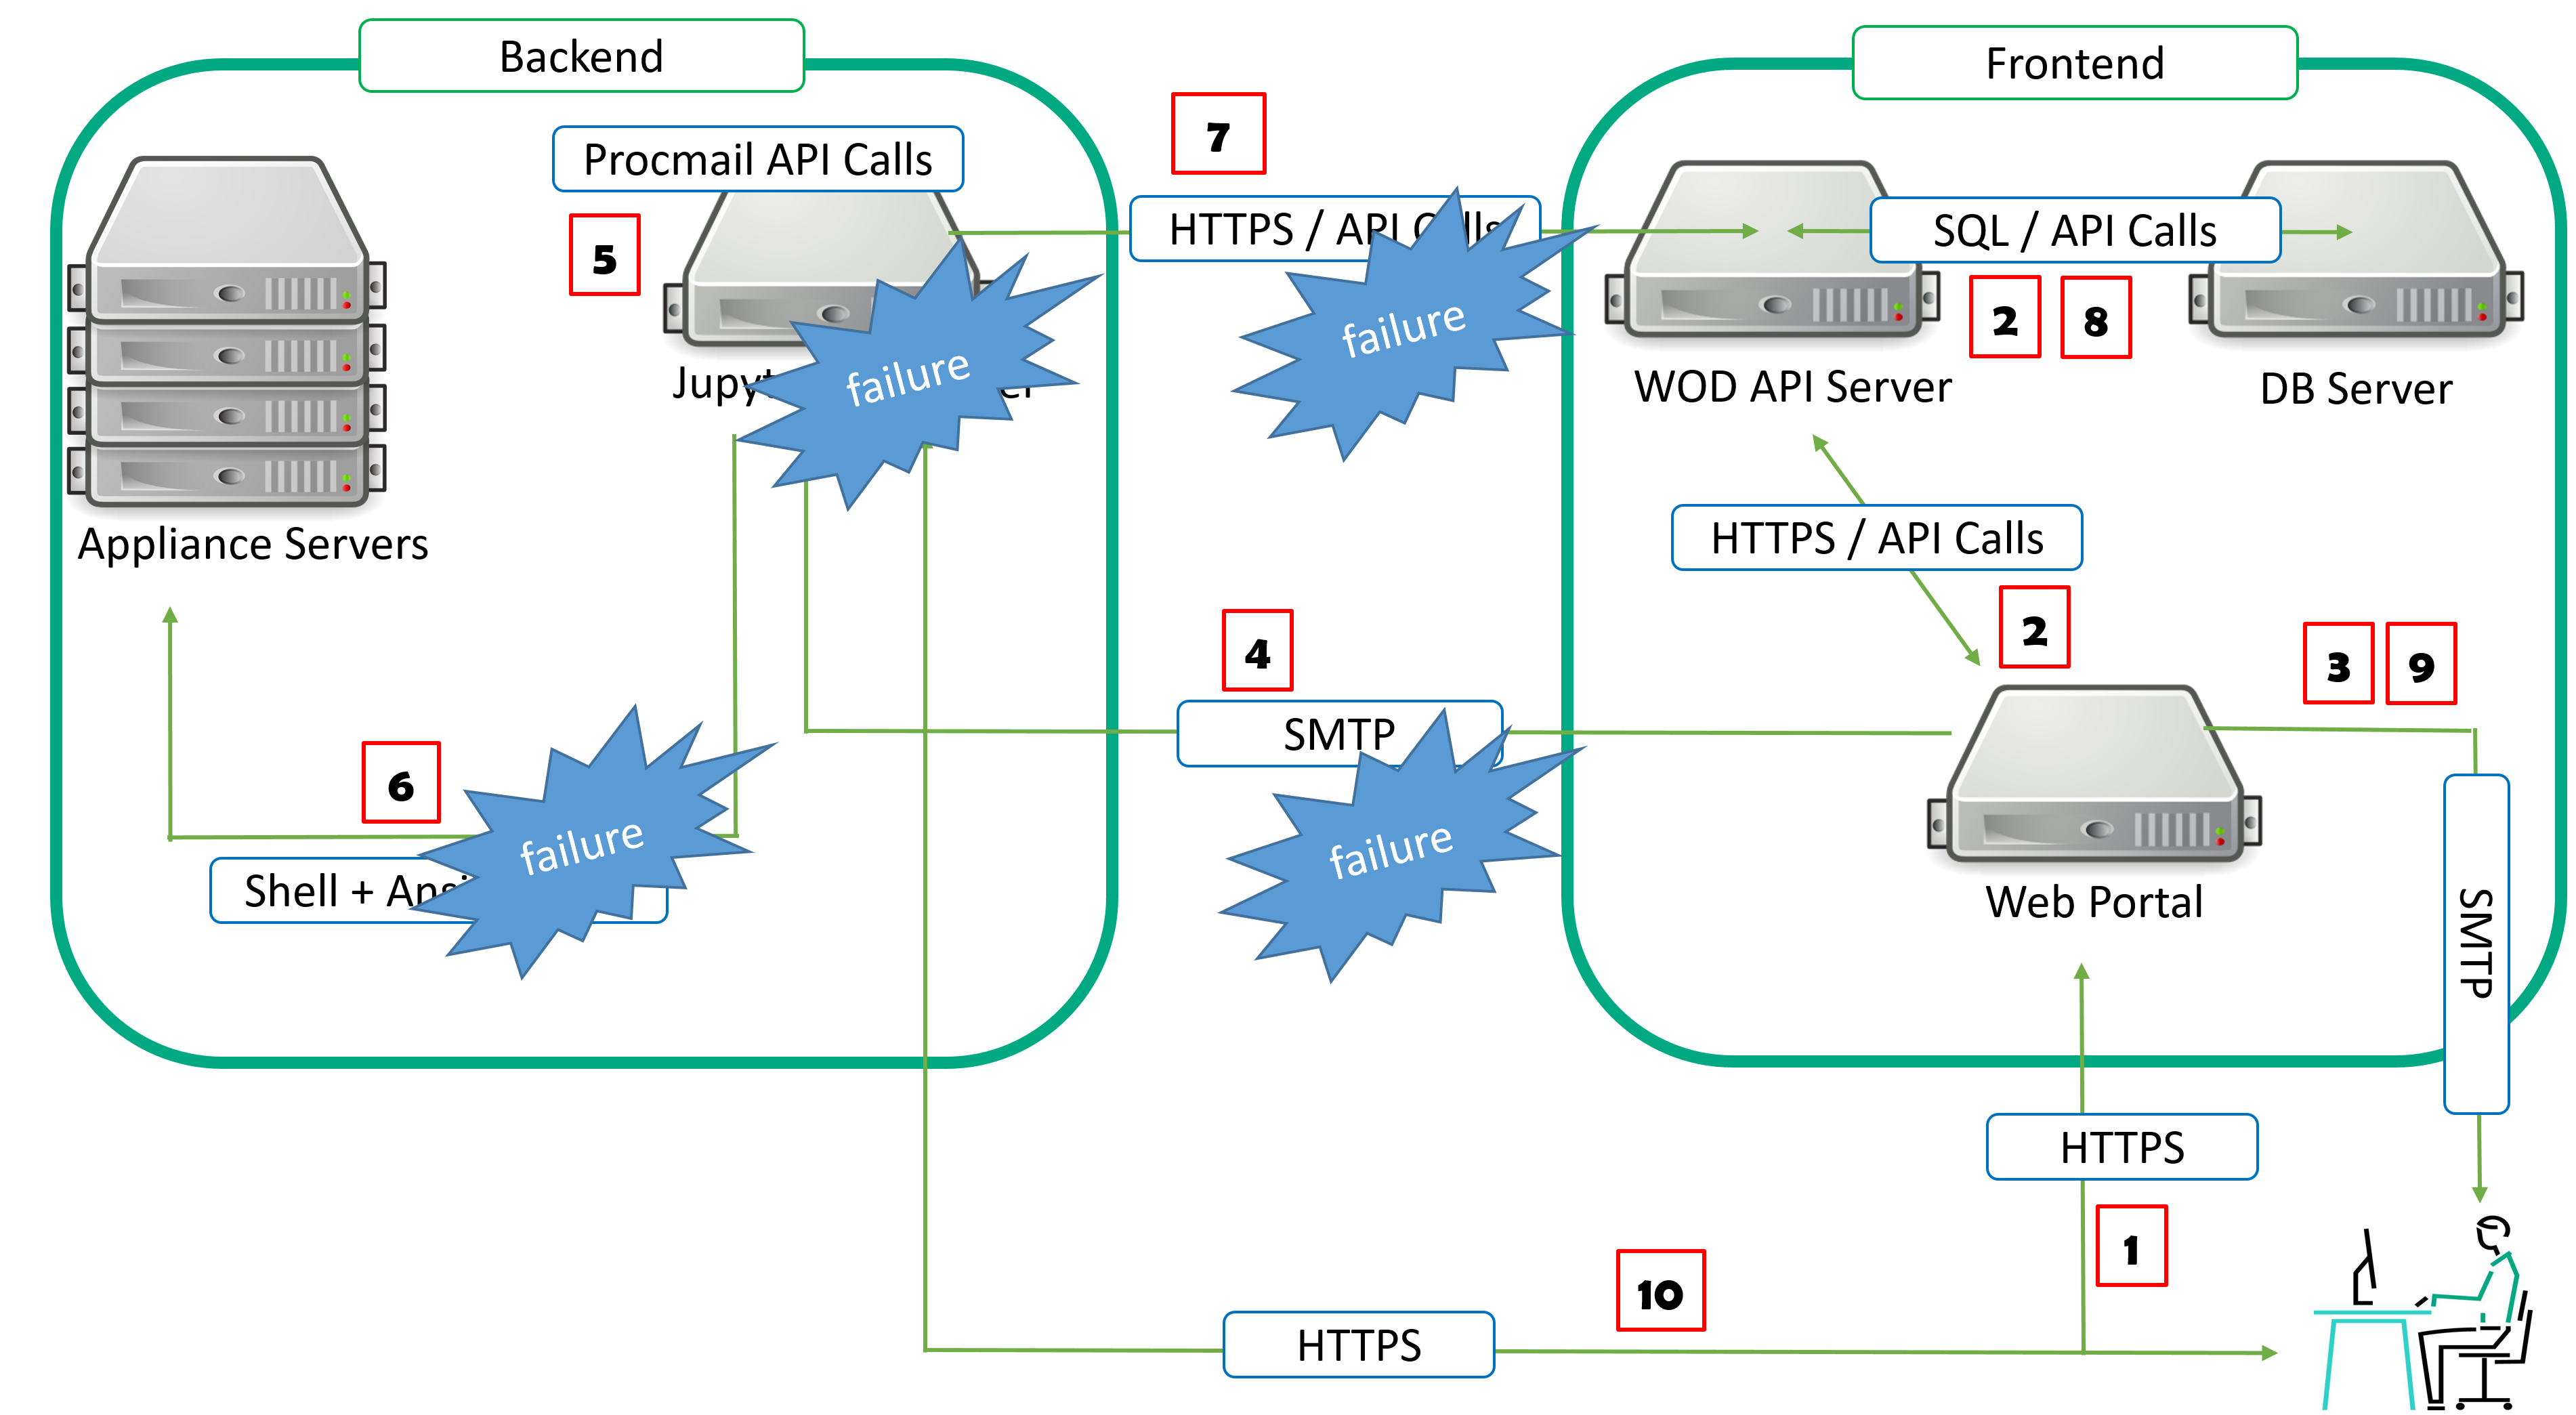
- frontend - backend communication issues
- JupyterHub server failure
- JupyterHub server - appliance server communication issues
The PURGE scenario is therefore triggered on Workshops-on-Demand' deployment failures.
At the registration time, when the participant hits the register button on the frontend web portal, an entry is automatically created in the database for him. It associates the participant to a student and a workshop. It also registers the date and start time of the workshop, sets the participant status to 'welcome' in the database and a first email is sent to the participant from the frontend web portal welcoming him to the Workshop-on-Demand and stating to him that within a few minutes a second email will be sent along with the necessary information (credentials and url) to connect to the workshop's environment.
If for any reason, the deployment of the workshop fails and as a consequence, no API call is made back to the frontend from the backend, the frontend could remain stuck forever and so would the participant. To overcome this, we implemented a check on the frontend web portal to test this welcome status. In a normal scenario, this welcome status gets updated within less than 3 minutes. If the status is not updated within 10 minutes, we consider that something went wrong during the deployment and as a result, a PURGE scenario is initiated to clean up both the backend and the frontend sides of the related registration. Of course, depending of the backend sanity, some actions could also fail. But from our experience, both frontend and backend are really reliable.
Considering now the most common case: the backend server and frontend servers can communicate but the JupyterHub server has issues to communicate with appliances. In terms of tasks associated to the PURGE scenario, you can see that we kept the minimal as there should not be much to clean up on the backend server. Simply consider that it is a CLEANUP scenario without any workshop deployment.
We call the same tasks to begin with as we still need student ID and workshop ID.
We then initiate :
9- generate_randompwd(): We always update the student's password for security reasons.
10- erase-student(): We perform a cleanup of the student folder.
11- API calls to update tables in the database. The new student password is recorded. We also generate a new password at the PURGE phase to prevent unregistered logins. The student status is set to inactive. The capacity figure is incremented by one to make the seat available again.
An email is then sent to the participant explaining to him that we encountered an issue with the deployment and that we apologize for this. The same email is sent to the admin so he can work on the issue.
Now, you should have a clearer view of what is really happening in the background when one registers for a workshop. You can see that I have uncovered many scripts to explain step by step all the stages of a workshop's deployment process. But there is more to be explained. It is obvious that the main function of the backend server is to deploy and run workshops. Nevertheless, as any other server, it cannot live without maintenance.
This subject will be at the core of my next article where I will detail how one needs to manage and work with this server on a daily basis. What we usually call Day 2 operations.
If we can be of any help in clarifying any of this, please reach out to us on Slack. Please be sure to drop back at HPE DEV for a follow up on this. Check out also the Hack Shack for new workshops! Willing to collaborate with us? Contact us and let's build together some more workshops! Stay tuned!
Related

10 Myths About Scalable Parallel Programming Languages (Redux), Part 1: Productivity and Performance
Apr 30, 2025
10 Myths About Scalable Parallel Programming Languages (Redux), Part 2: Past Failures and Future Attempts
Jun 2, 2025
10 Myths About Scalable Parallel Programming Languages (Redux), Part 3: New Languages vs. Language Extensions
Jun 26, 2025
10 Myths About Scalable Parallel Programming Languages (Redux), Part 4: Syntax Matters
Jul 23, 2025
10 Myths About Scalable Parallel Programming Languages (Redux), Part 5: Productivity and Magic Compilers
Aug 21, 2025
10 Myths About Scalable Parallel Programming Languages (Redux), Part 6: Performance of Higher-Level Languages
Sep 18, 2025
10 Myths About Scalable Parallel Programming Languages (Redux), Part 7: Minimalist Language Designs
Oct 15, 2025