Implementing OAuth 2 Flow for Data Services Cloud Console's Client Application
November 30, 2021HPE GreenLake API Security
In my blog post, Using HPE GreenLake Console's API Gateway for Data Services Cloud Console, I explained that the HPE GreenLake console supports the Client Credential authentication grant type (This concept is known as OAuth 2 client credential authorization workflow). This particular grant type allows the client application (scripts, applications, programs that leverage the console features via the API) to authenticate using separate credentials (client id and client secret) that are authorized inside the API Gateway menu using the HPE GreenLake user account (resource owner).

Some of the benefits of the Data Services Cloud Console Client Credential OAuth authentication grant:
- The authorization for the client does not involve the transmission of the HPE GreenLake user credentials.
- Changing the client secret or deleting the client credentials will not impact HPE GreenLake user credentials.
- According to OAuth 2.0 Authorization Framework, the Client Credentials Grant type allows the client application to authenticate itself independent of the user (no user intervention), which makes this grant type appropriate for machine-to-machine (M2M) applications that can safely protect the registered client credentials (confidential clients), such as scripts, daemon, or services contained in a host. Please refer to the OAuth 2.0 Authorization Framework for more information.
- Each client application uses a different set of client ids and client secrets to ensure the secrecy and the independence of each client application.
How do I implement Data Services Cloud Console API in my client application or my script?
This blog post will go through an example of setting up the client application using the client id, client secret, console API definition in yaml, and the Postman tool. The flow to get the client id and client secret from this menu is detailed in my blog entitled Using HPE GreenLake's API Gateway to Data Services Cloud Console. Note that the client id and client secret are shown only once during the API credential creation; hence they need to be securely recorded.

The user who generates this client id and client secret pair must store them and transfer them securely to the designated client application. Using the client id and the client secret, the client application can generate the access token in order to issue the REST API request to resources in the console. The client application access to the permitted console's resources depends on the role-based access control (RBAC) of the user. If the user does not have the correct authority for a resource, such as the volumes of an array, then the REST API request will receive an "unauthorized request" response.
For the client application to perform the REST API request, the application must obtain the access token from HPE GreenLake as described in below diagram. This special end-point https://sso.common.cloud.hpe.com/as/token.oauth2 provides the access token in the response of the authorization request from any client application.

The method required to obtain the access token is described in the following HTTPs request as shown in this snippet of HTTP strings.
HTTP method:
POST

URL:
https://sso.common.cloud.hpe.com/as/token.oauth2

Headers:
Content-Type: application/x-www-form-urlencoded

Body:
grant_type=client_credentials
&client_id=xxxxxxxxxx
&client_secret=xxxxxxxxxx
The following code snippet shows an example using cURL to obtain the access token. The variables of the $YOUR_CLIENT_ID and $YOUR_CLIENT_SECRET will be substituted with the client id and client secret from the above menu.
curl -X POST https://sso.common.cloud.hpe.com/as/token.oauth2 -H
"Content-Type: application/x-www-form-urlencoded"
-d "grant_type=client_credentials&client_id=$YOUR_CLIENT_ID&client_secret=$YOUR_CLIENT_SECRET"
The next code snippet shows an example using Python to obtain the access token. As in the previous code snippet, YOUR_CLIENT_ID and YOUR_CLIENT_SECRET variables must be substituted accordingly.
from oauthlib.oauth2 import BackendApplicationClient
from requests.auth import HTTPBasicAuth
from requests_oauthlib import OAuth2Session

client = BackendApplicationClient(YOUR_CLIENT_ID)

oauth = OAuth2Session(client=client)
auth = HTTPBasicAuth(YOUR_CLIENT_ID, YOUR_CLIENT_SECRET)

token = oauth.fetch_token(token_url='https://sso.common.cloud.hpe.com/as/token.oauth2', auth=auth)
print(token["access_token"])
Another code snippet below shows an example using the PowerShell to obtain the access token. As in the previous code snippet, the client id and the client secret variables must be substituted accordingly.
$AuthUri = "https://sso.common.cloud.hpe.com/as/token.oauth2"
 [Net.ServicePointManager]::SecurityProtocol = [Net.SecurityProtocolType]::Tls12
 $AuthHeaders = @{ 'Content-Type' = 'application/x-www-form-urlencoded' }
 $AuthBody    = [ordered]@{  'grant_type' = 'client_credentials',
                             'client_id' = {Insert Client ID Here},
                             'client_secret' = {Insert Client Secret Here } }
 (invoke-restmethod -uri "$AuthURI" -Method Post -headers $AuthHeaders -body $MyBody).access_token
The access token contains the information in JWT format that is self-contained, securely encoded, and signed using RS256. The access token is designed to enable secure transmission between the client application and the REST API server with a limited lifetime (2 hours).
eyJhbGciOiJSUzI1NiIsImtpZCI6IjFvVEFmay1UOTZ1ZDd5cDBZTGlYM1ROSWdDWSIsInBpLmF0bSI6ImRlejAifQ.eyJjbGllbnRfaWQiOiIwMGNmZmY3MC04NmFiLTRmNjYtODI0NS0xZWIwNTQ2MzljMzgiLCJpc3MiOiJodHRwczovL3Nzby5jb21tb24uY2xvdWQuaHBlLmNvbSIsImF1ZCI6ImV4dGVybmFsX2FwaSIsInN1YiI6InJvbmFsZC5kaGFybWFAaHBlLmNvbSIsInVzZXJfY3R4IjoiZThhNGRhMmVlZmMzMTFlYmEwMmNiNjAzNDIyYmMwYTAiLCJhdXRoX3NvdXJjZSI6ImNjc190b2tlbl9tYW5hZ2VtZW50IiwicGxhdGZvcm1fY3VzdG9tZXJfaWQiOiIyMzRkNzZjNmU5ZDAxMWViYjczMDgyYjIxMmFkNmZlYSIsImlhdCI6MTYzNDc3OTIwNiwiYXBwbGljYXRpb25faW5zdGFuY2VfaWQiOiIzYzE4YmQwMy04MzA2LTRjN2MtOTQyZS1jNzA0YTRiODc0NGMiLCJleHAiOjE2MzQ3ODY0MDZ9.sz7GHvCdO_NjPgVt5rz7JHRSegZWD0pimNqiw7s_SC9vB2XsQnSEP71Kh1y3SqQxkKF8AgbJ02iEZYsk-GO-JmufGfeIUbl2idrFlfXPiKsKftn35dHO-uHW8s4KwL7mUF_HiPxUPIsixQ1zS_88-qdUGzAWDjcR0JO2gKnkaWeQ_AUGzdDw09ZSYZG3sxIoqU_HNjLF1c8hJmVV9Q6IN1ItKAspECc_UYTnjUBrZz5mpupDxuLIMJytTFUFwCriphi9cXQCTyQ3TXW_EALtRq_KdLEe311WFMX9mAL87zXP2JNc8bf8CTiiAty5eCjM2wxrPK9-ep0i5J5v6kJW_Q
Some of the information inside the JWT details the client id, source of authentication, and other details, including time of expiration (in Unix epoch time).
{
  "client_id": "00cfff70-86ab-4f66-8245-1eb054639c38",
  "iss": "https://sso.common.cloud.hpe.com",
  "aud": "external_api",
  "sub": "xxxxxxxxxxxxxx@hpe.com",
  "user_ctx": "e8a4da2eefc311eba02cb603422bc0a0",
  "auth_source": "ccs_token_management",
  "platform_customer_id": "234d76c6e9d011ebb73082b212ad6fea",
  "iat": 1634779206,
  "application_instance_id": "3c18bd03-8306-4c7c-942e-c704a4b8744c",
  "exp": 1634786406
}
I don't know any programming language. How can I explore this console's REST API?
Postman is the well-known tool used to explore a REST API that provides enough flexibility to import the API definition, automate the access token retrieval and experiment with the parameters. Postman provides this capability with a lot less of typing and knowledge of any programming language. To experiment with Postman, I recommend you download the application-based (rather than web-based) version. This is the download link for the Postman app, which is available in either a Microsoft Windows or Apple MacOS version. Install the application on a workstation that has access to the internet via website browser (HTTPS) and is capable of connecting to cloud.hpe.com such as https://common.cloud.hpe.com or https://us-west.data.cloud.hpe.com.
Start by downloading the storage-api.yaml OpenAPI 3.0 definition into the workstation. Anyone can go to the DSCC API documentation website and click on the download button for either the Yaml or JSON definition file.
Postman provides the ability to create a workspace where one can experiment with the DSCC OpenAPI by importing the DSCC OpenAPI definition (storage-api.yaml) into the API library. Start the process by selecting the Workspaces menu, then click on the Create Workspace button and type in the desired workspace name. In this example, it's called HPE DSCC API.

Inside this new workspace, you will need to create an environment variable called {baseUrl} that represents the baseURL toward the console's API path for that specified region. This is the current list of the URLs based on the region where the console are allowed to be deployed as of November 2021:
Data Services Cloud Console Region | base-URL |
| EU Central (Europe) | https://eu1.data.cloud.hpe.com |
| AP Northeast (Asia Pacific) | https://jp1.data.cloud.hpe.com |
| US West (United States) | https://us1.data.cloud.hpe.com |
In this example, the baseURL points to a testing instance of console (https://scint-app.qa.cds.hpe.com). For your exercise, you must replace this value with any of the baseUrl values that match the region where the console is deployed based on the above table. For any activities issuing the console's API request, configure the environment context to "DSCC testing" under the "HPE DSCC API" workspace, and ensure that this environment contains the current value of the variable of {baseUrl}.

Next, import the Data Services Cloud Console API definition into this workspace. Note that you will be importing the storage-api.yaml rather than JSON; nevertheless, Postman can recognize the console API in either format. To save the time required for importing, you can uncheck the Create Documentation button. If need be, the documentation can be created after the importing.

Select the Data Services Cloud Console API definition in yaml format that was downloaded from the HPE Data Services Cloud Console API documentation by clicking on the Download YAML button as shown below.

Once the API definition completes the import, Postman recognizes the fact that it's an OpenAPI 3.0 definition and builds the API library automatically.

As a result of the upload of the console API definition file, Postman will show the API definition tree under the Postman API menu as shown in the picture below. Note that Postman validates that the console API definition doesn't contain any issues, as shown by the message at the very bottom of the following picture.

After the Data Services Cloud Console API definition is loaded, you can then use the automation for obtaining that access token that is facilitated by Postman. To start the OAuth2 automation, select the Collections menu and display the rest of the API listing under the tree. At the top of the tree, you will initialize the authorization with correct parameters, such as the client id, client secret, Data Services Cloud Console OAuth2 end point, and other required parameters. With this setup, any API request that inherits the authorization from the top of tree will be able to populate their header for REST API request with the access token as the token bearer. Below, you can see a display of the configuration that is populated with the required parameters under the authorization menu.
- Type = OAuth 2.0
- Add auth data to = Request Headers
- Token Name =
- Grant Type = Client Credentials
- Access Token URL = https://sso.common.cloud.hpe.com/as/token.oauth2
- Client ID = obtained from the client credential creation in API Gateway
- Client Secret = obtained from the client credential creation in API Gateway (The pair to the Client ID)
- Client Authentication = Send client credentials in body
Click on the Get New Access Token button to obtain the valid access token

As a result of getting the new access token, a new menu will be shown that shows the content of the access token. Click the Use Token button to select this new access token. If there is an existing access token, it will be invalidated and the name of that invalid access token will have a strike-through, as shown in the image below.

Once selection to use the valid access token is done, this token can be made available for all of the API Requests under the same tree. To make this happen, click on the Sync Access Token button until it's synced-up (the icon color changes to green). To enable this sync-up, please select Delete Expired Tokens and select Available Tokens. Lastly, ensure that the header prefix is set to Bearer.

After the access token is synced-up, you can then issue any REST API request by selecting the appropriate REST API request. For this example, you are going to issue the REST API to show all of the storage systems connected to the Data Services Cloud Console(Get all Storage systems). Select the Headers (7) to display the parameters of the REST API header and note that the Authorization parameter contains the valid access token.
- Note that the environment selection (the menu at top right) must be set to the above mentioned environment (console testing for the current exercise) using the V button.

- Select the Authorization tab and set the Type to inherit auth from the parent's authorization to allow this REST API request to use the access token acquired at the top of the console API tree. Note that this inheritance requires the sync of the valid access token obtained at the top of the tree.

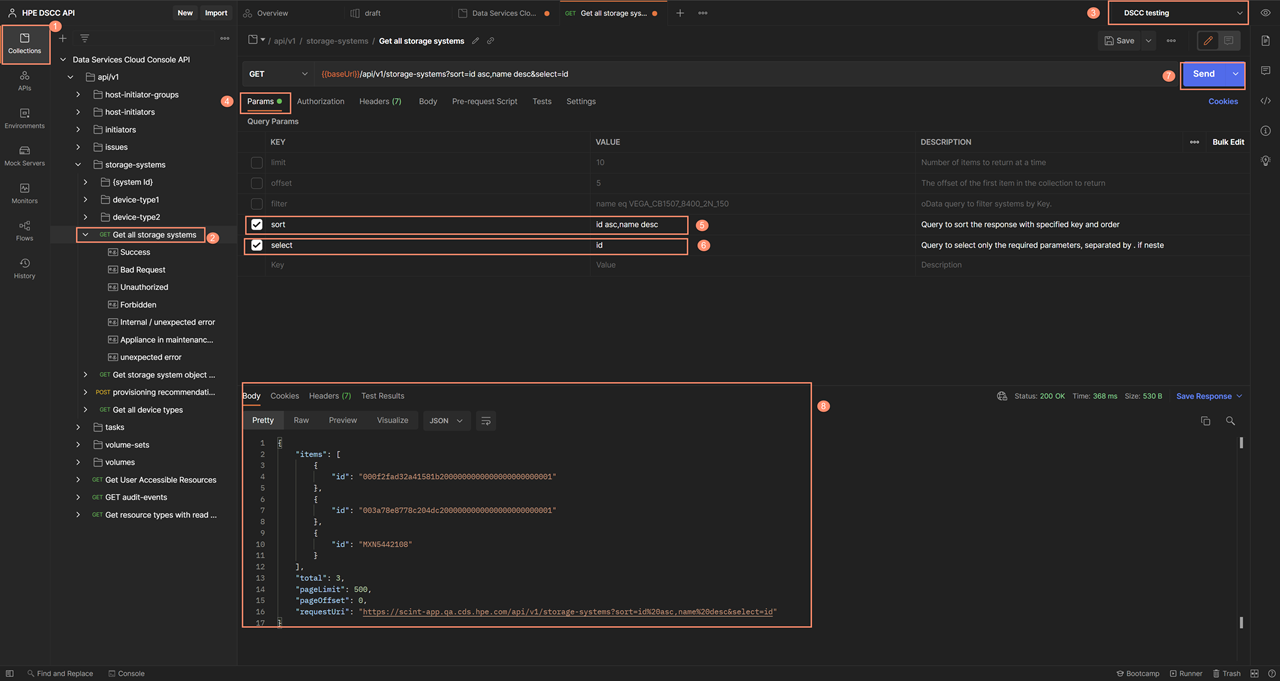
For the first REST API request in this example, you will issue the Get all storage systems API request. This request can return a huge amount of data depending on the arrays that were registered in this instance of the console. To enable concise information to be returned from this REST API request, we can check the following parameters and uncheck all others:
- sort = id asc, name dscc
- select = id
Click on the Send button to issue the GET all storage system API request. Within seconds, the body section on the bottom of this menu is filled with the list of the available arrays. It's very easy to use, simple, with no programming required and minimal typing.
Isn't it awesome?
I hope you find this blog post is helpful in using the Data Services Cloud Console public REST API. More blog posts will be coming to help you take further advantage of its capabilities. Stay tuned to the HPE DEV blog for more blog posts about HPE Data Services Cloud Console REST API.
Tags
Related
Using HPE GreenLake Console's API Gateway for Data Services Cloud Console
Nov 30, 2021Automating operations on HPE GreenLake Data Services Cloud Console using Ansible Playbooks
Mar 29, 2023
Converting HPE GreenLake API specifications in OAS 3.1 using OpenAPI tools
May 27, 2024Creating HPE GreenLake Data Services Cloud Console block storage resources using Ansible playbooks
Mar 30, 2023Get Started Building Data Services Cloud Console API Client Libraries for Python using OpenAPI Generator
Mar 28, 2022
Getting started with HPE GreenLake APIs for Data Services
Apr 2, 2024Getting started with HPE GreenLake API for Virtualization
Apr 3, 2024