
In my previous tutorial on webhooks for HPE GreenLake cloud, I used a no-code/low-code platform called Make.com to implement a webhook handler. The webhook handler’s URL endpoint was then registered with HPE GreenLake cloud to subscribe to audit log events from the platform. In my simplistic use case, I stored these events in a Google Sheet as they arrived.
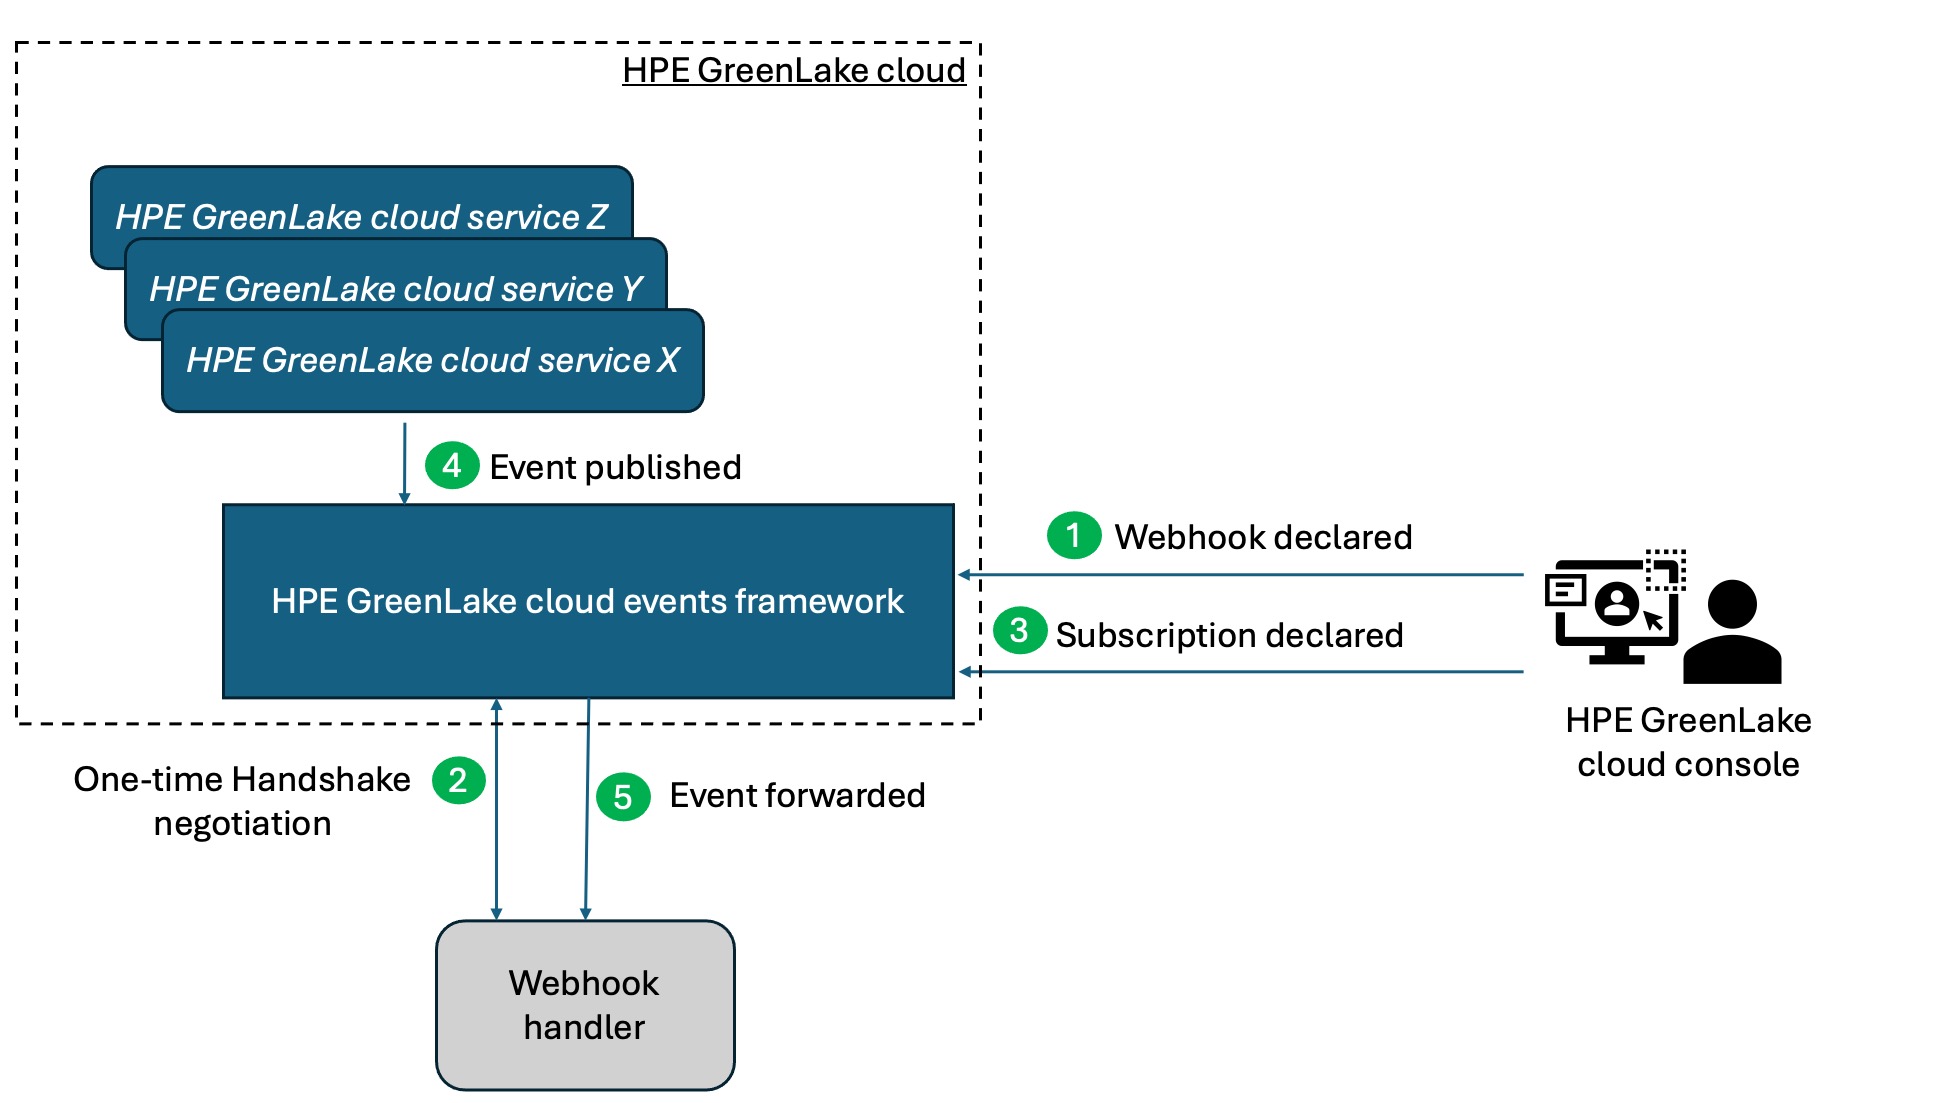
For this handler, I was responsible for taking care of the handshake initiated by HPE GreenLake cloud when the new webhook was registered. This is a security feature that uses a secret key shared by HPE GreenLake cloud and the webhook handler. The following diagram illustrates the mechanics involved in this process.
As this implementation was working well, I thought I would reuse this low-code handler technique to demonstrate another use case of an integration with an IT service management (ITSM) platform. I decided to use ServiceNow because it’s a very popular ITSM platform and because it provides a very nice way for developers to fire up a personal developer instance (PDI) and get their work done.
Problems, incidents and change orders
Most of these ITSM platforms are managed through the lifecycle of different types of tickets (New, In Progress, Resolved). One of the most common ticket types is called Incident, which is the type of ticket that users might open when they face an issue and want to raise it to their IT team for resolution. In most cases, end users use a web portal to do this. However, there is also an API to programmatically do it, and this is exactly what I’m going to use in this blog.
What’s the right API then?
To be fair, I must admit that I initially reached out to ChatGPT to get started, asking it “how do I create an incident in ServiceNow?”. To my surprise it returned a short Python script that, once edited to use my ServiceNow personal developer instance, my username and password, worked immediately. This confirmed my choice of selecting ServiceNow.
Here is the Python script returned by ChatGPT:
import requests
import json
# Replace these variables with your own information
instance_url = "https://your-instance.service-now.com"
username = "your-username"
password = "your-password"
service_id = "service-id"  # The Service ID related to the incident

# Define the API endpoint for creating an incident
url = f"{instance_url}/api/now/table/incident"

# Create the headers for the request (set the content-type to application/json)
headers = {
    "Content-Type": "application/json",
    "Accept": "application/json"
}

# Define the data to be sent in the request body
data = {
    "short_description": "Issue with email service",
    "description": "The email service is down and needs urgent attention.",
    "category": "Inquiry",
    "impact": "3",  # 1=High, 2=Medium, 3=Low (you can adjust accordingly)
    "urgency": "2",  # 1=High, 2=Medium, 3=Low (you can adjust accordingly)
    "service": service_id  # The ID of the service being impacted
}

# Make the POST request to create the incident
response = requests.post(url, auth=(username, password), headers=headers, data=json.dumps(data))

# Check the response
if response.status_code == 201:
    print(f"Incident created successfully! Incident Number: {response.json()['result']['number']}")
else:
    print(f"Failed to create incident. Status Code: {response.status_code}")
    print(f"Response: {response.text}")
Note: ServiceNow provides the full documentation for their API once you sign up as a ServiceNow developer and it is free.
The script it provided was very helpful because it helped me understand:
- The API I need to use is the table API and the table name to be used is called incident, thus the API call: POST /api/now/table/incident
- The (minimal) payload I need to pass in the API call
- The necessary headers
- The response code expected if it worked should be 201
From event to incident
Now that I understand how to create an incident, it would be good to think about what represents an incident within HPE GreenLake cloud. In my previous tutorial, I subscribed to audit log events (workspace loaded by user X, user Y logged out, user Z changed these settings, etc.) but you most likely would not want to open an incident for each of these. First, they are not really incidents, and second, you don’t want to flood your incident table with inappropriate data, as real incidents might get lost. For this use case, I decided to use another event that could be triggered by the Subscriptions Management service in HPE GreenLake cloud when a subscription is expiring in 1, 30, 60, and 90 days. The event is called Expiring Subscriptions. The full description of this event can be found on the HPE GreenLake Developer Portal.
This can be considered an incident and could be added in ServiceNow incident table.
The payload sent to the webhook handler when this event is triggered by the Subscriptions Management service has the following format:
{
  "specversion": "1.0",
  "id": "fb25f344-5e20-4f13-9937-c3ecc0327dc3",
  "source": "https://global.api.greenlake.hpe.com/subscriptions",
  "type": "com.hpe.greenlake.subscriptions.v1.expiring-subscriptions",
  "datacontenttype": "application/json",
  "time": "2024-10-30T21:09:16.127443806Z",
  "data": {
      "key": "OFKIAASTEST168IZ",
      "expirydate": "10/25/2024",
      "sku": "S0B80AAE",
      "licensetier": "ENHANCED PROLIANT",
      "quantity": 500,
      "username": "John Doe Inc.",
      "subscriptionendinsecs": 1729848600,
      "subscriptiontype": "Compute Subscription",
      "producttype": "DEVICE",
      "platformcustomerid": "22e7e552184511ef88e9cacb36fa7032",
      "devices": []
    }
}
Now that I know what my webhook handler will receive as input and how I can open an incident in ServiceNow, I can get started.
From code to no-code
Let me show you how to translate these learnings in Make.com. In my previous article, I created a scenario in Make.com that looked like this:
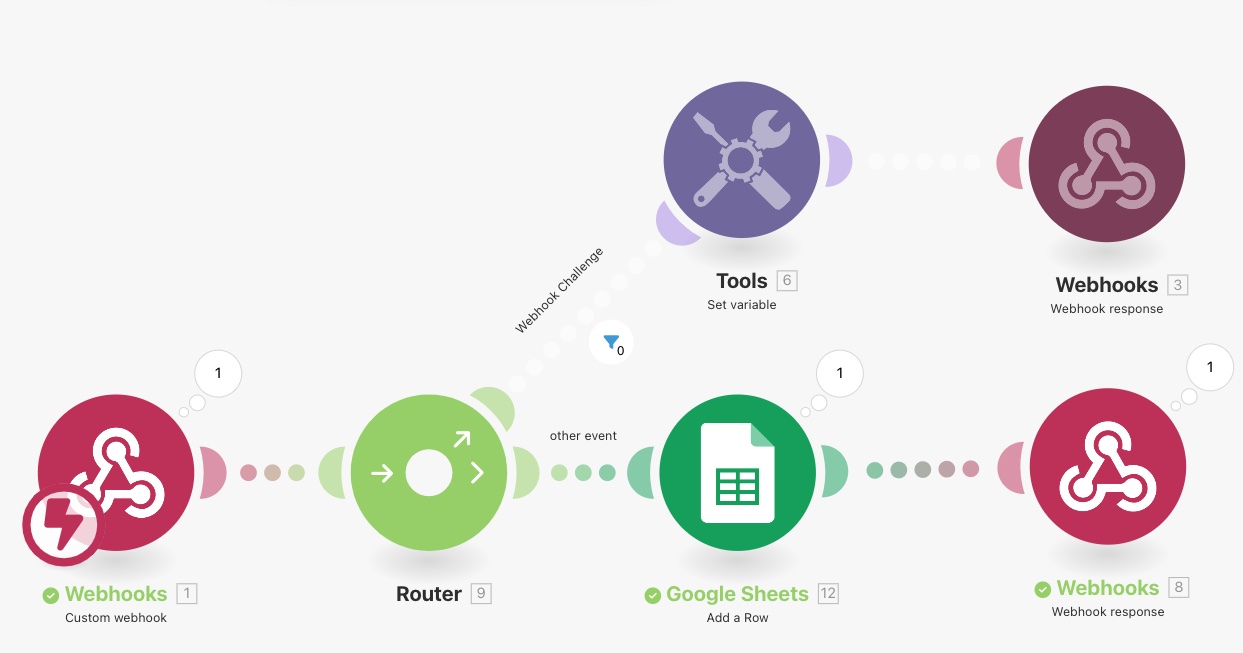
The topmost branch was used to handle the initial security handshake. I will keep that intact. If you need details about this branch, check out my previous tutorial.
What I will do now is duplicate this scenario, delete the Google Sheets module, and replace it with another one called HTTP Make a request. Then I will link the new module to the Webhook response.
The HTTP Make a request module allows you to make any type of REST API call. It comes in very handy for integration use cases.
Note: Make.com also provides a native ServiceNow integration, but you need an Enterprise plan to use it, which I don’t have.
My scenario looks like this:
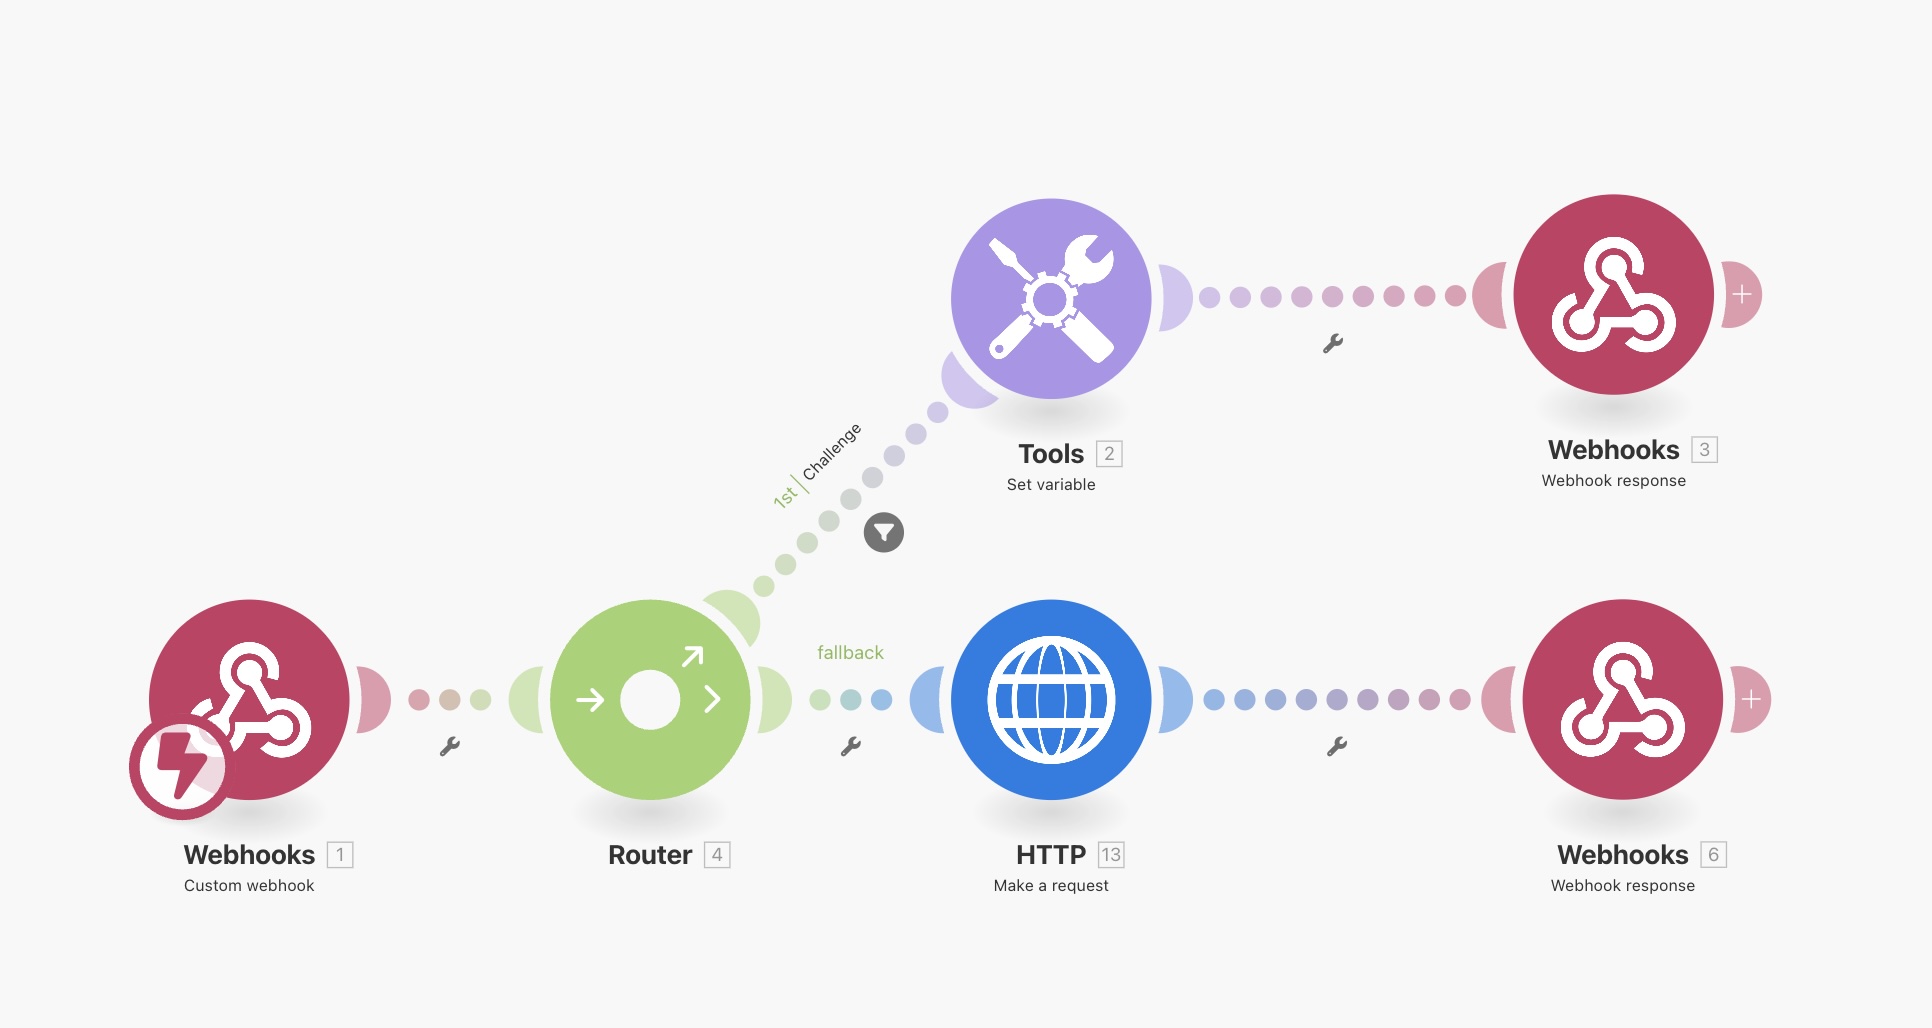
My new scenario includes:
- The Custom webhook module as a trigger of your webhook scenario with advanced option enabled
- The Set variable module and the Webhook response module to validate the verification challenge and ensure the webhook communication between HPE GreenLake cloud and the webhook handler is authenticated
- A Router module in the scenario to branch your flow into several routes and process the data within each route differently, based on the type of event received
- The HTTP Make a request module connected to the bottom branch of the Router module along with the Webhook response module connected to the HTTP Make a request module to create the incident in ServiceNow and return a 200 status to HPE GreenLake cloud
For more information, you can refer to the chapter “Getting started with Make” in my first blog post.
Next, I’ll dive into the properties of the HTTP Make a request module that needs to be configured based on the details collected from the Python script:
- The URL endpoint of my ServiceNow instance: https://{your-instance}/api/now/table/incident
- Method: POST
- Two custom headers for Accept and Content-Type both set to application/json
- Body type: Raw
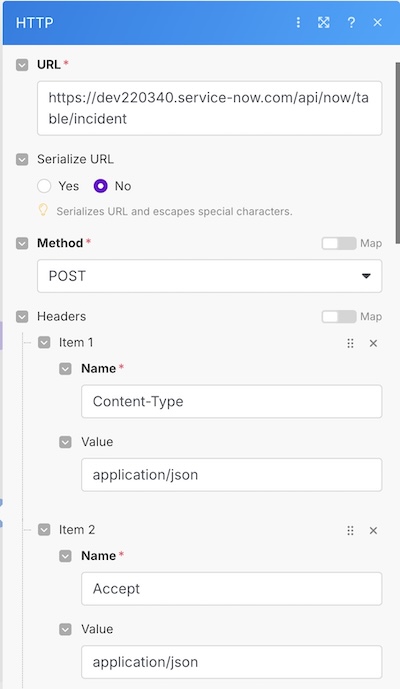
To setup the JSON payload as shown below, I need to first configure the first step of my webhook scenario to use the JSON payload of the Expiring Subscriptions event described earlier.
I then need to set up the JSON payload (Request content as shown below) with ServiceNow information such as:
- The short description (for example, the subscription type is expiring soon)
- The description (for example, License
expires on ) - The category, and the subcategory
- The level of urgency (1=high, 2=medium, 3=low) and the level of the impact (1=high, 2=medium, 3=low) which will be used to compute priority in ServiceNow
- The caller_id
- The service
Once this is in place, I can build the Request content and drag/drop items from the JSON input payload (shown in red) into the Request content of the HTTP call as shown below:
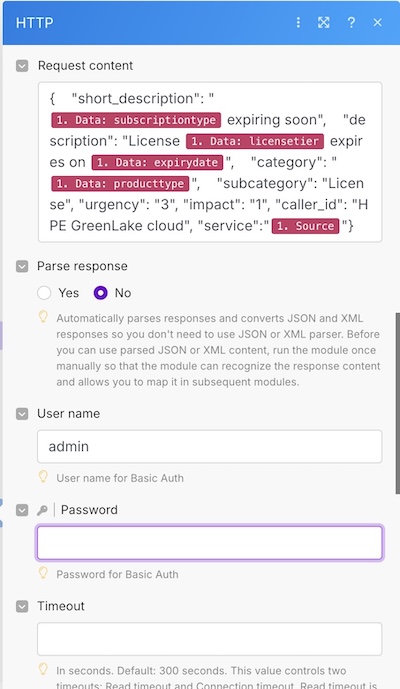
It’s important not to forget to specify username and password obtained when creating a ServiceNow personal developer instance.
Putting it all together
Voila! Now the Webhook scenario is in place. I need to subscribe to the event with HPE GreenLake cloud. As noted in my first blog post, I can apply the same logic, except that this time I will subscribe to Expiring Subscriptions event as shown below:
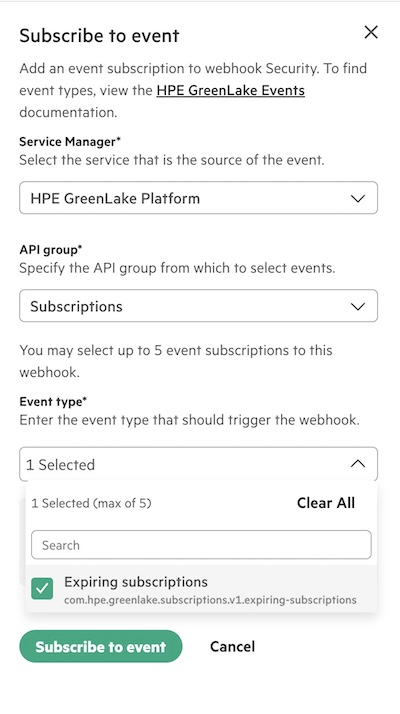
If everything goes well, I should see the following subscribed event configuration:
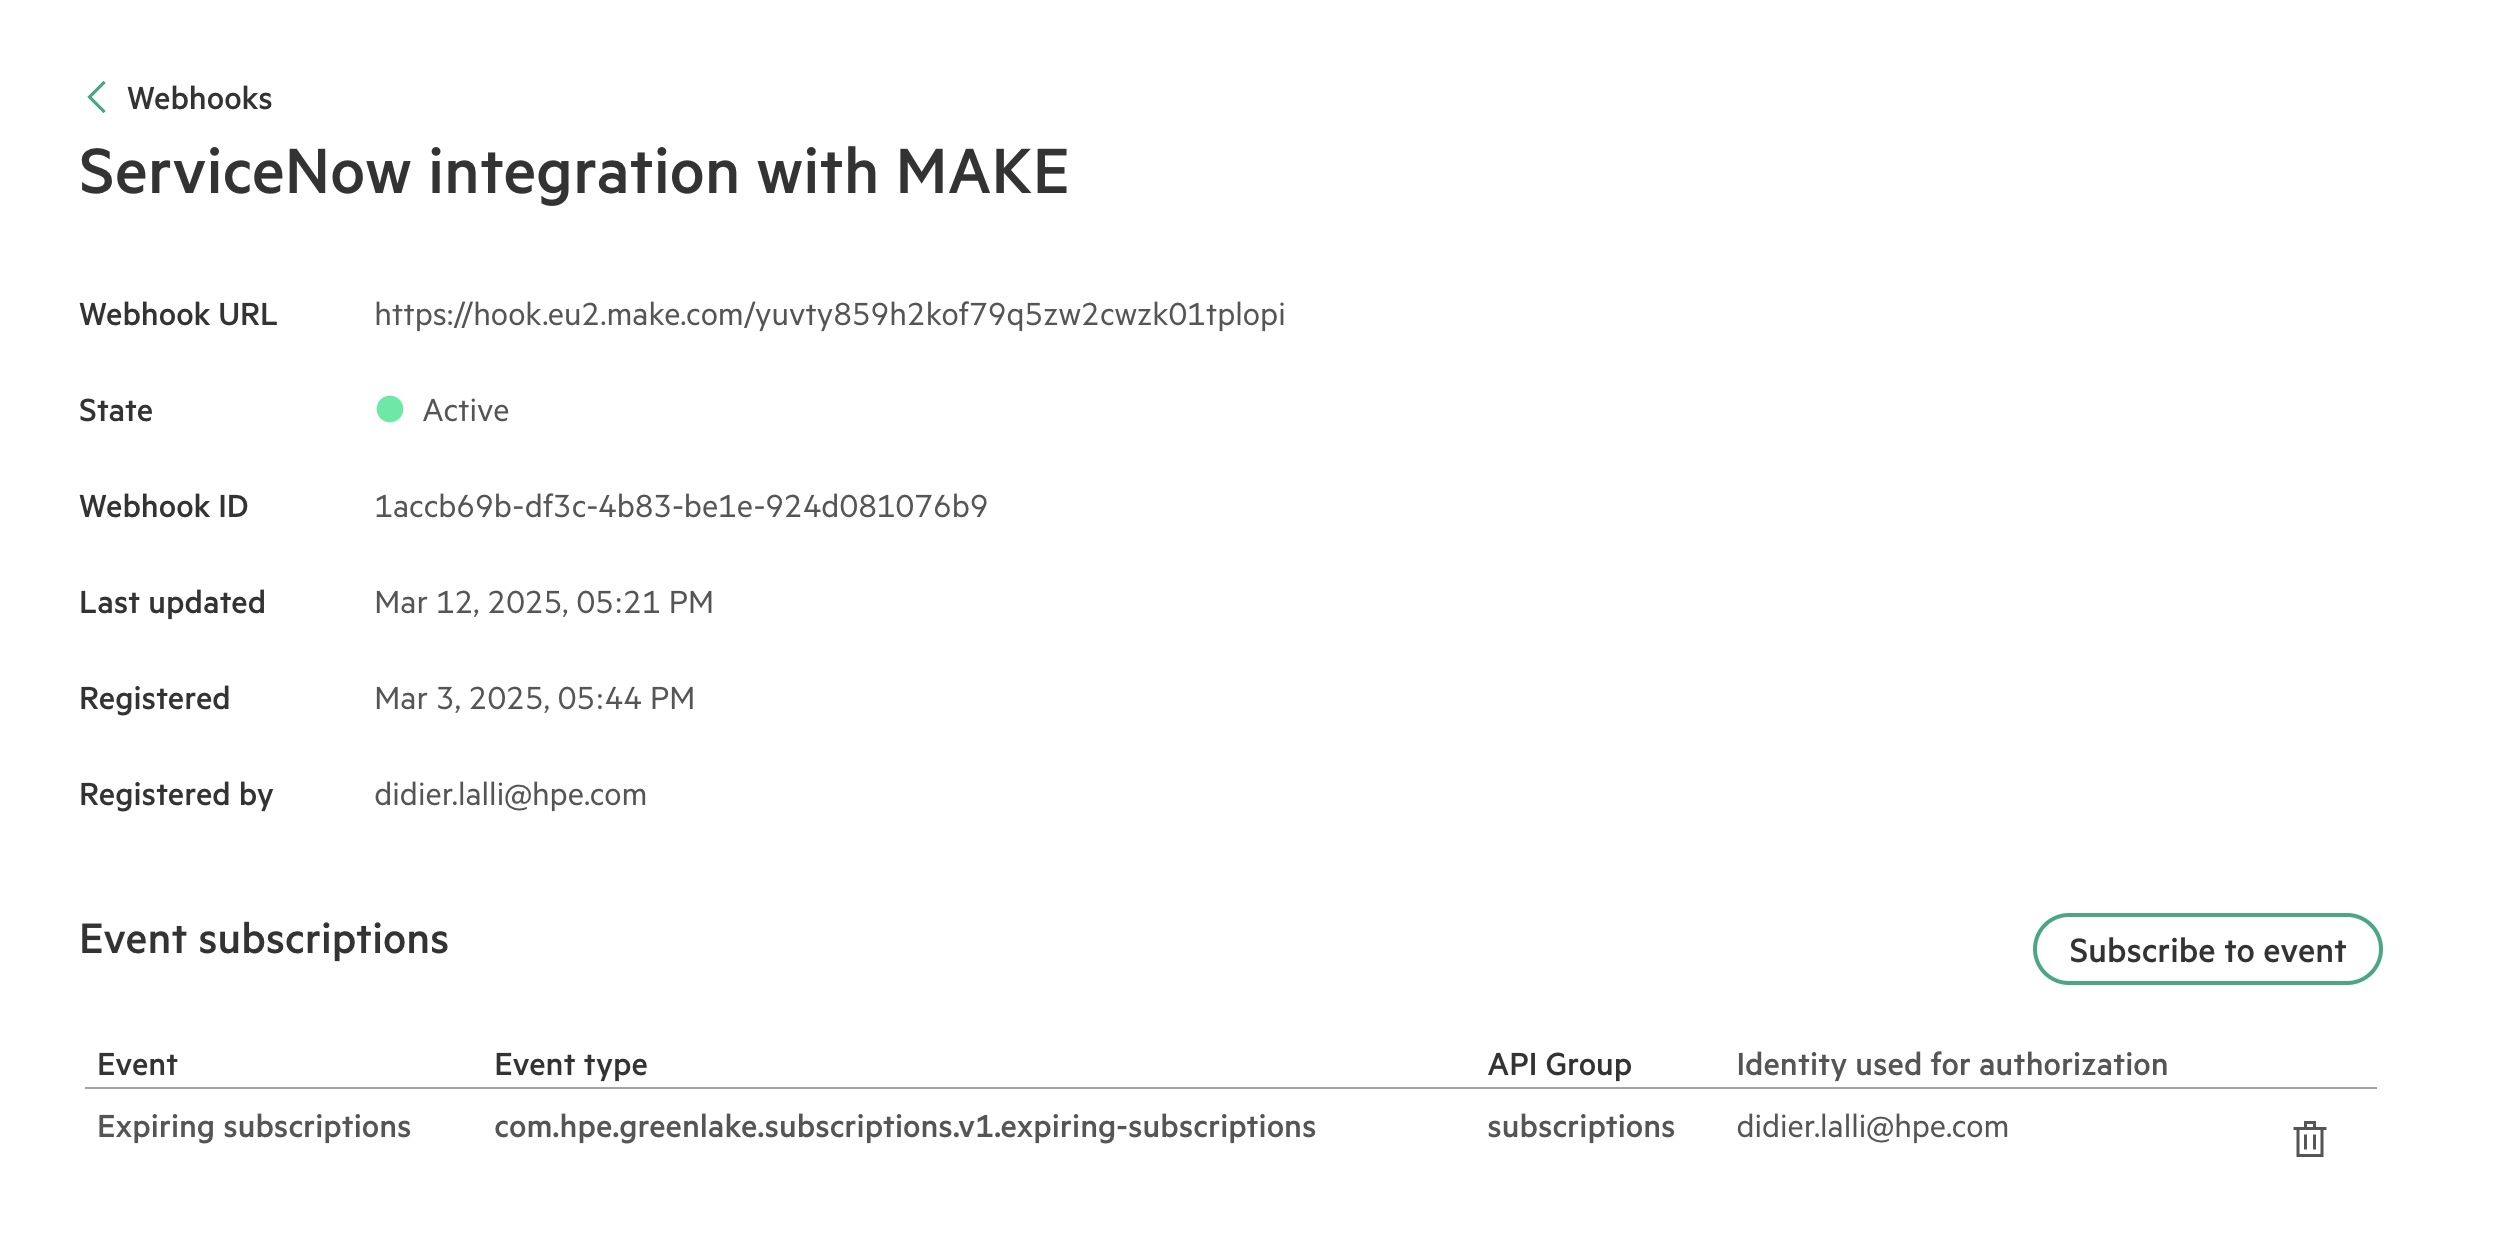
First, let’s take a look at the open incidents page of the ServiceNow console:
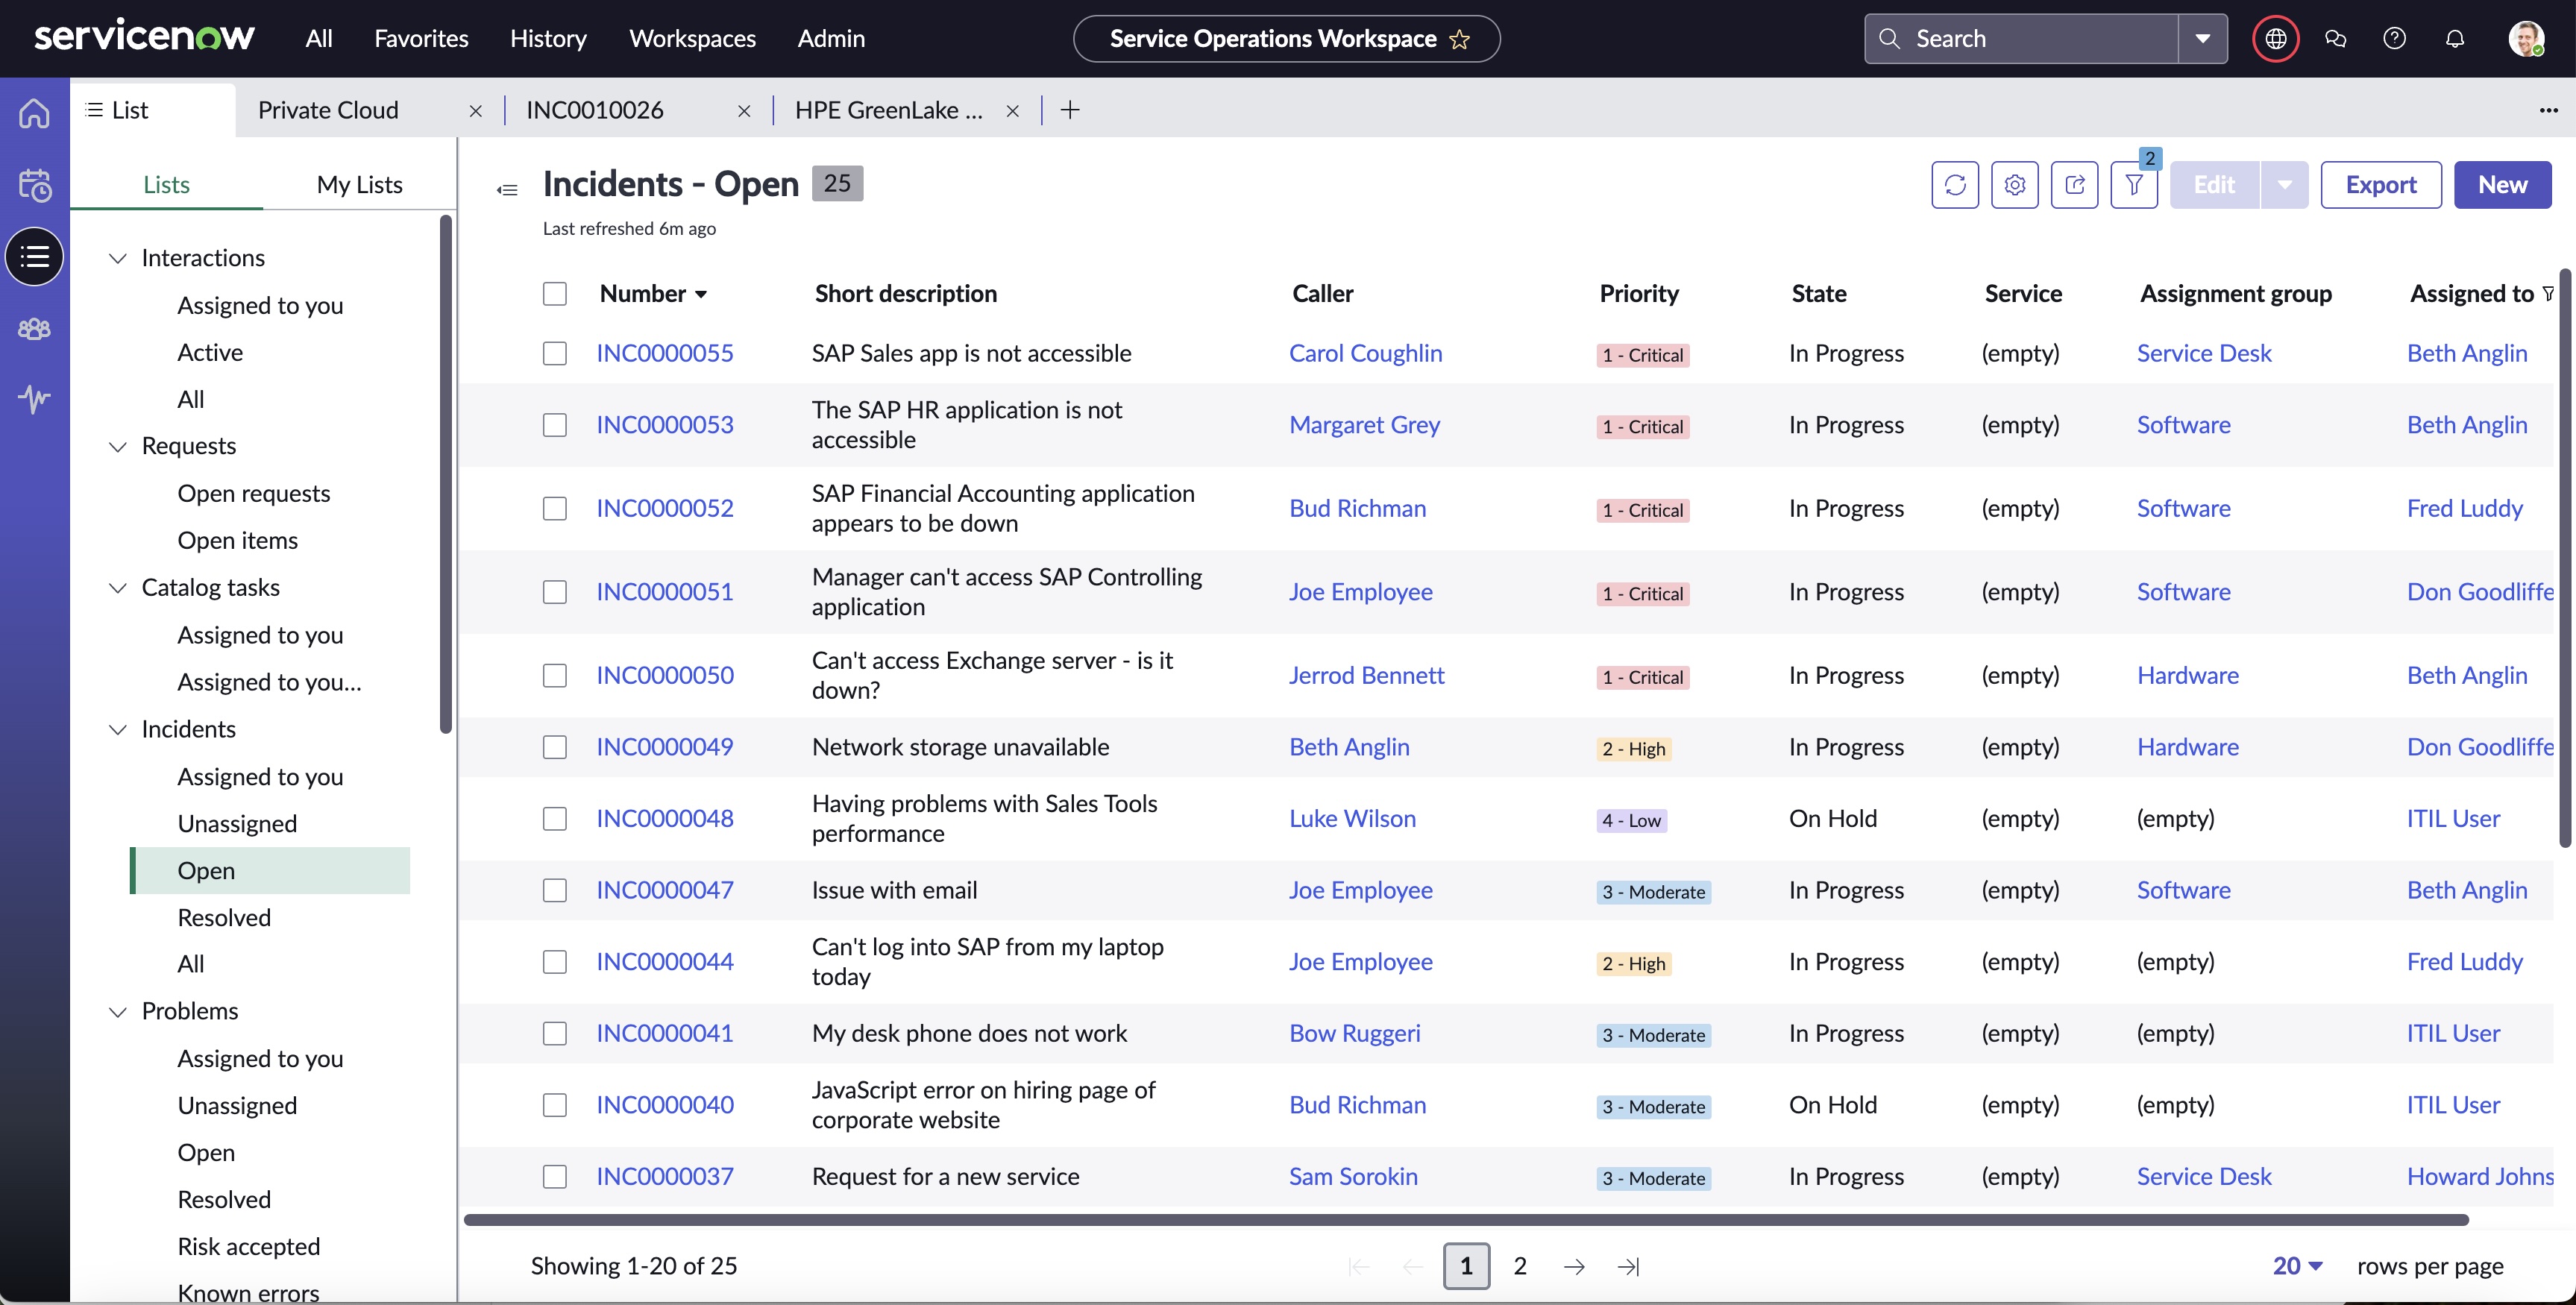
Once a subscription reaches an expiration threshold, HPE GreenLake cloud will send an event to my webhook handler, which will, in turn, open a new incident to track it in ServiceNow, as shown below:
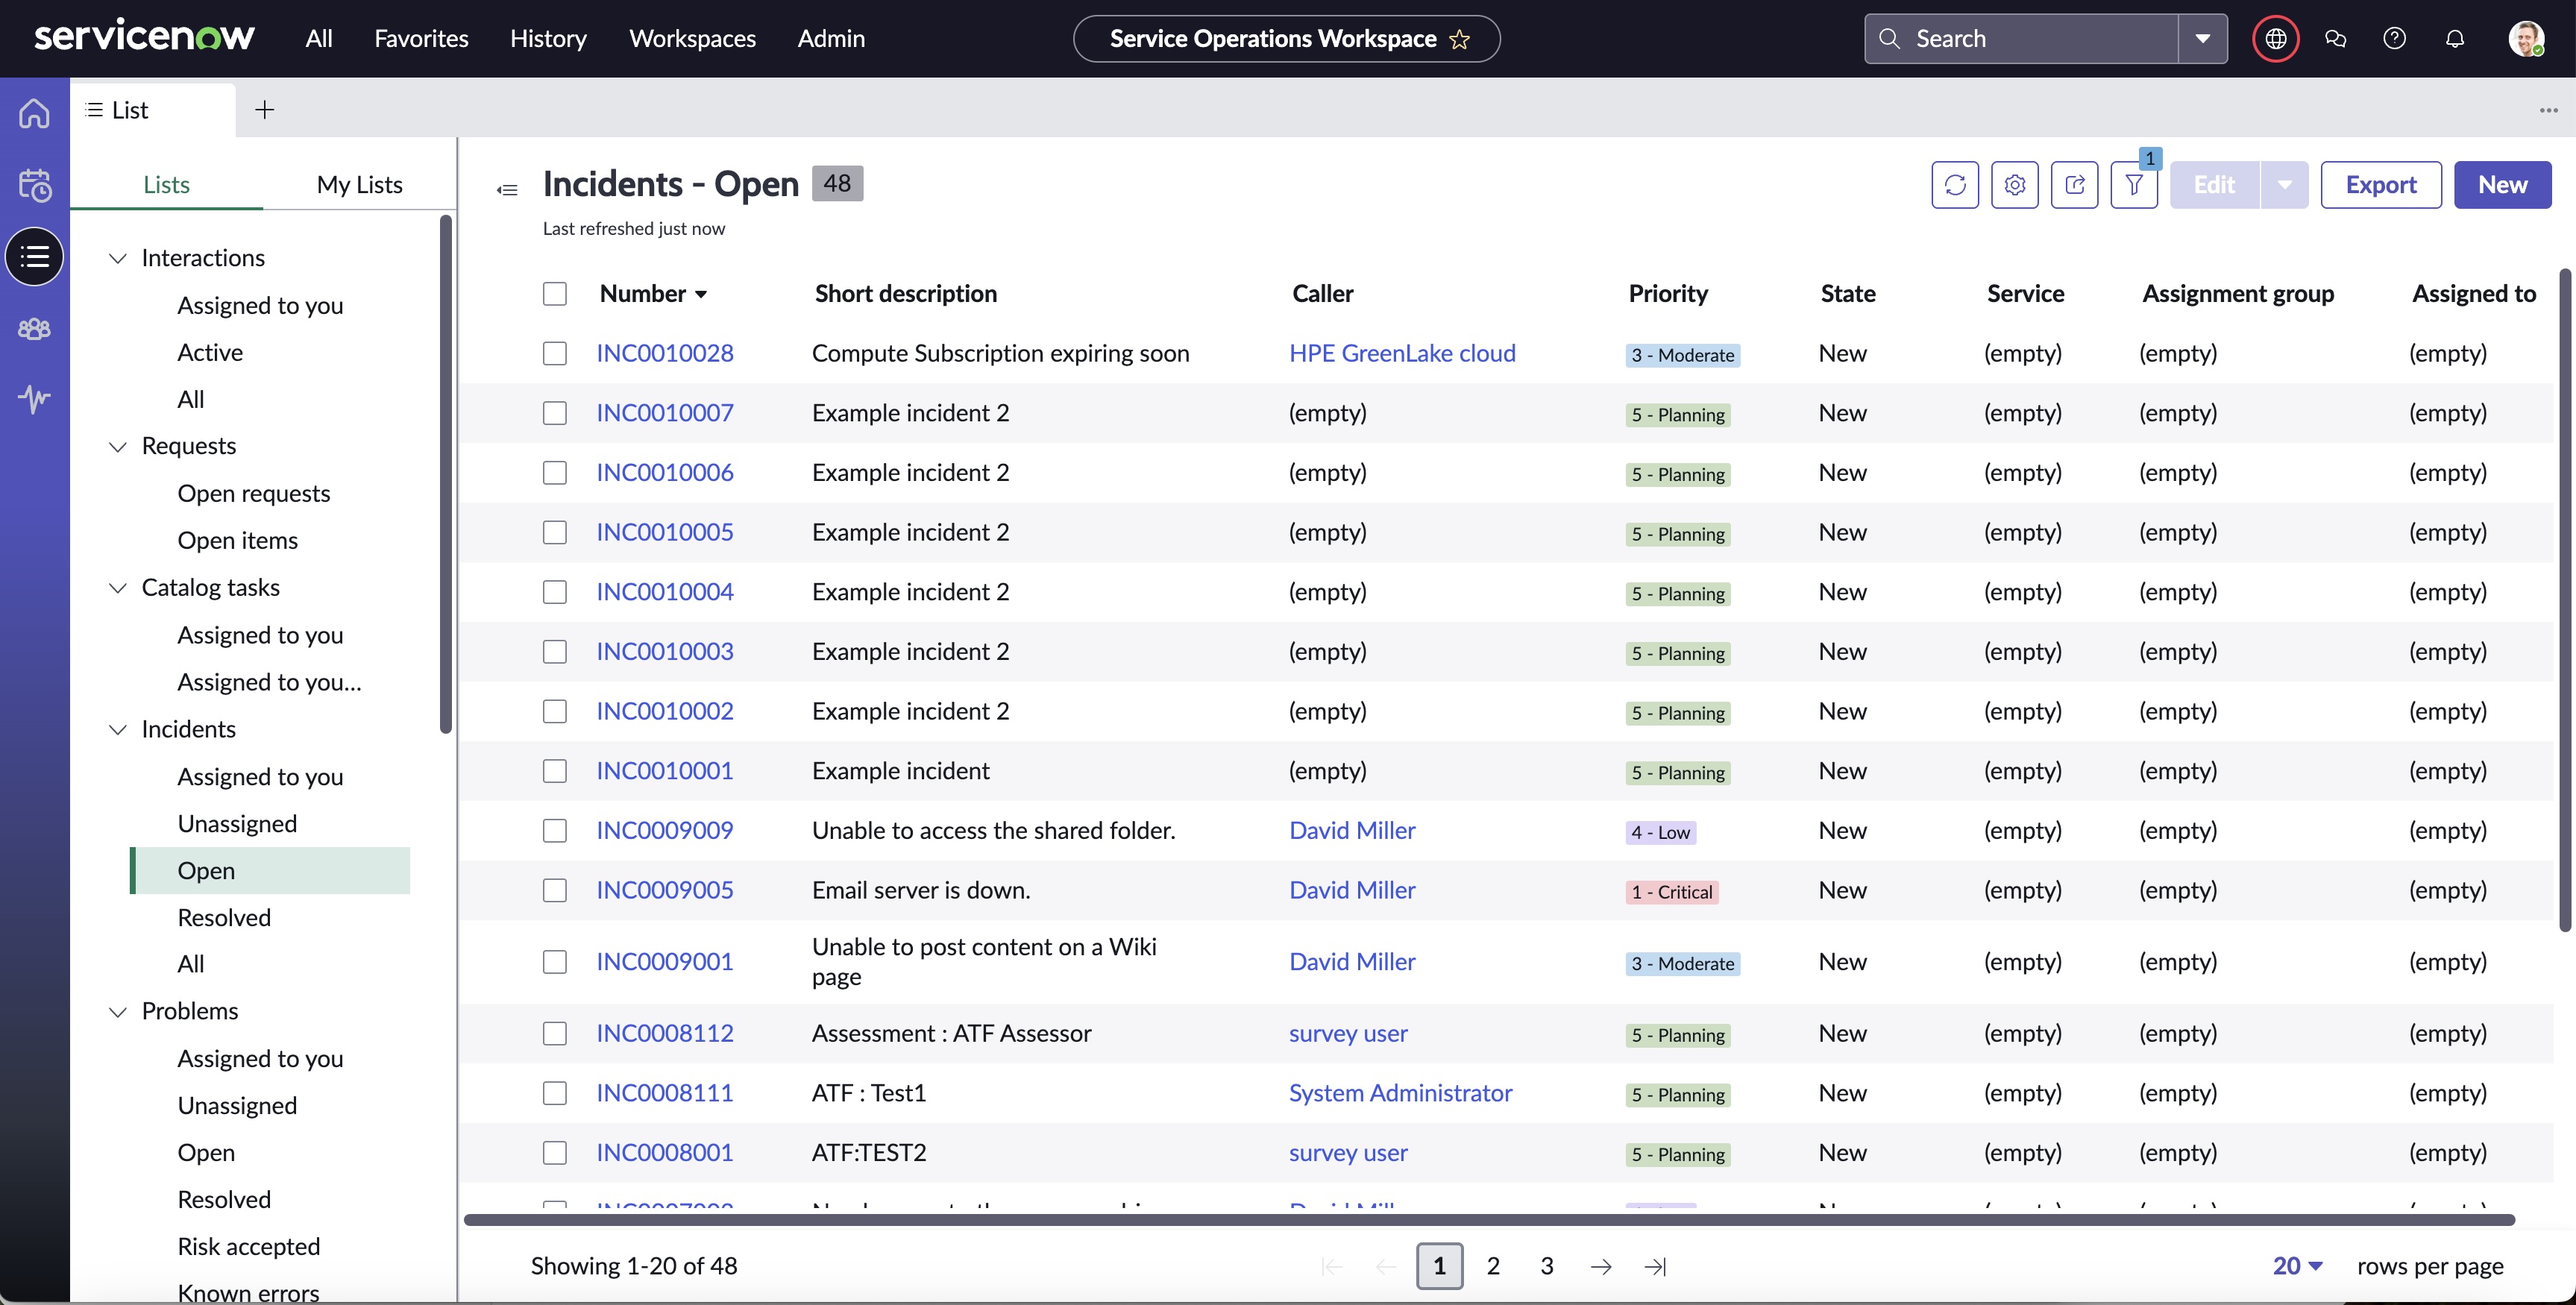
The new incident, visible at the top of the list above, was automatically opened by the webhook handler. I can open it to check out the details that were set up by the webhook handler:
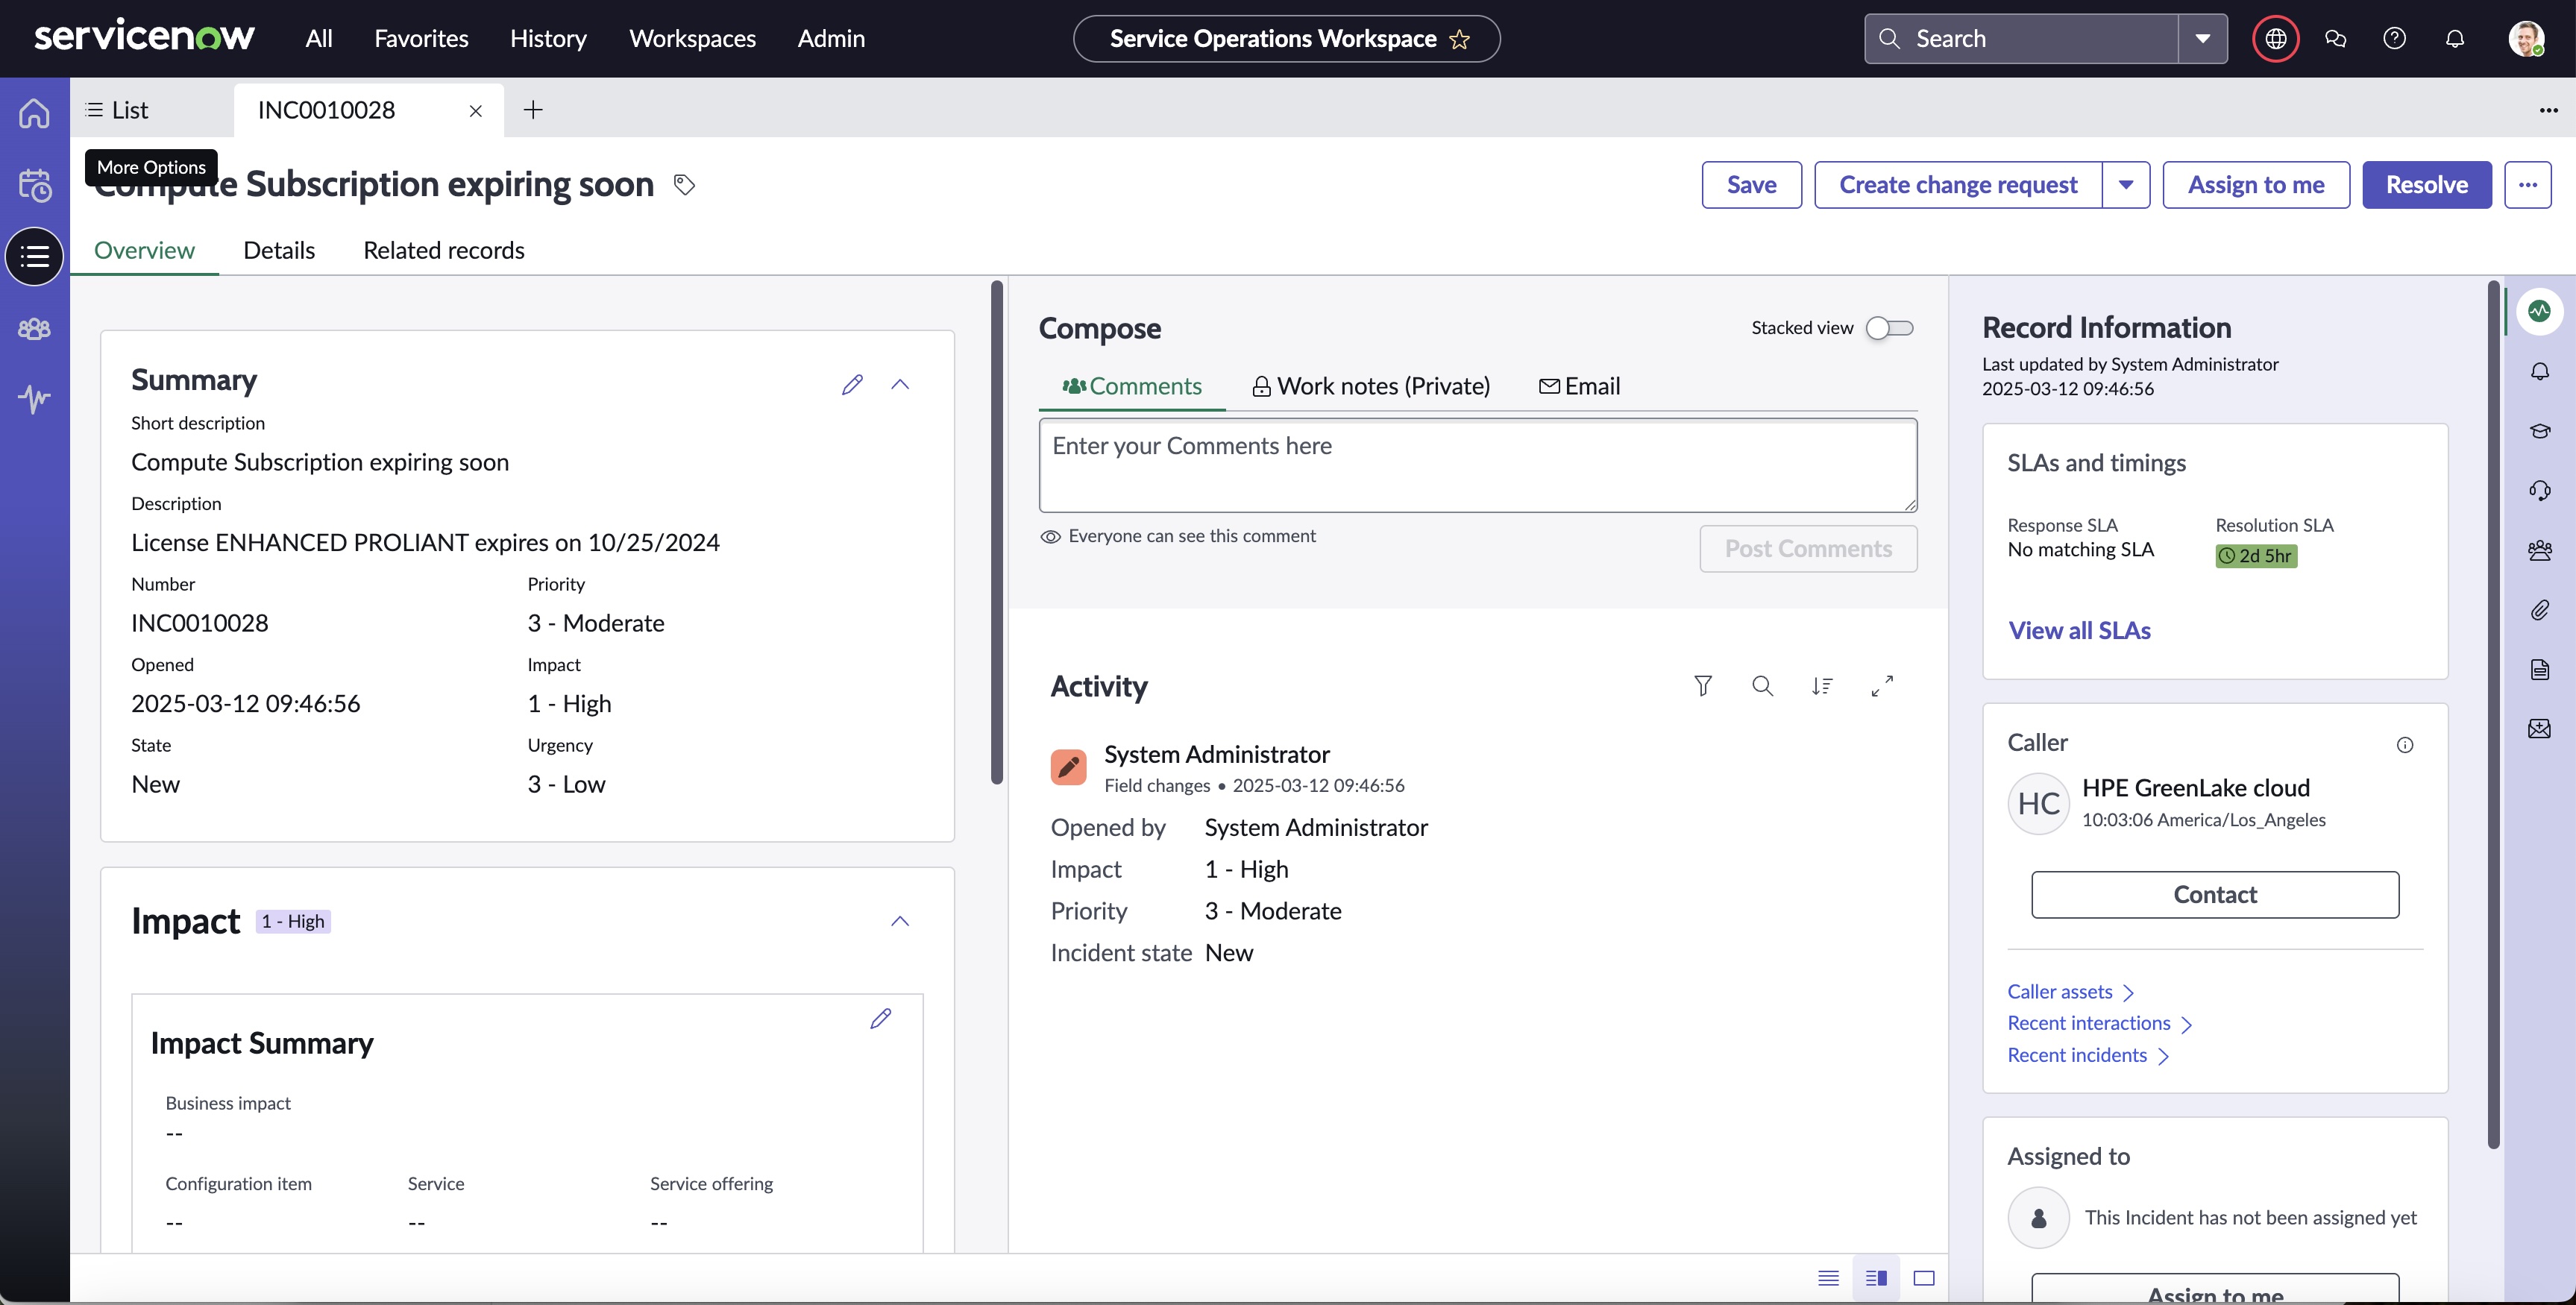
This HPE GreenLake cloud event is now an incident in ServiceNow. It will continue its lifecycle until its closure in ServiceNow.
Call to action
Webhooks together with the HPE GreenLake cloud events framework provide a great way to integrate with HPE GreenLake cloud using modern technology. They provide great flexibility on where you can run the subscriber code and allow you to choose the language in which to write the webhook code. They also allow you to build a tight integration with an existing platform such as ServiceNow or HPE OpsRamp.
Additional benefits I can see from this technique are:
- No need to verify that a polling code is still running
- No risk of API token expiration
- No loss of events
- It’s a well-established industry standard mechanism
- There is a huge choice of implementation methods including low code/no code ones
Note: While a low-code/no-code approach was taken in this tutorial, the same logic applies to any other programming language selected.
You can request access to this feature by signing up to the Automations/Webhook Access Beta Program here.
Related
Bringing AI assistants to GreenLake with MCP Servers
Dec 3, 2025
Getting started with webhooks on HPE GreenLake cloud
Feb 6, 2025