Do you run your applications in virtual machines on VMware today using the same patterns once employed by bare-metal paradigms? It's just a bit more efficient from a resource consumption perspective, but what about the lifecycle of the application, its dependencies — including libraries, host operating systems and various mnemonics — used to keep the application up and running?
Containerization, and Kubernetes in particular, helps businesses move away from imperative operational models that require multiple teams to perform tedious tasks on a regular basis. It allows them to adopt an agile declarative model where there's a clean separation of concerns, along with a high degree of automation and abstractions that make sense for running a high-performance technology company.
In this blog post, we’ll discuss a methodology that can be employed for lifting and transforming legacy stateful applications running on VMware vSphere to Kubernetes using HPE Alletra, Nimble Storage or Primera and the HPE CSI Driver for Kubernetes. The destination Kubernetes cluster could potentially be running on VMware vSphere or any other hypervisor, but it’s not a requirement. As long as the Kubernetes cluster and the origin VMware vSphere environment has connectivity to the underlying array, we’re in good shape.
The TL;DR version of this blog post is available as an instructional lightboard video published on YouTube. The blog post concretizes what’s being outlined in the lightboard video.
Still want more details? Let’s get started!
Origin state
In the following example, we’re going to use a MariaDB database with the commonly used Employees database as an example workload. It provides a simple means to validate its contents and ensure that the contents are intact throughout its journey.
The database is running in a standalone Virtual Machine (VM) hosted on a legacy NFS datastore.
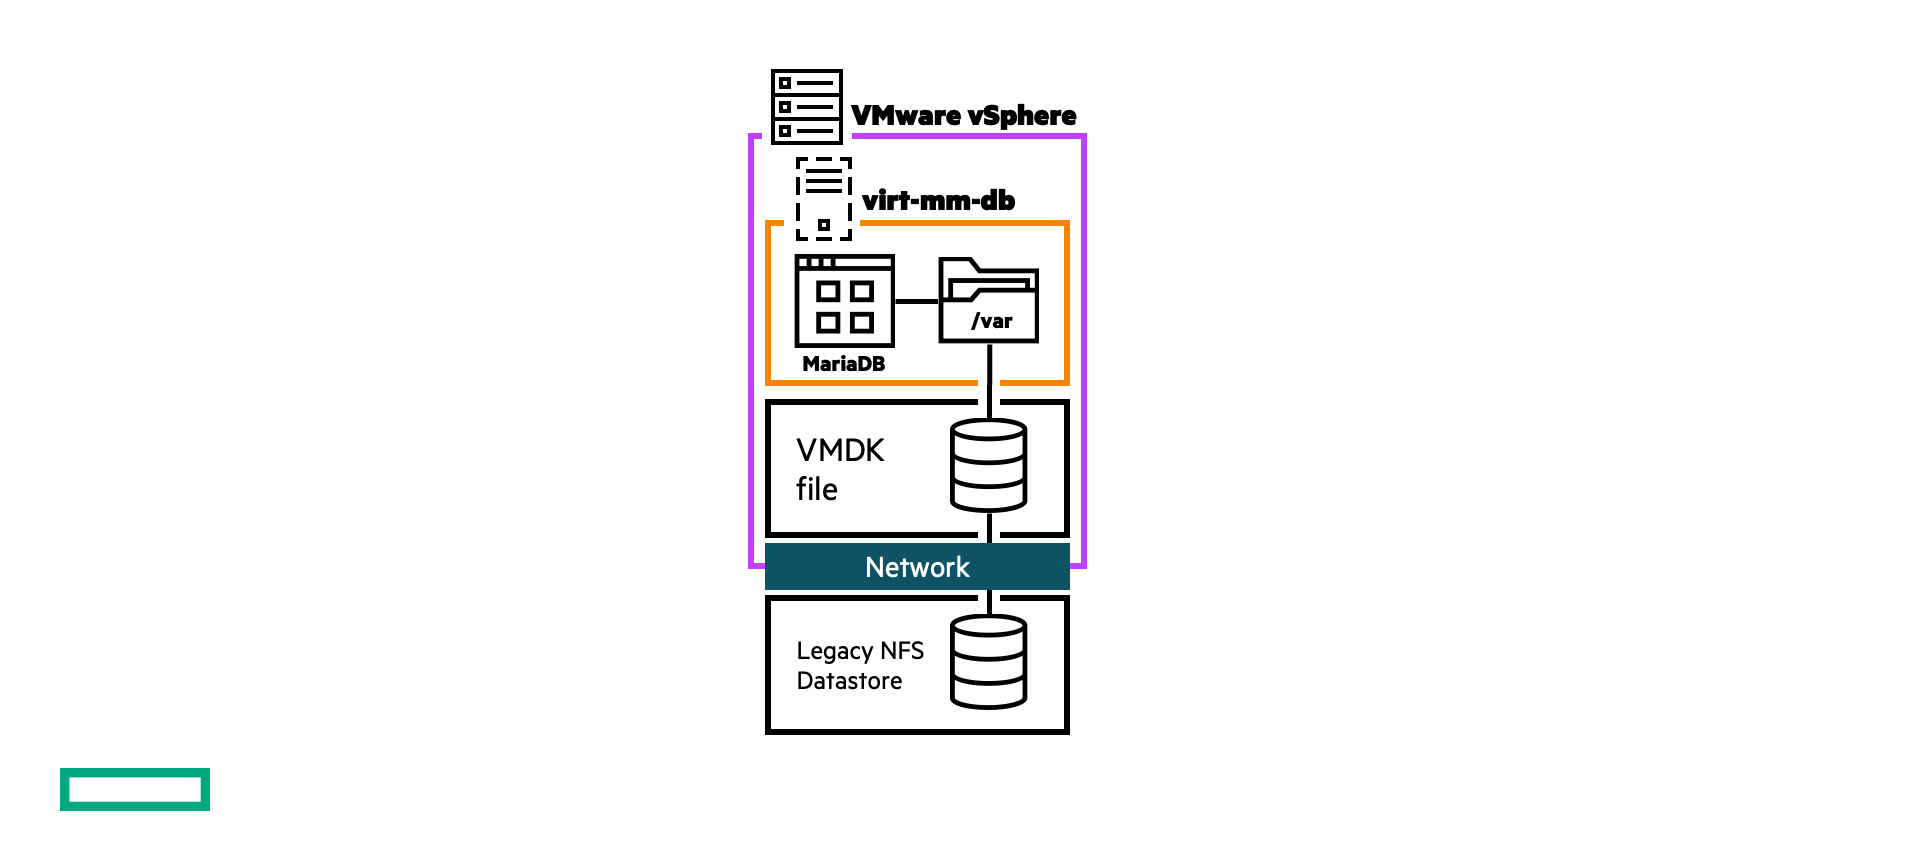
The content is simply validated by loading a SQL statement file provided in the GitHub repo.
$ mysql -u mmattsson -ppassword < test_employees_sha.sql
INFO
TESTING INSTALLATION
table_name    expected_records    expected_crc
departments    9    4b315afa0e35ca6649df897b958345bcb3d2b764
dept_emp    331603    d95ab9fe07df0865f592574b3b33b9c741d9fd1b
dept_manager    24    9687a7d6f93ca8847388a42a6d8d93982a841c6c
employees    300024    4d4aa689914d8fd41db7e45c2168e7dcb9697359
salaries    2844047    b5a1785c27d75e33a4173aaa22ccf41ebd7d4a9f
titles    443308    d12d5f746b88f07e69b9e36675b6067abb01b60e
table_name    found_records       found_crc
departments    9    4b315afa0e35ca6649df897b958345bcb3d2b764
dept_emp    331603    d95ab9fe07df0865f592574b3b33b9c741d9fd1b
dept_manager    24    9687a7d6f93ca8847388a42a6d8d93982a841c6c
employees    300024    4d4aa689914d8fd41db7e45c2168e7dcb9697359
salaries    2844047    b5a1785c27d75e33a4173aaa22ccf41ebd7d4a9f
titles    443308    d12d5f746b88f07e69b9e36675b6067abb01b60e
table_name    records_match    crc_match
departments    OK    ok
dept_emp    OK    ok
dept_manager    OK    ok
employees    OK    ok
salaries    OK    ok
titles    OK    ok
computation_time
00:00:49
summary    result
CRC    OK
count    OK
In the remaining tests throughout this post, only the summary results will be displayed.
Destination state
When the transition has completed, the Employees database should be running on a Kubernetes cluster using persistent storage provided by the HPE CSI Driver for Kubernetes backed by a HPE Nimble Storage array. The procedures are similar regardless of the backend (HPE Alletra and Primera included).
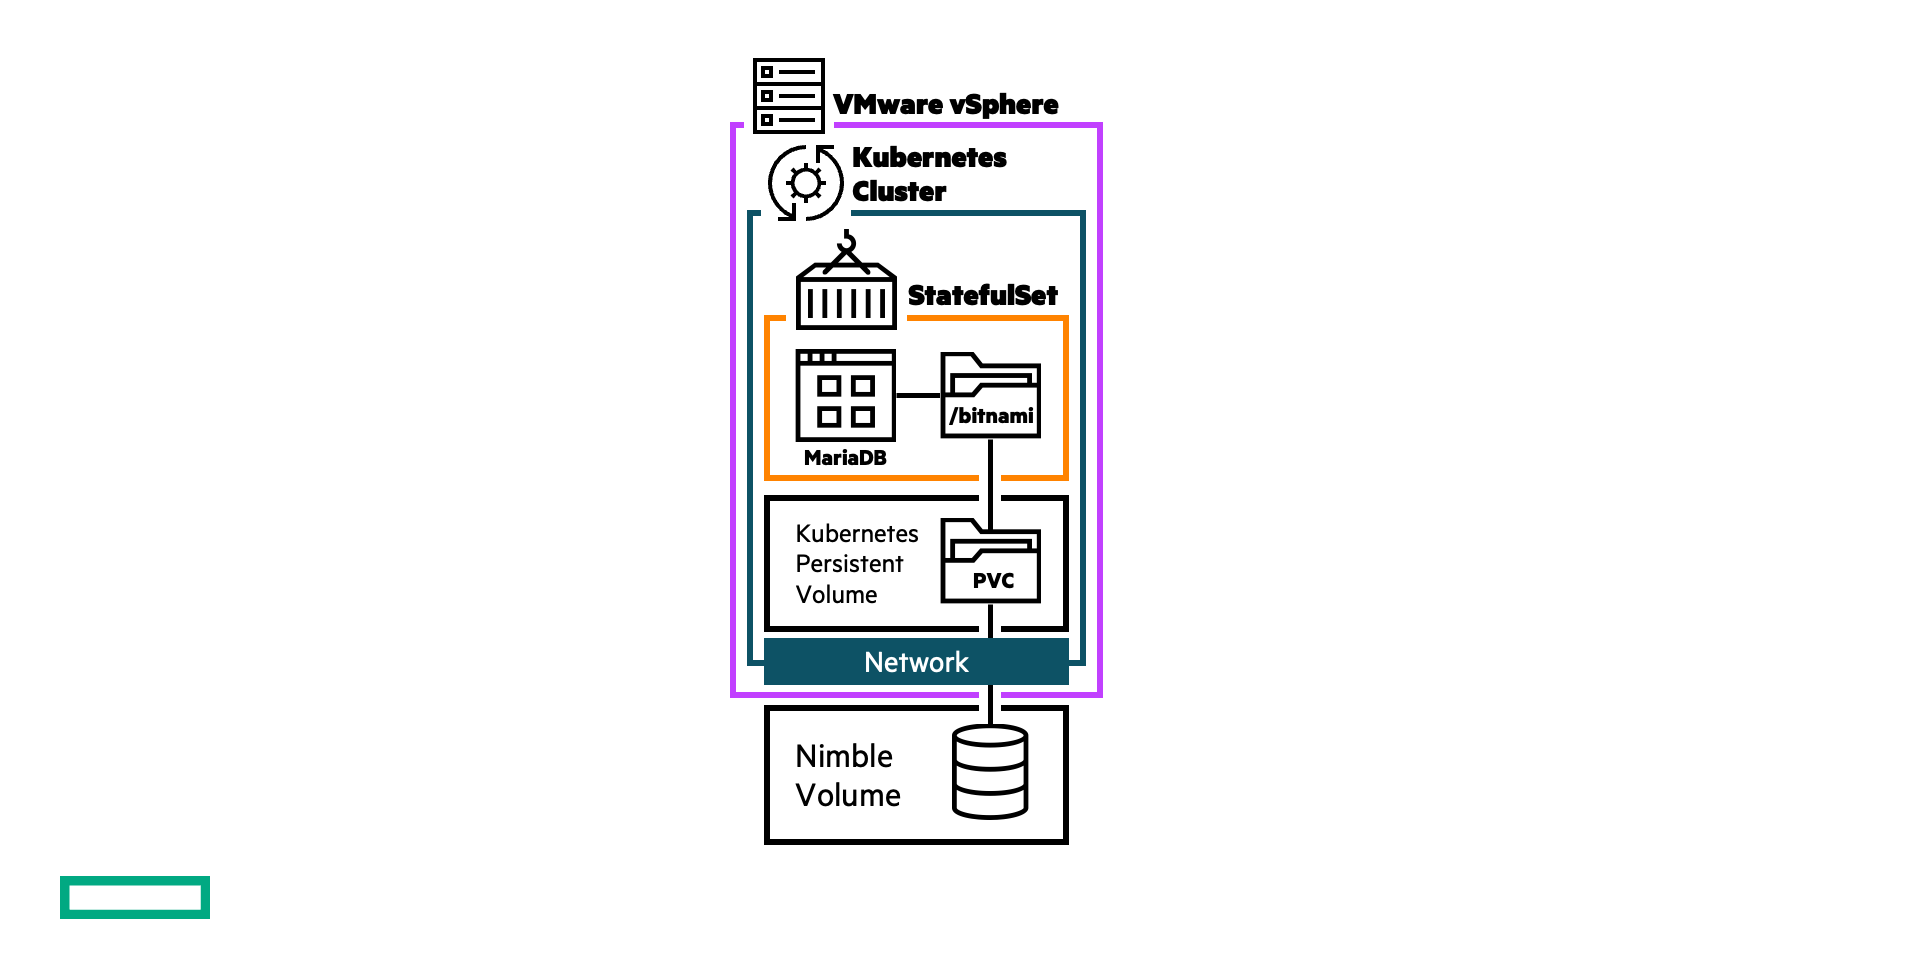
While the destination state in our example is a virtualized Kubernetes cluster within the same vSphere environment, that is not a requirement. It can be any hypervisor, bare-metal or otherwise as long as the destination cluster is compatible with the HPE CSI Driver for Kubernetes and any of the supported backends.
Initial transition
The first step in becoming agile with the dataset of interest (the MariaDB database in this case) is to transition the virtual machine's storage to a VMware vSphere Virtual Volume (vVol) from the legacy NFS datastore. This is done with VMware vSphere Storage vMotion that allows the live migration of a running virtual machine's file system from one storage system to another, with no downtime for the VM or service disruption.
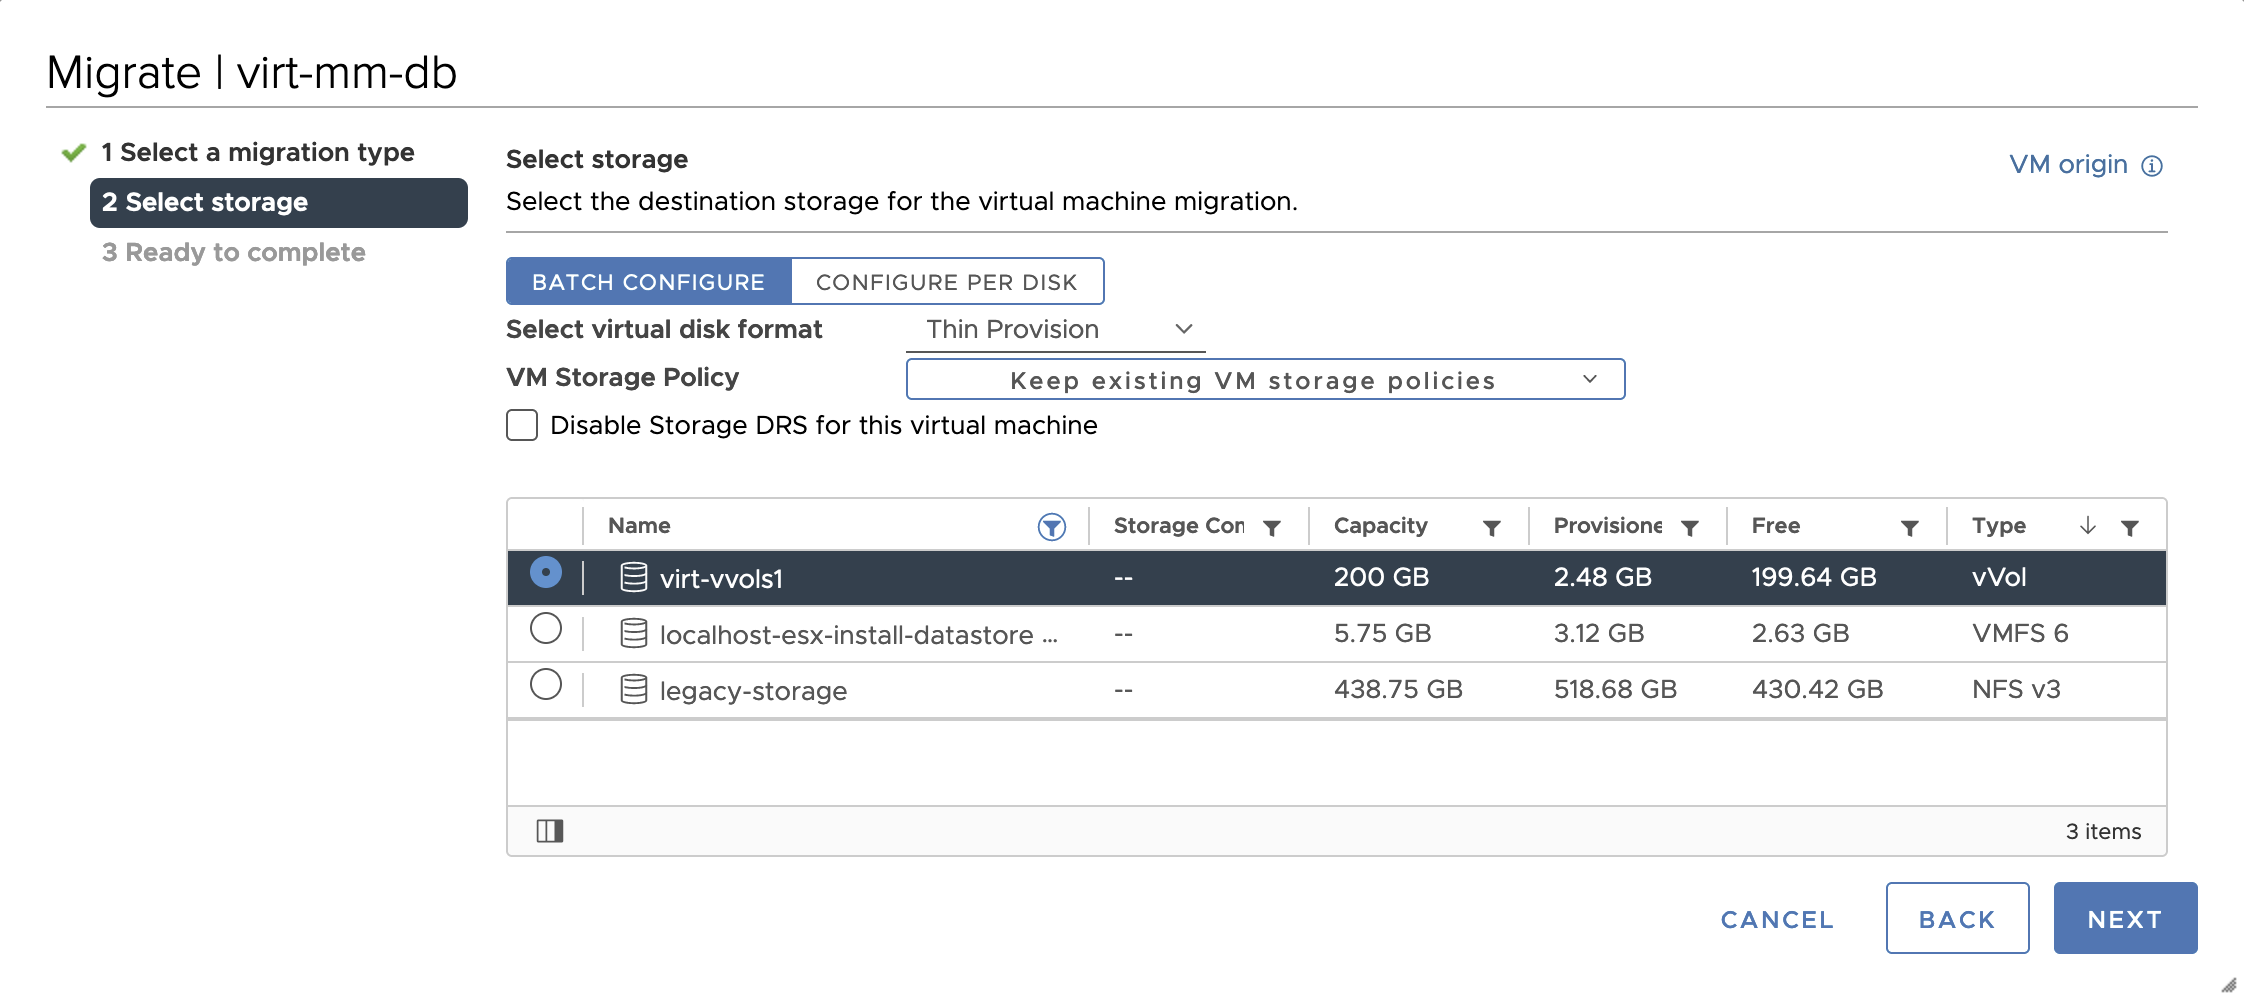
Another important detail is that the data that matters to the application resides in a filesystem compatible with the destination Kubernetes cluster and without partitioning schemes or volume managers. We know for a fact that MariaDB stores all its data on /var/lib/mysql, so let’s investigate that path.
$ df -h /var/lib/mysql
Filesystem      Size  Used Avail Use% Mounted on
/dev/sda         64G  1.2G   63G   2% /var
In the output we can clearly see that the filesystem of interest resides on a disk device without a volume manager or a partitioning scheme. If this is not the case, the data needs to migrate within the VM to a new blank disk.
Once the disk(s) have been migrated over the HPE Nimble Storage array, each individual virtual disk is represented as a standalone volume along with the VM's metadata volumes.
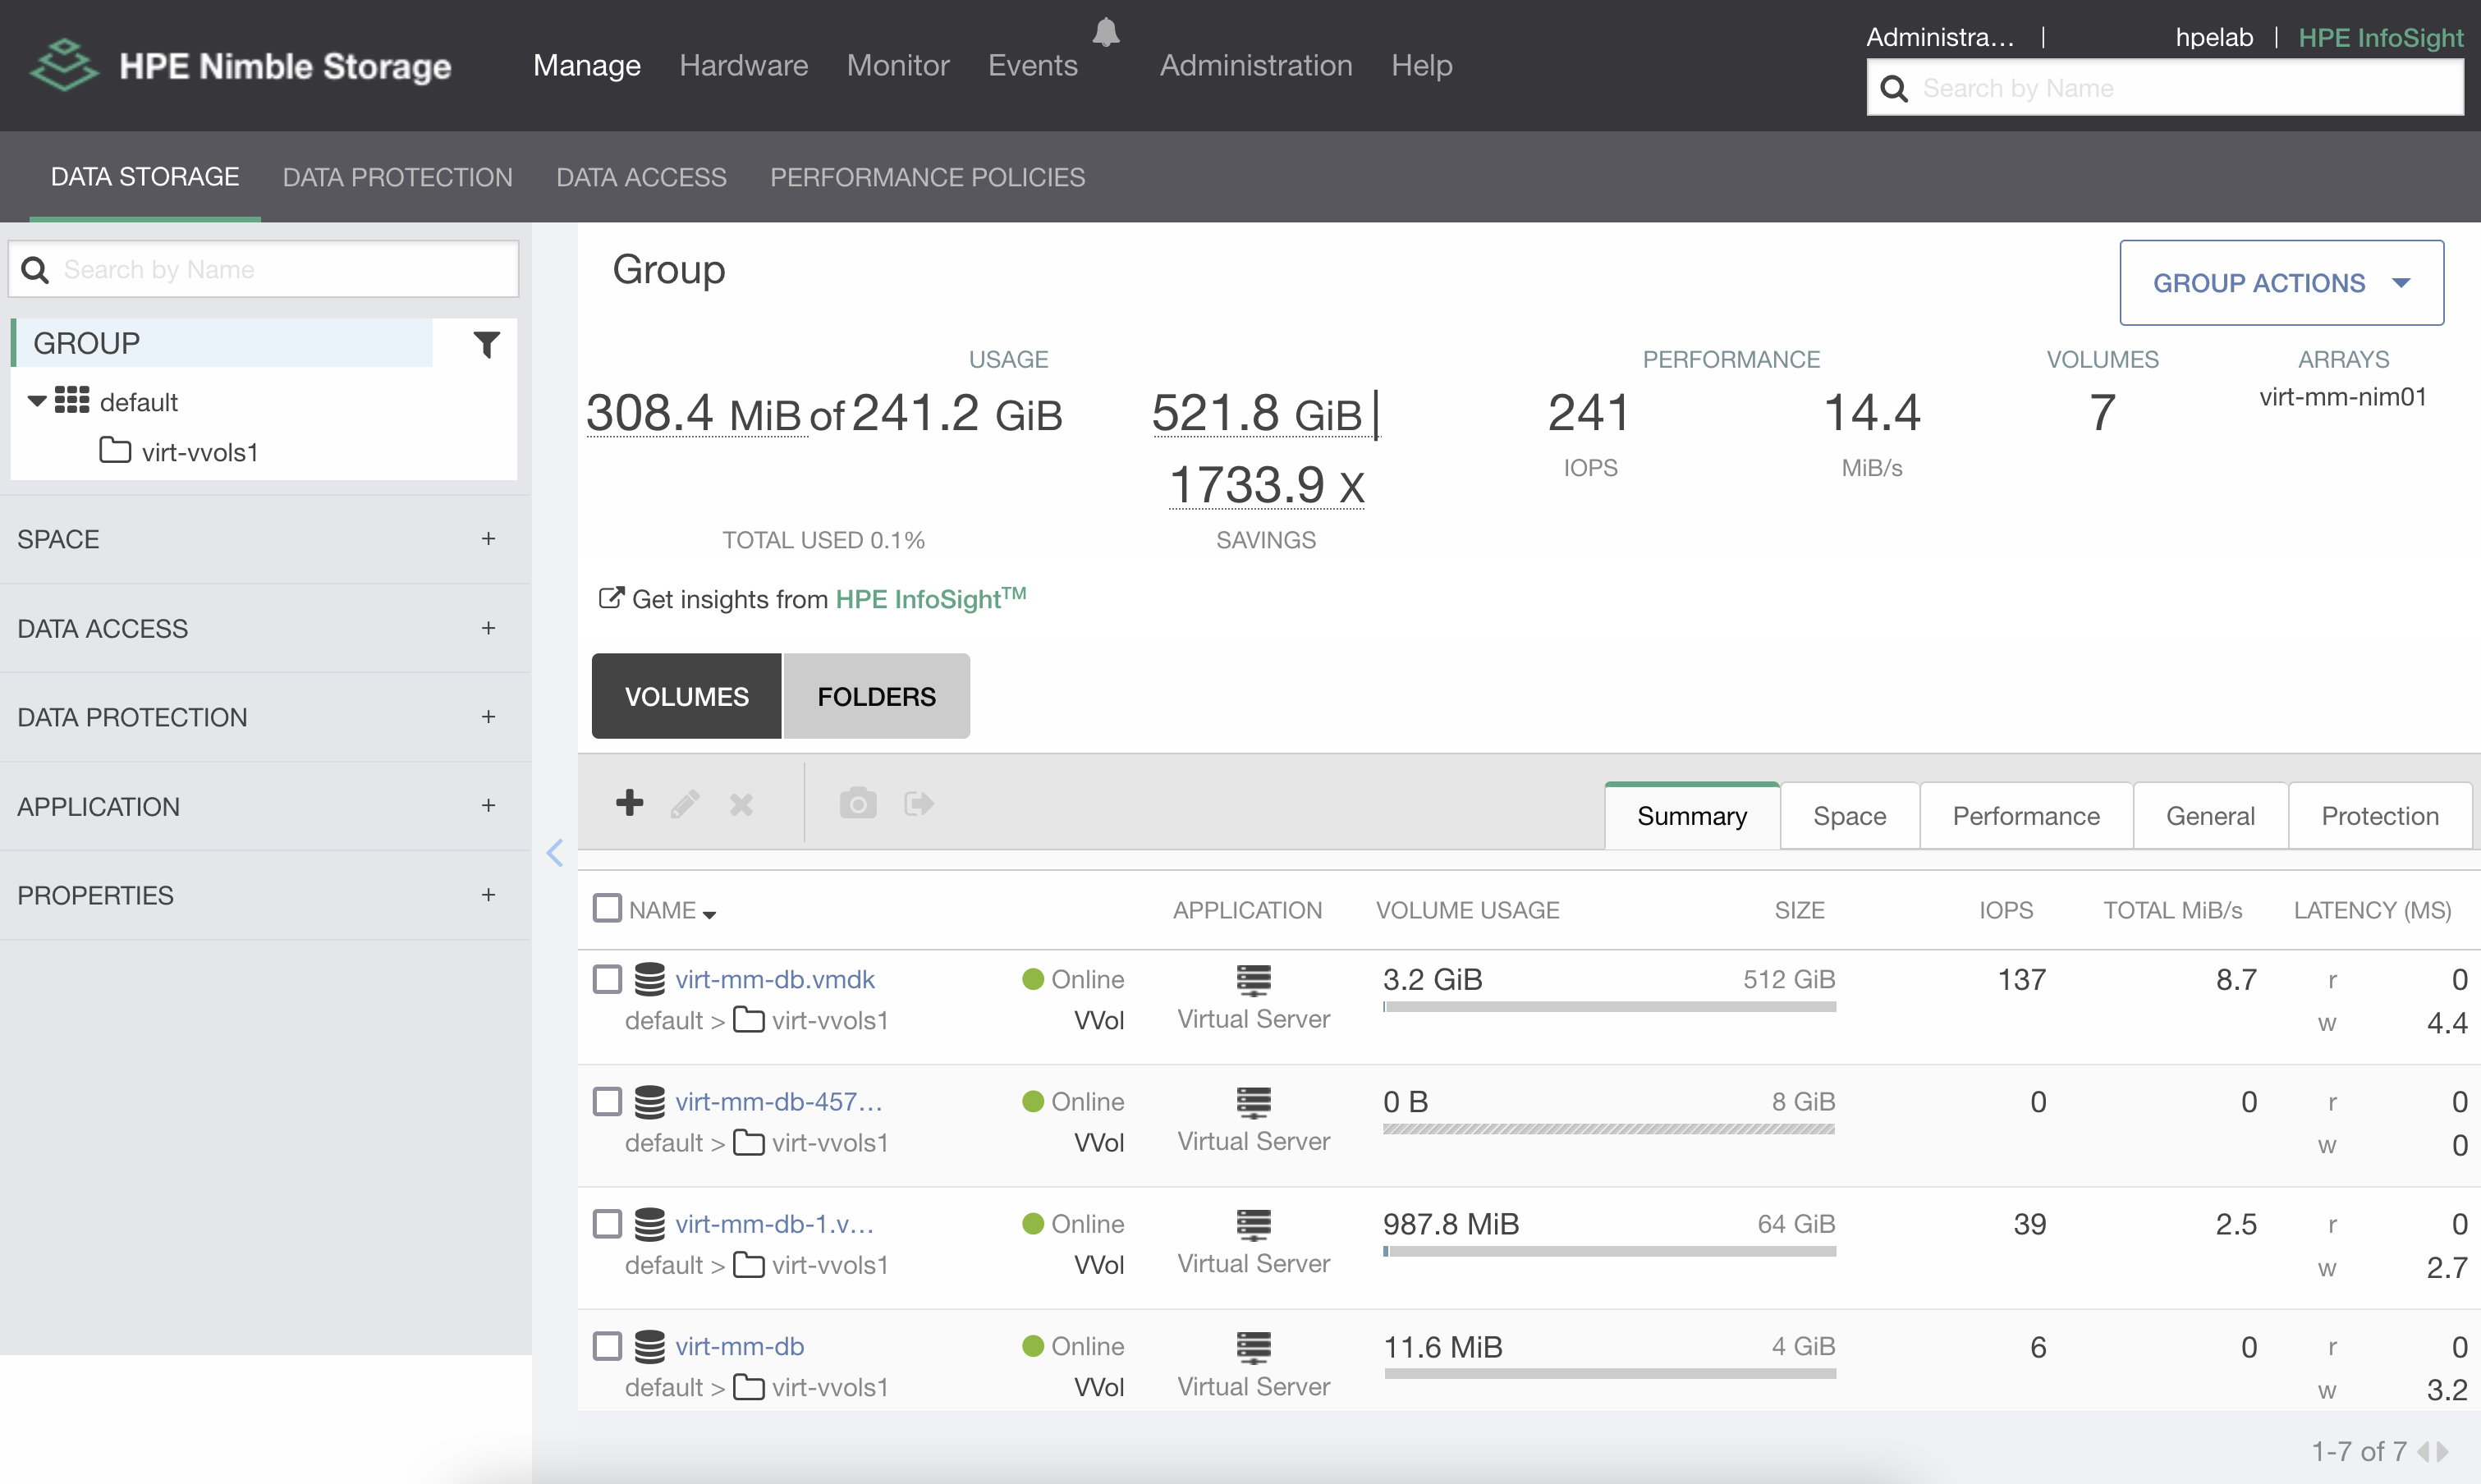
The 64GB volume represents the /var filesystem subject for transforming into a Kubernetes persistent volume.
Iterate and learn
In this next phase of the workflow, all configuration and testing are performed directly from the Kubernetes cluster. An admin needs to install the HPE CSI Driver for Kubernetes, create a Secret that represents the backend user or tenant and setup a StorageClass designed to allow the importing of volumes.
There are several ways to deploy the HPE CSI Driver but the most common method is to use Helm. Here's the gist of it.
$ kubectl create ns hpe-storage
$ helm install my-hpe-csi-driver hpe-storage/hpe-csi-driver --version 2.1.1-0 -n hpe-storage
Next, create a Secret for the backend.
apiVersion: v1
kind: Secret
metadata:
  name: hpe-backend
  namespace: hpe-storage
stringData:
  serviceName: nimble-csp-svc
  servicePort: "8080"
  backend: <Your Nimble array>
  username: <Your username with privileges to the vVol folder>
  password: <Your password>
A StorageClass needs to be specifically crafted to allow users to import volumes and snapshots from the storage array.
apiVersion: storage.k8s.io/v1
kind: StorageClass
metadata:
  name: hpe-transform
provisioner: csi.hpe.com
parameters:
  csi.storage.k8s.io/fstype: xfs
  csi.storage.k8s.io/controller-expand-secret-name: hpe-backend
  csi.storage.k8s.io/controller-expand-secret-namespace: hpe-storage
  csi.storage.k8s.io/controller-publish-secret-name: hpe-backend
  csi.storage.k8s.io/controller-publish-secret-namespace: hpe-storage
  csi.storage.k8s.io/node-publish-secret-name: hpe-backend
  csi.storage.k8s.io/node-publish-secret-namespace: hpe-storage
  csi.storage.k8s.io/node-stage-secret-name: hpe-backend
  csi.storage.k8s.io/node-stage-secret-namespace: hpe-storage
  csi.storage.k8s.io/provisioner-secret-name: hpe-backend
  csi.storage.k8s.io/provisioner-secret-namespace: hpe-storage
  description: Volume transformed from vVol by HPE CSI Driver
  allowOverrides: importVolAsClone,importVolumeName,forceImport
reclaimPolicy: Delete
allowVolumeExpansion: true
The important details in the StorageClass are the allowOverrides. Here, we put the parameters we want the application admin to override once testing has started (importVolAsClone) and once the database is ready for the final import (importVolumeName and forceImport).
For the final production instance, we’re going to use the Bitnami MariaDB Helm chart. For this chart to install cleanly and be able to bring up the database, the following considerations need to be taken into account:
- There needs to be a known
root@localhostaccount with a known password in the source database. - The Bitnami chart does not support altering the
mountPath. The source filesystem needs to have a symlink to/var/lib/mysqlfrom/var/lib/data.
For the initial cloning of the source database, the following values.yaml file is being used.
image:
  tag: 10.3
auth:
  rootPassword: my-password
global:
  imagePullSecrets: # Only needed if you're rate limited to Docker Hub
  - regcred
primary:
  persistence:
    enabled: true
    storageClass: hpe-transform
    annotations:
      csi.hpe.com/importVolAsClone: virt-mm-db-1.vmdk
    size: 64Gi
    subPath: lib
The above parameters are quite self-explanatory. The subPath directive instructs the kubelet to mount the lib directory in the root of the volume. As a result, /lib in the volume will be mounted at /bitnami/mariadb and the data subdirectory, which holds the MariaDB databases, will be seen properly by the container binaries.
Deploying the chart is straight forward.
$ helm repo add bitnami https://charts.bitnami.com/bitnami
$ helm install my-test-clone bitnami/mariadb -f values.yaml
Once the chart is deployed and the database comes up, the "Hello World" test will, of course, verify the database.
$ kubectl exec -it my-test-clone-mariadb-0 -- bash
I have no name!@my-test-clone-mariadb-0:/$ mysql -ummattsson -ppassword < /bitnami/mariadb/scripts/test_employees_sha.sql
INFO
TESTING INSTALLATION
computation_time
00:00:49
summary    result
CRC    OK
count    OK
It's likely that things may not come up properly on the first couple of iterations. It needs to read logs, error messages, and course correct until the database comes up cleanly. Once it does, in a production scenario, test clients can be attached to further validate and solidify that moving the application to Kubernetes will actually work.
The endgame
Up until now, there’s been zero downtime or disruption to the source application. The final step of this project is a one-way street. Ensure clients can connect to the destination database instance before proceeding.
While it’s harmless to leave the test clone chart and PersistentVolumeClaim on the cluster, we’ll remove it to avoid confusion.
$ helm uninstall my-test-clone
$ kubectl delete pvc/data-my-test-clone-mariadb-0
Next, we need to prepare the values-prod.yaml file.
image:
  tag: 10.3
auth:
  rootPassword: my-password
global:
  imagePullSecrets: # Only needed if you're rate limited to Docker Hub
  - regcred
primary:
  persistence:
    enabled: true
    storageClass: hpe-transform
    annotations:
      csi.hpe.com/importVolumeName: virt-mm-db-1.vmdk
      csi.hpe.com/forceImport: "true"
    size: 64Gi
    subPath: lib
The only change we need to make is the annotations stanza. Changing the directive from importVolAsClone to importVolumeName. We also need to “force” the import as the volume we’re importing already has residual vSphere application metadata associated with it. That will be overwritten by the HPE CSI Driver when forcing the import.
Before deploying the new chart, the source VM needs to be shut down and removed from vSphere control. With HPE Nimble Storage and HPE Alletra 6000, it’s perfectly safe to orderly shut down the VM and “Delete from Disk” in the vCenter context menus. If you’re attempting these workflows and procedures with HPE Alletra 9000, Primera or 3PAR, only use “Remove from Inventory” to prevent disruption.
Also, remember to have backups or volume replicas and a contingency plan for any unplanned event.
Once the VM has been deleted from vSphere, the remnants on the storage array can be seen as offline volumes. The metadata volumes have been permanently removed.
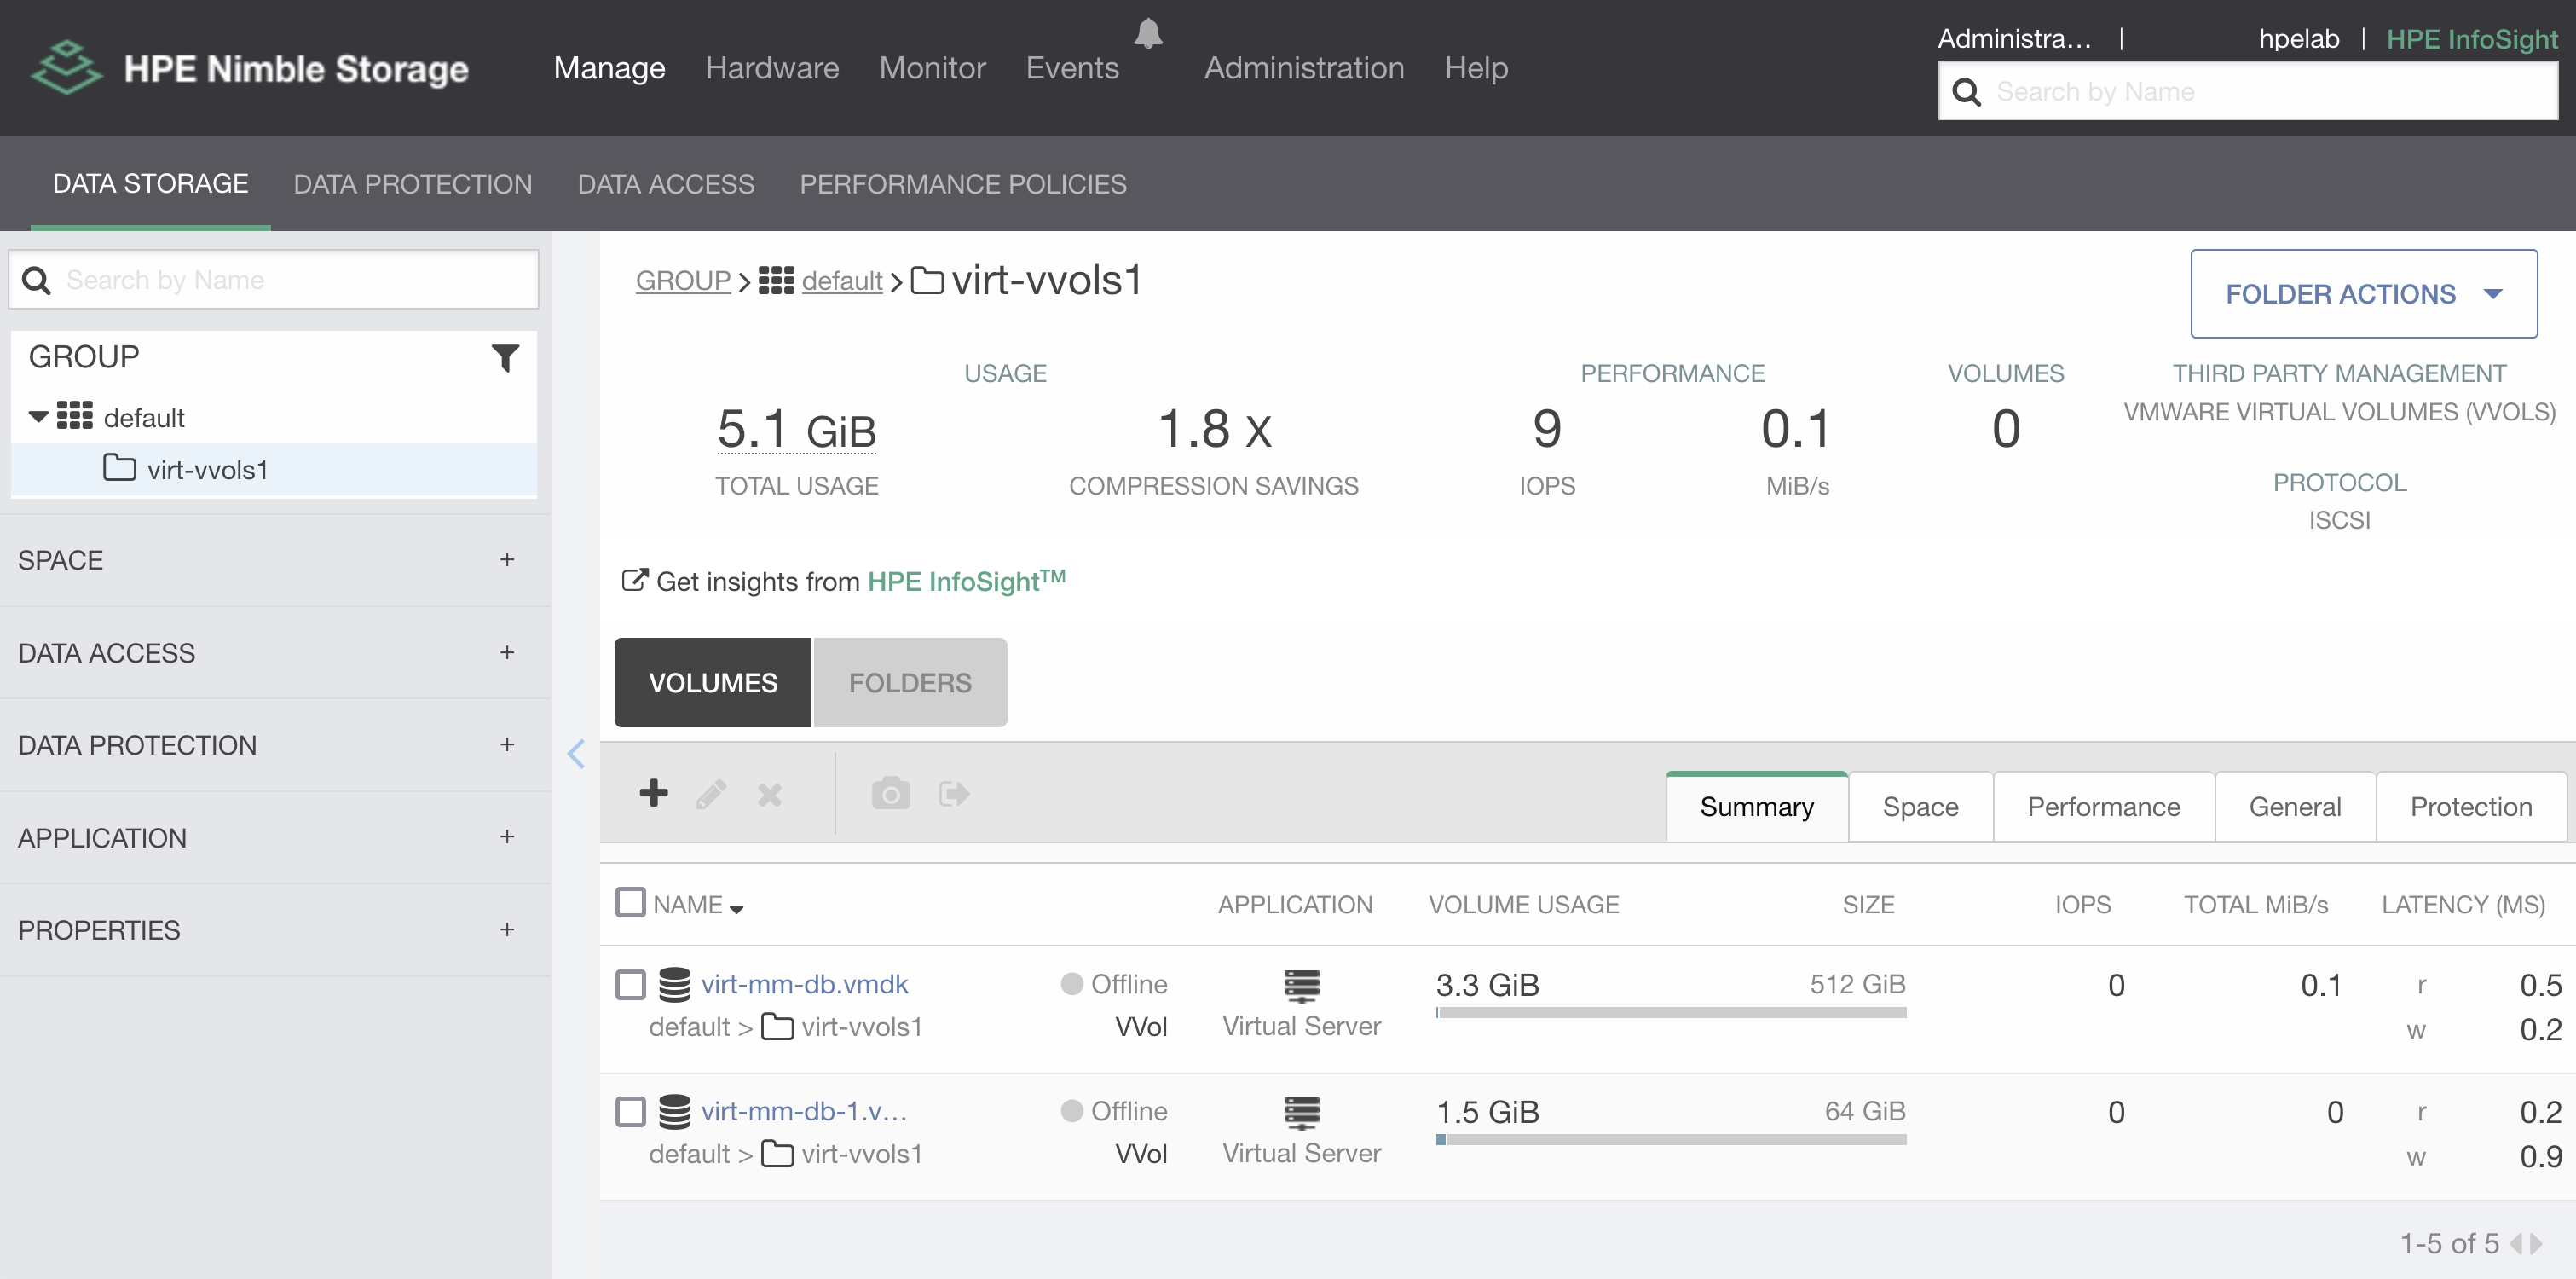
An important detail to understand is that importVolumeName only works for offline volumes on HPE Alletra 6000 and Nimble Storage.
Ok, let’s import the database into its final state.
$ helm install my-prod bitnami/mariadb -f values-import.yaml
Once the database is up, we can connect to the database and verify the contents yet again.
$ kubectl exec -it my-prod-mariadb-0 -- bash
I have no name!@my-prod-mariadb-0:/$ mysql -u mmattsson -ppassword < /bitnami/mariadb/scripts/test_employees_sha.sql
INFO
TESTING INSTALLATION
computation_time
00:00:48
summary    result
CRC    OK
count    OK
Back on the storage array, the volume has automatically been renamed and now corresponds to the PersistentVolume name known to Kubernetes.
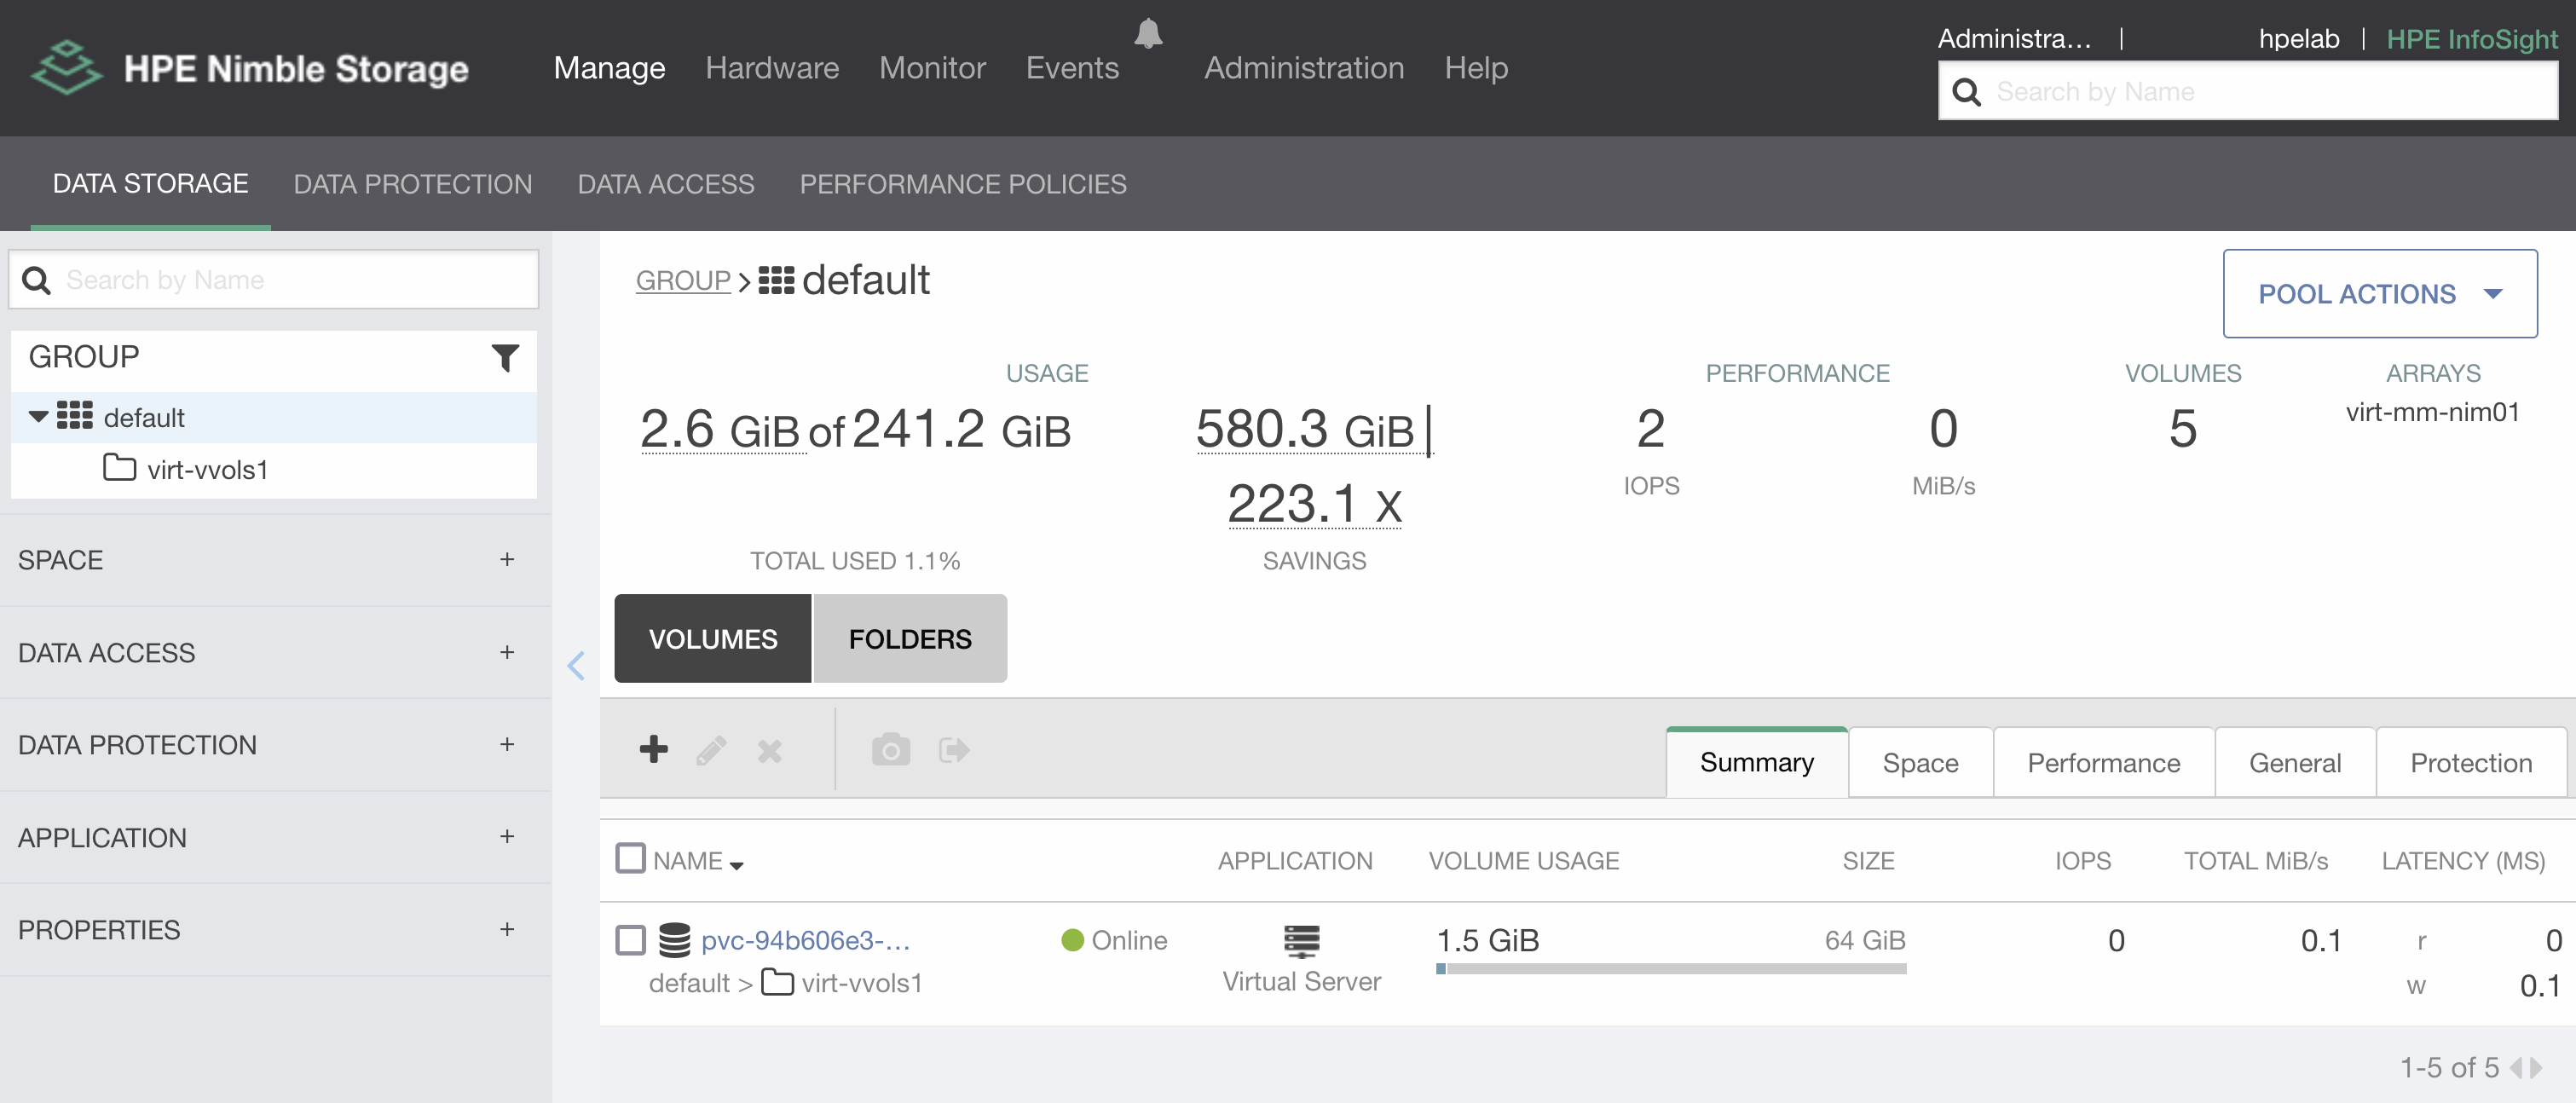
It’s also safe to move the volume out of the vVol datastore folder, as it’s a non-disruptive operation and may be carried out by a storage administrator.
Summary
While this blog only skims the surface of possibilities of performing IT transformations from thirty-year-old paradigms, it gives an idea of what tools DevOps teams have at their disposal while taking a crack at one of the biggest challenges in application modernization. The ability to iterate safely without production disruption is key. Quite frankly, I performed a dozen clone imports before I got every parameter right before the final import while writing this blog post. There is no easy button, you must put in the work!
I’m gearing up for HPE Discover 2022. If you’d like to connect and talk shop, I’ll be in the HPE Developer Community Hack Shack on the main expo floor. We have treasure hunts, hacking challenges and meetups. Find my session “Get Started with Persistent Storage for Kubernetes with the HPE CSI Driver” (HSM4991) in the HPE Discover content catalog.
The team is also on the HPE Developer Community Slack. Sign up and login to join the conversation on everything HPE Developer related. See you there!
Tags
Related
Catch HPE at KubeCon NA 2022
Oct 4, 2022Containers, Kubernetes, and MapR: The Time is Now
Feb 5, 2021
Deploy stateful MongoDB applications on Kubernetes clusters in HPE GreenLake for Private Cloud Enterprise
Aug 16, 2022Deploying Cribl Stream Containers on HPE GreenLake for Private Cloud Enterprise
Jan 17, 2024Doryd: A Dynamic Provisioner for Docker Volume plugins
Dec 6, 2017

