Integrating Istio and SPIRE on HPE GreenLake for Private Cloud Enterprise
April 25, 2023This blog demonstrates how to integrate Istio and SPIRE to enable advanced analysis and visualization of the service mesh.
Istio
Istio is an open-source service mesh that provides a uniform and efficient way to secure, connect, and monitor services. Istio automatically manages load balancing for HTTP, gRPC, WebSocket, and TCP traffic. For details, see The Istio service mesh.

SPIRE
SPIRE (SPIFFE Runtime Environment) is a production-ready implementation of the SPIFFE (Secure Production Identity Framework for Everyone) specification that performs node and workload attestation to securely issue cryptographic identities to workloads running in heterogeneous environments.
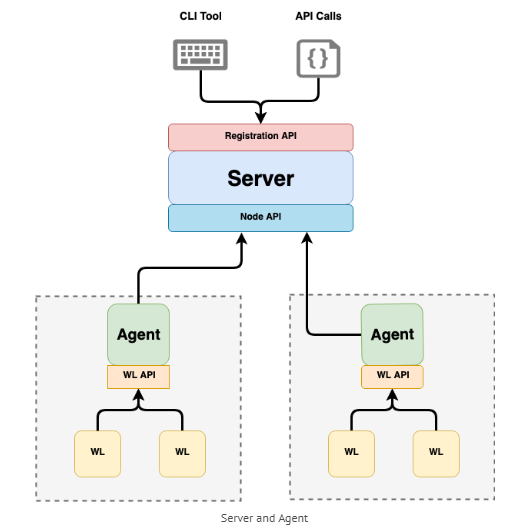
SPIRE can be configured as a source of cryptographic identities for Istio workloads through an integration with Envoy’s SDS (Secret Discovery Service) API. This integration with SPIRE provides flexible attestation options not available with the default Istio identity management while harnessing Istio’s powerful service management.

Once integrated, SPIRE issued certificates to workloads can be used for communication between different trust domains or between two different clusters also.
In this blog post, we will show you the steps you can use to install Istio and SPIRE on the same cluster and how to deploy a sample application using SPIRE-issued identities.
Step 1: Creating your own cluster
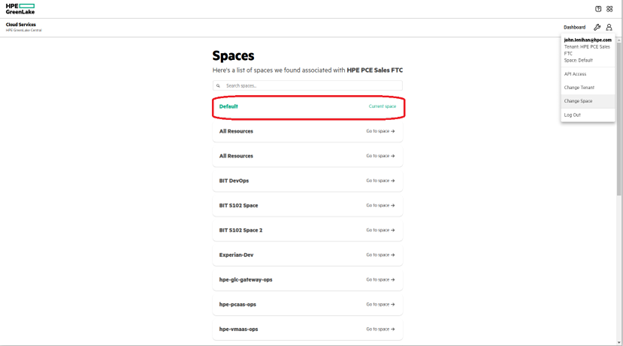
1.1 Go to HPE Greenlake client page.
1.2 Login to your tenant in HPE GreenLake Central and navigate to the HPE GreenLake for Private Cloud Enterprise dashboard. Click on Containers to launch into the containers dashboard.
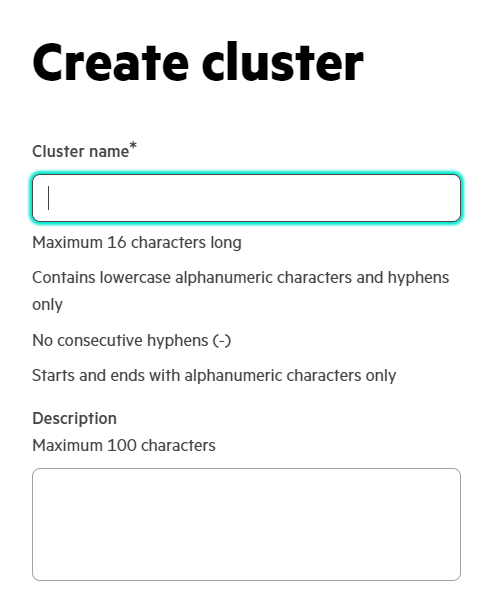
1.3 You will notice a page similar to the one shown below. Click Create cluster to create a new cluster, or you can also choose from the already created clusters. Ensure that you choose a cluster that does not have Istio pre-deployed, since this exercise will deploy SPIRE and Istio together.
1.4 After clicking Create cluster, give a name and description to your cluster and identify the type of cluster. In our case, we have chosen a large type.
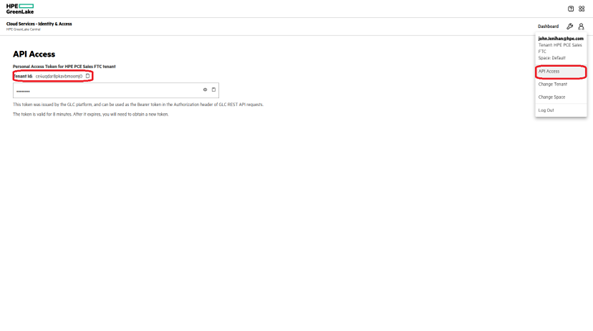
1.5 Obtain Kubeconfig for your cluster and launch a Web terminal to access your cluster to handle steps found later in this post.
From the Containers main page, click Launch Service Console to launch the HPE Ezmeral Runtime Enterprise. Open Kubectl, which allows you to enter commands to communicate with your cluster.
If Kubectl is not installed, download Kubectl and the HPE Kubectl Plugin from the Dashboard.
For more information, see Dashboard - Kubernetes Tenant/Project Administrator in the HPE Ezmeral Runtime Enterprise documentation.
Step 2: Install SPIRE
Get the quickstart yaml file using this link and copy that into your cluster and apply it by using kubectl.
kubectl apply -f spire-quickstart.yaml
This will install SPIRE into your cluster, along with two additional components: the SPIFFE CSI Driver and the SPIRE Kubernetes Controller manager which facilitate the registration of workloads and establishment of federation relationships.
Verify installation of SPIRE by checking if all pods are running and containers within them are up. Specifically, you should look for the agent and SPIRE server.
Note: The number of agents depends on number of nodes you are working with. Here, we are working with three worker nodes, so three agents are assigned for each node.
Use the command given below, and you will get the output as shown.
k8s-spiffe-integ-master-7j7fh-m67q9:~ kubectl get pods -n spire
NAME                            READY   STATUS    RESTARTS       AGE
spire-agent-5tlck               3/3     Running   2 (31d ago)    31d
spire-agent-gnwbj               3/3     Running   1 (31d ago)    31d
spire-agent-mghnw               3/3     Running   2 (31d ago)    31d
spire-server-574474c7dc-42kln   2/2     Running   4 (4d1h ago)   31d
Step 3: Install Istio
Download the latest release:
You can download the latest release using the official Istio repository or just copy the following command (which would do the same thing for you).
curl -L https://istio.io/downloadIstio | sh -
For details, reach out to ISTIO download page.
Get into the Istio directory and set the path by command:
export PATH=$PWD/bin:$PATH
After exporting, get out of directory.
cd ..
Note: In the future, a case might occur when your cluster does not recognize istioctl. In this case, export the path again after getting into the Istio directory.
Install Istio with patches:
After deploying SPIRE into your environment and verifying that all deployments are in Ready state, install Istio with custom patches for the Ingress-gateway as well as for Istio-proxy.
Get the istio-spire-config patch using this link and copy that patch into your cluster. Install that patch using following command.
istioctl install -f istio-spire-config.yaml
This will share the spiffe-csi-driver with the Ingress Gateway and the sidecars that are going to be injected on workload pods, granting them access to the SPIRE Agent’s UNIX Domain Socket.
Patching Istio-Ingress gateways
If you receive the error shown below, your ingress-gateway is not patched yet and is not being registered onto the server.

For patching, the first step is to get and apply one of SPIRE controller manager’s CRD (Custom Resource Definition) ClusterSPIFFEID. It is a cluster-wide resource used to register workloads with SPIRE. The ClusterSPIFFEID can target all workloads in the cluster or can be optionally scoped to specific pods or namespaces via label selectors.
Create a ClusterSPIFFEID CRD to generate registration entries in SPIRE server for all workloads with the label
spiffe.io/spire-managed-identity: true.Get the ClusterSPIFFEID used by us for this demo using this link, copy that into your cluster, and apply it.
kubectl apply -f cluster-spiffeID-crd.yamlNote: You can create your own custom clusterSPIFFEID CRD with your own match label and own selector. For now, we have created a simple CRD with one pod selector and one match label.
Now, simply patch the ingress-gateway with spiffe.io/spire managed-identity: true label.
This will register your ingress-gateway pod into the server.
kubectl patch deployment istio-ingressgateway -n istio-system -p '{"spec":{"template":{"metadata":{"labels":{"spiffe.io/spire-managed-identity": "true"}}}}}'After patching, confirm that your ingress-gateway pod, istiod, and all their containers work.
Step 4: Deploying Sample Application
Now that our SPIRE and Istio are integrated, the identities to workloads must be issued by SPIRE.
For our case, we will create a namespace “bookinfo” and will add a label “spiffe.io/spire-managed-identity: true” to it. Then, we will create a new ClusterSPIFFEID CRD with namespace selector with match label as “spiffe.io/spire-managed-identity: true.”
When the new workload is added to this namespace or any other namespace that has the lable mentioned above, it will now automatically get registered in the server.
4.1 Create a new namespace.
kubectl create namespace <insert-namespace-name-here>
4.2 Add a lable to it, using the same one that you have used for the clusterSPIFFEID.
kubectl label namespaces <namespace_name> spiffe.io/spire-managed-identity=true
4.3 Enable istio-injection for this namespace so that any new pods that are created in that namespace will automatically have a sidecar added to them. You can achieve this by just adding another label in similar fashion.
kubectl label namespace <namespace_name> istio-injection=enabled --overwrite
After all edits to your namespace, the namespace should look similar as shown below.
Note: If you want to, you can edit further using the following command. But take care that your resulting yaml is not invalid. You can validate your yaml using any online validator available.
kubectl edit ns <namespace_name>
apiVersion: v1
kind: Namespace
metadata:
  annotations:
    kubectl.kubernetes.io/last-applied-configuration: |
      {"apiVersion":"v1","kind":"Namespace","metadata":{"annotations":{},"labels":{"name":"backend"},"name":"bookinfo"}}
  creationTimestamp: "2023-03-21T06:23:38Z"
  labels:
    istio-injection: enabled
    kubernetes.io/metadata.name: bookinfo
    spiffe.io/spire-managed-identity: "true"
  name: bookinfo
  resourceVersion: "6116523"
  uid: 6193a0b7-8455-46bd-a456-797ef69c045a
spec:
  finalizers:
  - kubernetes
status:
  phase: Active
4.4 Create and apply a ClusterSPIFFEID CRD with namespace selector.
Copy the clusterSPIFFEID from this link and just change the selector to namespace selector. Make sure that the correct match label is there like shown below.
apiVersion: spire.spiffe.io/v1alpha1
kind: ClusterSPIFFEID
metadata:
  name: bookinfo
spec:
  spiffeIDTemplate: "spiffe://{{ .TrustDomain }}/ns/{{ .PodMeta.Namespace }}/sa/{{ .PodSpec.ServiceAccountName }}"
  namespaceSelector:
    matchLabels:
      spiffe.io/spire-managed-identity: "true"
After editing your clusterSPIFFEID, apply it using kubectl.
kubectl apply -f <your_clusterSPIFFEID_name>
4.5 After successfully creating namespace and applying CRD, deploy your application in the namespace you created. But before you deploy your application, the workloads will need to have the SPIFFE CSI Driver volume be able to access the SPIRE Agent socket. To accomplish this, we can leverage the SPIRE pod annotation template:
annotations:
            inject.istio.io/templates: "sidecar,spire"
You can patch it to the workload or just add this to your deployment manifest at {spec:{template:{metadata:{ annotation:}}}} as shown below.

You can get the sample bookinfo application manifest from this link.
Note: This manifest is annotation free, so you need to add annotation to its deployments by following the steps shown above.
After editing the manifest, apply it in a newly created namespace.
kubectl apply -f bookinfo.yaml -n <namespace_name>
Verify all workloads and services you just deployed are running and up.
kubectl get all -n <namespace_name>
You will get output as shown below if everything is working fine.
k8s-spiffe-integ-master-7j7fh-m67q9:~ kubectl get all -n bookinfo
NAME                                 READY   STATUS    RESTARTS      AGE
pod/details-v1-f8957ccb4-7vdgw       2/2     Running   0             37d
pod/productpage-v1-cfb4bc854-5km2l   2/2     Running   0             37d
pod/ratings-v1-65cd6fbcd8-s9jnc      2/2     Running   0             37d
pod/reviews-v1-55f769fb78-czh7j      2/2     Running   0             37d
pod/reviews-v2-6b7c798cc8-wkpxg      2/2     Running   0             37d
pod/reviews-v3-695c7f59db-nzwwk      2/2     Running   2 (34d ago)   37d

NAME                  TYPE        CLUSTER-IP       EXTERNAL-IP   PORT(S)    AGE
service/details       ClusterIP   10.111.38.161    <none>        9080/TCP   37d
service/productpage   ClusterIP   10.102.189.161   <none>        9080/TCP   37d
service/ratings       ClusterIP   10.105.7.153     <none>        9080/TCP   37d
service/reviews       ClusterIP   10.106.49.246    <none>        9080/TCP   37d

NAME                             READY   UP-TO-DATE   AVAILABLE   AGE
deployment.apps/details-v1       1/1     1            1           37d
deployment.apps/productpage-v1   1/1     1            1           37d
deployment.apps/ratings-v1       1/1     1            1           37d
deployment.apps/reviews-v1       1/1     1            1           37d
deployment.apps/reviews-v2       1/1     1            1           37d
deployment.apps/reviews-v3       1/1     1            1           37d

NAME                                       DESIRED   CURRENT   READY   AGE
replicaset.apps/details-v1-f8957ccb4       1         1         1       37d
replicaset.apps/productpage-v1-cfb4bc854   1         1         1       37d
replicaset.apps/ratings-v1-65cd6fbcd8      1         1         1       37d
replicaset.apps/reviews-v1-55f769fb78      1         1         1       37d
replicaset.apps/reviews-v2-6b7c798cc8      1         1         1       37d
replicaset.apps/reviews-v3-695c7f59db      1         1         1       37d
Once everything is up, all workloads would get registered under the SPIRE server.
4.6 You can verify the registration of workloads using the following command:
kubectl exec <spire-server_pod_name> -n spire -c spire-server -- ./bin/spire-server entry show
Verify that every workload with same label as clusterSPIFFEID CRD’s match label is registered in the server.

4.7 Verify that the certificate issuer of workloads is SPIRE using the following commands for each workload.
istioctl proxy-config secret <pod_name> -n <namespace_name> -o json | jq -r '.dynamicActiveSecrets[0].secret.tlsCertificate.certificateChain.inlineBytes' | base64 --decode > chain.pem
k8s-spiffe-integ-master-7j7fh-m67q9:~ openssl x509 -in chain.pem -text | grep SPIRE
 Subject: C = US, O = SPIRE, x500UniqueIdentifier = e2f9c35b9198e1824373e874b13287d0
You should also check that everything is the same for the ingress-gateway pod in Istio-system namespace and verify that your deployed workloads and ingress-gateway has the same issuer.
Step 5: Open the application to outside traffic
The Bookinfo application is deployed but not accessible from the outside. To make it accessible, you need to create an Istio Ingress Gateway, which maps a path to a route at the edge of your mesh.
5.1 Associate this application with the Istio gateway:
kubectl apply -f samples/bookinfo/networking/bookinfo-gateway.yaml -n bookinfo
5.2 Ensure that there are no issues with the configuration:
k8s-spiffe-integ-master-7j7fh-m67q9:~ # istioctl analyze -n bookinfo

✔ No validation issues found when analyzing namespace: bookinfo.
5.3 Execute the following command to determine if your Kubernetes cluster is running in an environment that supports external load balancers:
k8s-spiffe-integ-master-7j7fh-m67q9:~ kubectl get svc istio-ingressgateway -n istio-system
NAME                   TYPE           CLUSTER-IP      EXTERNAL-IP   PORT(S)                                      AGE
istio-ingressgateway   LoadBalancer   10.105.191.32   172.16.17.5   15021:30189/TCP,80:30392/TCP,443:30566/TCP   32d
If the EXTERNAL-IP value is set, your environment has an external load balancer. If not, then set the external load balancer first then follow further steps.
For this cluster, we are using metallb.
5.4 Download and install Kiali dashboard and Prometheus.
Install Kiali:
Kiali is an observability console for Istio with service mesh configuration and validation capabilities. It helps you understand the structure and health of your service mesh by monitoring traffic.
kubectl apply -f https://raw.githubusercontent.com/istio/istio/release-1.17/samples/addons/kiali.yaml
Install Prometheus:
Prometheus is an open-source monitoring system and time series database. You can use Prometheus with Istio to record metrics that track the health of Istio and of applications within the service mesh.
kubectl apply -f https://raw.githubusercontent.com/istio/istio/release-1.17/samples/addons/prometheus.yaml
5.5 After setting up the ingress gateway and bookinfo gateway, we will view the dashboard later on in this post. To ensure you'll be able to do this, you'll need to make these setting changes in your system proxy status.
Go to Settings > Network > Proxy status > Turn Use a proxy server On. In the exceptions field, add your external IP address of kiali and ingressgateway service.
You can get IPs of these services by following command:
k8s-spiffe-integ-master-7j7fh-m67q9:~ kubectl get svc -n istio-system
NAME                   TYPE           CLUSTER-IP      EXTERNAL-IP   PORT(S)                                      AGE
istio-ingressgateway   LoadBalancer   10.105.191.32   172.16.17.5   15021:30189/TCP,80:30392/TCP,443:30566/TCP   32d
istiod                 ClusterIP      10.101.27.65    <none>        15010/TCP,15012/TCP,443/TCP,15014/TCP        32d
kiali                  LoadBalancer   10.103.14.197   172.16.17.6   20001:32116/TCP,9090:31950/TCP               32d
prometheus             ClusterIP      10.98.101.102   <none>        9090/TCP                                     32d

Format: http://{external ip};
Note: Your kiali service might be of ClusterIP type, so to get the external IP for this service, you first need to edit the service type to LoadBalancer.
Use the following command to edit the service, then edit the service type.
kubectl edit svc kiali -n istio-systemEdit the service type {spec: {type:LoadBalancer}} as shown below

5.6 Set the ingress IP and ports:
export INGRESS_NAME=istio-ingressgateway

export INGRESS_NS=istio-system

export INGRESS_HOST=$(kubectl -n "$INGRESS_NS" get service "$INGRESS_NAME" -o jsonpath='{.status.loadBalancer.ingress[0].ip}')

export INGRESS_PORT=$(kubectl -n "$INGRESS_NS" get service "$INGRESS_NAME" -o jsonpath='{.spec.ports[?(@.name=="http2")].port}')
5.7 Export and Set GATEWAY_URL:
export GATEWAY_URL=$INGRESS_HOST:$INGRESS_PORT
k8s-spiffe-integ-master-7j7fh-m67q9:~ echo "$GATEWAY_URL"
172.16.17.5:80
Curl into the productpage using gateway URL using following command.
k8s-spiffe-integ-master-7j7fh-m67q9:~ curl -v  http://$GATEWAY_URL/productpage
* Uses proxy env variable no_proxy == 'localhost,127.0.0.1,10.96.0.1,172.16.5.41,172.16.5.42,172.16.5.43,172.16.5.44,172.16.5.45,172.16.5.46,172.16.5.40,glhc-caas.glhc-hpe.local,.glhc-hpe.local,glhc-caas.customer.hpe.net,172.16.17.20,172.16.17.21,172.16.17.22,172.16.5.47,gl-pulpnode.glhc-hpe.local,gl-pulpnode,10.96.0.1,10.192.0.0/12,10.96.0.0/12,.svc,.cluster.local,.default.svc,.customer.hpe.net,172.16.17.23,172.16.17.30,gl-cp-gw-node2.glhc-hpe.local,gl-cp-gw-node1.glhc-hpe.local,172.16.17.50'
* Uses proxy env variable http_proxy == 'http://172.16.0.250:8080'
*   Trying 172.16.0.250:8080...
* TCP_NODELAY set
* Connected to 172.16.0.250 (172.16.0.250) port 8080 (#0)
> GET http://172.16.17.5:80/productpage HTTP/1.1
> Host: 172.16.17.5
> User-Agent: curl/7.66.0
> Accept: */*
> Proxy-Connection: Keep-Alive
>
You can generate traffic on the product page by just reaching out to the shown http URL.
Note: Before reaching out to this page and kiali in further step, ensure that you have followed step 5.5 properly.
5.9 Kiali Dashboard
Generate traffic on the product page and observe the graphs on the Kiali dashboard. Reach out to the kiali dashboard in your browser by just copying the external IP from above and http into that IP and port.
http://<kiali_external_ip>:<port>
After reaching kiali dashboard, generate traffic on product page and simultaneously, view and analyse traffic on kiali using various graphs and visualising methods.
App Graph:

Service Graph:


The graph below shows services communication, and the lock here symbolises mTls protocol.
We hope that this blog has helped you in integrating Istio and SPIRE from scratch, getting SPIRE issued identities for your sample application workloads, and setting up Kiali on your cluster for better visualisation of your service mesh.
Related
Federating SPIRE on HPE GreenLake for Private Cloud Enterprise
May 15, 2023Galadriel - A SPIRE Federation Alternative
Oct 31, 2022HPE achieves gold for large-scale enterprise Kubernetes deployments
Jun 17, 2020
Open source contributor helps Istio integrate with SPIRE
Oct 12, 2022