Highly available NFS workload on HPE GreenLake for Private Cloud Enterprise using Serviceguard for Linux
October 30, 2023Introduction
HPE GreenLake for Private Cloud Enterprise offers the ability to manage and provision compute through machine-readable definition files, otherwise known as Infrastructure-as-Code (IaC). This offers many significant benefits; for example, it helps increase operational agility, simplifies management, reduces errors, and saves cost.
In this blog post, you will discover how to provision a highly available and scalable NFS server solution on HPE GreenLake for Private Cloud Enterprise platform in conjunction with HPE Serviceguard for Linux. This blog post covers provisioning of VMs and other required components using Terraform, and the second part talks about installing and configuring an NFS server and Serviceguard for Linux (SGLX) to provide a highly available NFS service.
HPE GreenLake for Private Cloud Enterprise
One of the options provided through HPE GreenLake is to make it easy for customers to order and operate a private cloud with a mix of virtual machines, containers, and physical servers. This service allows customers to create resources such as virtual machines using just a few button clicks. It provides access via a public API, allowing developers to use an Infrastructure-as-Code type of tool to automate the provisioning, i.e., Terraform.
Terraform
Terraform is an open-source Infrastructure-as-Code framework originally created by HashiCorp that is written in Go. It uses a declarative language (HashiCorp Configuration Language HCL or JSON more recently) to describe the desired state of the infrastructure in terms of cloud, virtual machines, networks, storage, and many other components. Terraform uses the concept of “providers” to integrate with all major public clouds. Terraform is a so-called idempotent system in the sense that it does not generate any side effects if applied multiple times on infrastructure already in the desired state. Terraform has gained quite the momentum in the last few years.
HPE Serviceguard for Linux
HPE Serviceguard for Linux (SGLX) is a high availability (HA) and disaster recovery (DR) clustering solution that increases uptime for your critical applications by protecting them from a multitude of infrastructure and application faults across physical or virtual environments over any distance. The solution also reduces the impact of unplanned downtime with no compromise on data integrity or performance, and it helps achieve near zero planned downtime for maintenance.
Ansible
Ansible Automation Platform is an end-to-end automation platform to configure systems, deploy software, and orchestrate advanced workflows. It includes resources to create, manage, and scale across the entire enterprise.
Preparing for an Infrastructure-as-Code implementation
Terraform installation
The first step is to create a virtual machine that can act as a Jump Host and where you will execute your code. Virtual machines created in later steps will be reachable from your Jump Host if you configure your networking infrastructure appropriately. You can create a virtual machine in the Virtual Machines service of HPE GreenLake for Private Cloud Enterprise as follows:
- Log into HPE GreenLake Central by navigating to https://client.greenlake.hpe.com
- Launch the Virtual Machines Service Console
- Select Provisioning --> Instances and create a Linux-based virtual machine using whichever VM (Virtual Machine) image, Plan, and the network you find most suitable.
- (optional) Configure your virtual machine so you can access your GitHub or other code repository.
- Log into your virtual machine and install Terraform: Hashi Corp has provided a useful tutorial on how to do this for various distributions of Linux
- Verify the installation by executing this command:
terraform --help
At this point, you are ready to start building your infrastructure description file.
Building a Terraform configuration file from scratch
Let’s start building this Terraform (TF) file using your favourite editor.
Selecting a Terraform provider
The first section of the file will enumerate the “providers” you rely upon for building your infrastructure, and they could be multiple providers in a single TF file. In the case here, you only have the HPE GreenLake provider referenced as hpe/hpegl in the official Terraform registry. The first lines of your Terraform configuration file should look like this:
# Load HPE GreenLake terraform provider

terraform {
      required_providers {
         hpegl = {
            source  = "hpe/hpegl"
            version = "0.3.17"
         }
      }
   }
You can find out more about the HPE GreenLake Terraform provider from its Terraform Registry page. This page also provides a link to the GitHub repository corresponding to this provider. The docs folder is your best source of information for using the different data sources and resources provided by the provider. If you navigate to the resources section, you will see that one resource you can configure with this provider is a VM instance. This article will focus on this resource.
Note: Because this is open source, do not hesitate to open issues, or even a pull request, if you identify an issue.
Setting up the Terraform provider
Set up the required parameters for hpegl provider that was specified earlier. As previously explained, you can either explicitly set those parameters in your TF file or have them set in a series of environment variables or have a mix of both. It is recommended to add the following two parameters in your TF file:
# Setup provider environment (location and space)
provider "hpegl" {
      vmaas {
         location   = "FTC06"
         space_name = "Default"
      }
}
The rest (such as tenant id, user id and user secret key) can be placed in a RC file, which you can source before running your Terraform command. You can find your location and your space name from the HPE GreenLake for Private Cloud Enterprise Overview.
In the example shown below, FTC06 is our location:
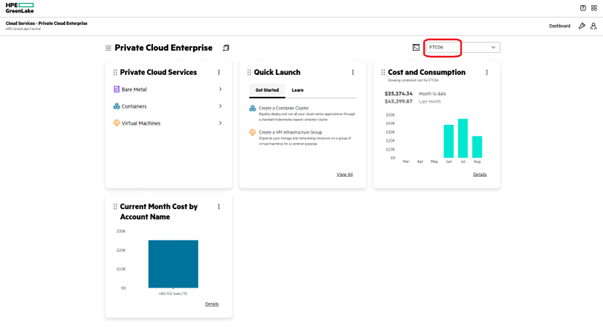
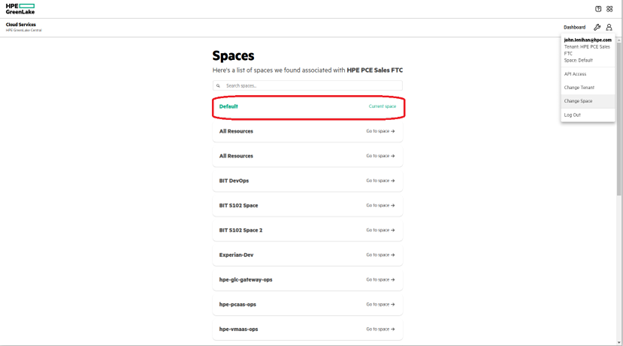
In the capture below, Default is the space you will use for your work with Terraform. You can check your available Spaces from the HPE GreenLake console under your profile icon, Change Space.
Setting up API Client access
Next, you need to create a new API Client access dedicated to Terraform. You can do this from the HPE GreenLake console under your settings icon, select User Management and then the API Clients tab.
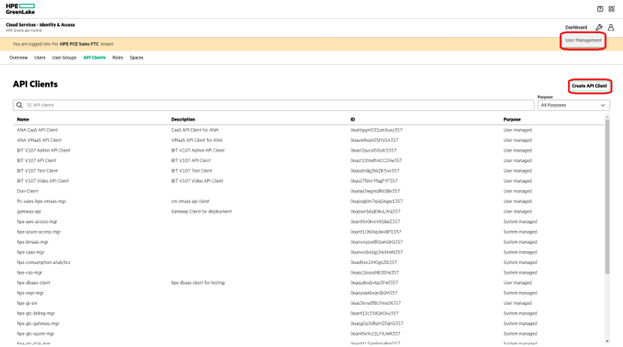
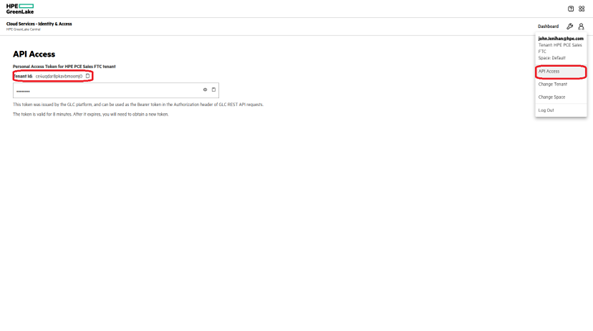
Create a new API Client and be sure to note down the Issuer, Client ID and Client Secret values which are shown. The value for the tenant ID may be seen in the Tenant ID field under the API Access menu and in the URL of your browser.
With this you can now build a resource file that defines the following environment variables:
export HPEGL_TENANT_ID=<Your Tenant ID>
export HPEGL_USER_ID=<Client ID of the API Client>
export HPEGL_USER_SECRET=<Secret Key displayed when you created the API Client>
export HPEGL_IAM_SERVICE_URL=<Issuer URL>
And execute it on your machine to set these environment variables.
Assign Roles to API Client
Once your API Client has been created, you need to assign a Role and a Space. You can assign a Role and a Space by clicking on your new API Client and then clicking the Create Assignment button. Since intent is to use this API Client to create resources in the Virtual Machines Service, we need to assign an appropriate Virtual Machines Role. Choose a Role like ‘Private Cloud Tenant Contributor’ and choose the same Space as used earlier, I.e., ‘Default.’
Note: More details on HPE GreenLake user roles can be found in the HPE GreenLake documentation.
Set API Client Usernames and Passwords
When a user creates virtual machines using the HPE GreenLake for Private Cloud Enterprise: Virtual Machines user interface, they first set the Linux and Windows username and password. Once this is done, any virtual machines subsequently created by that user will inherit these credentials. The user can later use these credentials to log into these virtual machines.
API Clients which are used to create virtual machines can also set Linux and Windows username and password values. Since the API Client does not use the HPE GreenLake for Private Cloud Enterprise: Virtual Machines user interface, this must be done via an API call.
Here is a sample script which reads the VM_USERNAME and VM_PASSWORD environment variables and uses the values for Linux and Windows username and password for the API Client. The script assumes a Location value of ‘FTC06’ and Space value of ‘Default’.
To execute this script, first set appropriate values for the VM_USERNAME and VM_PASSWORD environment variables. Next, execute the resource file, which was created earlier, which sets the HPEGL** environment variables for your API Client.
Finally, execute the script below:
#!/bin/bash
export LOCATION='FTC06'
export SPACE='Default'
export SPACE_ENCODED=$(echo -n -e "$SPACE" | od -An -tx1 | tr ' ' % | xargs printf "%s")

ACCESS_TOKEN=$(curl -s -k -X POST \
  "${HPEGL_IAM_SERVICE_URL}/v1/token" \
  -H "Content-Type: application/x-www-form-urlencoded" \
  -d "client_id=${HPEGL_USER_ID}" \
  -d "client_secret=${HPEGL_USER_SECRET}" \
  -d grant_type=client_credentials \
  -d scope=hpe-tenant | jq -r '.access_token')
echo "Token: ${ACCESS_TOKEN}"

curl -s -k -X GET \
   "https://client.greenlake.hpe.com/api/iac-vmaas/v1/whoami?space=${SPACE_ENCODED}&location=${LOCATION}" \
   -H "Authorization: ${ACCESS_TOKEN}" | jq '.'

# Sets user settings
curl -s -k -X POST \
  "https://client.greenlake.hpe.com/api/iac-vmaas/v1beta1/user-settings?space=${SPACE_ENCODED}&location=${LOCATION}" \
  -H "Authorization: ${ACCESS_TOKEN}" \
  -H "Content-Type: application/json" \
  -d '{
    "user": {
      "linuxUsername": '${VM_USERNAME}',
      "linuxPassword": '${VM_PASSWORD}',
      "windowsUsername": '${VM_USERNAME}',
      "windowsPassword": '${VM_PASSWORD}'
    }
  }'
Querying for infrastructure components
Your next step with the TF file is to query the HPE GreenLake provider to collect information needed to create your first VM instance. From the documentation, you can see that you need to gather the following information:
• Cloud ID
• Group ID
• Layout ID
• Plan ID
• Instance type code
• Network ID
• Resource Pool ID
• Template ID
• Folder Code
For this, you will use the Terraform data statements. For example, the following statement retrieves the Cloud ID and stores it (in variable called cloud), which we can later retrieve using: data.hpegl_vmass_cloud.cloud.id
# Retrieve cloud id
data "hpegl_vmaas_cloud" "cloud" {
     name = "HPE GreenLake VMaaS Cloud"
   }
Using a similar technique, you can retrieve the rest of the data you need:
# And a network
data "hpegl_vmaas_network" "blue_segment" {
     name = "Blue-Segment"
   }

data "hpegl_vmaas_cloud_folder" "compute_folder" {
   cloud_id = data.hpegl_vmaas_cloud.cloud.id
   name     = "ComputeFolder"
   }

# Locate a resource pool
data "hpegl_vmaas_resource_pool" "cl_resource_pool" {
     cloud_id = data.hpegl_vmaas_cloud.cloud.id
     name = "gl-ftc06-G2i-vm-02"
   }

# And a group
data "hpegl_vmaas_group" "default_group" {
  name = "Default"
}

# Locate a plan
data "hpegl_vmaas_plan" "g2i_medium" {
     name = "G2i-medium"
   }

# A layout
data "hpegl_vmaas_layout" "vmware" {
  name               = "Vmware VM"
  instance_type_code = "vmware"
}

# And a template
data "hpegl_vmaas_template" "vanilla" {
     name = "redhat8-20220331T1850"
   }
You can get information about each of the data statements supported by the hpegl provider from GitHub.
Creating VM resources
The next step is to use a Terraform resource statement to create a random integer (used in VM names) and a second resource to request the creation of several VM instances:
resource "random_integer" "random" {
  min = 1
  max = 50000
}

resource "hpegl_vmaas_instance" " my_HA_NFS" {
     count              = 2
     name               = "drbd-${count.index}-${random_integer.random.result}"
     hostname           = "drbd-${count.index}-${random_integer.random.result}"
     cloud_id           = data.hpegl_vmaas_cloud.cloud.id
     group_id           = data.hpegl_vmaas_group.default_group.id
     layout_id          = data.hpegl_vmaas_layout.vmware.id
     plan_id            = data.hpegl_vmaas_plan.g2i_medium.id
     instance_type_code = data.hpegl_vmaas_layout.vmware.instance_type_code
     network {
         id = data.hpegl_vmaas_network.blue_segment.id
     }

     volume {
         name         = "root_vol"
         size         = 50
         datastore_id = "auto"
     }
      volume {
         name         = "drbd_vol"
         size         = 50
         datastore_id = "auto"
     }

     config {
         resource_pool_id = data.hpegl_vmaas_resource_pool.cl_resource_pool.id
         template_id      = data.hpegl_vmaas_template.vanilla.id
         no_agent         = false
         asset_tag        = "vm_terraform_sglx"
         folder_code      = data.hpegl_vmaas_cloud_folder.compute_folder.code
         create_user      = true
     }

   }
Finally, we will create a VM to act as Serviceguard quorum node:
resource "hpegl_vmaas_instance" "my_quorum" {
     count           = 1
     name            = "drbd-${count.index}-qs-${random_integer.random.result}"
     hostname        = "drbd-${count.index}-qs-${random_integer.random.result}"
     cloud_id        = data.hpegl_vmaas_cloud.cloud.id
     group_id        = data.hpegl_vmaas_group.default_group.id
     layout_id       = data.hpegl_vmaas_layout.vmware.id
     plan_id         = data.hpegl_vmaas_plan.g2i_medium.id
     instance_type_code = data.hpegl_vmaas_layout.vmware.instance_type_code
     network {
         id = data.hpegl_vmaas_network.blue_segment.id
     }

     volume {
         name         = "root_vol"
         size         = 50
         datastore_id = "auto"
     }

     config {
         resource_pool_id = data.hpegl_vmaas_resource_pool.cl_resource_pool.id
         template_id      = data.hpegl_vmaas_template.vanilla.id
         no_agent         = false
         asset_tag        = "vm_terraform_sglx_quorum"
         folder_code      = data.hpegl_vmaas_cloud_folder.compute_folder.code
         create_user      = true
     }
   }
3 VMs need to be created to setup SGLX. 2 VMs will be used to create Serviceguard for Linux nodes where the NFS service will be up and running. The third VM will act as a quorum server for the Serviceguard cluster to ensure that split brain of the cluster does not impact the availability of the monitored workload.
Note: You can get information about each of the resource statements supported by the hpegl provider from GitHub.
Note: An existing Serviceguard Quorum Server in your environment can be used instead of provisioning a third VM, provided the Quorum Server is reachable to the 2 VM’s that were created.
Terraform init
Before you can use Terraform, you need to initialize it from the configuration file we have created. This is done with the following step:
terraform init
Terraform ready to plan
To validate your configuration file, it is recommended to run the terraform validate command. Once ready, the terraform plan command will provide the a summary of the deployment that would be built when terraform apply method would be used. Once you agree with the plan and confirm, you can apply the configuration.
Terraform ready to apply
The command you need to use is now:
This will rerun the plan command, then prompt you to confirm before it starts building what is in the plan. Here is some sample output from the `terraform apply` command:terraform apply
Do you want to perform these actions?
  Terraform will perform the actions described above.
  Only 'yes' will be accepted to approve.

  Enter a value: yes

hpegl_vmaas_instance.my_drbd[1]: Creating...
hpegl_vmaas_instance.my_quorum[0]: Creating...
hpegl_vmaas_instance.my_drbd[0]: Creating...
hpegl_vmaas_instance.my_quorum[0]: Still creating... [10s elapsed]
hpegl_vmaas_instance.my_drbd[1]: Still creating... [10s elapsed]
hpegl_vmaas_instance.my_drbd[1]: Still creating... [10s elapsed]

hpegl_vmaas_instance.my_drbd[1]: Creation complete after 2m8s [id=3105]
hpegl_vmaas_instance.my_drbd[0]: Creation complete after 2m8s [id=3111]
hpegl_vmaas_instance.my_quorum[0]: Creation complete after 2m8s [id=3108]

Apply complete! Resources: 4 added, 0 changed, 0 destroyed.
Once the command completes, your virtual machines are ready.
Configuring a Highly Available NFS solution
Now that the VMs are provisioned, we can now deploy HPE Serviceguard for Linux on these VMs to create a cluster to provide high availability for the applications running on the VMs, NFS server in this case.
Installing Serviceguard for Linux
Serviceguard and all its components can be installed using Ansible playbooks. Clone the repository on ansible control node:
git clone https://github.com/HewlettPackard/serviceguard.git
cd serviceguard/ansible-sglx
Checkout the stable branch. For ex: to checkout branch 1.0,
git checkout Stable-v1.0
To upgrade to the latest version of the playbooks:
git pull https://github.com/HewlettPackard/serviceguard.git
Master playbook site.yml contains the roles which will be executed for the inventory defined in hosts.
When the master playbook is run, the version specified in the parameters file will be installed. The parameters for the master playbook, roles are configured in group_vars/all.yml.
Now let's look into some of the fields in this file which needs to be configured. It’s time to configure the version of Serviceguard to be installed, in this case SGLX 15.10.00 will be installed.
sglx_version : 15.10.00
Provide the Serviceguard for Linux ISO location on the controller node.
sglx_inst_upg_mode: iso
sglx_inst_upg_additional_params:
    ..
    iso_params:
        iso_location: <absolute path of the iso on ansible controller node>
Provide the Serviceguard Flex storage add-on ISO location on the control node.
   storage_flex_add_on:
        install_upgrade: yes
        install_upg_mode: iso
        iso_params:
            iso_location: <absolute path of the iso on ansible controller node>
Next, install Serviceguard NFS add-on.
sglx_add_on_inst_upg_params:
    sglx_addon: nfs
Serviceguard installation mandates a replicated user configuration. As part of the installation, a replicated user for Serviceguard Manager (sgmgr) is created on the hosts and the password for the same can be configured under the below parameter.
sglx_sgmgr_password: "{{ vault_sglx_sgmgr_password }}"
Ansible vault will be used to encrypt this password, when you run the command as below:
ansible-vault encrypt_string 'your_password' --name 'vault_sglx_sgmgr_password'
The generated output must be substituted in
vault_sglx_sgmgr_password: !vault |
          $ANSIBLE_VAULT;1.1;AES256
          34363834323266326237363636613833396665333061653138623431626261343064373363656165
          6639383863383633643035656336336639373161323663380a303331306337396435366535313663
          31336636333862303462346234336138393135393363323739633661653534306162323565646561
          6662396366333534350a663033303862646331613765306433353632316435306630343761623237
          3863
Once these parameters are populated, you can modify the hosts file to add the two VMs that were provisioned earlier where the cluster will be formed, and the quorum server that was provisioned earlier. In this case, it’s as shown below:
[sglx-storage-flex-add-on-hosts]
drbd-0-808
drbd-1-808
[sglx-cluster-hosts:children]
sglx-storage-flex-add-on-hosts
[quorum-server-hosts]
drbd-0-qs-808
[primary]
drbd-0-808
[secondary]
drbd-1-808
When the parameters specified above are configured, playbook site.yml can be run from the directory where the repository is cloned on the ansible control node.
cd serviceguard/ansible-sglx
ansible-playbook -i hosts -v --vault-password-file <path_to_vault_password_file> site.yml
This completes the Serviceguard software installation.
Configuring data replication using Serviceguard flex Storage Add-on
Serviceguard for Linux Flex Storage Add-on is a software-based, shared-nothing, replicated storage solution that mirrors the content of block devices. NFS server export data will be replicated to all Serviceguard cluster nodes using this add-on. The Ansible snippet below can be used to configure the replication.
- hosts: sglx-storage-flex-add-on-hosts
  tasks:
  - name: Populate /etc/drbd.d/global_common.conf file
    become: True
    shell: |
      echo "global { usage-count yes; } common { handlers { disconnected /usr/local/cmcluster/conf/scripts/sgenss/replication_software/drbd/drbd_disconnect_handler.sh; } options { auto-promote no; } }" > /etc/drbd.d/global_common.conf

  - name: Create first part of drbd config file
    become: True
    shell: |
      echo "resource drbd0 {" >/etc/drbd.d/drbd0.res
      echo "    disk /dev/sdb;" >> /etc/drbd.d/drbd0.res
      echo "    device /dev/drbd0;" >> /etc/drbd.d/drbd0.res
      echo "    meta-disk internal;" >> /etc/drbd.d/drbd0.res

  - name: Create second part of drbd config file
    become: True
    vars:
      this_nodename: "{{ hostvars[item]['ansible_hostname'] }}"
    shell: |
        echo "    on {{ this_nodename }} {" >> /etc/drbd.d/drbd0.res
        echo "      address {{ item }}:7789;" >> /etc/drbd.d/drbd0.res
        echo "      node-id {{ my_index }};" >> /etc/drbd.d/drbd0.res
        echo "    }" >> /etc/drbd.d/drbd0.res
    loop: "{{ ansible_play_batch }}"
    loop_control:
      index_var: my_index

  - name: Set initial empty mesh list
    set_fact:
      mesh: ""

  - name: Build list of nodes for connection-mesh entry
    loop: "{{ ansible_play_batch }}"
    set_fact:
      mesh: "{{ mesh + hostvars[item]['ansible_hostname'] + ' ' }}"

  - name: Check mesh nodes
    debug: var=mesh

  - name: Create connection-mesh portion of config file
    become: True
    shell: |
      echo "    connection-mesh {" >> /etc/drbd.d/drbd0.res
      echo "      hosts {{ mesh|trim }};" >> /etc/drbd.d/drbd0.res
      echo "    }" >> /etc/drbd.d/drbd0.res

  - name: Create last part of drbd config file
    become: True
    shell: |
      echo "}" >> /etc/drbd.d/drbd0.res

 - name: Create drbd0 device
    become: True
    shell: |
      drbdadm create-md drbd0
    when: res.rc != 0

  - name: Start DRBD service
    become: True
    systemd:
      name: drbd
      enabled: True
      state: started

- hosts: primary
  tasks:
  - name: Enable this node as Primary
    become: True
    shell: |
      drbdadm primary drbd0 --force
    when: res.rc != 0
Configuring LVM
Once data replication is configured on the nodes, you can configure LVM on top of the DRBD disk /dev/drbd0. The following Ansible snippet can be used to configure the LVM volume group named nfsvg and logical volume names nfsvol of size 45GB.
---
- hosts: sglx-storage-flex-add-on-hosts
  tasks:
  - name: Modify lvm configuration
    become: True
    lineinfile:
      path: /etc/lvm/lvm.conf
      regexp: "# volume_list"
      line: volume_list=["nfsvg","nfsvg/nfsvol","@tag1","@*"]
      state: present
      backup: True
  - name: reject disk in lvm configuration
    become: True
    lineinfile:
      path: /etc/lvm/lvm.conf
      regexp: ".*/dev/cdrom.*"
      line: '      filter = [ "r|/dev/sdb|", "a|/dev/drbd0|" ] '
      state: present
      backup: True

- hosts: primary
  tasks:
  - name: Create a volume group on /dev/drbd0
    become: True
    lvg:
      vg: nfsvg
      pvs: /dev/drbd0

  - name: create logical volume for nfs
    become: True
    lvol:
      vg: nfsvg
      lv: nfsvol
      size: 45g
      force: True

  - name: Format filesystem
    become: True
    filesystem:
      dev: /dev/nfsvg/nfsvol
      fstype: xfs
Setting up the NFS server
Now start the NFS service and export the NFS share from the primary node using the Ansible snippet below.
---
- hosts: sglx-storage-flex-add-on-hosts
  tasks:
  - name: Install NFS Server and related components
    become: True
    ansible.builtin.yum:
      name:
        - nfs-utils
      state: present
    ignore_errors: True

  - name: Enable NFS related services
    become: True
    systemd:
      name: "{{ item }}"
      enabled: True
    with_items:
      - rpcbind
      - nfs-server

  - name: Start NFS related services
    become: True
    systemd:
      name: "{{ item }}"
      state: started
    with_items:
      - rpcbind
      - nfs-server

  - name: Add /etc/exports entry and create NFS mount point
    become: True
    shell: |
       mkdir -p /nfs
       chmod go+rwx /nfs
       echo '/nfs *(rw,sync,no_root_squash)' > /etc/exports

- hosts: primary
  tasks:
    - name: mount nfs on primary
      become: True
      shell: |
         mount /dev/nfsvg/nfsvol /nfs
         exportfs -a
Creating an SGLX cluster and providing HA to the NFS workload
Once NFS share is configured, look into creating an SGLX cluster and deploy the NFS workload in the SGLX environment to make it highly available. The below snippet will help you achieve this.
---
 - hosts: primary
  - name: Build string of primary nodes
    set_fact:
      primary_nodes: "{{ primary_nodes  | default ('') + ' -n ' + hostvars[item].ansible_hostname }}"
    with_items:
      - "{{ groups['primary'] }}"

  - name: Build string of secondary nodes
    set_fact:
      secondary_nodes: "{{ secondary_nodes  | default ('') + ' -n ' + hostvars[item].ansible_hostname }}"
    with_items:
      - "{{ groups['secondary'] }}"

  - name: Build string of quorum nodes
    set_fact:
      quorum_nodes: "{{ quorum_nodes  | default ('') + ' -q ' + hostvars[item].ansible_hostname }}"
    with_items:
      - "{{ groups['quorum-server-hosts'] }}"

  - name: Run cmdeploycl command
    become: True
    ansible.builtin.expect:
      command: "$SGSBIN/cmdeploycl {{ primary_nodes }} {{secondary_nodes }} {{ quorum_nodes }}"
      responses:
        password: "{{ root_pass }}"
      timeout: 300
  - name: Update cluster config
    become: True
    shell: |
      rm -rf /tmp/cluster.txt
      $SGSBIN/cmgetconf > /tmp/cluster.txt
      echo "GENERIC_RESOURCE_NAME CGR_SGeNSS_drbd" >> /tmp/cluster.txt
      echo "GENERIC_RESOURCE_TYPE simple" >> /tmp/cluster.txt
      echo "GENERIC_RESOURCE_CMD $SGSBIN/scripts/sgenss/replication_software/drbd/cluster_generic_resource.sh" >> /tmp/cluster.txt
      echo "GENERIC_RESOURCE_SCOPE node" >> /tmp/cluster.txt
      echo "GENERIC_RESOURCE_RESTART none" >> /tmp/cluster.txt
      echo "GENERIC_RESOURCE_HALT_TIMEOUT 10000000" >> /tmp/cluster.txt

  - name: Run cmapplyconf command
    become: True
    shell: |
      $SGSBIN/cmapplyconf -v -C /tmp/cluster.txt -f

  - name: Create a DRBD and NFS package
    become: True
    shell: |
      rm -rf /tmp/nfs_drbd.conf
      $SGSBIN/cmmakepkg -m sgenss/rf_drbd -m tkit/nfs/nfs /tmp/nfs_drbd.conf

  - name: update the drbd resource name
    become: True
    replace:
      path: /tmp/nfs_drbd.conf
      regexp: "{{ item.regexp }}"
      replace: "{{ item.rep }}"
    with_items:
      - { regexp: 'res0', rep: 'drbd0'}

  - name: Make change to package configuration
    become: True
    lineinfile:
      path: /tmp/nfs_drbd.conf
      regexp: "{{ item.regexp }}"
      line: "{{ item.line }}"
      state: present
    with_items:
      - { regexp: '^package_name', line: 'package_name          nfs_drbd'}
      - { regexp: '^#vg', line: 'vg     nfsvg'}
      - { regexp: '^tkit/nfs/nfs/XFS', line: 'tkit/nfs/nfs/XFS  "-o rw,sync,no_root_squash *:/nfs"'}
      - { regexp: '^tkit/nfs/nfs/QUOTA_MON', line: 'tkit/nfs/nfs/QUOTA_MON      no'}

  - name: Add additional NFS configuration
    become: True
    lineinfile:
      path: /tmp/nfs_drbd.conf
      insertafter: EOF
      line: |
        fs_name /dev/nfsvg/nfsvol
        fs_directory /nfs
        fs_type "xfs"
        fs_mount_opt "-o rw"
        ip_subnet 10.10.180.0
        ip_address 10.10.180.99

  - name: check the package and apply it
    become: True
    shell: |
$SGSBIN/cmcheckconf -P /tmp/nfs_drbd.conf
      $SGSBIN /cmapplyconf -P /tmp/nfs_drbd.conf -f

  - name: enable the package
    become: True
    shell: |
      $SGSBIN /cmmodpkg -e nfs_drbd
The NFS server is now deployed in Serviceguard cluster with high availability.
Conclusion
In this blog, you learned how to use platforms like Terraform and Ansible to easily provision and deploy a highly available NFS server solution with Serviceguard for Linux on an HPE GreenLake Private Cloud Enterprise environment.
Serviceguard for Linux has high availability and disaster recovery solutions available for various applications such as SAP, Oracle, SQL Server On Linux, EDB Postgres, etc. For more information regarding these solutions you can refer to the HPE Serviceguard for Linux operational guide for workloads and solutions available at https://www.hpe.com/info/linux-serviceguard-docs
Check back on the HPE Developer Community blog for more articles on HPE GreenLake for Private Cloud.
Related
A guide to enabling a managed Istio service mesh in a Kubernetes cluster on HPE GreenLake for Private Cloud Enterprise
Feb 16, 2023
Bare metal provisioning on HPE GreenLake using Terraform
Mar 20, 2023Configuring Azure Active Directory with long-lived tokens for user provisioning
Jul 16, 2024
Create a General-Purpose Kubeconfig File in HPE GreenLake for Private Cloud Enterprise
May 20, 2022Curate and Expose Service Catalog Items using HPE GreenLake for Private Cloud Enterprise
Feb 16, 2022Deploy stateful MongoDB applications on Kubernetes clusters in HPE GreenLake for Private Cloud Enterprise
Aug 16, 2022A guide to deploying MongoDB applications using HPE GreenLake for Private Cloud Enterprise
Dec 1, 2022