Federating SPIRE on HPE GreenLake for Private Cloud Enterprise
May 15, 2023SPIRE is designed to enable widespread deployment of Mutual TLS (mTLS), a method for mutual authentication, between workloads in distributed systems. In our previous blog post, we explained how you can deploy a Kubernetes cluster on HPE GreenLake for Private Cloud Enterprise and integrate Istio and SPIRE to enable advanced analysis and visualization of the service mesh.
In this blog post, we will install and federate SPIRE across two Kubernetes clusters deployed on HPE GreenLake for Private Cloud Enterprise: cluster 1 and cluster 2. We will then show you how to deploy a sample application to verify the federation and visualize the communication across services through a graph.
Step 1. Installing SPIRE
Using the QuickStart files provided in this link, get started installing SPIRE on both Clusters. Since there are two clusters in our example, the trust domain configured for the first cluster is cluster 1.demo and the other is cluster2.demo.
Note: You may configure your own custom trust domains for the clusters by replacing these values across the configuration files.
1.1 Clone the repo using the command
git clone https://github.com/cxteamtrials/caas-trials-content.git
1.2 Apply the QuickStart file on each cluster using the following commands
As the Kubectl command is required for installation and configuration, please refer to our first blog post, which explains how to obtain the Kubeconfig file to manage the K8s clusters using Kubectl.
#for K8s cluster 1:
kubectl apply -f services/spire/federation/spire-quickstart-cluster-1.yaml
#for K8s cluster 2:
kubectl apply -f services/spire/federation/spire-quickstart-cluster-2.yaml
This step will install SPIRE into your Kubernetes clusters, along with two additional components: the SPIFFE CSI Driver and the SPIRE Kubernetes Controller manager, which facilitates the registration of workloads and establishment of federated relationships.
Verify the installation by checking to see if all the pods are running and that the containers within them are up.
Cluster1:~ # kubectl get po -n spire
NAME                            READY   STATUS    RESTARTS      AGE
spire-agent-92q5m               3/3     Running   0             37d
spire-agent-jhgwf               3/3     Running   0             37d
spire-agent-sm8gt               3/3     Running   0             37d
spire-server-574474c7dc-gbzl6   2/2     Running   1 (11d ago)   37d
Cluster2:~ # kubectl get po -n spire

NAME                                 READY      STATUS      RESTARTS       AGE

spire-agent-wttmd                    3/3        Running     1 (24h ago)    24h
spire-server-574474c7dc-2bfcx        2/2        Running     0              24h
Step 2. Installing Istio
On each of your Kubernetes clusters, install Istio and patch Istio ingress gateway. Istio can detect the existence of a UNIX Domain Socket that implements the Envoy SDS API on a defined socket path, allowing Envoy to communicate and fetch identities directly from it. SPIRE can be configured for Istio workloads through an integration with Envoy’s SDS API.
2.1 Download the latest release
You can download the latest release using the official Istio repository or just copy the following command, which would do the same thing for you.
curl -L https://istio.io/downloadIstio | sh -
Change to the Istio directory (cd command), and set the path by using this command:
cd istio-1.17.1
export PATH=$PWD/bin:$PATH
2.2 Install Istio with custom patch
Install Istio with custom patches for the Ingress-gateway as well as for Istio-proxy.
Get the Istio-spire-config patch using this link, and install that patch using the following commands:
#For K8s cluster 1:
istioctl apply -f services/istio/release-1.17/spire/spire-patch-cluster1.yaml
#For K8s cluster 2:
istioctl apply -f services/istio/release-1.17/spire/spire-patch-cluster2.yaml
Installing Istio with the custom patch will share the spiffe-csi-driver with the Ingress Gateway and the sidecars that are going to be injected on workload pods, granting them access to the SPIRE Agent’s UNIX Domain Socket.
2.3 Patch Istio Ingress Gateway
2.3.1 Apply SPIFFE ID
First, you must get and apply one of SPIRE controller manager’s CRD (Custom Resource Definition) ClusterSPIFFEID. The CRD - ClusterSPIFFEID is a cluster-wide resource used to register workloads with SPIRE. The ClusterSPIFFEID can target all workloads in the cluster or can be optionally scoped to specific pods or namespaces via label selectors.
Create a ClusterSPIFFEID CRD to generate registration entries in SPIRE server for all workloads labeled spiffe.io/spire-managed-identity: true.
Apply the ClusterSPIFFEID used for this demo to both clusters.
kubectl apply -f services/spire/clusterspiffeid-example.yaml
2.3.2 Patch Ingress Gateway
Now, simply patch the ingress-gateway with spiffe.io/spire managed-identity: true label.
This patch will register your ingress-gateway pod into the server.
kubectl patch deployment istio-ingressgateway -n istio-system -p '{"spec":{"template":{"metadata":{"labels":{"spiffe.io/spire-managed-identity": "true"}}}}}'
2.3.3 Check your work
After patching, confirm that your ingress-gateway pod, istiod and all their containers work.
Cluster1:~ # kubectl get po -n istio-system
NAME                                   READY   STATUS    RESTARTS   AGE
istio-ingressgateway-5d77cdd9d-gh9w4   1/1     Running   0          37d
istiod-d5bc8669c-4bdvh                 1/1     Running   0          37d
Cluster2:~ #  kubectl get po -n istio-system
NAME                                   READY   STATUS    RESTARTS   AGE
istio-ingressgateway-64bd5ccbbb-kqs2h  1/1     Running   0          37d
istiod-d5bc8669c-thbpj                 1/1     Running   0          37d
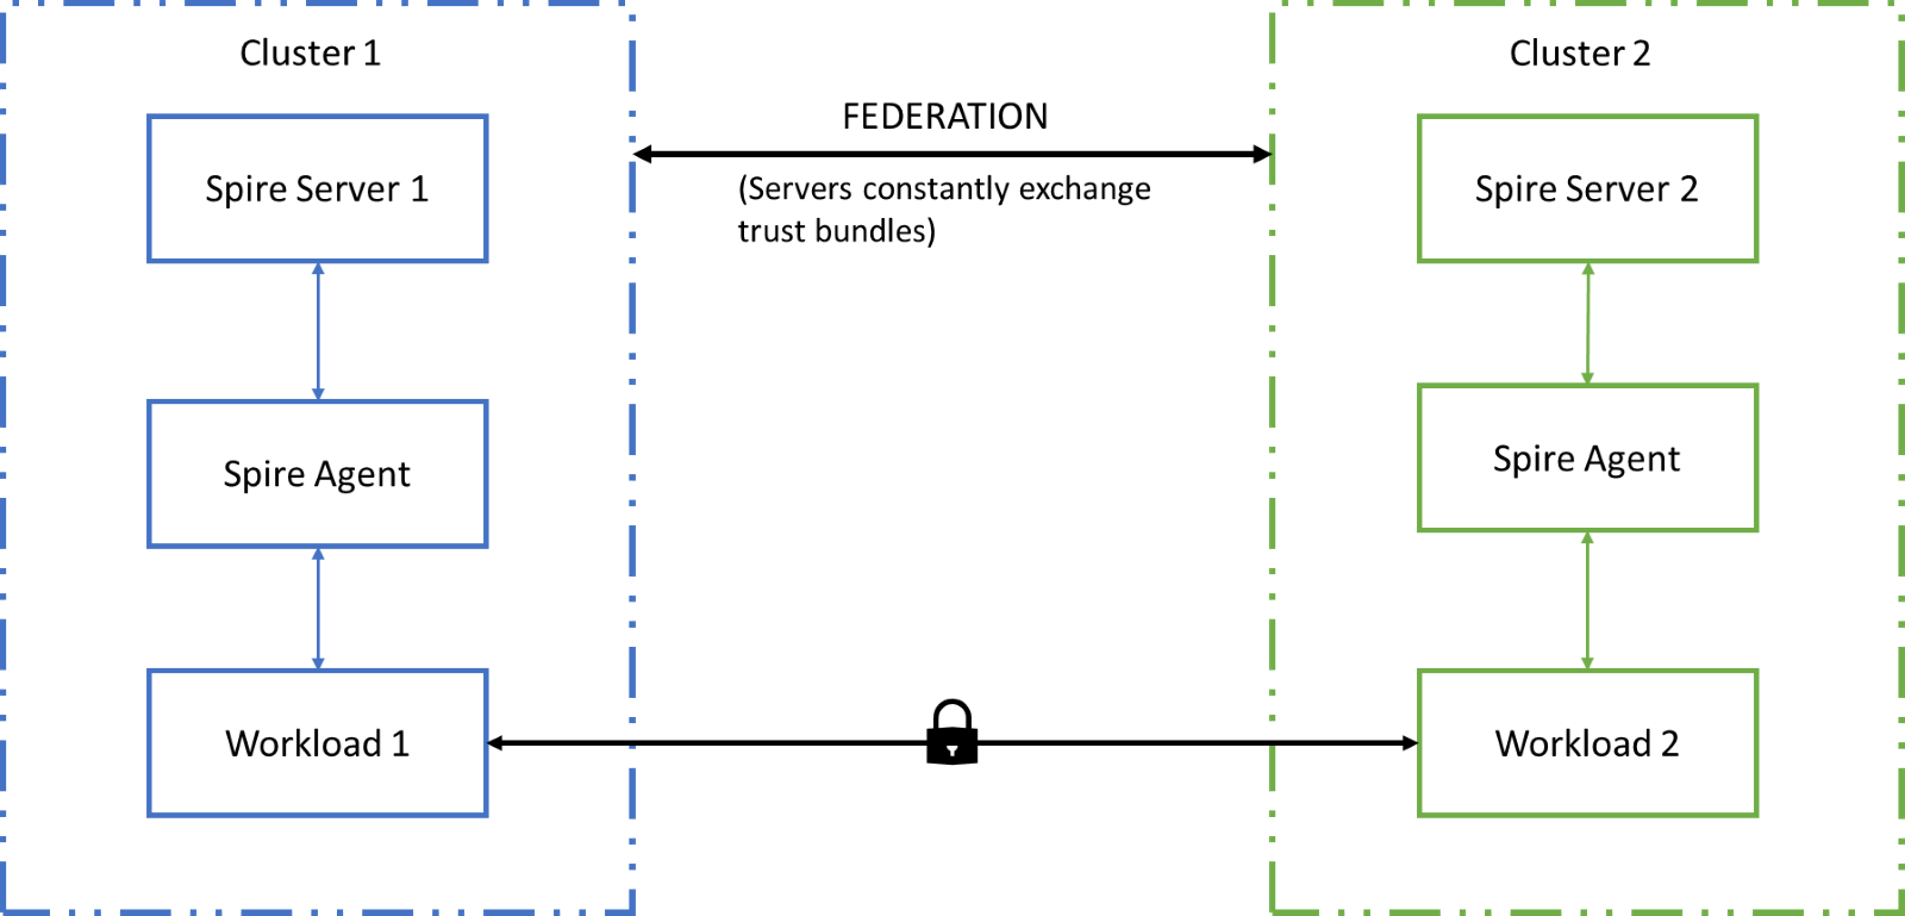
Step 3. Federating SPIRE
3.1 Expose SPIRE server bundle endpoint
Assign an external IP to your spire-server-bundle-endpoint service on each cluster.
SPIFFE (Secure Production Identity Framework For Everyone) is a specification for implementing identity for workloads, and SPIRE is the code that implements this specification in practice. A SPIFFE bundle is a resource that contains the public key material needed to authenticate credentials from a particular trust domain. A SPIFFE bundle endpoint is a resource (represented by a URL) that serves a copy of a SPIFFE bundle for a trust domain. SPIFFE control planes may both expose and consume these endpoints to transfer bundles between themselves, thereby achieving federation. The SPIRE server is used to host the “spire-server-bundle-endpoint” service that serves the SPIFFE bundle to an external SPIRE agent of a different trust domain.
MetalLB is used to assign the IP for this service. MetalLB hooks into your Kubernetes cluster and provides a network load-balancer implementation. In short, it allows you to create Kubernetes services of type LoadBalancer in clusters that don’t run on a cloud provider, and thus cannot simply hook into paid products to provide load balancers.
Follow this link to set up an automatic address allocation for all services that have type external IP.
The configuration should now look something like this:
Cluster1:~ # kubectl get svc -n spire
NAME                                       TYPE           CLUSTER-IP      EXTERNAL-IP   PORT(S)          AGE
spire-controller-manager-webhook-service   ClusterIP      10.111.48.177   <none>        443/TCP          37d
spire-server                               NodePort       10.106.72.102   <none>        8081:30256/TCP   37d
spire-server-bundle-endpoint               LoadBalancer   10.99.0.208     172.16.17.9   8443:30889/TCP   37d
Cluster2:~ # kubectl get svc -n spire
NAME                                       TYPE           CLUSTER-IP      EXTERNAL-IP   PORT(S)          AGE
spire-controller-manager-webhook-service   ClusterIP      10.97.108.123   <none>        443/TCP          37d
spire-server                               NodePort       10.104.109.247  <none>        8081:30256/TCP   37d
spire-server-bundle-endpoint               LoadBalancer   10.104.151.184  172.16.17.3   8443:30889/TCP   37d
3.2 Create cluster federated trust domain
The Cluster Federated Trust Domain CRD is used to federate the clusters with each other.
It requires the following federation configurations:
Cluster Federated Trust Domain:

Bundle Endpoint:

The sample CRD’s can be applied to each cluster.
#For K8s cluster 1:
kubectl apply -f services/spire/federation/clusterfederatedtrustdomain-cluster1.yaml
#For K8s cluster 2:
kubectl apply -f services/spire/federation/clusterfederatedtrustdomain-cluster2.yaml
The Bundle endpoint URL and the TrustDomainBundle fields must be edited to be configured to the specifications of your cluster.
Using the previous step, the Bundle endpoint URL can be obtained. To obtain the trust domain bundle, edit the clusters as follows:
Cluster1:~ # kubectl exec -n spire -c spire-server deployment/spire-server -- /opt/spire/bin/spire-server bundle show -format spiffe > cluster1.bundle

Cluster2:~ # kubectl exec -n spire -c spire-server deployment/spire-server -- /opt/spire/bin/spire-server bundle show -format spiffe > cluster2.bundle
Doing a cat command of the bundles reveals the keys to be copied into the trust domain bundle field.
After the Bundle endpoint URL and the TrustDomainBundle fields are configured and applied, check the status of the SPIRE pods to make sure they are running and check the logs of the spire-server to verify successful federation.
Cluster1:~ # kubectl logs -n spire -c spire-server spire-server-574474c7dc-gbzl6

Cluster2:~ # kubectl logs -n spire -c spire-server spire-server-574474c7dc-2bfcx

Step 4. Deploying a sample application
Now that SPIRE is federated and communication across clusters can be facilitated, here's how you can deploy a sample application that verifies this functionality.
4.1 Deploy a resource in Cluster-1
In Cluster 1, apply a new ClusterSpiffeID called curl-greeter that registers resources with the label spiffe.io/spire-managed-identity=curl-greeter that can be federated with cluster2. Create a resource called curl-greeter that has the label: spiffe.io/spire-managed-identity=curl-greeter and annotation: inject.istio.io/templates=sidecar, spire
#Apply SPIFFEID
kubectl apply -f /services/spire/federation/clusterspiffeid-curl-greeter-cluster1.yaml
#Create Curl-Greeter Resource
kubectl run curl-greeter --image=radial/busyboxplus:curl --labels="spiffe.io/spire-managed-identity=curl-greeter" --overrides='{ "apiVersion": "v1", "spec": { "template": {"metadata": {"annotations": { "inject.istio.io/templates":"sidecar,spire" } } }}}' -i --tty
4.2 Deploy Bookinfo Sample Application in Cluster-2
In Cluster 2, apply a new ClusterSpiffeID called federated that registers resources with the label spiffe.io/spire-managed-identity=spire that can be federated with cluster1. Then apply the bookinfo sample application manifest.
#Apply SPIFFEID
kubectl apply -f /services/spire/federation/clusterspiffeid-federated-cluster2.yaml
#Apply Bookinfo Manifest
kubectl apply -f services/istio/release-1.17/bookinfo.yaml
4.3 Check if all the resources created are up and running
Cluster1:~ # kubectl get po

NAME                              READY   STATUS    RESTARTS   AGE

curl-greeter                      2/2     Running   0          15h
Cluster2:~ # kubectl get po

NAME                                READY   STATUS    RESTARTS   AGE
details-v1-bff8759df-vkvb4          2/2     Running   0          16h
greeter-client-76686757cd-6j2ft     2/2     Running   0          21h
productpage-v1-98887b9b-x5k24       2/2     Running   0          16h
ratings-v1-7ddbb859fc-htmfq         2/2     Running   0          16h
reviews-v1-67b576c8bf-jr6tj         2/2     Running   0          16h
reviews-v2-7ffbdcc5f7-m2c29         2/2     Running   0          16h
reviews-v3-6dbfcc6d89-zn9tw         2/2     Running   0          16h
4.4 Check that the workload identity was issued by SPIRE
SPIRE certificate at Curl-Greeter
Cluster1:~ # istioctl proxy-config secret curl-greeter -o json | jq -r \

> '.dynamicActiveSecrets[0].secret.tlsCertificate.certificateChain.inlineBytes' | base64 --decode > chain.pem

Cluster1:~ # openssl x509 -in chain.pem -text | grep SPIRE

        Subject: C = US, O = SPIRE, x500UniqueIdentifier = c3dd29b5f4a326f8a567854407456ea9
Note: Similarly, certificates for other pods can be checked.
4.5 Create a secret
Create a secret to hold bookinfo product page credentials like this:
kubectl create -n istio-system secret generic bookinfo-credential \

\--from-file=tls.key=bookinfo.com.key \

\--from-file=tls.crt=bookinfo.com.crt \

\--from-file=ca.crt=bookinfo.ca.crt
Obtain the tls cert and key using this command:
kubectl exec -n spire -c spire-server deployment/spire-server -- /opt/spire/bin/spire-server x509 mint -spiffeID spiffe://cluster2.demo/ns/default/sa/bookinfo-productpage
Note: Copy the SVID section into a new file bookinfo.com.crt and Private key section into bookinfo.com.key.
Obtain the ca cert using this command:
kubectl exec -n spire -c spire-server deployment/spire-server -- /opt/spire/bin/spire-server bundle list
Note: Copy the ca cert under the cluster1.demo section into a new file bookinfo.ca.cert.
Apply the gateway configuration for the bookinfo application found here: (It uses the istio-ingress gateway)
kubectl apply -f services/istio/release-1.17/bookinto-gateway.yaml
4.6 Generate traffic to the sample application on cluster2 from the curl greeter on cluster 1
Curl Command at Cluster 1 (IP addr: istio-ingress-gateway external ip)
Cluster1:~ # curl -v -HHost:bookinfo.com --resolve "bookinfo.com:443:172.16.17.2"   --cacert bookinfo.ca.crt --cert svid.pem --key key.pem   "https://bookinfo.com:443/productpage" -k

* Added bookinfo.com:443:172.16.17.2 to DNS cache

* Hostname bookinfo.com was found in DNS cache

*   Trying 172.16.17.2:443...

* TCP_NODELAY set

* Connected to bookinfo.com (172.16.17.2) port 443 (#0)

* ALPN, offering h2

* ALPN, offering http/1.1

* successfully set certificate verify locations:

*   CAfile: bookinfo.ca.crt

  CApath: none

* TLSv1.3 (OUT), TLS handshake, Client hello (1):

* TLSv1.3 (IN), TLS handshake, Server hello (2):

* TLSv1.3 (IN), TLS handshake, Encrypted Extensions (8):

* TLSv1.3 (IN), TLS handshake, Request CERT (13):

* TLSv1.3 (IN), TLS handshake, Certificate (11):

* TLSv1.3 (IN), TLS handshake, CERT verify (15):

* TLSv1.3 (IN), TLS handshake, Finished (20):

* TLSv1.3 (OUT), TLS change cipher, Change cipher spec (1):

* TLSv1.3 (OUT), TLS handshake, Certificate (11):

* TLSv1.3 (OUT), TLS handshake, CERT verify (15):

* TLSv1.3 (OUT), TLS handshake, Finished (20):

* SSL connection using TLSv1.3 / TLS_AES_256_GCM_SHA384

* ALPN, server accepted to use h2

* Server certificate:

*  subject: C=US; O=SPIRE; x500UniqueIdentifier=a09f8093609833482827d697f2719205

*  start date: May  9 08:45:18 2023 GMT

*  expire date: May  9 09:45:28 2023 GMT

*  issuer: C=US; O=SPIFFE

*  SSL certificate verify ok.

* Using HTTP2, server supports multi-use

* Connection state changed (HTTP/2 confirmed)

* Copying HTTP/2 data in stream buffer to connection buffer after upgrade: len=0

* Using Stream ID: 1 (easy handle 0x5569570e8050)

> GET /productpage HTTP/2

> Host:bookinfo.com

> User-Agent: curl/7.66.0

> Accept: */*

>

* TLSv1.3 (IN), TLS handshake, Newsession Ticket (4):

* TLSv1.3 (IN), TLS handshake, Newsession Ticket (4):

* old SSL session ID is stale, removing

* Connection state changed (MAX_CONCURRENT_STREAMS == 2147483647)!

< HTTP/2 200

< content-type: text/html; charset=utf-8

< content-length: 4294

< server: istio-envoy

< date: Tue, 09 May 2023 08:49:40 GMT

< x-envoy-upstream-service-time: 24
Obtain cert and key file using:
kubectl exec -n spire -c spire-server deployment/spire-server -- /opt/spire/bin/spire-server x509 mint -spiffeID spiffe://cluster.1demo/curl-greeter
Note: Copy the SVID section into a new file svid.pem and Private key section into key.pem.
Obtain ca cert using:
kubectl exec -n spire -c spire-server deployment/spire-server -- /opt/spire/bin/spire-server bundle list
Note: Copy the ca cert under the cluster2.demo section into a new file bookinfo.ca.cert.
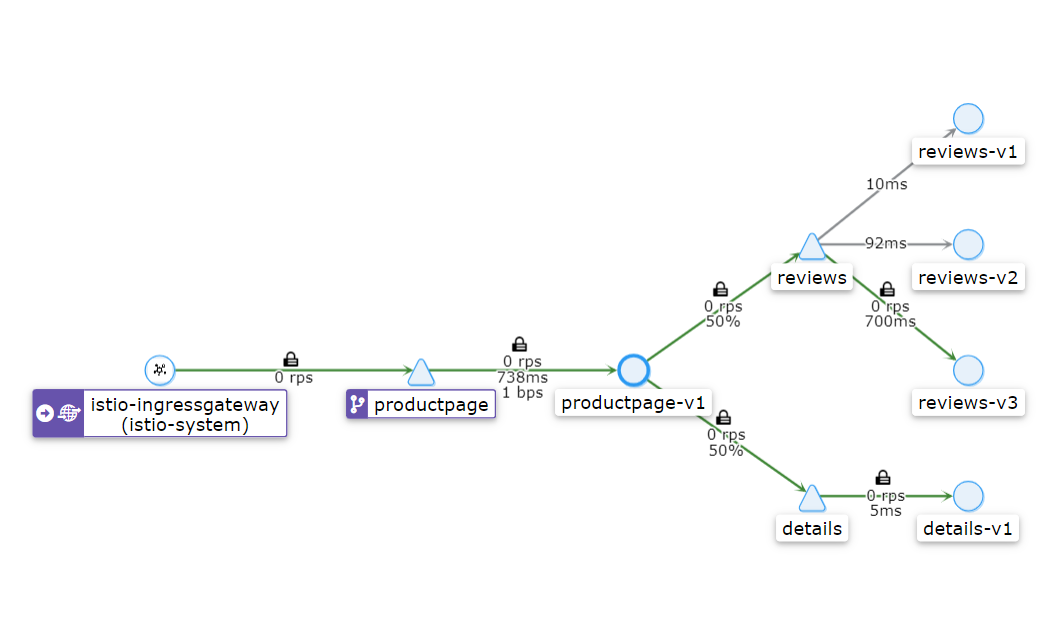
4.7 Visualize using Service Mesh
Using the Kiali dashboard, observe the graphs of generated traffic.
The graph below shows services communication, and the locks symbolize mTls protocol.
Summary
The goal of this blog post was to guide you through federating SPIRE across two Kubernetes clusters deployed on HPE GreenLake for Private Cloud Enterprise. It shows you how to do this by creating a cluster federated trust domain and federated ClusterSpiffeIDs for your sample application workloads and then helps you visualize your service mesh through Kiali Dashboard.
Tags
Related
Galadriel - A SPIRE Federation Alternative
Oct 31, 2022Integrating Istio and SPIRE on HPE GreenLake for Private Cloud Enterprise
Apr 25, 2023
Open source contributor helps Istio integrate with SPIRE
Oct 12, 2022