
End-to-end, easy-to-use pipeline for training a model on Medical Image Data using HPE Machine Learning Development Environment
June 16, 2023In this blog post, we’ll be covering how HPE Machine Learning Development Environment can add value to your machine learning workflow, as well as how to utilize HPE Machine Learning Development Environment and Flask together to train and serve a model on a medical domain-specific use case. An end-to-end workflow and step-by-step instructions are provided in the "Practice" section. If you want to jump right in, the repository contains all code referenced in this post as well as instructions to run.
Introduction
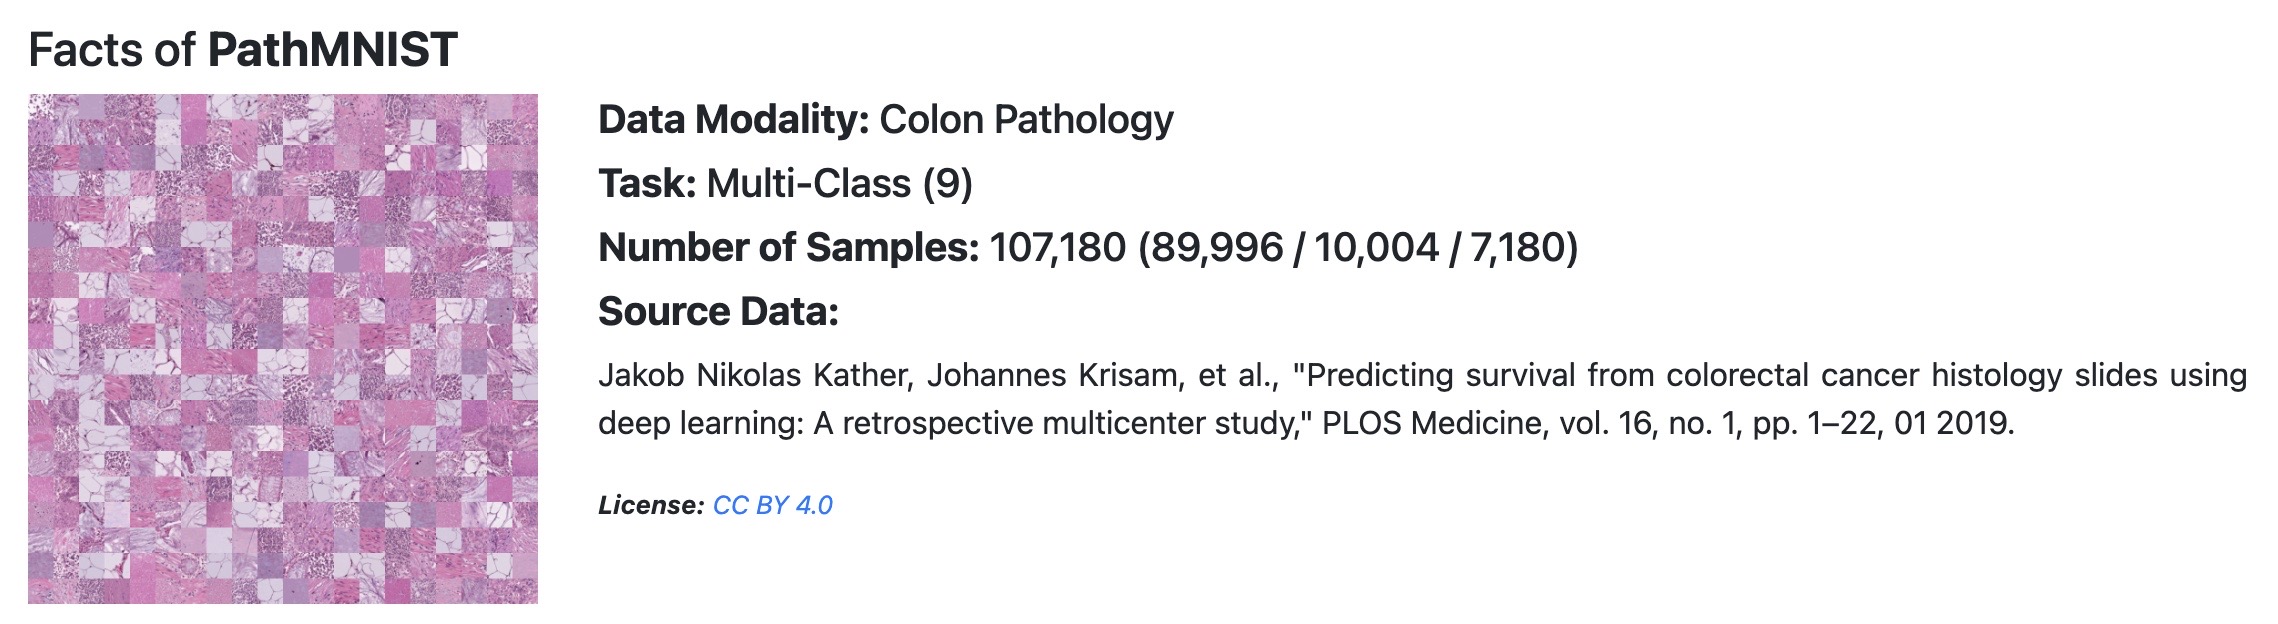
MedMNIST
Cancer is a horrible disease, and hospitals and research labs are increasingly using AI technology, such as convolutional neural networks (CNNs), to assist in image-based diagnoses. MedMNIST is a meta-dataset which contains 12 2-D datasets and 6 3-D computer vision datasets for various biomedical image classification problems. One of these datasets is PathMNIST, a colon cancer classification dataset. PathMNIST is derived from a prior study, and contains images of colorectal cancer histology slides, some of which contain cancer-associated stroma. Researchers can train a model on this dataset (for example, a CNN model) to help them identify cancer-associated-stroma in future patients.
The goal of training a model on this dataset is to accurately classify images into their respective categories, for example, this image of adipose tissue:

"prediction": "adipose"
HPE Machine Learning Development Environment
On its own, HPE Machine Learning Development Environment helps developers and scientists focus on innovation by removing the complexity and cost associated with at-scale machine learning model training. In this post we’re going to explore the advantages of building an end-to-end ML workflow using HPE Machine Learning Development Environment – occasionally referring to HPE’s open source platform, Determined - for model training. We also provide an example end-to-end solution using Flask for model deployment, as well as the steps taken to develop this example in the "Practice" section.
Why use HPE Machine Learning Development Environment?
At its core, Determined and HPE Machine Learning Development Environment are training platforms that reduce complexity for ML researchers and help research teams collaborate.
Researchers currently write training scripts that include not only the core ML functionalities to train a model on a dataset, but also code to manage the underlying infrastructure such as training on multiple GPUs, running a hyperparameter search, visualizing the training progress, and saving model checkpoints. Researchers should not have to focus on infrastructure problems – taking away these software engineering and systems administration-related tasks can allow researchers to focus on what’s important: building great models.
Additionally, collaboration is an important part of ML development. Many research teams don’t have the appropriate resources to share experiment results or share GPU infrastructure, resulting in a lack of reproducibility and ad-hoc resource management. This frustration due to a lack of high-quality resources causes slow progress and is a common reason why ML projects fail. Even at the smallest scale – say, one data scientist working alone – using a tool like HPE Machine Learning Development Environment can drastically speed up iteration time by removing the need to write boilerplate code.
In this blog post, you'll get to see firsthand how HPE Machine Learning Development Environment can remove infrastructure code in a real-world research script and, at the same time, provide out-of-the-box distributed training, checkpointing, hyperparameter search, and visualization functionailty, drastically accelerating research teams’ capabilities. You'll also learn about features that allow teams to collaborate effectively.
If you are interested in more details about how this example was developed, take a look at the "Practice" section. For a full, in-depth, model porting guide, check out this model porting guide. The code for this example and the instructions used to run it can be found in the repository.
Feature | Without HPE Machine Learning Development Environment | With HPE Machine Learning Development Environment |
| Distributed Training | Configure using open-source tools of your choice (e.g. Ray, Horovod) | Fault tolerant distributed training automatically enabled |
| Experiment Visualization | Write custom code or configure using open-source tools of your choice, (e.g. Weights & Biases, Tensorboard) | Training metrics (model accuracy, model loss) available natively in WebUI, including Tensorboard extension |
| Checkpointing | Write custom logic to save checkpoints during training, which may not be robust to code failures, or configure using open-source tools of your choice | Automatic, robust checkpoint management (e.g. best checkpoint saved at end of training, automatic checkpoint deletion, save checkpoint on experiment pause) |
| Hyperparameter Search | Write custom code or configure using tools of your choice (e.g. Ray Tune, Optuna) | State-of-the-art hyperparameter search algorithm (Adaptive ASHA) automatically available out of the box |
As you can see, without a centralized training platform to handle all necessary features in one place, users are left to write custom code or use a variety of open-source tools. This can get complicated very quickly, as it’s difficult to manage multiple dependencies, and compatibility issues start to arise between tools.
In many cases, HPE Machine Learning Development Environment can reduce the length of a training script to nearly half its original size, due to the sheer amount of boilerplate code normally required to enable these features. Let’s take a closer look at each of these to see HPE Machine Learning Development Environment in action.
Let's take a closer look at the core features of HPE Machine Learning Development Environment!
Distributed training
Distributed training refers to the process of distributing a model training workload across multiple devices, such as GPUs. It’s very common for machine learning workloads to run for weeks on end due to large model and dataset sizes, so distributing mode training across GPUs can drastically speed up the time it takes to develop a machine learning model, from weeks to hours.
However, this is difficult to set up and difficult to manage: manual interaction with GPUs through code is often necessary when setting up distributed training, and, once set up, managing distributed training is cumbersome due to issues like fault tolerance. Fault tolerance refers to the ability of a system to gracefully handle and continue a training job even if something on the infrastructure level goes wrong, such as a device failing. Setting up a fault tolerant solution manually is an enormous lift on an ML team, and not normally within the scope of a researcher’s abilities.
Determined not only takes away the need to automatically interface with individual GPUs, but is also fault-tolerant. Let’s take a look at how the original training script handles running the model on GPUs.
In line 291, the gpu_ids are received from input arguments from the user:
gpu_ids = args.gpu_ids
The device is configured using only the first gpu_id (distributed training is not yet enabled):
device = torch.device('cuda:{}'.format(gpu_ids[0])) if gpu_ids else torch.device('cpu')
And the model is ported to the GPU in line 90:
model = model.to(device)
As well as the inputs to the model, for example, in line 190:
outputs = model(inputs.to(device))The variable “device” is referenced a total of 27 times in the training script, for purposes like porting other inputs to the GPU, and passing the device variable around to different functions so they are aware of the GPU. This is a perfect example of how a researcher would normally need to manage training on a GPU – manually. And we haven't even started distributed training yet!
With Determined or HPE Machine Learning Development Environment, none of this manual device management is necessary. Simply using one of our high-level APIs gives you access to not only running on GPUs but running distributed training on multiple GPUs out-of-the-box. The only configuration needed (after porting your model to one of our APIs) would be to set the number of desired resources (GPUs) to use in your experiment settings, e.g.:
resources:
    slots_per_trial: 4
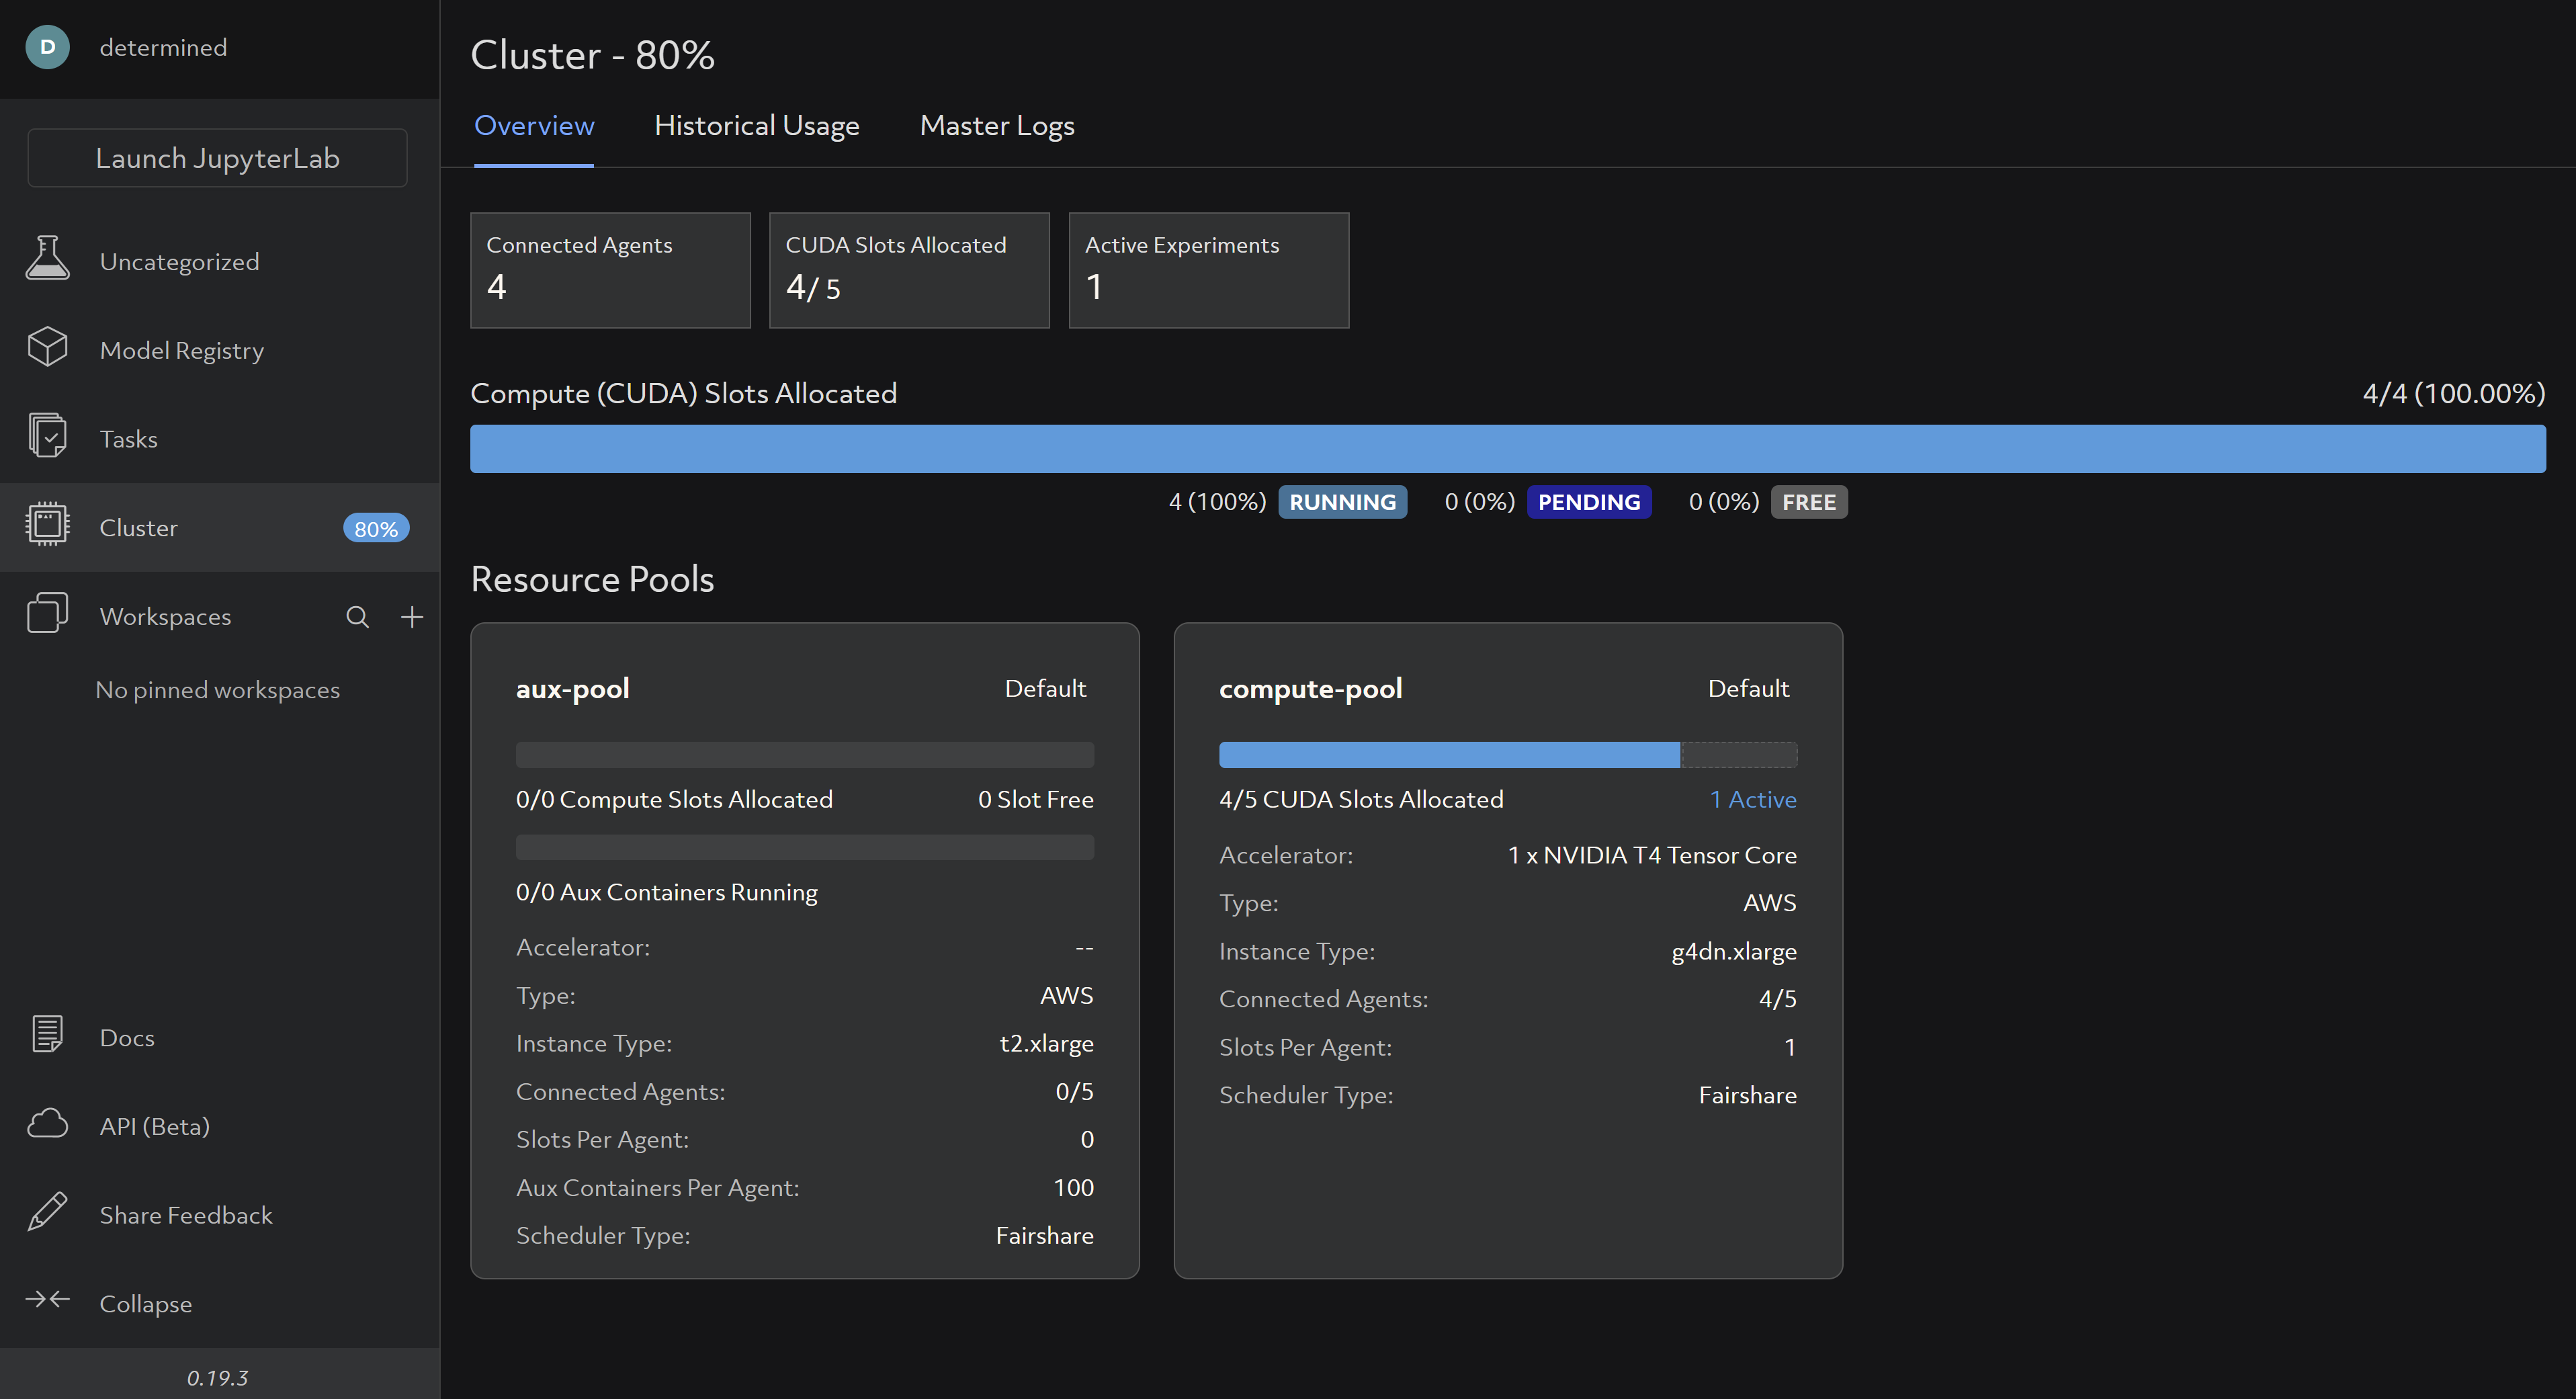
After taking these steps, you’d be able to watch your experiment progress in the WebUI and be assured that you’re utilizing multiple GPUs. By viewing the “Cluster” tab, you will notice that 4/5 CUDA Slots are allocated and in use:
Experiment visualization and metric logging
Visualization tools are important when developing models due to the probabilistic nature of machine learning. Debugging a model often involves analyzing a model’s training journey by visualizing metrics at different timestamps during an experiment. Commonly used tools for visualization often require manual configuration. Let’s take a look at how the original training script handles visualization:
The original script uses a library called tensorboardX:
from tensorboardX import SummaryWriter
Using this library, a writer object is created for handling visualization data:
writer = SummaryWriter(log_dir=os.path.join(output_root, 'Tensorboard_Results'))
The writer object is referenced a total of 9 times throughout the script.
In addition, training and testing metrics are manually calculated and logged in various places throughout the script, e.g.:
logs = ['loss', 'auc', 'acc']
    train_logs = ['train_'+log for log in logs]
    val_logs = ['val_'+log for log in logs]
    test_logs = ['test_'+log for log in logs]
    log_dict = OrderedDict.fromkeys(train_logs+val_logs+test_logs, 0)
    train_log = 'train  auc: %.5f  acc: %.5f\n' % (train_metrics[1], train_metrics[2])
    val_log = 'val  auc: %.5f  acc: %.5f\n' % (val_metrics[1], val_metrics[2])
    test_log = 'test  auc: %.5f  acc: %.5f\n' % (test_metrics[1], test_metrics[2])

    log = '%s\n' % (data_flag) + train_log + val_log + test_log
    print(log)
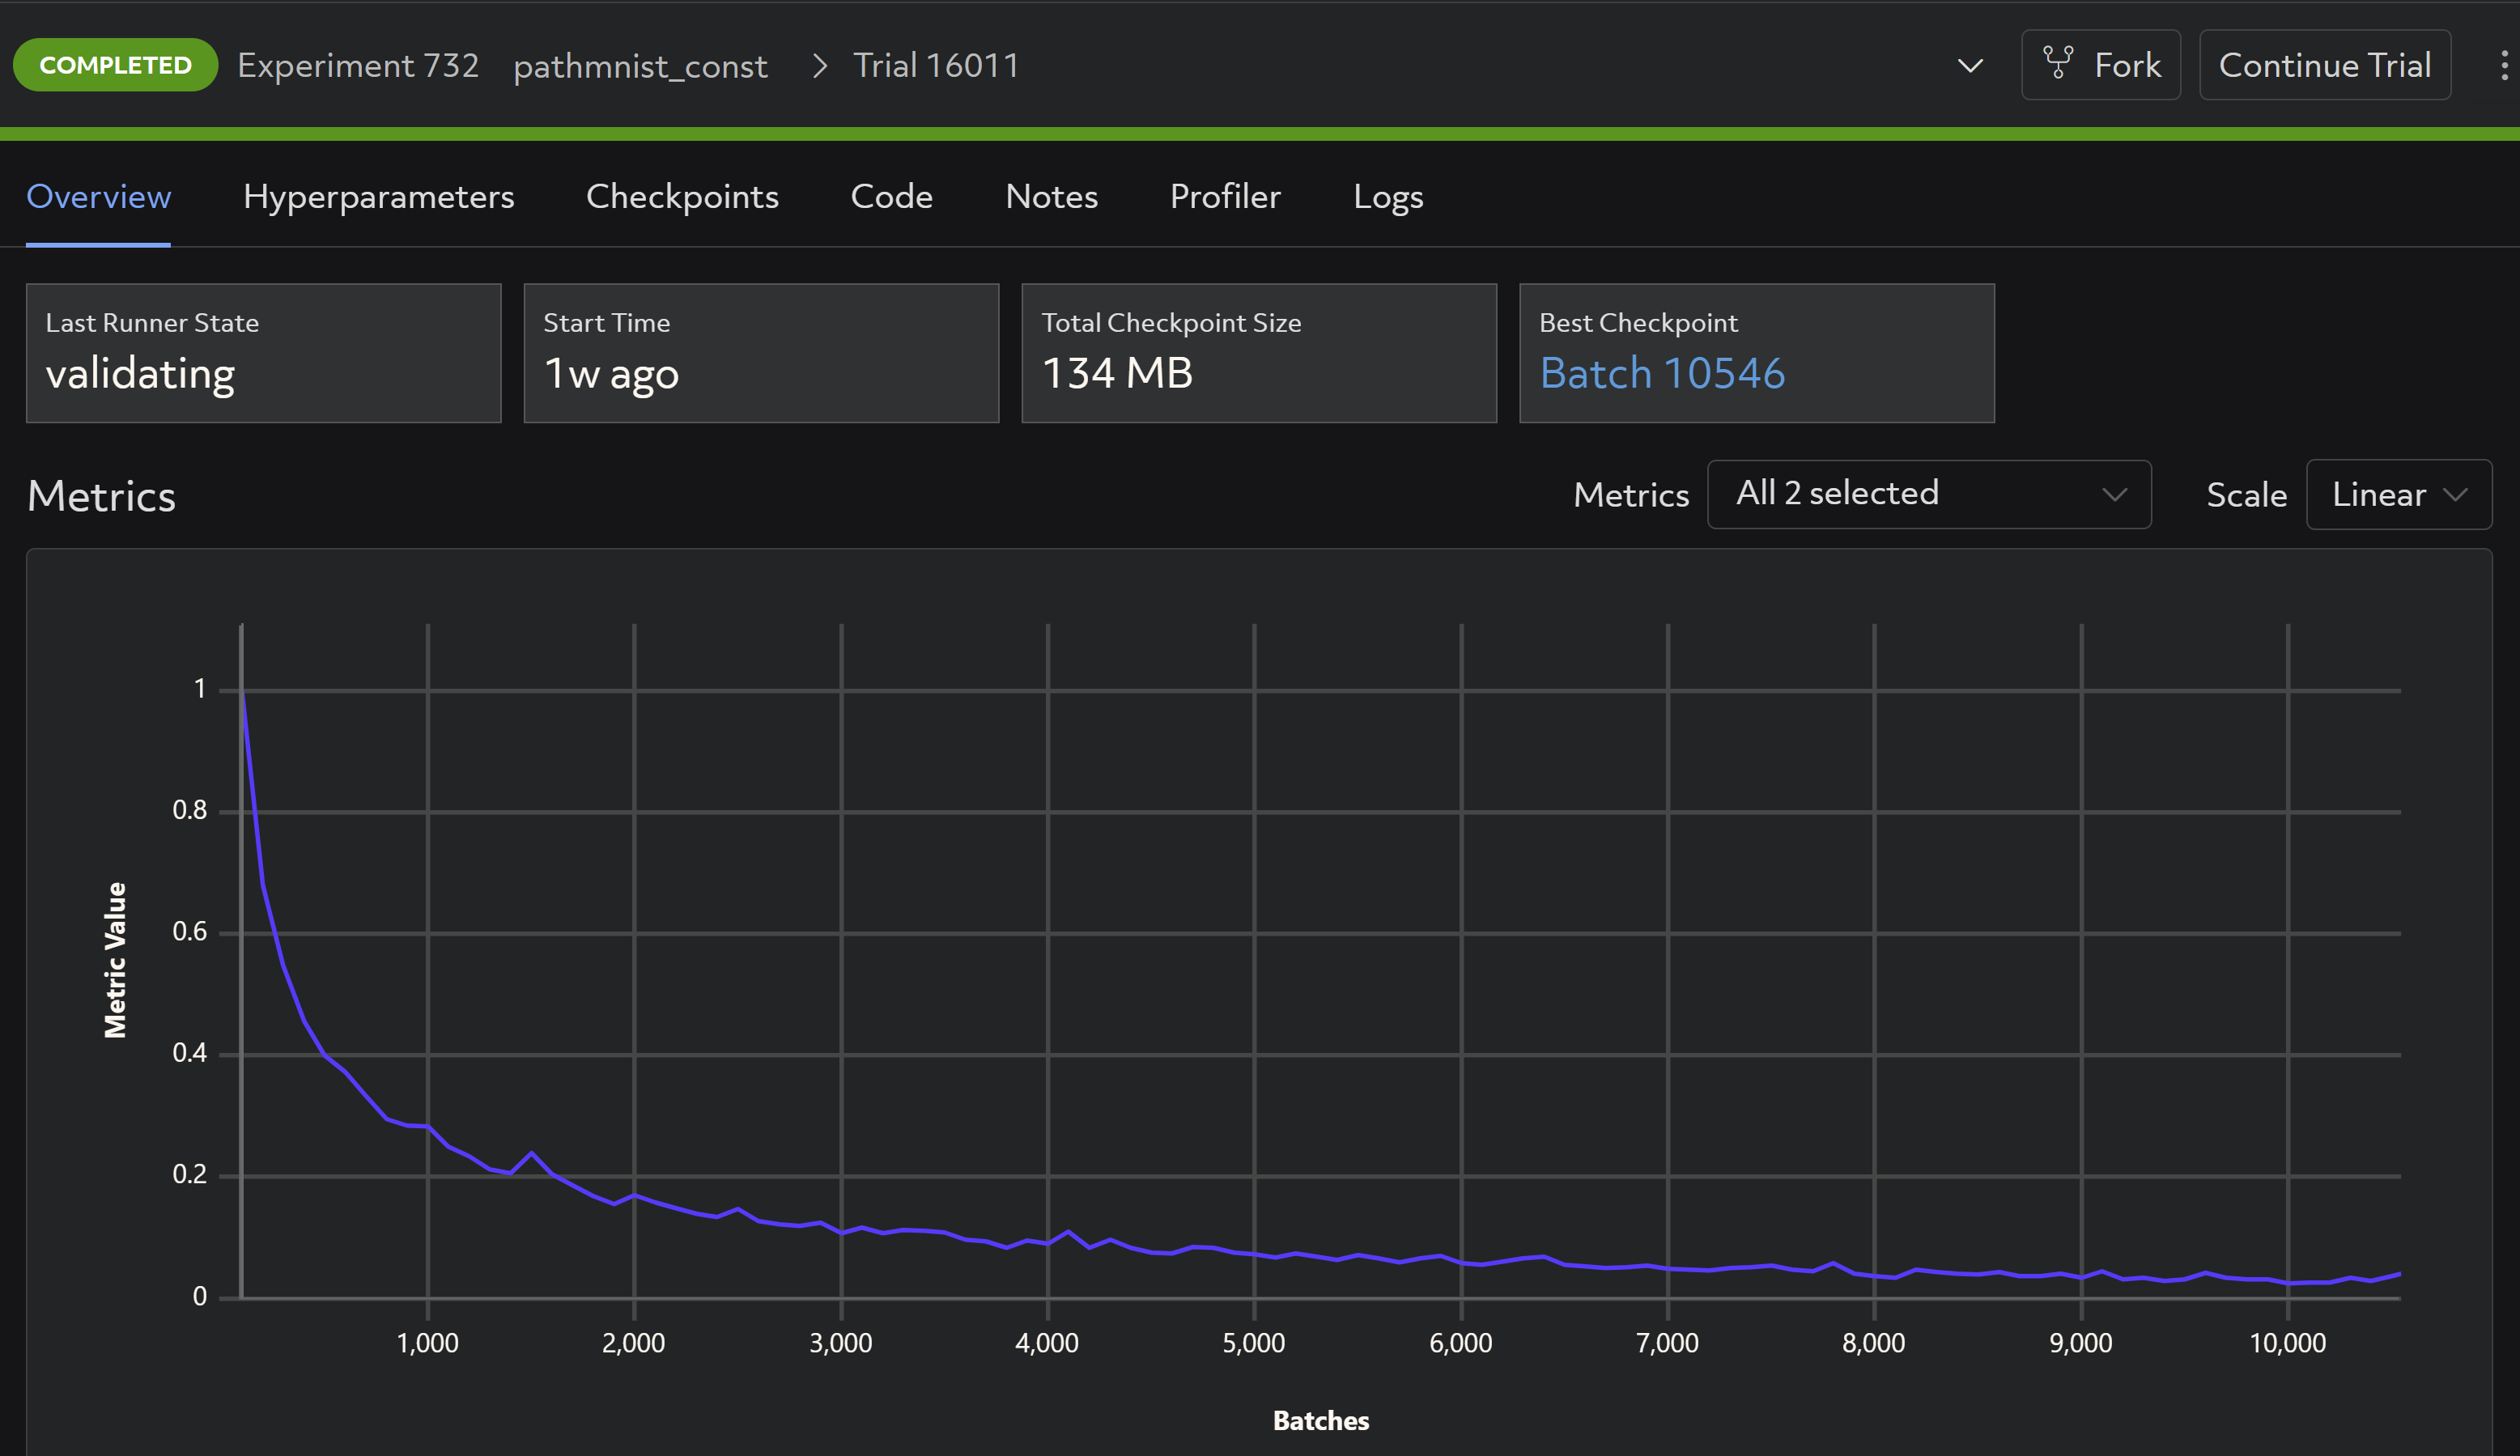
With Determined, no manual metric tracking or logging is necessary. When porting your model to one of our high-level APIs, the default training and testing metrics, such as model losses, are automatically configured and rendered natively in the WebUI:
Automatic checkpointing
Checkpointing a model throughout an experiment is important to maintain training progress and for preserving the best model at the end of an experiment. Let’s take a look at how the original training script handles model checkpointing.
The original training script saves the last model at the very end of the training process, in a location specified by the user, but does not checkpoint throughout the training job:
    path = os.path.join(output_root, 'best_model.pth')
    torch.save(state, path)
This approach is problematic for the following reasons:
- The last model, at the end of a training job, is not always the best model.
- The script could fail before the end of a training job, resulting in no model checkpoint, which wastes time and resources.
Determined automatically checkpoints in the following situations:
- Periodically throughout the course of model training, to keep a record of the training progress.
- During training – If a trial fails on epoch 9 and the last checkpoint was saved during epoch 1, Determined will save yet another checkpoint at epoch 9, making this a very efficient system.
- Upon completion of the trial.
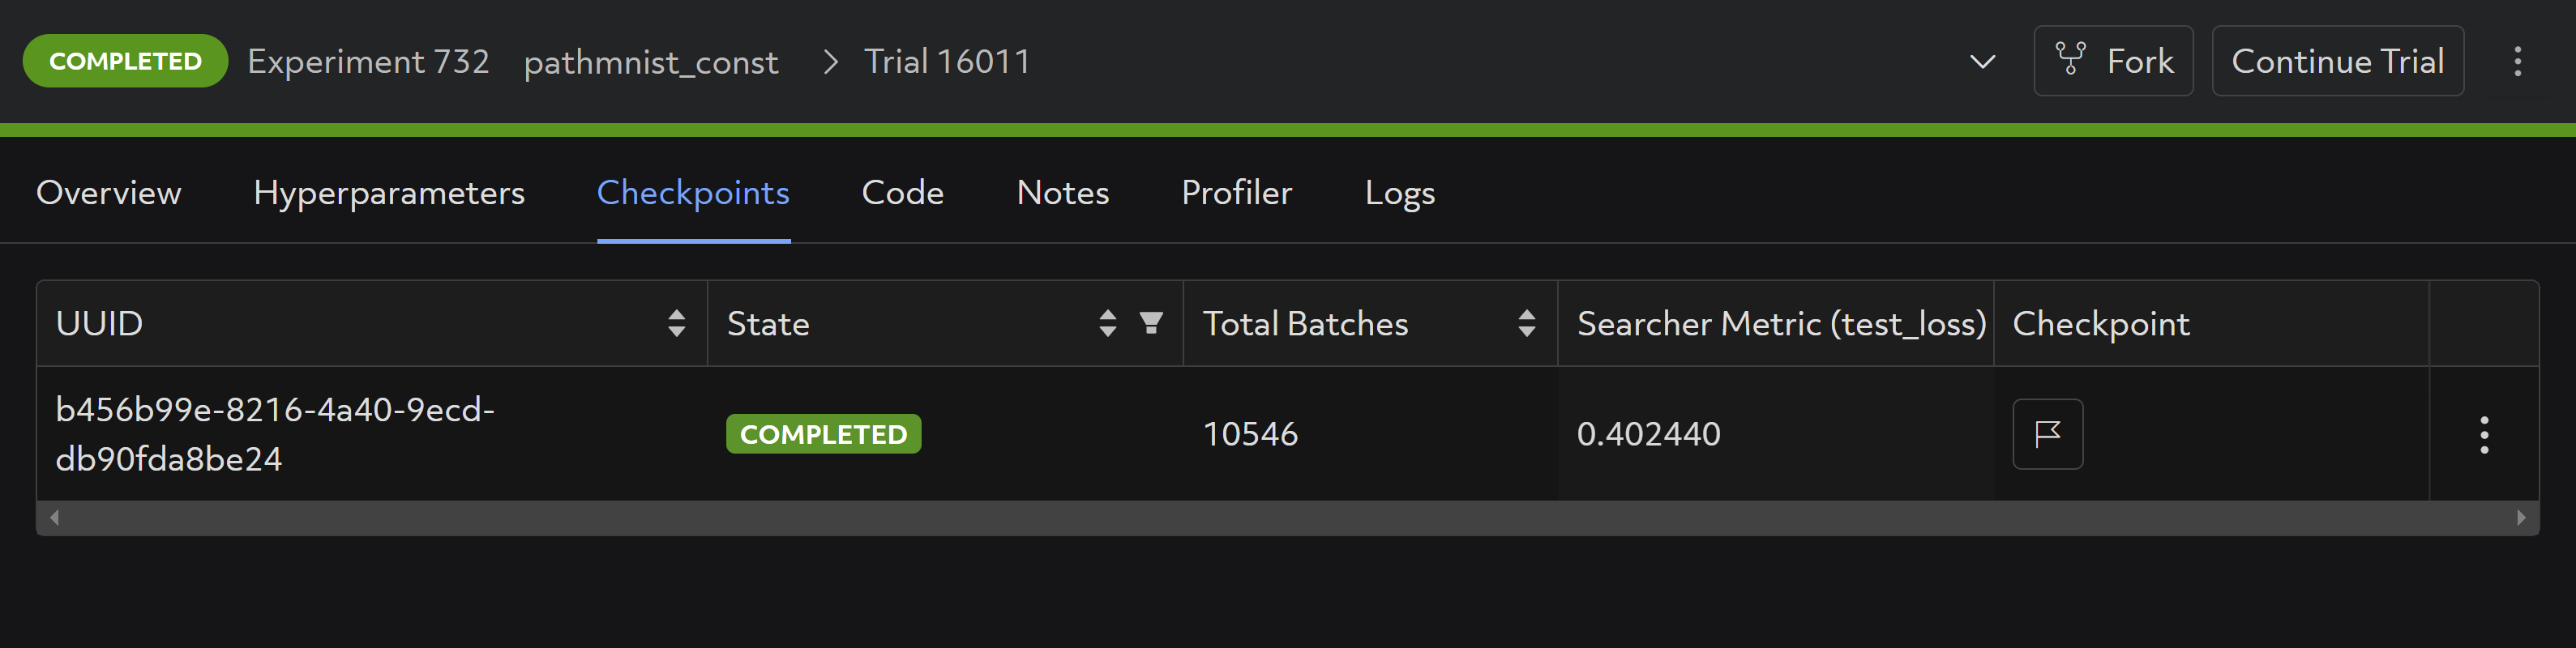
Additional checkpoint configuration settings can be modified to make this even more customizable. Checkpoints can be easily examined through the WebUI even after an experiment completes, and downloaded easily through the Determined APIs:
Hyperparameter search
Hyperparameter search refers to the process of searching for the optimal configuration settings for your machine learning model – for example, searching for the optimal learning rate or convolution sizes in a convolutional neural network. The original training script does not implement hyperparameter search. This is not surprising, as hyperparameter search is yet another heavy lift for a researcher who wants to focus on experimentation, not the grunt work of setting up a hyperparameter search.
With Determined or HPE Machine Learning Development Environment, configuring hyperparameter search is easy. Defining hyperparameters, either static or in ranges, is easy through experiment configuration:
hyperparameters:
    global_batch_size: 128
    data_flag: pathmnist
    dataset_name: "pathmnist.npz"
    model_flag: resnet18
    lr: 0.001
    gamma: 0.1
    resize: True
    task: "multi-class"
    num_epochs: 15
In this case, the “hyperparameters” feature can also be used to switch between datasets and types of training tasks if configured appropriately in the training script – which is neat!
Collaboration
Data scientists and researchers rarely work alone, especially in today’s data-driven technological boom. Sharing experiment results across a large team and sharing a single GPU cluster is not traditionally straightforward, but HPE Machine Learning Development Environment makes for a much better experience:
Resource management
At the enterprise level, HPE Machine Learning Development Environment automatically scales up and down workloads depending on priority and resource availability. For example, if a researcher is running a hefty training job and is utilizing all 10 GPUs on a shared cluster, but their colleague needs two of them for a higher priority smaller job, HPE Machine Learning Development Environment can temporarily scale back the larger job utilizing all 10 GPUs down to using only 8, leaving room for the smaller training job.
Model sharing and reproducibility
The HPE Machine Learning Development Environment WebUI makes it easy to track experiments and see which model configurations resulted in particular results, across a team. This makes reproducibility easy, something that is of utmost importance when developing models for a use case like predicting cancer in biomedical images.
Now that you have a good background on the HPE Machine Learning Development Environment, l'll show you how you can build an E2E solution for your model training.
Practice: Building an E2E solution
Step 1: Model training
To get started, we’ll take a look at the original training script provided here.
This script contains all the functionality needed to download the dataset as well as train and test the model (a commonly used convolutional neural network architecture – ResNet), on the PathMNIST data.
The original script has some boilerplate code that can be removed since HPE Machine Learning Development Environment handles functionality such as distributed training and experiment visualization. For a full guide to model porting, refer to the model porting guide. Walk through the steps taken to port the code to HPE Machine Learning Development Environment using the PyTorch API. The PyTorch API is a high-level API which allows you to utilize the full functionality of HPE Machine Learning Development Environment out-of-the-box.
Step 1.1: Connect to HPE Machine Learning Development Environment
Once your admin has provisioned a cluster with HPE Machine Learning Development Environment and configured you as a user, connect to HPE Machine Learning Development Environment by exporting the DET_MASTER variable:
export DET_MASTER=<your cluster address>
Then log in as your user:
det login user <your username>
You can check to make sure you are logged in via
det user whoami
Refer to the Determined User Guide and the Reference Page for more information on how to interact with the cluster.
In steps 1.2 - 1.4, I'm going to describe how to port this model to HPE Machine Learning Development Environment step-by-step, (model_def.py). If you are interested in running the final training job, skip to step 1.5.
Step 1.2: Port model definition
To train your own custom model using one of Determined’s high level APIs, such as the PyTorch API, you need to port your code to the API first. A template of all the functions Determined needs to run your training loops is provided here. Fill them out, one-by-one, to port your code. Once these functions are populated, Determined can use these, along with the provided configuration file, to run your experiment.
To start, create a class definition that inherits from PyTorchTrial (this is the template referred to above). Create a context (line 29). This is like an interface to the Determined master, allowing you to communicate back and forth with it. Also include the model, optimizer, and criterion in the initialization function so that Determined is aware of them. Make each object an attribute of the class as shown below and transfer relevant hyperparameters to config.yaml. As shown here, we can obtain hyperparameters defined in this configuration file by calling self.context.get_hparam(), making it easier to change these hyperparameters without modifying training code.
class MyMEDMnistTrial(PyTorchTrial):
    def __init__(self, context: PyTorchTrialContext) -> None:
        self.context = context

        self.info = INFO[self.context.get_hparam("data_flag")]
        task = self.info["task"]
        n_classes = len(self.info["label"])

        self.context = context
        if self.context.get_hparam("model_flag") == "resnet18":
            model = resnet18(pretrained=False, num_classes=n_classes)
        elif self.context.get_hparam("model_flag") == "resnet50":
            model = resnet50(pretrained=False, num_classes=n_classes)
        else:
            raise NotImplementedError

        self.model = self.context.wrap_model(model)

        optimizer = torch.optim.Adam(
            self.model.parameters(), lr=self.context.get_hparam("lr")
        )
        self.optimizer = self.context.wrap_optimizer(optimizer)

        if self.context.get_hparam("task") == "multi-label, binary-class":
            self.criterion = nn.BCEWithLogitsLoss()
        else:
            self.criterion = nn.CrossEntropyLoss()
Step 1.3: Port data loaders
Next, port the training and evaluation data loaders to the following class functions as follows. This is the code that trains one batch of data. You no longer need the standard for loop to iterate over batches or epochs inside these functions, since Determined will handle the training loop for you.
    def build_training_data_loader(self) -> DataLoader:
        DataClass = getattr(medmnist, self.info["python_class"])

        if self.context.get_hparam("resize"):
            data_transform = transforms.Compose(
                [
                    transforms.Resize((224, 224), interpolation=PIL.Image.NEAREST),
                    transforms.ToTensor(),
                    transforms.Normalize(mean=[0.5], std=[0.5]),
                ]
            )
        else:
            data_transform = transforms.Compose(
                [transforms.ToTensor(), transforms.Normalize(mean=[0.5], std=[0.5])]
            )

        train_dataset = DataClass(
            split="train",
            transform=data_transform,
            download=False,
            as_rgb=True,
            root=DATASET_ROOT,
        )
        train_loader = determined.pytorch.DataLoader(
            dataset=train_dataset,
            batch_size=self.context.get_per_slot_batch_size(),
            shuffle=True,
        )

        return train_loader
In each function, initialize and return the relevant PyTorch DataLoader object (e.g. val_loader from build_validation_data_loader, and train_loader in build_training_data_loader).
Step 1.4: Port training and evaluation functions
Finally, port your training and evaluation functions to the following class functions by including the relevant steps to train and evaluate the model on one batch of data. Here, make sure to remove the for-loop iterating over epochs and include only the relevant code corresponding to one data batch. HPE Machine Learning Development Environment handles the training loop behind the scenes.
    def train_batch(
        self, batch: TorchData, epoch_idx: int, batch_idx: int
    ) -> Dict[str, Any]:
        inputs, targets = batch
        outputs = self.model(inputs)

        if self.context.get_hparam("task") == "multi-label, binary-class":
            targets = targets.to(torch.float32)
            loss = self.criterion(outputs, targets)
        else:
            targets = torch.squeeze(targets, 1).long()
            loss = self.criterion(outputs, targets)

        self.context.backward(loss)
        self.context.step_optimizer(self.optimizer)

        return {"loss": loss}

    def evaluate_batch(self, batch: TorchData) -> Dict[str, Any]:
        inputs, targets = batch
        outputs = self.model(inputs)

        if self.context.get_hparam("task") == "multi-label, binary-class":
            targets = targets.to(torch.float32)
            loss = self.criterion(outputs, targets)
            m = nn.Sigmoid()
            outputs = m(outputs)
        else:
            targets = torch.squeeze(targets, 1).long()
            loss = self.criterion(outputs, targets)
            m = nn.Softmax(dim=1)
            outputs = m(outputs)
            targets = targets.float().resize_(len(targets), 1)

        return {"test_loss": loss}
Notice that in all functions defined as part of MyMEDMnistTrial, all instances of manual device management, metric logging, and accuracy calculations have been removed. HPE Machine Learning Development Environment’s Trial APIs handle these automatically, given only the Trial definition and configuration file.
After porting the model, compare the original training script and our newly defined model_def.py training file. At 302 vs. 177 lines of code, we have cut the training script nearly in half!
Optional: Upload dataset to S3 bucket
The PathMNIST dataset includes images that are preprocessed to 28x28 images with corresponding classification labels, complete with data augmentation. The original training script downloads this dataset and performs data normalization prior to model training.
When submitting experiments to HPE Machine Learning Development Environment, the dataset will be downloaded to the master in the same way, which may cause a small delay. To avoid this, upload your data to an S3 bucket and access it via the following instead:
Modify config.yaml to include the data url as follows:
data:
  url: https://medmnist-pathmnist.s3.us-east-2.amazonaws.com/pathmnist.npz
Access the dataset via the following in the class initialization function:
os.makedirs(DATASET_ROOT, exist_ok=TRUE)
wget.download(
    context.get_data_config()["url"],
    out=os.path.join(DATASET_ROOT, "pathmnist.npz"),
)
Step 1.5: Train the model
In HPE Machine Learning Development Environment, an experiment is a training job that consists of one or more variations, or trials, on the same model
To begin training our PathMNIST model, you need to submit an experiment to HPE Machine Learning Development Environment. After setting up Determined, use the CLI to submit an experiment (refer to full setup instructions in the repository):
det e create config.yaml .
View progress on the WebUI located at <DET_MASTER>:8080, which you can reach by pasting this address into a browser window.
You can configure additional training parameters by modifying config.yaml. Refer to the Experiment Configuration Reference for more information.
And that’s it! Now that you have a trained PathMNIST model, progress to deployment, found in Step 2.
Step 2: Model deployment
Once you have finished training with HPE Machine Learning Development Environment, you can deploy your model using any solution.
In Step 2, you'll see an example of using Flask to deploy your model as a RESTful API.
Steps 2.1-2.4 describe the steps needed to create a Flask server (deploy.py). If you are interested in deploying the model directly, skip to steps 2.5-2.6.
Step 2.1: Load the model from your saved checkpoints in your experiment
# Load the Determined model
checkpoint = client.get_experiment(os.getenv("EXPERIMENT_ID")).top_checkpoint()
path = checkpoint.download()
trial = pytorch.load_trial_from_checkpoint_path(path)
model = trial.model
model.eval()
Now that you have a trained model, to properly load the model, reference checkpoints from the experiment.
Step 2.2: Define a function to preprocess your data
def preprocess_data(image):
    # Resize the image
    image = image.resize((28, 28))

    # Convert the image to a NumPy array
    image = np.array(image)

    # Add a channel dimension if it's a grayscale image
    if len(image.shape) == 2:
        image = np.expand_dims(image, axis=-1)

    # Normalize the image by dividing by 255 and subtracting 0.5
    image = (image / 255.0) - 0.5

    # Transpose the image dimensions
    image = np.transpose(image, (2, 0, 1))

    # Convert the image to a torch tensor
    processed_data = torch.tensor(image, dtype=torch.float32)

    # Add a batch dimension
    processed_data = processed_data.unsqueeze(0)

    return processed_data
Here, perform the same normalizations done when training the model on the training dataset.Step 2.3: Define a Flask server.
# Define a Flask route for serving predictions
@app.route("/predict", methods=["POST"])
def predict():
    # Get the input image file from the request
    file = request.files["file"]

    # Read the image file into a PIL Image object
    image = Image.open(io.BytesIO(file.read()))

    # Preprocess the input data
    processed_data = preprocess_data(image)

    # Use the Determined model to make a prediction
    output_tensor = model(processed_data)

    # Convert the output tensor to a numpy array
    output_array = output_tensor.detach().numpy()

    # Apply softmax to get probabilities for each class
    probabilities = F.softmax(output_tensor, dim=1)

    # Convert the output tensor to a numpy array
    output_array = probabilities.detach().numpy()

    # Get the predicted class label
    class_label = np.argmax(output_array)
    class_labels = [
        "adipose",
        "background",
        "debris",
        "lymphocytes",
        "mucus",
        "smooth muscle",
        "normal colon mucosa",
        "cancer-associated stroma",
        "colorectal adenocarcinoma epithelium",
    ]

    # Return the predicted class label as a JSON response
    return jsonify({"prediction": class_labels[class_label]})
Here, you will define a server that accepts an image file, performs the preprocessing steps defined in the preprocess_data function, and outputs the prediction as a json object.
Step 2.4: Define a function to start the Flask server:
# Start the Flask server
if __name__ == "__main__":
    app.run(debug=True, host="0.0.0.0", port=5000)
In this example the server is deployed on localhost on port 5000.
Step 2.5: Obtain test data
Your test data should be in the form of .jpeg, .png, or .jpg images. Deploy the Flask server and submit requests for inference.
Full instructions for running the example can be found in the repository.
For example, running prediction on the following image of adipose tissue results in:
"prediction": "adipose"
Deploying your model can make it a lot easier to use in production, and while this example uses Flask as a simple proof-of-concept, tools like KServe can help deploy your models in production.
Conclusion
That’s it! I've have shown you how to implement an end-to-end machine learning workflow using HPE Machine Learning Development Environment and Flask. For more information about HPE’s AI toolkit please visit the HPE AI Solutions homepage here.
If you enjoyed reviewing this model training and deployment example, we invite you to get in touch with the Determined Community and try this out for yourself by following the Determined Documentation.
If you and your team are ready for premium machine learning support from HPE, please please contact the team via the HPE Machine Learning Development Environment homepage.
Related
Build Transformative AI Applications at Scale with HPE Machine Learning Development Environment
Nov 4, 2021
Deep Learning Model Training – A First-Time User’s Experience with Determined - Part 1
Apr 14, 2022Deep Learning Model Training – A First-Time User’s Experience with Determined – Part 2
May 3, 2022Intro to Core API: Part 1 (Integer Incrementing)
Jan 19, 2023
Production-ready object detection model training workflow with HPE Machine Learning Development Environment
Jun 16, 2023Writing Deep Learning Tools for all Data Scientists, Not Just Unicorns
Feb 11, 2022