A guide to deploying MongoDB applications using HPE GreenLake for Private Cloud Enterprise
December 1, 2022Editor’s Note – NAME CHANGE: HPE GreenLake for Containers is now part of HPE GreenLake for Private Cloud Enterprise.
Introduction
In this blog post, we demonstrate how an end user can deploy a containerized, stateful MongoDB application on a Kubernetes-based container stack provided by HPE GreenLake for Containers and then access it over an external network or internet. In this scenario, the Kubernetes cluster gets configured using HPE CSI driver, along with the default storage class.
An overview of HPE GreenLake for Containers
HPE GreenLake for Containers provides a pay-as-you-go, Kubernetes-based container-optimized stack that is delivered as a service to help you operationalize your containers at scale.
HPE GreenLake for Containers provides a standardized approach for cluster creation using cluster blueprints with user roles and role-based access controls as defined in the HPE GreenLake for Containers interface to the created clusters and applications. It also provides you with a dashboard view that displays the status of all Kubernetes services and resource utilization across all clusters.
HPE manages your environment and will contact you before any upgrades are made to let you know the planned date and time, along with any pre-upgrade requirements.
The HPE GreenLake for Containers service:
- Is an HPE-designed, implemented, owned, and operated private cloud that is deployed at a customer site
- Is offered as a consumption-based service that allows customers to better align costs to outcomes
- Supports Kubernetes on VMware vSphere
- Supports HPE Nimble and Alletra Storage arrays which provides persistent storage for containerized workloads
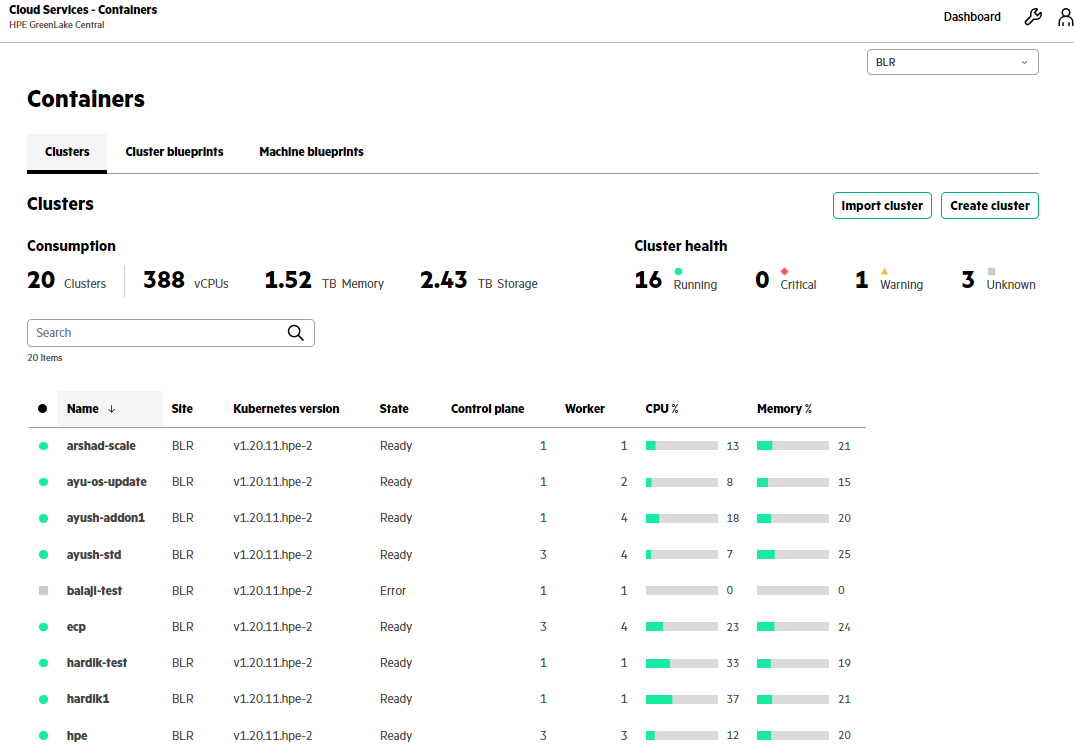
You can launch HPE GreenLake for Containers using the HPE GreenLake for Private Cloud Enterprise card on the HPE GreenLake Central Dashboard. From the Private Cloud Enterprise main page, click Containers to create clusters and blueprints, view details about existing clusters, and launch the HPE Ezmeral Runtime Environment (Containers page).
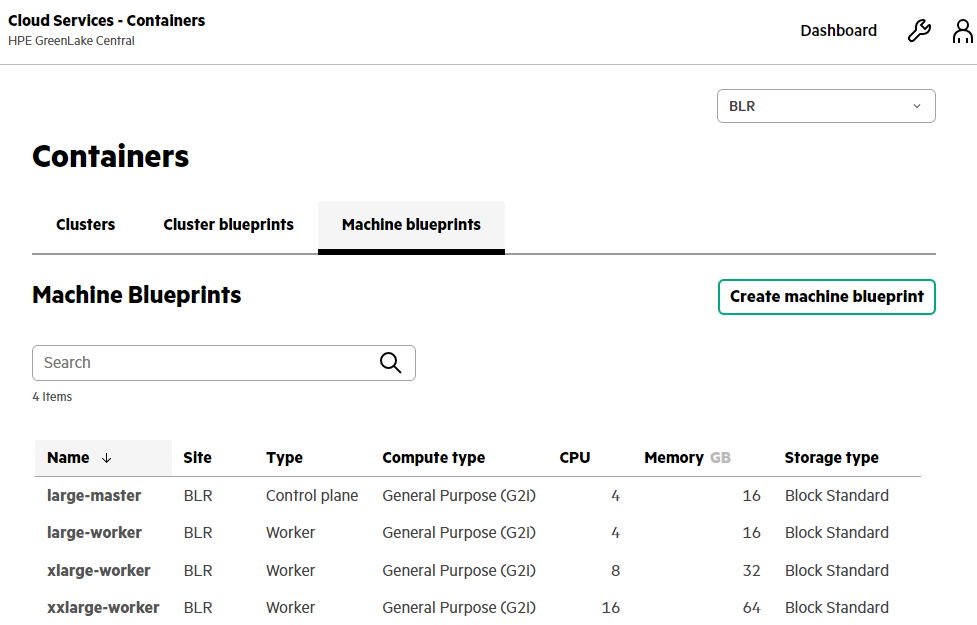
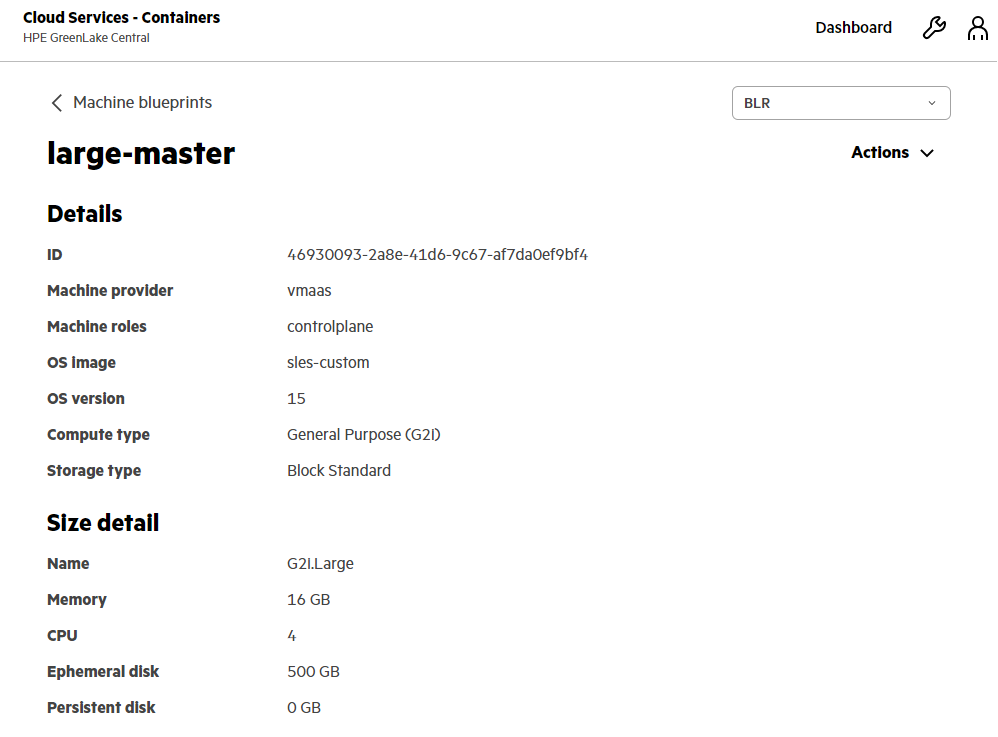
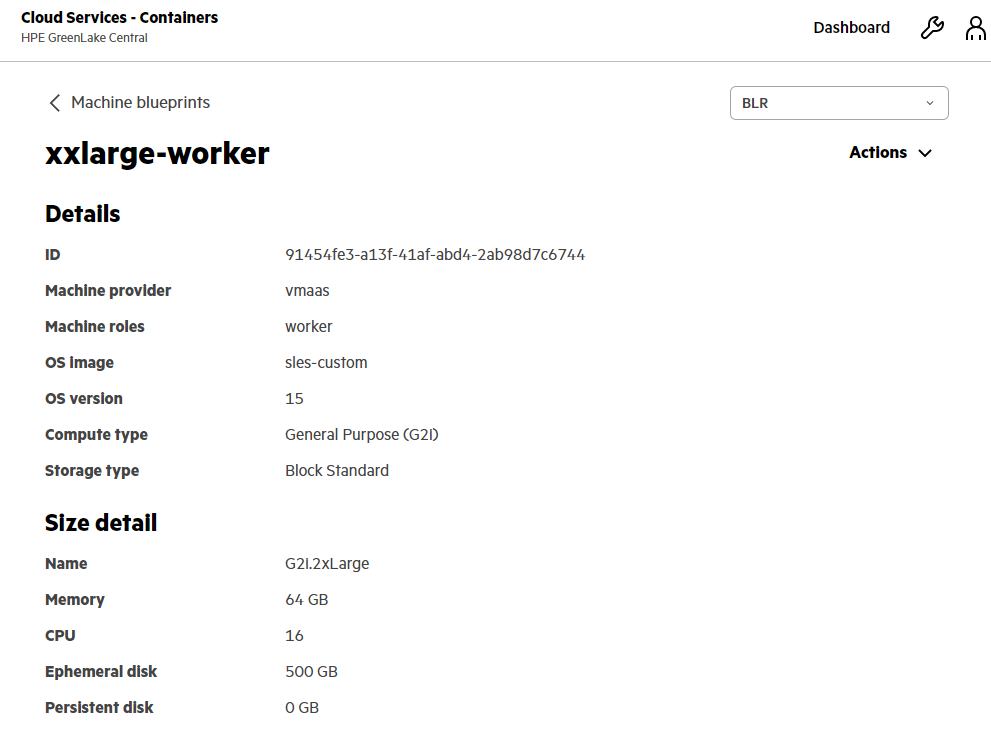
HPE GreenLake for Containers: Machine blueprint layout for Kubernetes cluster node(s)
HPE GreenLake for Containers uses machine blueprints to define the infrastructure details for the worker nodes used in a cluster.
Predefined blueprints are provided when the service is provisioned, and you can create your own custom machine blueprints.
A machine blueprint includes the:
- Machine provider
- Operating system image and version
- Number of vCPU cores and amount of memory in the node
- Compute instance types
- Storage instance types
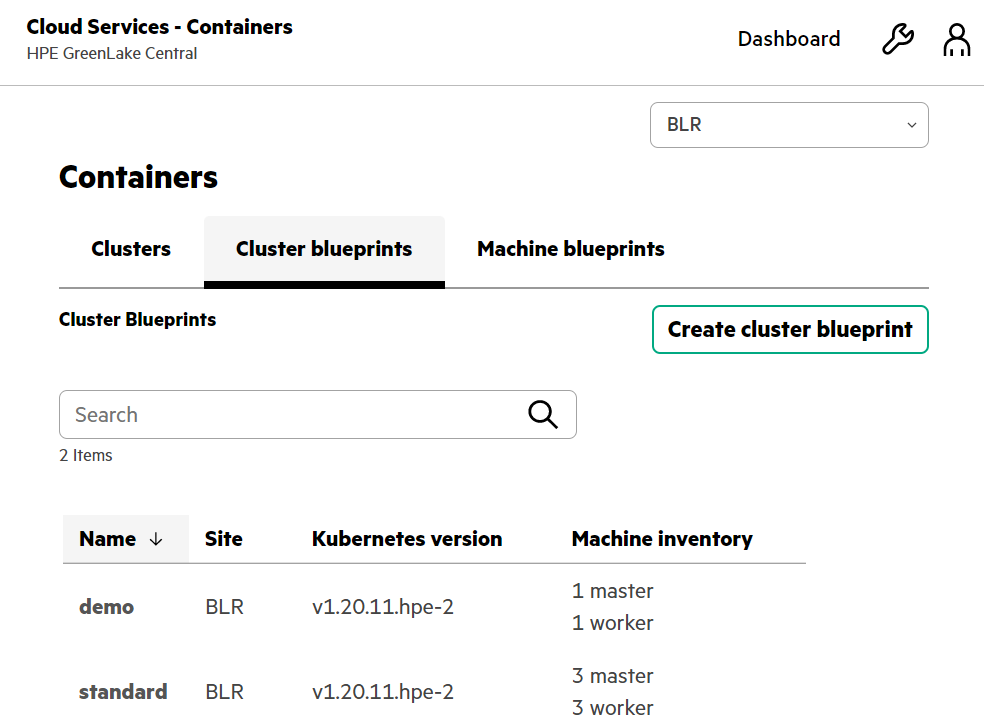
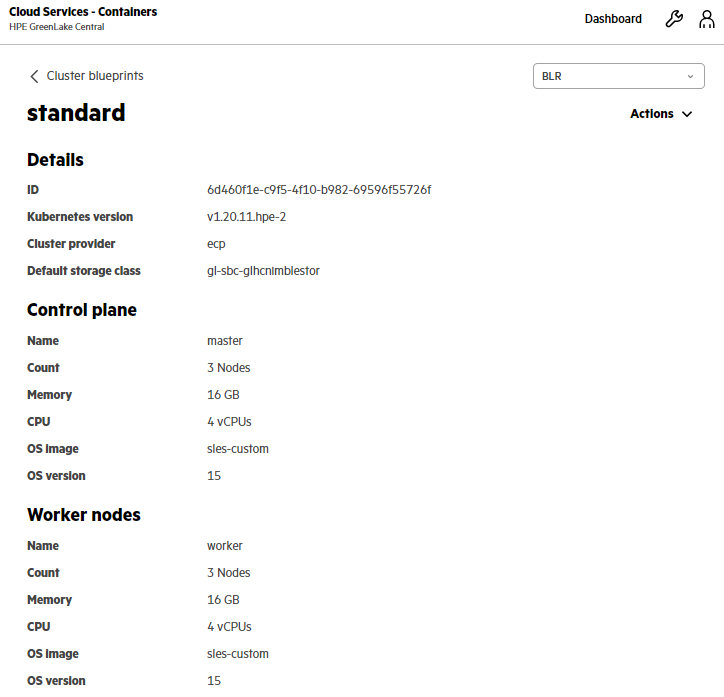
HPE GreenLake for Containers: Cluster blueprint layout for Kubernetes cluster
HPE GreenLake for Containers uses cluster blueprints to define the cluster layout and other infrastructure details used to create a cluster.
Predefined blueprints are provided when the service is provisioned. You can copy and modify the predefined blueprints or create your own custom cluster blueprints.
A cluster blueprint includes the:
- Cluster provider
- Version of Kubernetes to deploy on the cluster
- Default storage class
- Control plane nodes and worker nodes
HPE GreenLake for Containers: MongoDB application deployment on Kubernetes cluster
MongoDB is an open source, NoSQL database that provides support for JSON-styled, document-oriented storage systems. It supports a flexible data model that enables you to store data of any structure, and provides a rich set of features, including full index support, sharding, and replication.
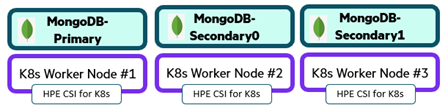
Below is the preferred cluster configuration for a MongoDB in-memory database workload.

Step-1: Create a Kubernetes cluster from containers page
To create a cluster, you must have been assigned the roles of Private Cloud Cluster Owner and Private Cloud Widget Viewer.
- From the Containers main page, under the Clusters tab, click Create Cluster.
- In the Create Cluster form, provide the cluster name 'hpe', and select the standard cluster blueprint. The new cluster appears in the list of clusters.
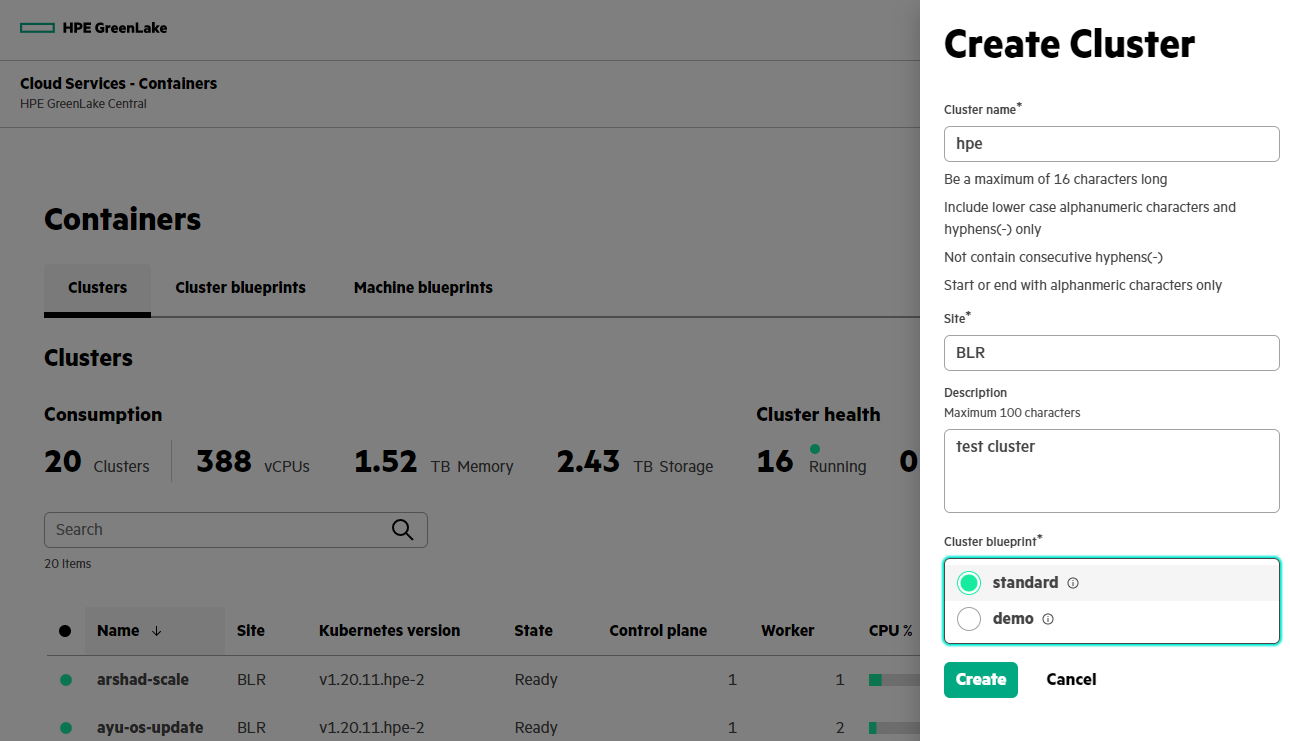
As indicated above, there are multiple clusters deployed in parallel for multiple purposes. For the MongoDB application deployment in our example, the cluster will be created with the name "hpe".
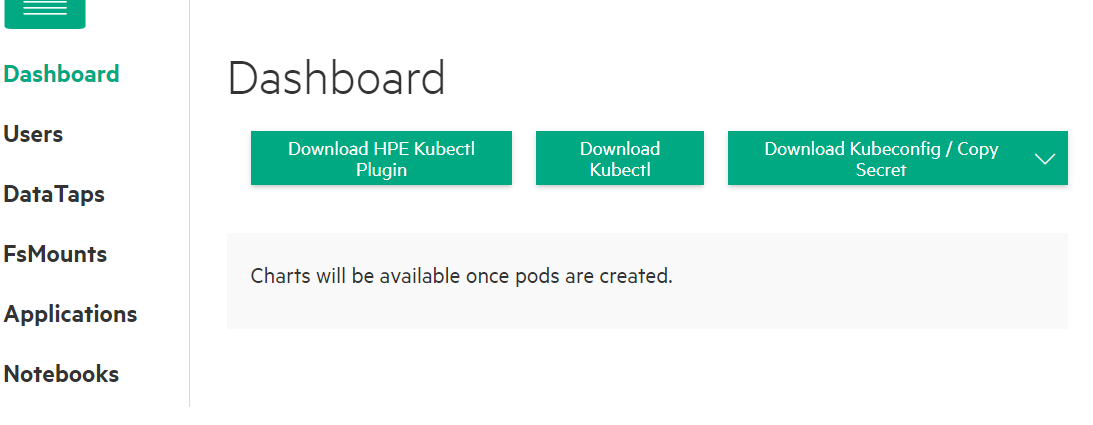
Step-2: Download scoped kubeconfig from Container platform page
- From the Clusters tab, select the 'hpe' Kubernetes cluster and click Launch Service Console. This will direct you to the container platform page.
- Click on Download kubeconfig.

Note: Launching HPE Ezmeral Runtime Enterprise from HPE GreenLake Central is configured through SAML SSO and adds a session token to the kubeconfig file. You will need to download the kubeconfig file again if you want to continue to access the cluster when the session token expires after an hour.
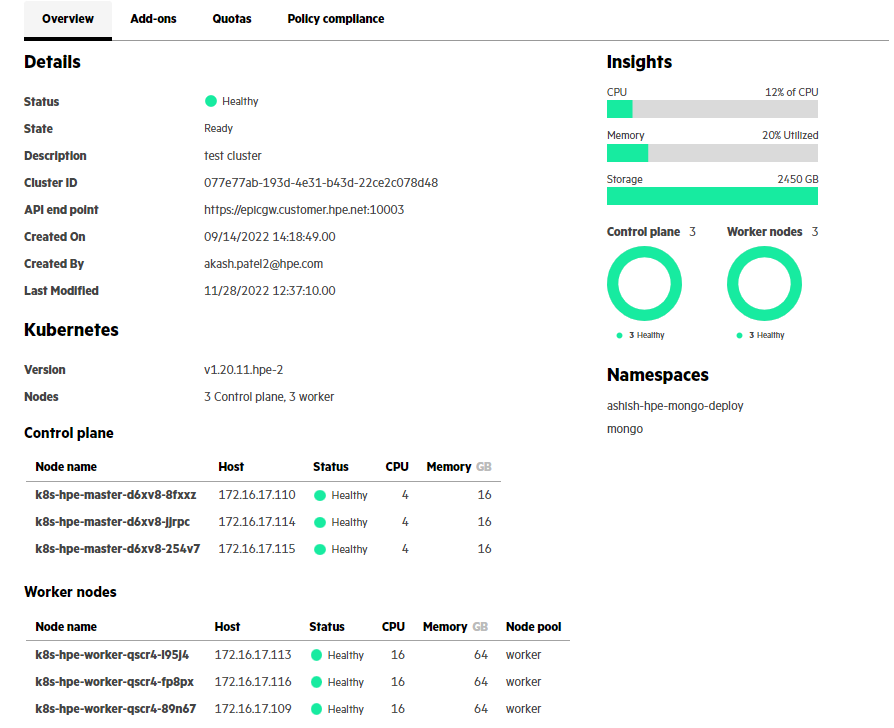
Step-3: View the 'hpe' Kubernetes cluster environment details
Get Kubernetes cluster version.
$ kubectl version --short
Client Version: v1.20.0
Server Version: v1.20.11-hpe-2
Get Kubernetes cluster nodes.
$ kubectl get nodes -o wide
NAME                                        STATUS   ROLES                  AGE   VERSION          INTERNAL-IP     EXTERNAL-IP   OS-IMAGE                              KERNEL-VERSION                 CONTAINER-RUNTIME
k8s-hpe-master-d6xv8-254v7.glhc-hpe.local   Ready    control-plane,master   71d   v1.20.11-hpe-2   172.16.17.115   <none>        SUSE Linux Enterprise Server 15 SP2   5.3.18-150200.24.115-default   containerd://1.5.1-hpe-1
k8s-hpe-master-d6xv8-8fxxz.glhc-hpe.local   Ready    control-plane,master   71d   v1.20.11-hpe-2   172.16.17.110   <none>        SUSE Linux Enterprise Server 15 SP2   5.3.18-150200.24.115-default   containerd://1.5.1-hpe-1
k8s-hpe-master-d6xv8-jjrpc.glhc-hpe.local   Ready    control-plane,master   71d   v1.20.11-hpe-2   172.16.17.114   <none>        SUSE Linux Enterprise Server 15 SP2   5.3.18-150200.24.115-default   containerd://1.5.1-hpe-1
k8s-hpe-worker-qscr4-89n67.glhc-hpe.local   Ready    worker                 71d   v1.20.11-hpe-2   172.16.17.109   <none>        SUSE Linux Enterprise Server 15 SP2   5.3.18-150200.24.115-default   containerd://1.5.1-hpe-1
k8s-hpe-worker-qscr4-fp8px.glhc-hpe.local   Ready    worker                 71d   v1.20.11-hpe-2   172.16.17.116   <none>        SUSE Linux Enterprise Server 15 SP2   5.3.18-150200.24.115-default   containerd://1.5.1-hpe-1
k8s-hpe-worker-qscr4-l95j4.glhc-hpe.local   Ready    worker                 71d   v1.20.11-hpe-2   172.16.17.113   <none>        SUSE Linux Enterprise Server 15 SP2   5.3.18-150200.24.115-default   containerd://1.5.1-hpe-1
Get Kubernetes cluster default storage class.
$ kubectl get sc
NAME                              PROVISIONER                    RECLAIMPOLICY   VOLUMEBINDINGMODE      ALLOWVOLUMEEXPANSION   AGE
gl-sbc-glhcnimblestor (default)   csi.hpe.com                    Delete          Immediate              true                   69d
gl-sbc-hpe                        csi.hpe.com                    Delete          Immediate              true                   69d
gl-sbp-glhcnimblestor             csi.hpe.com                    Delete          Immediate              true                   69d
hpe-hdd-storage                   kubernetes.io/no-provisioner   Delete          WaitForFirstConsumer   false                  69d
hpe-nvme-storage                  kubernetes.io/no-provisioner   Delete          WaitForFirstConsumer   false                  69d
hpe-ssd-storage                   kubernetes.io/no-provisioner   Delete          WaitForFirstConsumer   false                  69d
Get all resources available under hpe-storage namespace i.e. HPE CSI driver, Snapshot controller.
$ kubectl get all -n hpe-storage
NAME                                       READY   STATUS    RESTARTS   AGE
pod/hpe-csi-controller-7c6f876494-vrd49    9/9     Running   0          69d
pod/hpe-csi-node-cpmkg                     2/2     Running   0          69d
pod/hpe-csi-node-m2f75                     2/2     Running   0          69d
pod/hpe-csi-node-m9mj9                     2/2     Running   0          69d
pod/nimble-csp-db7c7bb65-c5wrk             1/1     Running   0          69d
pod/primera3par-csp-6f999b8d76-wtd4n       1/1     Running   0          69d
pod/snapshot-controller-0                  1/1     Running   0          69d
pod/snapshot-controller-64b98b668f-rdfwr   1/1     Running   0          32d
pod/snapshot-controller-64b98b668f-tdzz9   1/1     Running   0          32d

NAME                          TYPE        CLUSTER-IP       EXTERNAL-IP   PORT(S)    AGE
service/alletra6000-csp-svc   ClusterIP   10.109.228.208   <none>        8080/TCP   69d
service/alletra9000-csp-svc   ClusterIP   10.107.227.232   <none>        8080/TCP   69d
service/nimble-csp-svc        ClusterIP   10.102.45.17     <none>        8080/TCP   69d
service/primera3par-csp-svc   ClusterIP   10.104.57.79     <none>        8080/TCP   69d

NAME                          DESIRED   CURRENT   READY   UP-TO-DATE   AVAILABLE   NODE SELECTOR   AGE
daemonset.apps/hpe-csi-node   3         3         3       3            3           <none>          69d

NAME                                  READY   UP-TO-DATE   AVAILABLE   AGE
deployment.apps/hpe-csi-controller    1/1     1            1           69d
deployment.apps/nimble-csp            1/1     1            1           69d
deployment.apps/primera3par-csp       1/1     1            1           69d
deployment.apps/snapshot-controller   2/2     2            2           32d

NAME                                             DESIRED   CURRENT   READY   AGE
replicaset.apps/hpe-csi-controller-7c6f876494    1         1         1       69d
replicaset.apps/nimble-csp-db7c7bb65             1         1         1       69d
replicaset.apps/primera3par-csp-6f999b8d76       1         1         1       69d
replicaset.apps/snapshot-controller-64b98b668f   2         2         2       32d

NAME                                   READY   AGE
statefulset.apps/snapshot-controller   1/1     69d
Step-4: Create a namespace on 'hpe' Kubernetes cluster for MongoDB deployment
Create namespace with name mongo.
$ kubectl create ns mongo
namespace/mongo created

$ kubectl get ns
NAME                      STATUS   AGE
argocd                    Active   71d
default                   Active   71d
ezctl                     Active   71d
gatekeeper-system         Active   71d
hpe                       Active   71d
hpe-externalclusterinfo   Active   71d
hpe-ldap                  Active   71d
hpe-logzio                Active   71d
hpe-metering              Active   71d
hpe-nodesvc               Active   71d
hpe-operations            Active   50d
hpe-secure                Active   71d
hpe-security              Active   71d
hpe-snow                  Active   71d
hpe-storage               Active   71d
hpe-system                Active   71d
hpe-templates-compute     Active   71d
hpecp                     Active   71d
hpecp-bootstrap           Active   71d
hpecp-falco               Active   71d
kd-apps                   Active   71d
kd-mlops                  Active   71d
kube-node-lease           Active   71d
kube-public               Active   71d
kube-system               Active   71d
kubernetes-dashboard      Active   71d
mongo                     Active   6s
opsramp-agent             Active   71d
Switch to new namespace i.e. mongo in the current context.
$ kubectl config set-context --current --namespace=mongo
Context "caas-dev-3-hpe-hpe-ashish-kumar@hpe.com" modified.

$ kubectl config view --minify --output 'jsonpath={..namespace}'; echo
mongo

$ kubectl get pods
No resources found in mongo namespace.
Step-5: Deploy MongoDB
Deploy the MongoDB application using YAML file i.e. services/mongodb/install-mongo.yaml from https://github.com/cxteamtrials/caas-trials-content location.
$ kubectl create -f install-mongo.yaml
service/mongo created
statefulset.apps/mongo created

$ cat install-mongo.yaml
---
apiVersion: v1
kind: Service
metadata:
  name: mongo
  labels:
    name: mongo
    hpecp.hpe.com/hpecp-internal-gateway: "true" # Expose the service on ERE Gateway
spec:
  ports:
  - protocol: TCP
    port: 27017
    targetPort: 27017
  selector:
    role: mongo
---
apiVersion: apps/v1
kind: StatefulSet
metadata:
  name: mongo
spec:
  selector:
    matchLabels:
      app: mongo
  serviceName: "mongo"
  # Number of initial MongoDB pods to deploy - default is 1 if not set
  replicas: 3
  podManagementPolicy: Parallel
  template:
    metadata:
      labels:
        app: mongo
    spec:
      terminationGracePeriodSeconds: 10
      containers:
        - name: mongo
          image: mongo
          env:
          - name: POD_IP_ADDRESS
            valueFrom:
              fieldRef:
                fieldPath: status.podIP
          command:
          - "mongod"
          - "--bind_ip_all"
          - "--replSet"
          - rs0
          - "--oplogSize"
          - "128"
          ports:
            - containerPort: 27017
          volumeMounts:
            - name: mongo-persistent-storage
              mountPath: /data/db
        - name: mongo-sidecar
          image: cvallance/mongo-k8s-sidecar
          env:
            - name: MONGO_SIDECAR_POD_LABELS
              value: "app=mongo"
  volumeClaimTemplates:
    - metadata:
        name: mongo-persistent-storage
      spec:
        accessModes: [ "ReadWriteOnce" ]
        storageClassName: gl-sbc-glhcnimblestor
        resources:
          requests:
            storage: 50Gi
Step-6: Validate MongoDB deployment
Get MongoDB related Kubernetes resources like; pod, service, pvc and validate the deployment.
$ kubectl get pods -o wide
NAME      READY   STATUS    RESTARTS   AGE   IP             NODE                                        NOMINATED NODE   READINESS GATES
mongo-0   2/2     Running   0          18h   10.192.3.58    k8s-hpe-worker-qscr4-89n67.glhc-hpe.local   <none>           <none>
mongo-1   2/2     Running   0          18h   10.192.3.59    k8s-hpe-worker-qscr4-89n67.glhc-hpe.local   <none>           <none>
mongo-2   2/2     Running   0          18h   10.192.4.208   k8s-hpe-worker-qscr4-l95j4.glhc-hpe.local   <none>           <none>

$ kubectl get all
NAME          READY   STATUS    RESTARTS   AGE
pod/mongo-0   2/2     Running   0          18h
pod/mongo-1   2/2     Running   0          18h
pod/mongo-2   2/2     Running   0          18h

NAME              TYPE        CLUSTER-IP      EXTERNAL-IP   PORT(S)           AGE
service/mongo     ClusterIP   10.96.180.195   <none>        27017/TCP         18h

NAME                     READY   AGE
statefulset.apps/mongo   3/3     18h

$ kubectl get svc
$ kubectl get svc
NAME      TYPE        CLUSTER-IP      EXTERNAL-IP   PORT(S)           AGE
mongo     ClusterIP   10.96.180.195   <none>        27017/TCP         18h

$ kubectl describe svc mongo
Name:              mongo
Namespace:         mongo
Labels:            hpecp.hpe.com/hpecp-internal-gateway=true
                   name=mongo
Annotations:       <none>
Selector:          role=mongo
Type:              ClusterIP
IP Families:       <none>
IP:                10.96.180.195
IPs:               10.96.180.195
Port:              <unset>  27017/TCP
TargetPort:        27017/TCP
Endpoints:         <none>
Session Affinity:  None
Events:            <none>

$ kubectl get pvc
NAME                               STATUS   VOLUME                                     CAPACITY   ACCESS MODES   STORAGECLASS            AGE
mongo-persistent-storage-mongo-0   Bound    pvc-bc7faca6-6cd6-4796-acc1-864716c98f86   50Gi       RWO            gl-sbc-glhcnimblestor   18h
mongo-persistent-storage-mongo-1   Bound    pvc-1ef8ef09-c858-4862-989c-d246308518b4   50Gi       RWO            gl-sbc-glhcnimblestor   18h
mongo-persistent-storage-mongo-2   Bound    pvc-12044e23-8535-4b3e-bc02-a99819b9753b   50Gi       RWO            gl-sbc-glhcnimblestor   18h

$ kubectl describe pvc mongo-persistent-storage-mongo-0
Name:          mongo-persistent-storage-mongo-0
Namespace:     mongo
StorageClass:  gl-sbc-glhcnimblestor
Status:        Bound
Volume:        pvc-bc7faca6-6cd6-4796-acc1-864716c98f86
Labels:        app=mongo
Annotations:   pv.kubernetes.io/bind-completed: yes
               pv.kubernetes.io/bound-by-controller: yes
               volume.beta.kubernetes.io/storage-provisioner: csi.hpe.com
Finalizers:    [kubernetes.io/pvc-protection]
Capacity:      50Gi
Access Modes:  RWO
VolumeMode:    Filesystem
Used By:       mongo-0
Events:        <none>

$ kubectl get pv
NAME                                       CAPACITY   ACCESS MODES   RECLAIM POLICY   STATUS   CLAIM                                                                                                                 STORAGECLASS            REASON   AGE
pvc-12044e23-8535-4b3e-bc02-a99819b9753b   50Gi       RWO            Delete           Bound    mongo/mongo-persistent-storage-mongo-2                                                                                gl-sbc-glhcnimblestor            19h
pvc-193a0dbf-79ed-43da-864d-6dfc8673b502   1Gi        RWO            Delete           Bound    hpe-metering/prometheus-managed-kube-prometheus-st-prometheus-db-prometheus-managed-kube-prometheus-st-prometheus-0   gl-sbc-hpe                       71d
pvc-1ef8ef09-c858-4862-989c-d246308518b4   50Gi       RWO            Delete           Bound    mongo/mongo-persistent-storage-mongo-1                                                                                gl-sbc-glhcnimblestor            19h
pvc-4dabe263-101d-4fcd-be49-6c6a7a97d51a   500Gi      RWO            Delete           Bound    ashish-mongo-deploy/nimblepod-500                                                                                     gl-sbc-hpe                       66d
pvc-68265149-eaf7-4239-982d-917f34f704c4   100Gi      RWO            Delete           Bound    ashish-mongo-deploy/nimblepod-100                                                                                     gl-sbc-hpe                       66d
pvc-76062c79-819d-4b6e-af6b-207df5e008ee   100Gi      RWO            Delete           Bound    ashish-mongo-deploy/ashish-mongo-persistent-storage-mongo-1                                                           gl-sbc-hpe                       66d
pvc-86360549-ac45-4ab7-b01e-426c8d3b0d33   5Gi        RWO            Delete           Bound    ashish-hpe-mongo-deploy/ashish-test-pvc                                                                               gl-sbc-hpe                       2d20h
pvc-8a565d78-a0f3-4db1-b577-c88699c3aa41   100Gi      RWO            Delete           Bound    ashish-mongo-deploy/ashish-mongo-persistent-storage-mongo-2                                                           gl-sbc-hpe                       66d
pvc-96b24e79-9c05-4c6b-8fcf-754d70dad152   30Gi       RWO            Delete           Bound    ashish-hpe-mongo-deploy/ashish-test-pvc2                                                                              gl-sbc-hpe                       47h
pvc-a8e578e8-a213-4607-912e-f89da2203cfd   100Gi      RWO            Delete           Bound    ashish-mongo-deploy/ashish-mongo-persistent-storage-mongo-0                                                           gl-sbc-hpe                       66d
pvc-aced3b34-1d46-427a-a315-a90bdb687561   2Gi        RWO            Delete           Bound    hpe-metering/metering-agent                                                                                           gl-sbc-hpe                       51d
pvc-b4f5173e-ad34-4811-8722-c5f1ced1cafd   200Gi      RWO            Delete           Bound    ashish-mongo-deploy/nimblepod-200                                                                                     gl-sbc-hpe                       66d
pvc-bc7faca6-6cd6-4796-acc1-864716c98f86   50Gi       RWO            Delete           Bound    mongo/mongo-persistent-storage-mongo-0                                                                                gl-sbc-glhcnimblestor            19h
pvc-e27f5ae0-0f02-4690-b24a-2c65f9c51b1f   1000Gi     RWO            Delete           Bound    ashish-mongo-deploy/nimblepod-1000                                                                                    gl-sbc-hpe                       66d
pvc-e800beac-56c4-46df-8bf7-4374e311133e   30Gi       RWO            Delete           Bound    ashish-hpe-mongo-deploy/ashish-mongo-persistent-storage-mongo-2                                                       gl-sbc-hpe                       47h
pvc-e8aed33b-dc99-41bc-b301-2e2d3ca81b8d   30Gi       RWO            Delete           Bound    ashish-hpe-mongo-deploy/ashish-mongo-persistent-storage-mongo-0                                                       gl-sbc-hpe                       47h
pvc-ee3146e2-ad77-4418-93b8-a94cd30e63ad   10Gi       RWO            Delete           Bound    ashish-mongo-deploy/nimblepod-10                                                                                      gl-sbc-hpe                       66d
pvc-eee0e074-3284-40f5-914e-88842899efc2   5Gi        RWO            Delete           Bound    ashish-mongo-deploy/ashish-test-pvc                                                                                   gl-sbc-hpe                       69d
pvc-f42472d1-f8f2-4ac4-8955-c37664d7cf8b   30Gi       RWO            Delete           Bound    ashish-hpe-mongo-deploy/ashish-mongo-persistent-storage-mongo-1                                                       gl-sbc-hpe                       47h


$ kubectl describe pv pvc-bc7faca6-6cd6-4796-acc1-864716c98f86
Name:            pvc-bc7faca6-6cd6-4796-acc1-864716c98f86
Labels:          <none>
Annotations:     pv.kubernetes.io/provisioned-by: csi.hpe.com
Finalizers:      [kubernetes.io/pv-protection external-attacher/csi-hpe-com]
StorageClass:    gl-sbc-glhcnimblestor
Status:          Bound
Claim:           mongo/mongo-persistent-storage-mongo-0
Reclaim Policy:  Delete
Access Modes:    RWO
VolumeMode:      Filesystem
Capacity:        50Gi
Node Affinity:   <none>
Message:
Source:
    Type:              CSI (a Container Storage Interface (CSI) volume source)
    Driver:            csi.hpe.com
    FSType:            xfs
    VolumeHandle:      067ac428a6431c485b00000000000000000000044d
    ReadOnly:          false
    VolumeAttributes:      accessProtocol=iscsi
                           allowOverrides=nfsResources,nfsNamespace
                           cloneOf=
                           createSnapshot=false
                           dedupeEnabled=true
                           description=hpe
                           destroyOnDelete=true
                           encrypted=false
                           folder=caas-pvs
                           fsType=xfs
                           hostEncryption=false
                           limitIops=-1
                           limitMbps=-1
                           performancePolicy=default
                           pool=default
                           storage.kubernetes.io/csiProvisionerIdentity=1663147353961-8081-csi.hpe.com
                           syncOnDetach=false
                           targetScope=volume
                           thick=false
                           volumeAccessMode=mount
Events:                <none>
Step-7: Configure MongoDB primary and secondary replica
Get the IP address of each mongo pod.
$ kubectl get pods -o wide
NAME      READY   STATUS    RESTARTS   AGE   IP             NODE                                        NOMINATED NODE   READINESS GATES
mongo-0   2/2     Running   0          44m   10.192.3.58    k8s-hpe-worker-qscr4-89n67.glhc-hpe.local   <none>           <none>
mongo-1   2/2     Running   0          44m   10.192.3.59    k8s-hpe-worker-qscr4-89n67.glhc-hpe.local   <none>           <none>
mongo-2   2/2     Running   0          44m   10.192.4.208   k8s-hpe-worker-qscr4-l95j4.glhc-hpe.local   <none>           <none>
Expose mongo as a service.
kubectl expose pod/mongo-0 --type="NodePort" --port 27017
kubectl expose pod/mongo-1 --type="NodePort" --port 27017
kubectl expose pod/mongo-2 --type="NodePort" --port 27017
Describe each mongo service and get the port details on which service has been exposed over ERE Gateway.
$ kubectl get svc
NAME      TYPE        CLUSTER-IP      EXTERNAL-IP   PORT(S)           AGE
mongo     ClusterIP   10.96.180.195   <none>        27017/TCP         54m
mongo-0   NodePort    10.97.222.217   <none>        27017:30946/TCP   23m
mongo-1   NodePort    10.98.166.198   <none>        27017:32648/TCP   19m
mongo-2   NodePort    10.101.219.63   <none>        27017:31216/TCP   20m

$ kubectl describe svc mongo-0
Name:                     mongo-0
Namespace:                mongo
Labels:                   app=mongo
                          controller-revision-hash=mongo-7648bd99c8
                          hpecp.hpe.com/hpecp-internal-gateway=true
                          statefulset.kubernetes.io/pod-name=mongo-0
Annotations:              hpecp-internal-gateway/27017: epicgw.customer.hpe.net:10030
Selector:                 app=mongo,controller-revision-hash=mongo-7648bd99c8,statefulset.kubernetes.io/pod-name=mongo-0
Type:                     NodePort
IP Families:              <none>
IP:                       10.97.222.217
IPs:                      10.97.222.217
Port:                     <unset>  27017/TCP
TargetPort:               27017/TCP
NodePort:                 <unset>  30946/TCP
Endpoints:                10.192.3.58:27017
Session Affinity:         None
External Traffic Policy:  Cluster
Events:
  Type    Reason  Age   From         Message
  ----    ------  ----  ----         -------
  Normal  HpeCp   25m   hpecp-agent  Created HPECP K8S service

$ kubectl describe svc mongo-1
Name:                     mongo-1
Namespace:                mongo
Labels:                   app=mongo
                          controller-revision-hash=mongo-7648bd99c8
                          hpecp.hpe.com/hpecp-internal-gateway=true
                          statefulset.kubernetes.io/pod-name=mongo-1
Annotations:              hpecp-internal-gateway/27017: epicgw.customer.hpe.net:10031
Selector:                 app=mongo,controller-revision-hash=mongo-7648bd99c8,statefulset.kubernetes.io/pod-name=mongo-1
Type:                     NodePort
IP Families:              <none>
IP:                       10.98.166.198
IPs:                      10.98.166.198
Port:                     <unset>  27017/TCP
TargetPort:               27017/TCP
NodePort:                 <unset>  32648/TCP
Endpoints:                10.192.3.59:27017
Session Affinity:         None
External Traffic Policy:  Cluster
Events:
  Type    Reason  Age   From         Message
  ----    ------  ----  ----         -------
  Normal  HpeCp   22m   hpecp-agent  Created HPECP K8S service

$ kubectl describe svc mongo-2
Name:                     mongo-2
Namespace:                mongo
Labels:                   app=mongo
                          controller-revision-hash=mongo-7648bd99c8
                          hpecp.hpe.com/hpecp-internal-gateway=true
                          statefulset.kubernetes.io/pod-name=mongo-2
Annotations:              hpecp-internal-gateway/27017: epicgw.customer.hpe.net:10035
Selector:                 app=mongo,controller-revision-hash=mongo-7648bd99c8,statefulset.kubernetes.io/pod-name=mongo-2
Type:                     NodePort
IP Families:              <none>
IP:                       10.101.219.63
IPs:                      10.101.219.63
Port:                     <unset>  27017/TCP
TargetPort:               27017/TCP
NodePort:                 <unset>  31216/TCP
Endpoints:                10.192.4.208:27017
Session Affinity:         None
External Traffic Policy:  Cluster
Events:
  Type    Reason  Age   From         Message
  ----    ------  ----  ----         -------
  Normal  HpeCp   23m   hpecp-agent  Created HPECP K8S service
Install 'mongosh' client locally for shell interaction with MongoDB. mongosh will be accessing the mongo cluster from outside the Kubernetes cluster. You can download package services/mongodb/mongosh-1.6.0-win32-x64.zip from https://github.com/cxteamtrials/caas-trials-content location.
Extract the package and set the mongosh client bin path.
$ export PATH=$PATH:/c/Ashish/mongosh-1.6.0-win32-x64/bin/
Connect to MongoDB service over ERE Gateway through mongosh client.
$ mongosh --host epicgw.customer.hpe.net --port 10030
Current Mongosh Log ID: 637f7622aaa80bc199cfcb06
Connecting to:          mongodb://epicgw.customer.hpe.net:10030/?directConnection=true&appName=mongosh+1.6.0
Using MongoDB:          6.0.3
Using Mongosh:          1.6.0

For mongosh info see: https://docs.mongodb.com/mongodb-shell/

------
   The server generated these startup warnings when booting
   2022-11-24T12:48:39.726+00:00: Access control is not enabled for the database. Read and write access to data and configuration is unrestricted
   2022-11-24T12:48:39.727+00:00: You are running this process as the root user, which is not recommended
   2022-11-24T12:48:39.728+00:00: You are running on a NUMA machine. We suggest launching mongod like this to avoid performance problems: numactl --interleave=all mongod [other options]
   2022-11-24T12:48:39.728+00:00: vm.max_map_count is too low
------

------
   Enable MongoDB's free cloud-based monitoring service, which will then receive and display
   metrics about your deployment (disk utilization, CPU, operation statistics, etc).

   The monitoring data will be available on a MongoDB website with a unique URL accessible to you
   and anyone you share the URL with. MongoDB may use this information to make product
   improvements and to suggest MongoDB products and deployment options to you.

   To enable free monitoring, run the following command: db.enableFreeMonitoring()
   To permanently disable this reminder, run the following command: db.disableFreeMonitoring()
------

test>
Initialize MongoDB replicaset.
test> rs.initiate()
{
  info2: 'no configuration specified. Using a default configuration for the set',
  me: 'mongo-0:27017',
  ok: 1
}
rs0 [direct: other] test>
Register mongo-0 pod as primary replica.
rs0 [direct: other] test> var cfg = rs.conf();cfg.members[0].host="10.192.3.58:27017";rs.reconfig(cfg)
{
  ok: 1,
  '$clusterTime': {
    clusterTime: Timestamp({ t: 1669297890, i: 1 }),
    signature: {
      hash: Binary(Buffer.from("0000000000000000000000000000000000000000", "hex"), 0),
      keyId: Long("0")
    }
  },
  operationTime: Timestamp({ t: 1669297890, i: 1 })
}
Validate that mongo-0 pod is registered as primary replica.
rs0 [direct: other] test> rs.status()
{
  set: 'rs0',
  date: ISODate("2022-11-24T13:52:34.600Z"),
  myState: 1,
  term: Long("1"),
  syncSourceHost: '',
  syncSourceId: -1,
  heartbeatIntervalMillis: Long("2000"),
  majorityVoteCount: 1,
  writeMajorityCount: 1,
  votingMembersCount: 1,
  writableVotingMembersCount: 1,
  optimes: {
    lastCommittedOpTime: { ts: Timestamp({ t: 1669297950, i: 1 }), t: Long("1") },
    lastCommittedWallTime: ISODate("2022-11-24T13:52:30.843Z"),
    readConcernMajorityOpTime: { ts: Timestamp({ t: 1669297950, i: 1 }), t: Long("1") },
    appliedOpTime: { ts: Timestamp({ t: 1669297950, i: 1 }), t: Long("1") },
    durableOpTime: { ts: Timestamp({ t: 1669297950, i: 1 }), t: Long("1") },
    lastAppliedWallTime: ISODate("2022-11-24T13:52:30.843Z"),
    lastDurableWallTime: ISODate("2022-11-24T13:52:30.843Z")
  },
  lastStableRecoveryTimestamp: Timestamp({ t: 1669297900, i: 1 }),
  electionCandidateMetrics: {
    lastElectionReason: 'electionTimeout',
    lastElectionDate: ISODate("2022-11-24T13:49:50.807Z"),
    electionTerm: Long("1"),
    lastCommittedOpTimeAtElection: { ts: Timestamp({ t: 1669297790, i: 1 }), t: Long("-1") },
    lastSeenOpTimeAtElection: { ts: Timestamp({ t: 1669297790, i: 1 }), t: Long("-1") },
    numVotesNeeded: 1,
    priorityAtElection: 1,
    electionTimeoutMillis: Long("10000"),
    newTermStartDate: ISODate("2022-11-24T13:49:50.829Z"),
    wMajorityWriteAvailabilityDate: ISODate("2022-11-24T13:49:50.840Z")
  },
  members: [
    {
      _id: 0,
      name: '10.192.3.58:27017',
      health: 1,
      state: 1,
      stateStr: 'PRIMARY',
      uptime: 3836,
      optime: { ts: Timestamp({ t: 1669297950, i: 1 }), t: Long("1") },
      optimeDate: ISODate("2022-11-24T13:52:30.000Z"),
      lastAppliedWallTime: ISODate("2022-11-24T13:52:30.843Z"),
      lastDurableWallTime: ISODate("2022-11-24T13:52:30.843Z"),
      syncSourceHost: '',
      syncSourceId: -1,
      infoMessage: '',
      electionTime: Timestamp({ t: 1669297790, i: 2 }),
      electionDate: ISODate("2022-11-24T13:49:50.000Z"),
      configVersion: 2,
      configTerm: 1,
      self: true,
      lastHeartbeatMessage: ''
    }
  ],
  ok: 1,
  '$clusterTime': {
    clusterTime: Timestamp({ t: 1669297950, i: 1 }),
    signature: {
      hash: Binary(Buffer.from("0000000000000000000000000000000000000000", "hex"), 0),
      keyId: Long("0")
    }
  },
  operationTime: Timestamp({ t: 1669297950, i: 1 })
}
rs0 [direct: primary] test>
Add mongo-1 pod as secondary replica.
rs0 [direct: primary] test> rs.add("10.192.3.59:27017")
{
  ok: 1,
  '$clusterTime': {
    clusterTime: Timestamp({ t: 1669298574, i: 1 }),
    signature: {
      hash: Binary(Buffer.from("0000000000000000000000000000000000000000", "hex"), 0),
      keyId: Long("0")
    }
  },
  operationTime: Timestamp({ t: 1669298574, i: 1 })
}
Validate that mongo-1 pod is registered as secondary replica.
rs0 [direct: primary] test> rs.status()
{
  set: 'rs0',
  date: ISODate("2022-11-24T14:03:52.376Z"),
  myState: 1,
  term: Long("1"),
  syncSourceHost: '',
  syncSourceId: -1,
  heartbeatIntervalMillis: Long("2000"),
  majorityVoteCount: 2,
  writeMajorityCount: 2,
  votingMembersCount: 2,
  writableVotingMembersCount: 2,
  optimes: {
    lastCommittedOpTime: { ts: Timestamp({ t: 1669298630, i: 1 }), t: Long("1") },
    lastCommittedWallTime: ISODate("2022-11-24T14:03:50.861Z"),
    readConcernMajorityOpTime: { ts: Timestamp({ t: 1669298630, i: 1 }), t: Long("1") },
    appliedOpTime: { ts: Timestamp({ t: 1669298630, i: 1 }), t: Long("1") },
    durableOpTime: { ts: Timestamp({ t: 1669298630, i: 1 }), t: Long("1") },
    lastAppliedWallTime: ISODate("2022-11-24T14:03:50.861Z"),
    lastDurableWallTime: ISODate("2022-11-24T14:03:50.861Z")
  },
  lastStableRecoveryTimestamp: Timestamp({ t: 1669298619, i: 4 }),
  electionCandidateMetrics: {
    lastElectionReason: 'electionTimeout',
    lastElectionDate: ISODate("2022-11-24T13:49:50.807Z"),
    electionTerm: Long("1"),
    lastCommittedOpTimeAtElection: { ts: Timestamp({ t: 1669297790, i: 1 }), t: Long("-1") },
    lastSeenOpTimeAtElection: { ts: Timestamp({ t: 1669297790, i: 1 }), t: Long("-1") },
    numVotesNeeded: 1,
    priorityAtElection: 1,
    electionTimeoutMillis: Long("10000"),
    newTermStartDate: ISODate("2022-11-24T13:49:50.829Z"),
    wMajorityWriteAvailabilityDate: ISODate("2022-11-24T13:49:50.840Z")
  },
  members: [
    {
      _id: 0,
      name: '10.192.3.58:27017',
      health: 1,
      state: 1,
      stateStr: 'PRIMARY',
      uptime: 4514,
      optime: { ts: Timestamp({ t: 1669298630, i: 1 }), t: Long("1") },
      optimeDate: ISODate("2022-11-24T14:03:50.000Z"),
      lastAppliedWallTime: ISODate("2022-11-24T14:03:50.861Z"),
      lastDurableWallTime: ISODate("2022-11-24T14:03:50.861Z"),
      syncSourceHost: '',
      syncSourceId: -1,
      infoMessage: '',
      electionTime: Timestamp({ t: 1669297790, i: 2 }),
      electionDate: ISODate("2022-11-24T13:49:50.000Z"),
      configVersion: 4,
      configTerm: 1,
      self: true,
      lastHeartbeatMessage: ''
    },
    {
      _id: 1,
      name: '10.192.3.59:27017',
      health: 1,
      state: 2,
      stateStr: 'SECONDARY',
      uptime: 58,
      optime: { ts: Timestamp({ t: 1669298630, i: 1 }), t: Long("1") },
      optimeDurable: { ts: Timestamp({ t: 1669298630, i: 1 }), t: Long("1") },
      optimeDate: ISODate("2022-11-24T14:03:50.000Z"),
      optimeDurableDate: ISODate("2022-11-24T14:03:50.000Z"),
      lastAppliedWallTime: ISODate("2022-11-24T14:03:50.861Z"),
      lastDurableWallTime: ISODate("2022-11-24T14:03:50.861Z"),
      lastHeartbeat: ISODate("2022-11-24T14:03:52.308Z"),
      lastHeartbeatRecv: ISODate("2022-11-24T14:03:50.818Z"),
      pingMs: Long("0"),
      lastHeartbeatMessage: '',
      syncSourceHost: '10.192.3.58:27017',
      syncSourceId: 0,
      infoMessage: '',
      configVersion: 4,
      configTerm: 1
    }
  ],
  ok: 1,
  '$clusterTime': {
    clusterTime: Timestamp({ t: 1669298630, i: 1 }),
    signature: {
      hash: Binary(Buffer.from("0000000000000000000000000000000000000000", "hex"), 0),
      keyId: Long("0")
    }
  },
  operationTime: Timestamp({ t: 1669298630, i: 1 })
}
rs0 [direct: primary] test>
Add mongo-2 pod as secondary replica.
rs0 [direct: primary] test> rs.add("10.192.4.208:27017")
{
  ok: 1,
  '$clusterTime': {
    clusterTime: Timestamp({ t: 1669298829, i: 1 }),
    signature: {
      hash: Binary(Buffer.from("0000000000000000000000000000000000000000", "hex"), 0),
      keyId: Long("0")
    }
  },
  operationTime: Timestamp({ t: 1669298829, i: 1 })
}
Validate that mongo-2 pod is registered as secondary replica.
rs0 [direct: primary] test> rs.status()
{
  set: 'rs0',
  date: ISODate("2022-11-24T14:08:05.339Z"),
  myState: 1,
  term: Long("1"),
  syncSourceHost: '',
  syncSourceId: -1,
  heartbeatIntervalMillis: Long("2000"),
  majorityVoteCount: 2,
  writeMajorityCount: 2,
  votingMembersCount: 3,
  writableVotingMembersCount: 3,
  optimes: {
    lastCommittedOpTime: { ts: Timestamp({ t: 1669298880, i: 1 }), t: Long("1") },
    lastCommittedWallTime: ISODate("2022-11-24T14:08:00.869Z"),
    readConcernMajorityOpTime: { ts: Timestamp({ t: 1669298880, i: 1 }), t: Long("1") },
    appliedOpTime: { ts: Timestamp({ t: 1669298880, i: 1 }), t: Long("1") },
    durableOpTime: { ts: Timestamp({ t: 1669298880, i: 1 }), t: Long("1") },
    lastAppliedWallTime: ISODate("2022-11-24T14:08:00.869Z"),
    lastDurableWallTime: ISODate("2022-11-24T14:08:00.869Z")
  },
  lastStableRecoveryTimestamp: Timestamp({ t: 1669298870, i: 1 }),
  electionCandidateMetrics: {
    lastElectionReason: 'electionTimeout',
    lastElectionDate: ISODate("2022-11-24T13:49:50.807Z"),
    electionTerm: Long("1"),
    lastCommittedOpTimeAtElection: { ts: Timestamp({ t: 1669297790, i: 1 }), t: Long("-1") },
    lastSeenOpTimeAtElection: { ts: Timestamp({ t: 1669297790, i: 1 }), t: Long("-1") },
    numVotesNeeded: 1,
    priorityAtElection: 1,
    electionTimeoutMillis: Long("10000"),
    newTermStartDate: ISODate("2022-11-24T13:49:50.829Z"),
    wMajorityWriteAvailabilityDate: ISODate("2022-11-24T13:49:50.840Z")
  },
  members: [
    {
      _id: 0,
      name: '10.192.3.58:27017',
      health: 1,
      state: 1,
      stateStr: 'PRIMARY',
      uptime: 4767,
      optime: { ts: Timestamp({ t: 1669298880, i: 1 }), t: Long("1") },
      optimeDate: ISODate("2022-11-24T14:08:00.000Z"),
      lastAppliedWallTime: ISODate("2022-11-24T14:08:00.869Z"),
      lastDurableWallTime: ISODate("2022-11-24T14:08:00.869Z"),
      syncSourceHost: '',
      syncSourceId: -1,
      infoMessage: '',
      electionTime: Timestamp({ t: 1669297790, i: 2 }),
      electionDate: ISODate("2022-11-24T13:49:50.000Z"),
      configVersion: 6,
      configTerm: 1,
      self: true,
      lastHeartbeatMessage: ''
    },
    {
      _id: 1,
      name: '10.192.3.59:27017',
      health: 1,
      state: 2,
      stateStr: 'SECONDARY',
      uptime: 311,
      optime: { ts: Timestamp({ t: 1669298880, i: 1 }), t: Long("1") },
      optimeDurable: { ts: Timestamp({ t: 1669298880, i: 1 }), t: Long("1") },
      optimeDate: ISODate("2022-11-24T14:08:00.000Z"),
      optimeDurableDate: ISODate("2022-11-24T14:08:00.000Z"),
      lastAppliedWallTime: ISODate("2022-11-24T14:08:00.869Z"),
      lastDurableWallTime: ISODate("2022-11-24T14:08:00.869Z"),
      lastHeartbeat: ISODate("2022-11-24T14:08:05.090Z"),
      lastHeartbeatRecv: ISODate("2022-11-24T14:08:05.094Z"),
      pingMs: Long("0"),
      lastHeartbeatMessage: '',
      syncSourceHost: '10.192.3.58:27017',
      syncSourceId: 0,
      infoMessage: '',
      configVersion: 6,
      configTerm: 1
    },
    {
      _id: 2,
      name: '10.192.4.208:27017',
      health: 1,
      state: 2,
      stateStr: 'SECONDARY',
      uptime: 56,
      optime: { ts: Timestamp({ t: 1669298880, i: 1 }), t: Long("1") },
      optimeDurable: { ts: Timestamp({ t: 1669298880, i: 1 }), t: Long("1") },
      optimeDate: ISODate("2022-11-24T14:08:00.000Z"),
      optimeDurableDate: ISODate("2022-11-24T14:08:00.000Z"),
      lastAppliedWallTime: ISODate("2022-11-24T14:08:00.869Z"),
      lastDurableWallTime: ISODate("2022-11-24T14:08:00.869Z"),
      lastHeartbeat: ISODate("2022-11-24T14:08:05.104Z"),
      lastHeartbeatRecv: ISODate("2022-11-24T14:08:03.615Z"),
      pingMs: Long("0"),
      lastHeartbeatMessage: '',
      syncSourceHost: '10.192.3.59:27017',
      syncSourceId: 1,
      infoMessage: '',
      configVersion: 6,
      configTerm: 1
    }
  ],
  ok: 1,
  '$clusterTime': {
    clusterTime: Timestamp({ t: 1669298880, i: 1 }),
    signature: {
      hash: Binary(Buffer.from("0000000000000000000000000000000000000000", "hex"), 0),
      keyId: Long("0")
    }
  },
  operationTime: Timestamp({ t: 1669298880, i: 1 })
}
rs0 [direct: primary] test>
HPE GreenLake for Containers: Data Science with MongoDB deployed on a Kubernetes cluster
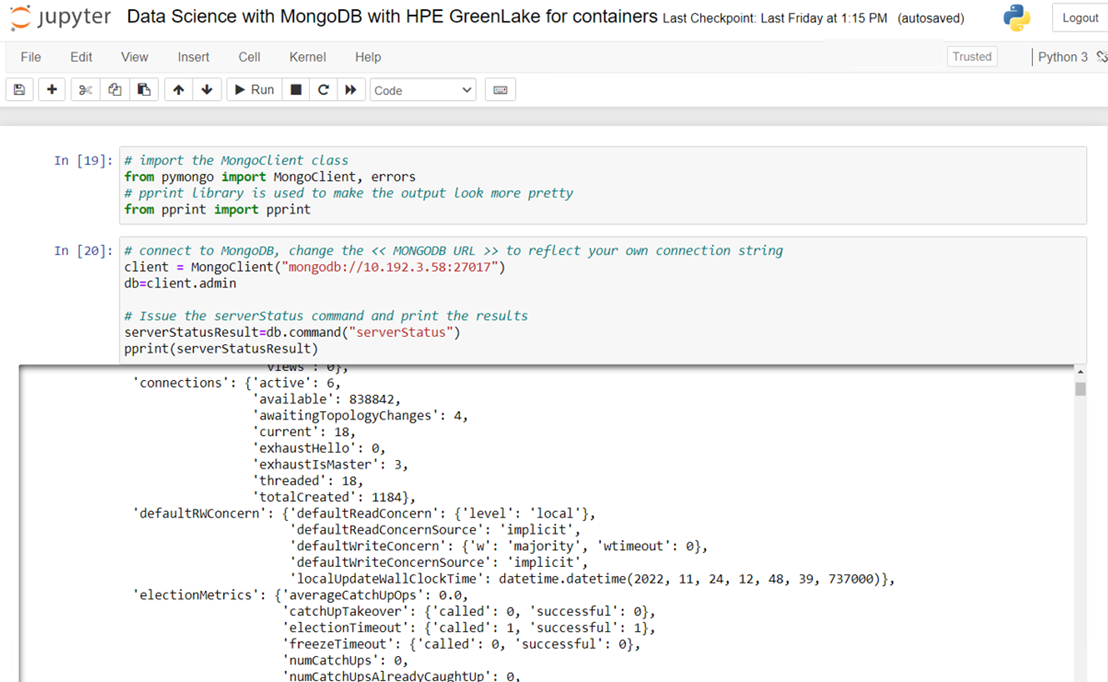
The below steps illustrate an interactive Jupyter notebook adding records and querying MongoDB deployed on the "hpe" Kubernetes cluster.
Create a Database instance 'glcaasmongodemo' and sample collection 'glsamplecollection' and add document records in database.

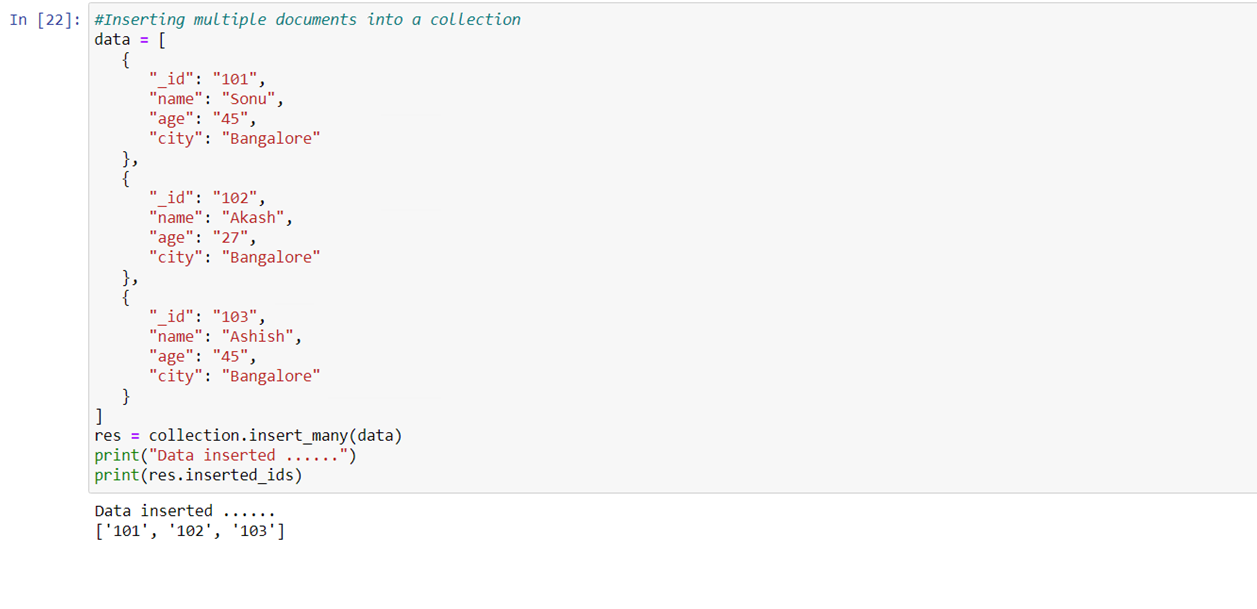
Add multiple documents to sample collection.
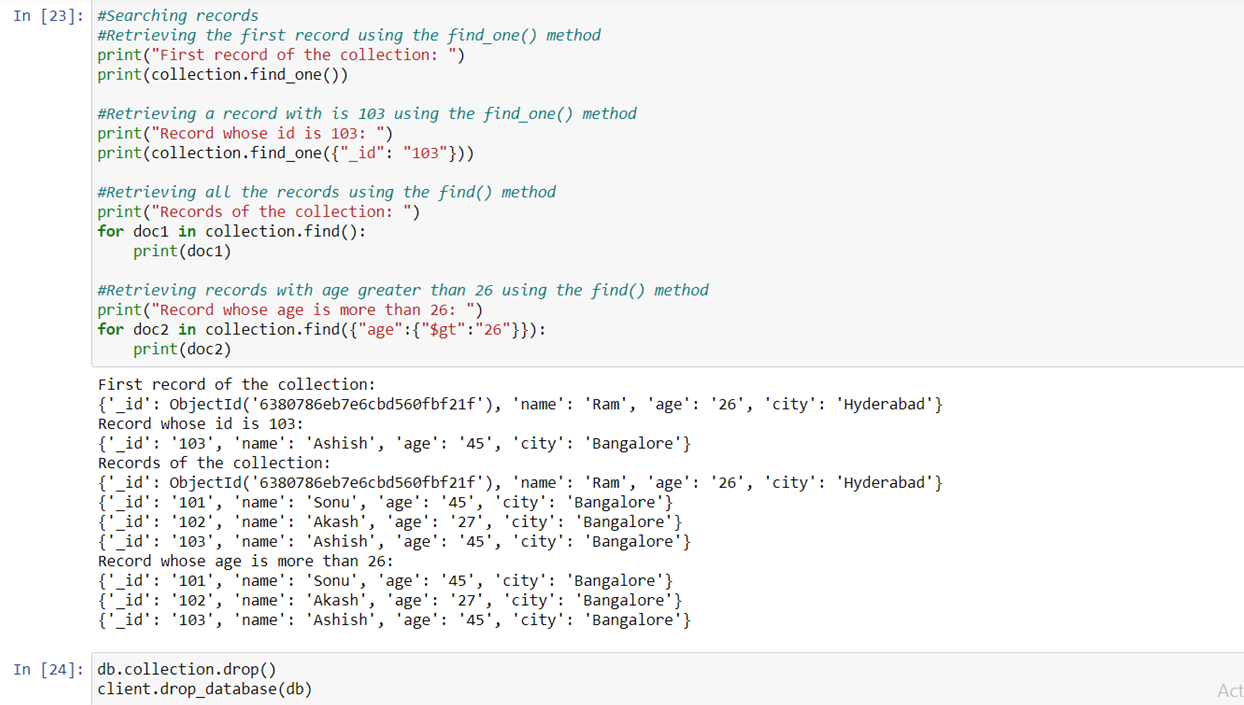
Perform query operation on sample collection.
HPE GreenLake for Containers: Demo Summary
You can find the GitHub repository that hosts demo code here.
We hope that this blog post has provided you with enough information for you to get started deploying a containerized, stateful MongoDB application using HPE GreenLake for Containers. To view more articles and tutorials on the use of HPE GreenLake for Containers, refer to the HPE Developer Community blog.
Tags
Related
A guide to enabling a managed Istio service mesh in a Kubernetes cluster on HPE GreenLake for Private Cloud Enterprise
Feb 16, 2023Federating SPIRE on HPE GreenLake for Private Cloud Enterprise
May 15, 2023
Using HPE GreenLake Console's API Gateway for Data Services Cloud Console
Nov 30, 2021Automate ITOps: announcing foundational APIs for the HPE GreenLake edge-to-cloud platform
Dec 1, 2023
Bare metal provisioning on HPE GreenLake using Terraform
Mar 20, 2023
Bulk onboarding of users in HPE GreenLake edge-to-cloud platform
Apr 24, 2024