
Deploy stateful MongoDB applications on Kubernetes clusters in HPE GreenLake for Private Cloud Enterprise
August 16, 2022Editor’s Note – NAME CHANGE: HPE GreenLake for Containers is now part of HPE GreenLake for Private Cloud Enterprise.
Introduction
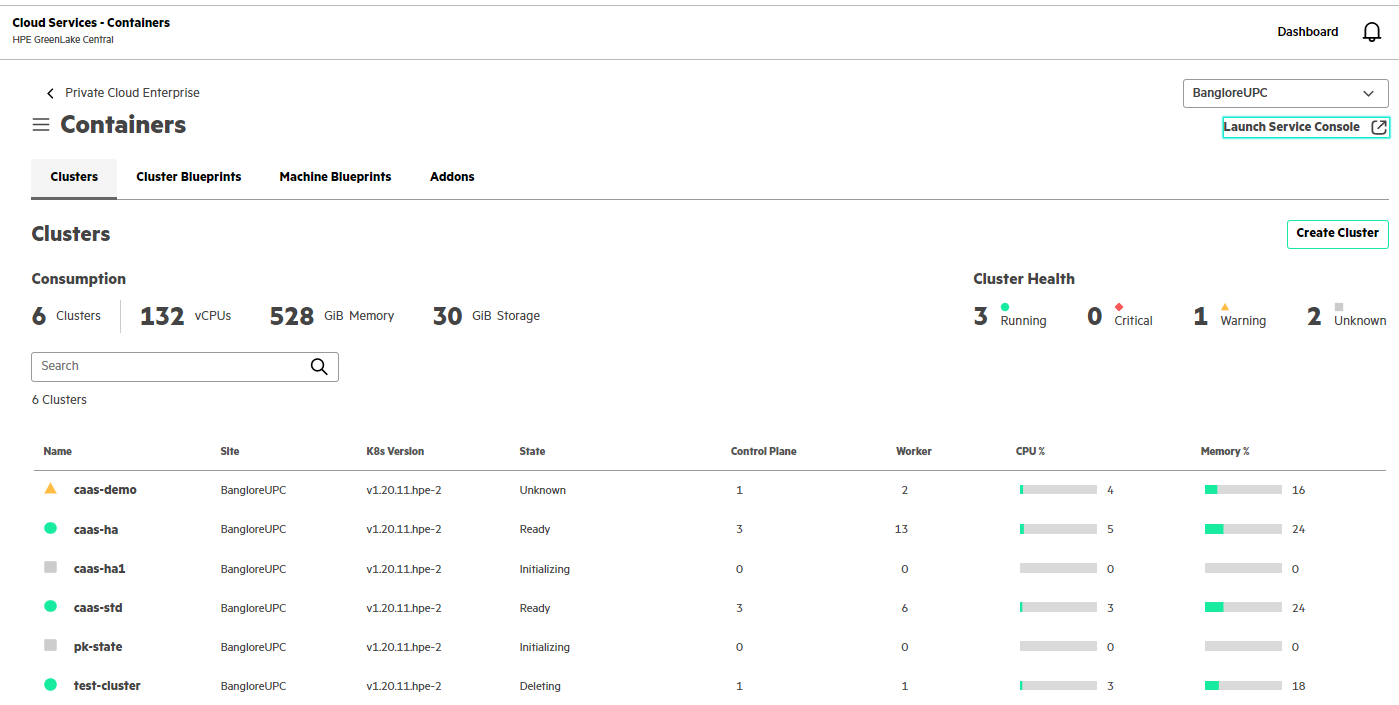
HPE GreenLake for Containers, one of the HPE GreenLake cloud services available on the HPE GreenLake Central platform, allows customers to open the Clusters screen to create a cluster, view details about existing clusters, and launch the HPE GreenLake for Container service console. It provides an enterprise-grade container management service using open source Kubernetes.
This blog post describes the process of deploying a stateful MongoDB application on the created Kubernetes clusters in HPE GreenLake for Containers. Using the Kubernetes StatefulSet and Headless Service, together with the pre-provisioned persistent volumes, the MongoDB application can be deployed as a Replica Set that provides redundancy, fault tolerance and high availability. This MongoDB application deployment can be used for working with a large amount of data and a high number of workloads in customer production environments.
MongoDB Application
MongoDB is a general-purpose, document-based NoSQL database program that is a popular alternative to traditional databases. The MongoDB data model can represent any kind of object structures that can have properties or even be nested for multiple levels. Unlike the relational databases, MongoDB can store large amounts of data without requiring a logical category or schema. Therefore, it takes up the challenge of focusing on scalability and the speed of queries. MongoDB is free, open-source software. You can download the MongoDB packages, set them up and configure them at no expense.
MongoDB can be deployed as a standalone instance that is running as a single mongod server. It can also be deployed as a Replica Set with multiple running mongod instances that maintain the same data set. The Replica Set contains several data-bearing nodes. Of those data-bearing nodes, one and only one member is deemed the Primary node, while the other nodes are deemed Secondary nodes.
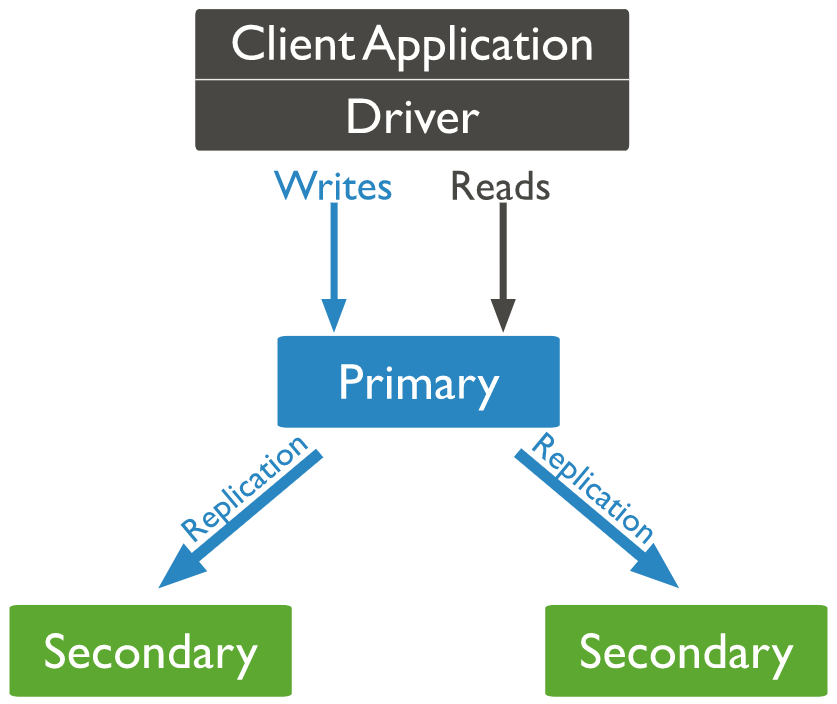
The standalone MongoDB instance deployment is suitable for testing and some aspects of development. However, it’s not adequate for production use. The MongoDB Replica Set deployment ensures multiple replicas running at any given time, which provides redundancy, fault tolerance and high availability. It is recommended for production environments, such as HPE GreenLake for Containers. This blog post will focus on deploying the MongoDB application as a Replica Set.
Deploy MongoDB Application
Requirements
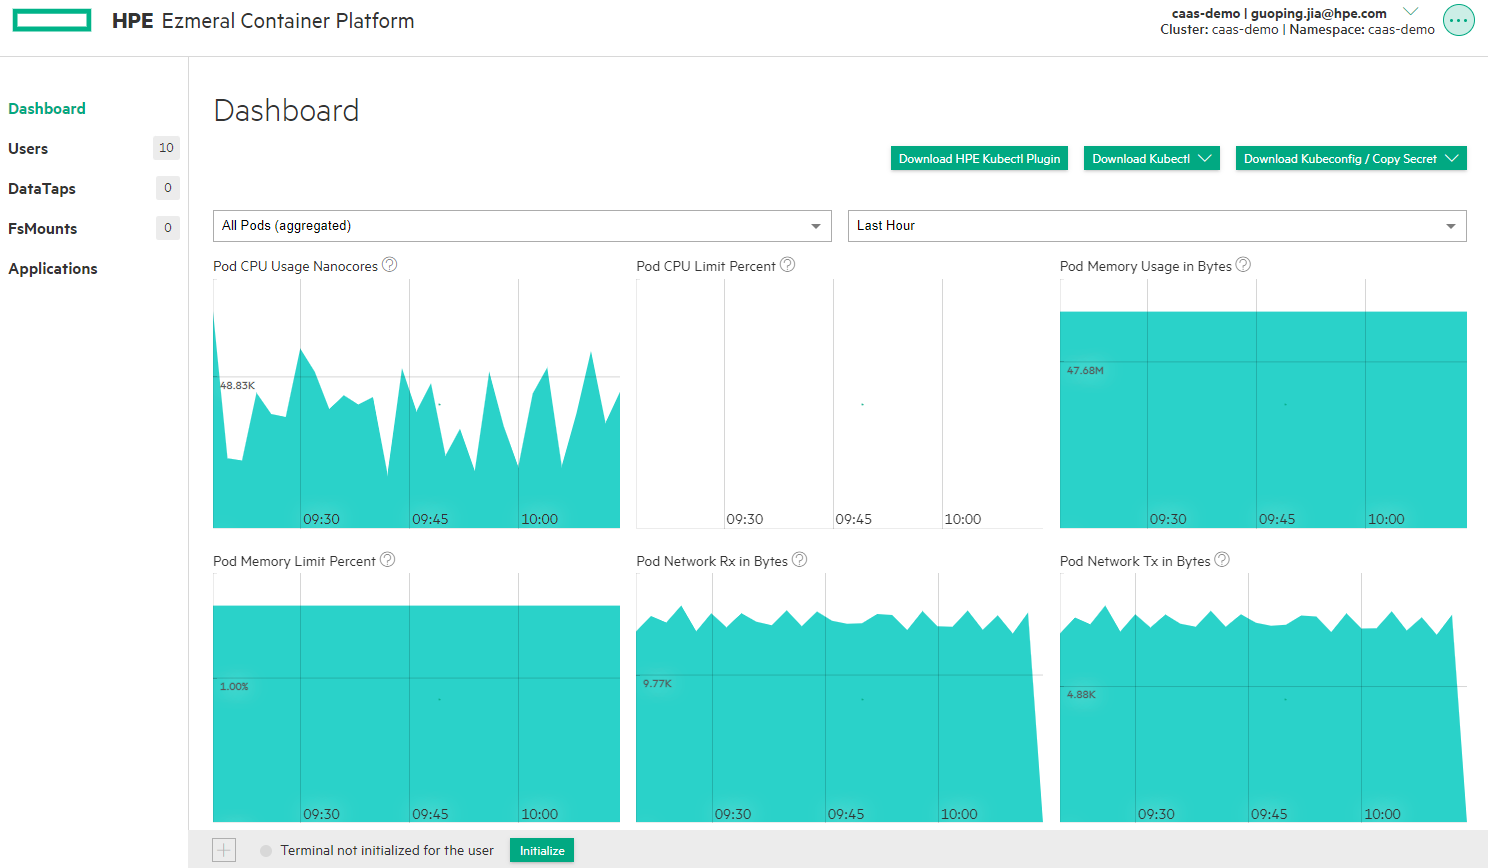
A Kubernetes cluster can be created using either HPE GreenLake for Containers GUI, or through Infrastructure as Code (IaC) with HPE GreenLake Terraform Provider as explained in the blog post Kubernetes Cluster as Code. By launching to the HPE GreenLake for Containers service console, you can download the kubectl binary, together with the kubeconfig file, and set it up to access the Kubernetes cluster using kubectl CLI. The administrative access will be configured from the created Kubernetes cluster in HPE GreenLake for containers, which allows you to set up the Kubernetes RBAC for MongoDB application deployment.
Sample view of HPE GreenLake for Containers Clusters screen:
Sample view of HPE GreenLake for Containers service console:
Set up Role-Based Access Control (RBAC)
Kubernetes RBAC is a key security control to ensure that cluster users and workloads have access only to resources required to execute their roles. It is important to ensure that, when designing permissions for cluster users, the cluster administrator understands the areas where privilege escalation could occur, to reduce the risk of excessive access leading to security incidents.
To set up RBAC, you create a Service Account, a ClusterRole, and connect the two with a Cluster RoleBinding.
1. Create a YAML file sa.yaml for the service account:
apiVersion: v1
kind: ServiceAccount
metadata:
  name: mongo-account
2. Create a YAML file clusterrole.yaml for the cluster roles:
apiVersion: rbac.authorization.k8s.io/v1
kind: ClusterRole
metadata:
  name: mongo-role
rules:
- apiGroups: [""]
  resources: ["deployments"]
  verbs: ["list", "watch"]
- apiGroups: [""]
  resources: ["services"]
  verbs: ["*"]
- apiGroups: [""]
  resources: ["pods"]
  verbs: ["get","list", "watch"]
3. Create a YAML file clusterrolebinding.yaml to bind the service account with the cluster access roles:
apiVersion: rbac.authorization.k8s.io/v1
kind: ClusterRoleBinding
metadata:
  name: mongo_role_binding
subjects:
- kind: ServiceAccount
  name: mongo-account
roleRef:
  kind: ClusterRole
  name: mongo-role
  apiGroup: rbac.authorization.k8s.io
Create the StatefuleSet Deployment
To deploy MongoDB as a Replica Set with multiple pods, a Kubernetes StatefulSet deployment will be required. The data persistence setup can be done with a VolumeClaimTemplate in the StatefulSet deployment.
It should be noted that the Kubernetes Deployment works fine if you have only one single MongoDB replica being deployed. In case multiple replicas are running, which is required in the production environment, there will be some issues using Kubernetes Deployment. Developers have to handle the concurrent read-write of the same data in the deployment.
1. Create a YAML file namespace.yaml for the namespace:
apiVersion: v1
kind: Namespace
metadata:
  name: mongodb
2. Create a YAML file statefulset.yaml for MongoDB StatefulSet deployment:
apiVersion: apps/v1
kind: StatefulSet
metadata:
  name: mongodb-replica
spec:
  serviceName: pce-mongodb
  replicas: 1
  selector:
    matchLabels:
      app: mongo
  template:
    metadata:
      labels:
        app: mongo
        selector: mongo
    spec:
      terminationGracePeriodSeconds: 30
      serviceAccount: pce-mongo-account
      containers:
      - name: mongodb
        image: docker.io/mongo:4.2
        command: ["/bin/sh"]
        args: ["-c", "mongod --replSet=rs0 --bind_ip_all"]
        resources:
          limits:
            cpu: 100m
            memory: 200Mi
          requests:
            cpu: 100m
            memory: 100Mi
        ports:
        - name: mongo-port
          containerPort: 27017
        volumeMounts:
        - name: mongo-data
          mountPath: /data/db
  volumeClaimTemplates:
  - metadata:
      name: mongo-data
    spec:
      accessModes:
        - ReadWriteOnce
      resources:
        requests:
          storage: 1Gi
Set Up the Headless Service
A Kubernetes Headless Service does not allocate an IP address or forward traffic. It’s used for creating a service grouping. Clients can connect to the pods of a Headless Service by connecting to the service’s DNS name. The DNS returns the pods’ IPs and the client can connect directly to the pods instead via the service proxy. The Headless Service can be used for deploying the stateful applications such as MongoDB, while still providing the benefits of a service definition for taking care of the pod restart.
Create a YAML file service.yaml for the headless service:
apiVersion: v1
kind: Service
metadata:
  name: mongodb
  labels:
    app: mongo
spec:
  ports:
  - port: 27017
    protocol: TCP
    targetPort: 27017
  selector:
    app: mongo
  clusterIP: None
Deploy MongoDB Application with Kustomize
With all created YAML files, MongoDB application will be deployed using Kustomize.
1. Move all YAML files to the folder 'base':
├── base
│   ├── clusterrolebinding.yaml
│   ├── clusterrole.yaml
│   ├── kustomization.yaml
│   ├── namespace.yaml
│   ├── pvc.yaml
│   ├── sa.yaml
│   ├── service.yaml
│   └── statefulset.yaml
The file kustomization.yaml lists all YAML files in its resources section:
apiVersion: kustomize.config.k8s.io/v1beta1
kind: Kustomization
resources:
  - namespace.yaml
  - sa.yaml
  - clusterrole.yaml
  - clusterrolebinding.yaml
  - statefulset.yaml
  - service.yaml
2. Create another folder 'overlays' and a sub-folder 'production':
└── overlays
    └── production
        ├── kustomization.yaml
        └── patch-statefulset.yaml
The contents of the file kustomization.yaml:
apiVersion: kustomize.config.k8s.io/v1beta1
kind: Kustomization
bases:
- ../../base
commonLabels:
  env: production
namePrefix: pce-
namespace: pce-mongodb
patches:
- ./patch-statefulset.yaml
The contents of the file patch-statefulset.yaml:
apiVersion: apps/v1
kind: StatefulSet
metadata:
  name: mongodb-replica
spec:
  replicas: 3
This YAML file will patch the original StatefulSet and deploy the MongoDB application as a three-member replica set.
3. Deploy MongoDB with the following command:
$ kubectl apply -k overlays/production
namespace/pce-mongodb created
serviceaccount/pce-mongo-account created
clusterrole.rbac.authorization.k8s.io/pce-mongo-role created
clusterrolebinding.rbac.authorization.k8s.io/pce-mongo_role_binding created
service/pce-mongodb created
statefulset.apps/pce-mongodb-replica created
MongoDB application is deployed as Replica Set to the namespace 'pce-mongodb' using the service account 'pce-mongo-account'. Running the following command, you should see three specified replicas pods are all in running status:
$ kubectl get all -n pce-mongodb
NAME                        READY   STATUS    RESTARTS   AGE
pod/pce-mongodb-replica-0   1/1     Running   0          30s
pod/pce-mongodb-replica-1   1/1     Running   0          19s
pod/pce-mongodb-replica-2   1/1     Running   0          11s

NAME                  TYPE        CLUSTER-IP   EXTERNAL-IP   PORT(S)     AGE
service/pce-mongodb   ClusterIP   None         <none>        27017/TCP   30s

NAME                                   READY   AGE
statefulset.apps/pce-mongodb-replica   3/3     30s
Set up MongoDB Replication Host
After the MongoDB application is deployed with all the replica pods in running states, you need to set up MongoDB replication.
1. Connect to the MongoDB pod pce-mongodb-replica-0:
$ kubectl exec -it pce-mongodb-replica-0 -n pce-mongodb -- mongo
MongoDB shell version v4.2.21
connecting to: mongodb://127.0.0.1:27017/?compressors=disabled&gssapiServiceName=mongodb
Implicit session: session { "id" : UUID("5d7b5a72-ff37-4ead-b864-965a551dc966") }
MongoDB server version: 4.2.21
Welcome to the MongoDB shell.
For interactive help, type "help".
For more comprehensive documentation, see
  https://docs.mongodb.com/
Questions? Try the MongoDB Developer Community Forums
  https://community.mongodb.com
---
Enable MongoDB's free cloud-based monitoring service, which will then receive and display
metrics about your deployment (disk utilization, CPU, operation statistics, etc).

The monitoring data will be available on a MongoDB website with a unique URL accessible to you
and anyone you share the URL with. MongoDB may use this information to make product
improvements and to suggest MongoDB products and deployment options to you.

To enable free monitoring, run the following command: db.enableFreeMonitoring()
To permanently disable this reminder, run the following command: db.disableFreeMonitoring()
---

>
2. Initiate the replication:
> rs.initiate()
{
  "info2" : "no configuration specified. Using a default configuration for the set",
  "me" : "pce-mongodb-replica-0:27017",
  "ok" : 1
}
rs0:SECONDARY>
3. Add the pod as the Primary server to the replication configuration:
rs0:SECONDARY> var cfg = rs.conf()
rs0:PRIMARY> cfg.members[0].host="pce-mongodb-replica-0.pce-mongodb:27017"
pce-mongodb-replica-0.pce-mongodb:27017
rs0:PRIMARY>

rs0:PRIMARY> rs.reconfig(cfg)
{
  "ok" : 1,
  "$clusterTime" : {
    "clusterTime" : Timestamp(1658309061, 1),
    "signature" : {
      "hash" : BinData(0,"AAAAAAAAAAAAAAAAAAAAAAAAAAA="),
      "keyId" : NumberLong(0)
    }
  },
  "operationTime" : Timestamp(1658309061, 1)
}
rs0:PRIMARY>
4. Add the second MongoDB pod pce-mongodb-replica-1 to the replication configuration:
rs0:PRIMARY> rs.add("pce-mongodb-replica-1.pce-mongodb:27017")
{
  "ok" : 1,
  "$clusterTime" : {
    "clusterTime" : Timestamp(1658309117, 1),
    "signature" : {
      "hash" : BinData(0,"AAAAAAAAAAAAAAAAAAAAAAAAAAA="),
      "keyId" : NumberLong(0)
    }
  },
  "operationTime" : Timestamp(1658309117, 1)
}
rs0:PRIMARY>
5. Continue to add the third MongoDB pod pce-mongodb-replica-2 to the replication configuration:
rs0:PRIMARY> rs.add("pce-mongodb-replica-2.pce-mongodb:27017")
{
  "ok" : 1,
  "$clusterTime" : {
    "clusterTime" : Timestamp(1658309148, 1),
    "signature" : {
      "hash" : BinData(0,"AAAAAAAAAAAAAAAAAAAAAAAAAAA="),
      "keyId" : NumberLong(0)
    }
  },
  "operationTime" : Timestamp(1658309148, 1)
}
rs0:PRIMARY>
6. Verify MongoDB replication status:
rs0:PRIMARY> rs.status()
{
  "set" : "rs0",
  "date" : ISODate("2022-07-20T09:26:19.014Z"),
  "myState" : 1,
  "term" : NumberLong(1),
  "syncingTo" : "",
  "syncSourceHost" : "",
  "syncSourceId" : -1,
  "heartbeatIntervalMillis" : NumberLong(2000),
  "majorityVoteCount" : 2,
  "writeMajorityCount" : 2,
  "optimes" : {
    "lastCommittedOpTime" : {
      "ts" : Timestamp(1658309173, 1),
      "t" : NumberLong(1)
    },
    "lastCommittedWallTime" : ISODate("2022-07-20T09:26:13.146Z"),
    "readConcernMajorityOpTime" : {
      "ts" : Timestamp(1658309173, 1),
      "t" : NumberLong(1)
    },
    "readConcernMajorityWallTime" : ISODate("2022-07-20T09:26:13.146Z"),
    "appliedOpTime" : {
      "ts" : Timestamp(1658309173, 1),
      "t" : NumberLong(1)
    },
    "durableOpTime" : {
      "ts" : Timestamp(1658309173, 1),
      "t" : NumberLong(1)
    },
    "lastAppliedWallTime" : ISODate("2022-07-20T09:26:13.146Z"),
    "lastDurableWallTime" : ISODate("2022-07-20T09:26:13.146Z")
  },
  "lastStableRecoveryTimestamp" : Timestamp(1658309133, 1),
  "lastStableCheckpointTimestamp" : Timestamp(1658309133, 1),
  "electionCandidateMetrics" : {
    "lastElectionReason" : "electionTimeout",
    "lastElectionDate" : ISODate("2022-07-20T09:22:33.048Z"),
    "electionTerm" : NumberLong(1),
    "lastCommittedOpTimeAtElection" : {
      "ts" : Timestamp(0, 0),
      "t" : NumberLong(-1)
    },
    "lastSeenOpTimeAtElection" : {
      "ts" : Timestamp(1658308953, 1),
      "t" : NumberLong(-1)
    },
    "numVotesNeeded" : 1,
    "priorityAtElection" : 1,
    "electionTimeoutMillis" : NumberLong(10000),
    "newTermStartDate" : ISODate("2022-07-20T09:22:33.139Z"),
    "wMajorityWriteAvailabilityDate" : ISODate("2022-07-20T09:22:33.224Z")
  },
  "members" : [
    {
      "_id" : 0,
      "name" : " pce-mongodb-replica-0.pce-mongodb:27017",
      "health" : 1,
      "state" : 1,
      "stateStr" : "PRIMARY",
      "uptime" : 459,
      "optime" : {
        "ts" : Timestamp(1658309173, 1),
        "t" : NumberLong(1)
      },
      "optimeDate" : ISODate("2022-07-20T09:26:13Z"),
      "syncingTo" : "",
      "syncSourceHost" : "",
      "syncSourceId" : -1,
      "infoMessage" : "",
      "electionTime" : Timestamp(1658308953, 2),
      "electionDate" : ISODate("2022-07-20T09:22:33Z"),
      "configVersion" : 4,
      "self" : true,
      "lastHeartbeatMessage" : ""
    },
    {
      "_id" : 1,
      "name" : "pce-mongodb-replica-1.pce-mongodb:27017",
      "health" : 1,
      "state" : 2,
      "stateStr" : "SECONDARY",
      "uptime" : 61,
      "optime" : {
        "ts" : Timestamp(1658309173, 1),
        "t" : NumberLong(1)
      },
      "optimeDurable" : {
        "ts" : Timestamp(1658309173, 1),
        "t" : NumberLong(1)
      },
      "optimeDate" : ISODate("2022-07-20T09:26:13Z"),
      "optimeDurableDate" : ISODate("2022-07-20T09:26:13Z"),
      "lastHeartbeat" : ISODate("2022-07-20T09:26:18.007Z"),
      "lastHeartbeatRecv" : ISODate("2022-07-20T09:26:18.010Z"),
      "pingMs" : NumberLong(0),
      "lastHeartbeatMessage" : "",
      "syncingTo" : "pce-mongodb-replica-0.pce-mongodb:27017",
      "syncSourceHost" : "pce-mongodb-replica-0.pce-mongodb:27017",
      "syncSourceId" : 0,
      "infoMessage" : "",
      "configVersion" : 4
    },
    {
      "_id" : 2,
      "name" : "pce-mongodb-replica-2.pce-mongodb:27017",
      "health" : 1,
      "state" : 2,
      "stateStr" : "SECONDARY",
      "uptime" : 31,
      "optime" : {
        "ts" : Timestamp(1658309173, 1),
        "t" : NumberLong(1)
      },
      "optimeDurable" : {
        "ts" : Timestamp(1658309173, 1),
        "t" : NumberLong(1)
      },
      "optimeDate" : ISODate("2022-07-20T09:26:13Z"),
      "optimeDurableDate" : ISODate("2022-07-20T09:26:13Z"),
      "lastHeartbeat" : ISODate("2022-07-20T09:26:18.007Z"),
      "lastHeartbeatRecv" : ISODate("2022-07-20T09:26:18.536Z"),
      "pingMs" : NumberLong(0),
      "lastHeartbeatMessage" : "",
      "syncingTo" : "pce-mongodb-replica-1.pce-mongodb:27017",
      "syncSourceHost" : "pce-mongodb-replica-1.pce-mongodb:27017",
      "syncSourceId" : 1,
      "infoMessage" : "",
      "configVersion" : 4
    }
  ],
  "ok" : 1,
  "$clusterTime" : {
    "clusterTime" : Timestamp(1658309173, 1),
    "signature" : {
      "hash" : BinData(0,"AAAAAAAAAAAAAAAAAAAAAAAAAAA="),
      "keyId" : NumberLong(0)
    }
  },
  "operationTime" : Timestamp(1658309173, 1)
}
rs0:PRIMARY>
The members section of the status output shows three replicas. The pod pce-mongodb-replica-0 is listed as the Primary replica, while the other two pods, pce-mongodb-replica-1 & pce-mongodb-replica-2, are listed as the Secondary replicas.
The MongoDB replica set deployment is set up and ready to operate now. You can download and install the MongoDB Compass and set up an external connection to connect to the MongoDB application deployed in the Kubernetes cluster. Using the powerful MongoDB Compass GUI, you can query, aggregate, and analyze the MongoDB data from the MongoDB deployment.
Scale MongoDB Application
If you want to add another replica set to the MongoDB deployment to scale up the MongoDB application, you can run the following kubectl command:
$ kubectl scale statefulset <name> -n <namespace> --replicas=<number of replicas>
Then, follow up with Step 1 from the previous section to connect to the first MongoDB pod and repeat Step 5 to add the new replica pod.
To scale down the MongoDB application, you can simply run the command rs.remove() to remove the replica pod from the replication configuration.
Summary
This blog post describes the detailed process used to deploy and set up a stateful MongoDB application as a Replica Set deployment on Kubernetes clusters in HPE GreenLake for Containers. Kubernetes provides the ability to persist the state, deploy the stateful application, and manage and scale those applications with state. The production deployment of the MongoDB application provides redundancy, fault tolerance, high availability, and scalability. It can be used for working with a large amount of data and a high number of workloads in customer production environments.
Related
A guide to enabling a managed Istio service mesh in a Kubernetes cluster on HPE GreenLake for Private Cloud Enterprise
Feb 16, 2023
Using HPE GreenLake Console's API Gateway for Data Services Cloud Console
Nov 30, 2021Automate ITOps: announcing foundational APIs for the HPE GreenLake edge-to-cloud platform
Dec 1, 2023
Bare metal provisioning on HPE GreenLake using Terraform
Mar 20, 2023
Bulk onboarding of users in HPE GreenLake edge-to-cloud platform
Apr 24, 2024
Configuring Azure AD as the SAML IDP with HPE Greenlake Cloud Platform and Aruba Central
Jul 11, 2022How to implement a single sign-on solution to authenticate users onto the HPE GreenLake edge-to-cloud platform
Nov 29, 2023