
Continuous Integration/Continuous Delivery & Deployment (CI/CD) is becoming a software development practice in which you build, test, integrate, deliver, and deploy software every time a developer or a development team merges code into a particular branch. Continuous integration, automated testing, and automated deployment capabilities allow software to be developed and deployed rapidly, reliably, and repeatedly with minimal human intervention. This blog helps you to understand in detail how to enable a CI/CD pipeline for a full stack application. In this blog post, I will show you how to host a static website on Netlify, including how to set up continuous deployment.
Project structure:
In order to deploy the site on Netlify, a few configurations need to be added to the project directory to enable the CI/CD pipeline.
For the purpose of this example, let’s assume that you have an application already created using the create-react-app cli tool.
At the root of the project, add the netlify.toml file and include the following text.
[build]
  command = "yarn build"
  publish = "dist"
Create a folder called dist at the project root so that when netlify starts its build command, it automatically copies the compiled binary files into a dist folder. You can also delegate this task to netlify and have it create a build folder during compilation using commands provided as part of the build command.
Your package.json file should look like this when the deployment process is complete.
"scripts": {
    "start": "react-scripts start",
    "build": "run-p build:**",
    "build:app": "react-scripts build",
    "test": "react-scripts test",
    "eject": "react-scripts eject"
  },
Push all these changes to your Git repository to move on to the deployment part of the exercise.
Getting started on Netlify:
In this section, I will walk you through how easy it is to launch your site on Netlify. If you are not already a Netlify user, go ahead and sign up for free here first.
Step 1: Create new team
Each Netlify site belongs to a team, even if it’s only a team of one. Teams can have multiple Netlify users as members, and a Netlify user can be a member of multiple teams.
Step 2: Create new site from Git
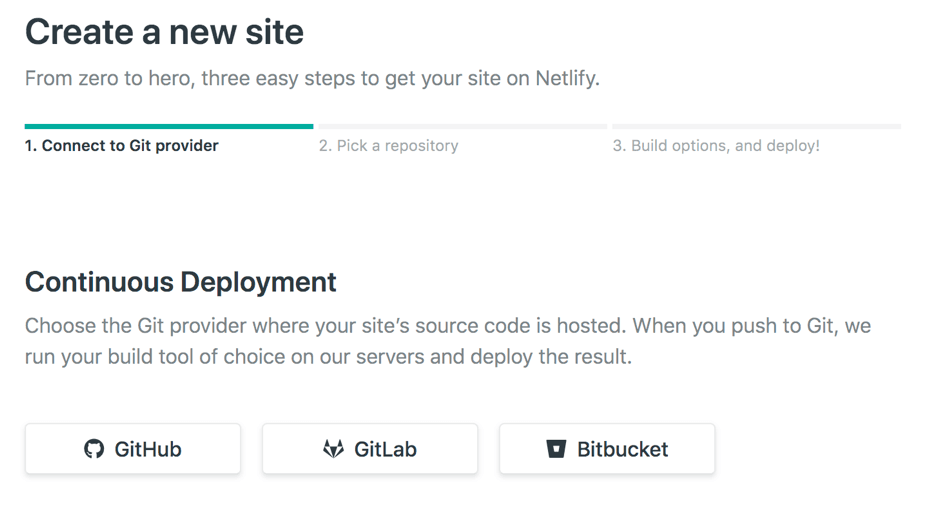
a) Connect your Git provider where the source code is hosted. Once you authorize Netlify to access the Git provider account, Netlify app is installed in your GH profile to allow access specifically to a repo or all repos hosted under the Git account.

b) Pick a repository or Select All repositories to avoid doing this step for every repo.

c) This is where you provide all of the deployment settings. Your build settings should match those found in the build directory provided in the netlify.toml file that was added at the beginning of the exercise.

Click on the Deploy site button and watch the deployment progress in the CLI provided.


At this point, you can preview the deployment for this specific build or go back to the home page on app.netlify.com site to find the default url allocated on the Netlify domain.
The URL should look like this https://something-abc-38642d.netlify.com
If your app needs to access any other routes apart from ‘/’ route, the above example indicates a problem. To fix this, add a ‘_redirects’ file to the public folder in your project directory where the index.html also resides. This allows any other routes to work with the app. Without this, you will end up landing on a “page not found” or you may be redirected to the home page.
_redirects:
/* /index.html 200Having completed the above, you should now have a working frontend application. But when you want to have your server running on the same host, you need to take a few extra steps, which I’ll explain next.
Server side setup:
Pre-requisites: You need to install the netlify-lambda package to enable serverless lambda functions for running the API. Since lambda functions run as service from the same host, you also need two more dependencies: 1) a http-proxy-middleware package to have localhost proxy setup, and 2) a npm-run-all package to run all build commands in parallel.
Once you install the netlify-lambda and http-proxy-middleware packages, update the package.json file to reflect the scripts tag.
"scripts": {
    "start": "react-scripts start",
    "start:lambda": "netlify-lambda serve src/lambda",
    "build": "run-p build:**",
    "build:app": "react-scripts build",
    "build:lambda": "netlify-lambda build src/lambda",
    "test": "react-scripts test",
    "eject": "react-scripts eject"
  },
Now, add a setupProxy.js file inside the src directory and add the following code:
Note: You do not need to import this file anywhere. It is automatically registered by create-react-app when you start the development server.
const proxy = require('http-proxy-middleware');

module.exports = function(app) {
  app.use(proxy('/.netlify/functions/', {
    target: 'http://localhost:9000/',
    "pathRewrite": {
      "^/\\.netlify/functions": ""
    }
  }));
};
At the root of the project, update netlify.toml file with the following code:
[build]
  command = "yarn build"
  functions = "functions"
  publish = "dist"
Now, add a lambda folder under the src directory to start setting the server side functionality. For simplicity, we will write a simple express.js app with few routes.
// DB connection
const mongoose = require('mongoose');
mongoose.connect(process.env.MONGODB_URI, { useNewUrlParser: true });

const express = require("express");
const cors = require('cors')
const serverless = require('serverless-http');

const app = express();
const router = express.Router();

const userSchema = mongoose.Schema({
  name: {type: String, required: true},
  email: {type: String},
});

const User = mongoose.model('User', userSchema);

app.use(express.json());
app.use(express.urlencoded({extended:true}));
app.use(cors());

router.get('/ping', (req, res) => {
  res.send('pong!');
});

// Get all user records
router.get('/users, (req,res) => {
  User.find()
    .then( users => res.send(users))
    .catch( err => {
      res.send(err);
    });
});
  }
});

// Model routes
app.use(`/.netlify/functions/api`, router);

module.exports = app;

module.exports.handler = serverless(app);
With this setup, when Netlify runs the build command as part of deployment, it builds the frontend app into the dist directory and places the API into the functions directory.
You can make GET requests on the API with http://localhost:9000/.netlify/functions/api/users if you are running locally or https://something-abc-38642d.netlify.com/.netlify/functions/api/users if you are running in production mode. Custom domains can be setup on the Netlify site if you want your site to run on a non-Netlify domain. As a bonus, Netlify automatically enables an SSL/TLS certificate with the help of Let’s Encrypt.
Now, every time you push changes to the master (or a PR is created to merge a particular branch into the master), the Netlify CI/CD pipeline automatically builds the code and deploys it into production.
CI/CD is integral in the building and deployment of software today, what with our smaller teams, constant changes, fast and real-time feedback, and quick app deployment. Not only does CI/CD provide clear benefits to businesses but also to stakeholders such as product owners, development teams, and end-users. While building a CI/CD pipeline requires additional effort, once the CI/CD process stabilizes within an organization, it offers substantial advantages, such as reduced costs, faster deployments and increased ROI. In addition, with CI/CD automation, developers can invest more time building better software solutions rather than spending the time on code integration and delivery.
The CI/CD methodology facilitates the building and improvement of great apps with faster time to market. Improved automation also allows for a more streamlined app development cycle, enabling developers to receive feedback quicker to help them build better, more consistent apps.
I hope this blog helps you to set up the CI/CD pipeline using Netlify for any of your personal projects or a project setup for an entire team. Please continue to follow our blogs for more hints and tutorials designed to help you optimize your development environment.