Curate and Expose Service Catalog Items using HPE GreenLake for Private Cloud Enterprise
February 16, 2022Editor’s Note – NAME CHANGE: HPE GreenLake for Private Cloud is now part of HPE GreenLake for Private Cloud Enterprise.
The HPE GreenLake Edge-to-Cloud platform has a very useful interface for managing the HPE GreenLake for private cloud service called HPE GreenLake Central. It provides a cloud experience to manage VMs in your on-premises, pay-per-use datacenter. Personas are alternate views in the HPE GreenLake for private cloud user interface (UI). A user’s access to the various personas is controlled by role permissions.
At present, there are two persona types: Standard and Service Catalog. The Standard persona is the typical default view. The Service Catalog persona is a simplified view where users are presented with different pre-configured instance types, blueprints, and workflows to choose from based upon their role. This improves the deployment experience with just a few clicks and without presenting an overwhelming list of options.
The goal of this article is to discuss the Service Catalog persona in greater detail, including how administrators can curate the catalog and how users can use the Service Catalog to deploy their services. For readers needing a good introduction to HPE GreenLake for private cloud concepts, check out this technical paper that will help you better understand the different concepts leveraged in this blog.
Using the Service Catalog persona view
Access to a persona view is controlled by a user’s role. By default, new roles and roles that existed prior to the creation of the personas will only have access to the Standard persona.
With the Tenant Admin user, connect to HPE GreenLake Central, locate the HPE GreenLake for private cloud dashboard widget and click the Launch icon to open the HPE GreenLake for private cloud dashboard.
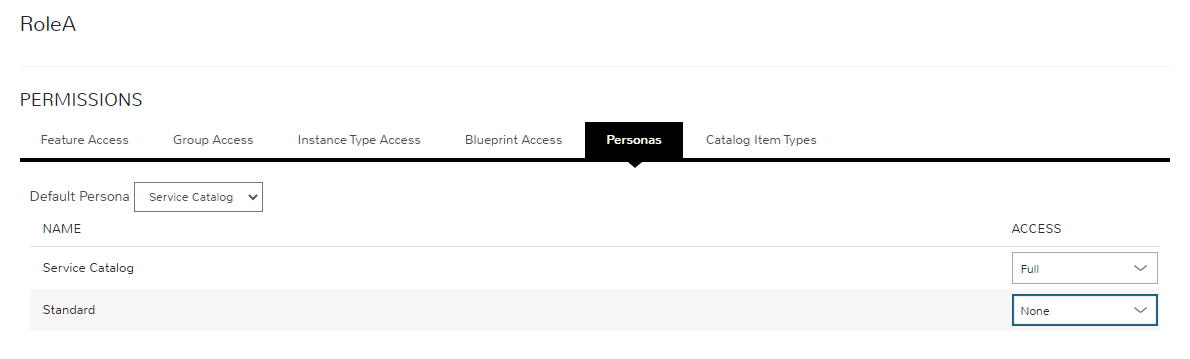
- Navigate to Administration > Roles
- Click the name of the role to modify
- Click the Personas tab
- From the default persona drop-down list, select the default setting. The Standard type is typically used as the default.
- From the list of personas, locate the Service Catalog persona
- From the ACCESS column of the role, select FULL
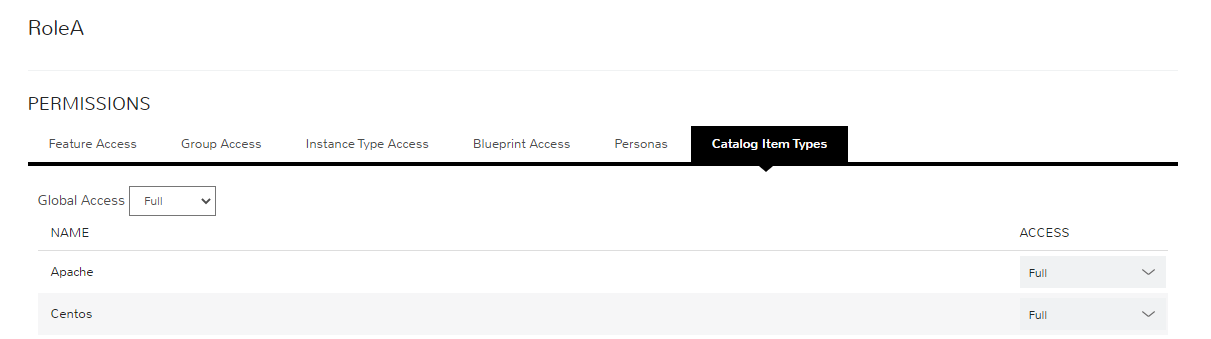
Configuring Service Catalog item access
By default, user roles have no access to any catalog items. When enabling the Service Catalog persona access for user roles, you will also need to provide access to some or all catalog items.
Configuring global access:
- Full: Gives access to all catalog items
- Custom: Gives access to individually-selected items from the list below
- None: No access is given to any catalog items
Build Service Catalog items
A Tenant Admin user can add catalog items (instance types, blueprints, and workflows) and allow some configurable options using the Option Types.
Note: A Tenant Admin user should have full permission for Tools: Self Service.
Adding an instance catalog item
This example shows how to create an Apache instance catalog item with the assumption that the Apache instance type exists in the platform.
- From your user name drop-down list, ensure that the Standard persona is selected (For more details, refer to the Accessing Service Catalog persona section of this post)
- Navigate to Tools > Self Service
- From the ADD drop-down list, select Instance
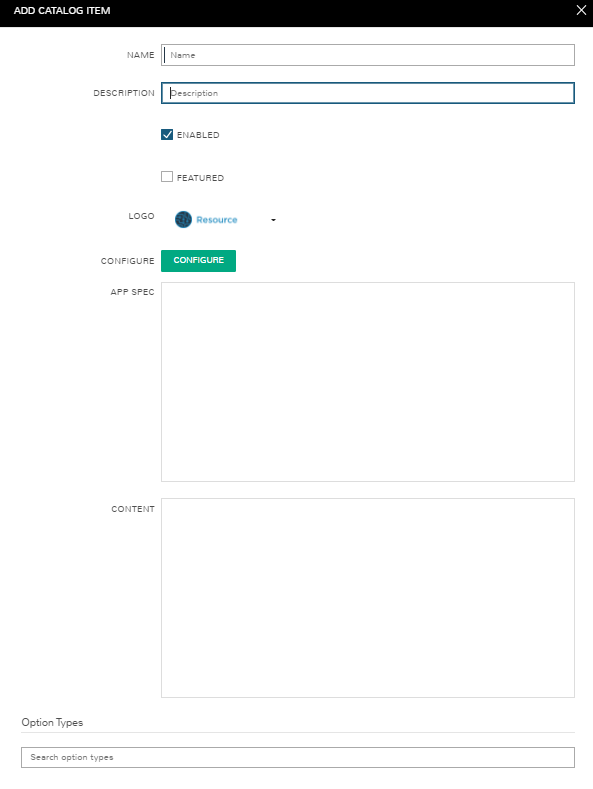
The ADD CATALOG ITEM dialog box opens
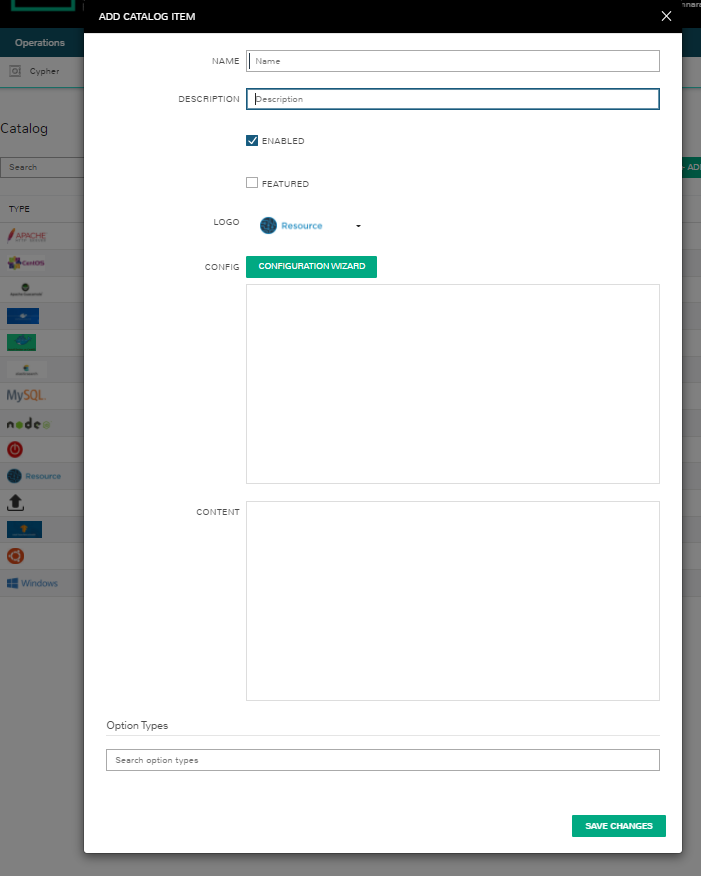
Configure the catalog items as follows:
- NAME - Enter the catalog item name
- DESCRIPTION - (Optional) Enter the catalog item description
- ENABLED - Select to enable the catalog item, making it available for provisioning (default). Clear to disable.
- FEATURED - Select to enable special visibility of this catalog item in the Service Catalog persona view. Clear to disable. Special visibility means that an item can be featured (a tag is added in the item) and given priority in the Service Catalog and Dashboard views.
- LOGO - From the drop-down list, do one of the following:
- Select an existing logo
- Select custom and click Browse to locate and upload a logo
- CONFIG - Enter, view, or edit the instance configuration
- To build this catalog item using the CREATE INSTANCE wizard, click CONFIGURATION WIZARD. For more details, see Instance creation configuration parameters
- CONTENT - Enter a more detailed description about the instance, which will display in the order screen
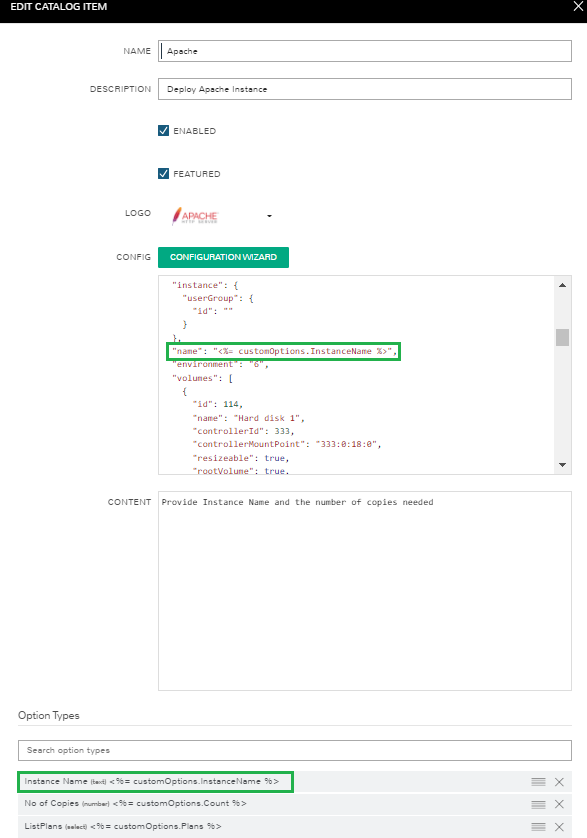
- Option Types - (Optional) Enter the Option Types to present users with mandatory or optional selections during provisioning. Option Types can then be used in the CONFIG section. Below is the sample usage of Options Types in the CONFIG section.
- Click SAVE CHANGES
- Optionally, a Tenant Admin can provide access to the catalog items to a specific user or role (see Configuring Service Catalog item access earlier in this article)
Adding a blueprint catalog item
Blueprints enable full multi-tier application deployment. In the self-service catalog, you can create catalog items based on existing app blueprints. You can preconfigure blueprints and expose them to the Service Catalog persona for a click-to-deploy use case.
- Click on your name in the upper-right corner and ensure that the STANDARD persona is selected (For more details, refer to the Accessing the Service Catalog persona section later in this tutorial)
- Navigate to Tools > Self Service
- From the ADD drop-down list, select Blueprint
The ADD CATALOG ITEM dialog box opens
This example shows the steps to create blueprint catalog item, which can be used to deploy Nodejs with MariaDB with the assumption that the blueprint exists in the platform.
Configure the catalog items as follows:
- NAME - Enter the catalog item name
- DESCRIPTION - (Optional) Enter the catalog item description
- ENABLED - Select to enable the catalog item, making it available for provisioning (default). Clear to disable.
- FEATURED - Select to enable special visibility of this catalog item in the Service Catalog persona view. Clear to disable. Special visibility means that an item can be featured (a tag is added in the item) and given priority in the Service Catalog and Dashboard views.
- LOGO - From the drop-down list, do one of the following:
- Select an existing logo
- Select custom and click Browse to locate and upload a logo
- CONFIGURE - Click CONFIGURE to build this catalog item. The NEW APP wizard opens. For information about using the wizard, refer to Creating an app from a blueprint.
- APP SPEC - (Optional) Inject an override blueprint spec in yaml format
- CONTENT - Enter a more detailed description about the app, which will display in the order screen
- Option Types - (Optional) Enter the option types to present to users with mandatory or optional selections prior to provisioning
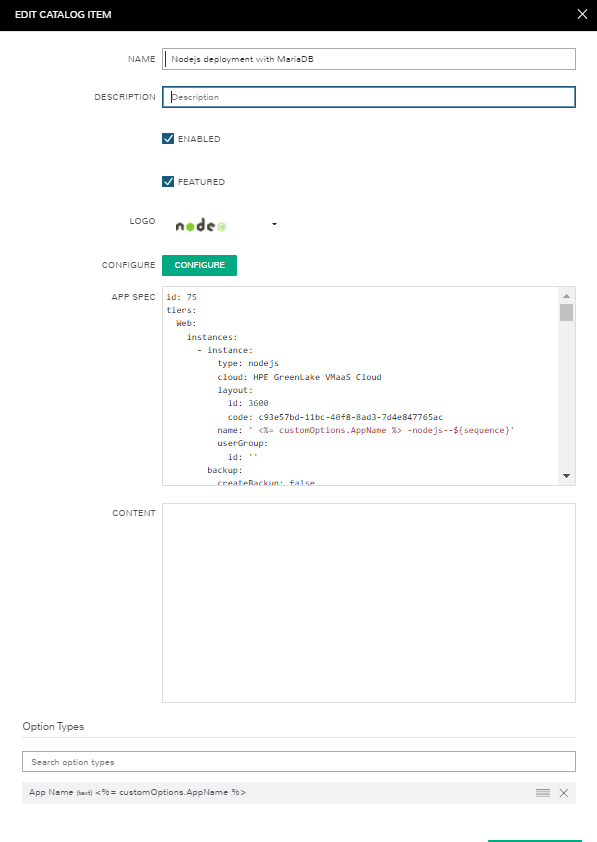
- Click SAVE CHANGES.
- Optionally, a Tenant Admin can provide access to the catalog items to a specific user or role (see Configuring Service Catalog item access earlier in this article)
Adding a workflow catalog item
Workflows are groups of Tasks and can be run on-demand against an existing instance. You can preconfigure operational workflows and expose them to the Service Catalog persona for a click-to-deploy use case.
- Click on your name in the upper-right corner and ensure that the Standard persona is selected (For more details, refer to the Accessing the Service Catalog persona section of this post)
- Navigate to Tools > Self Service
- From the ADD drop-down list, select WORKFLOW
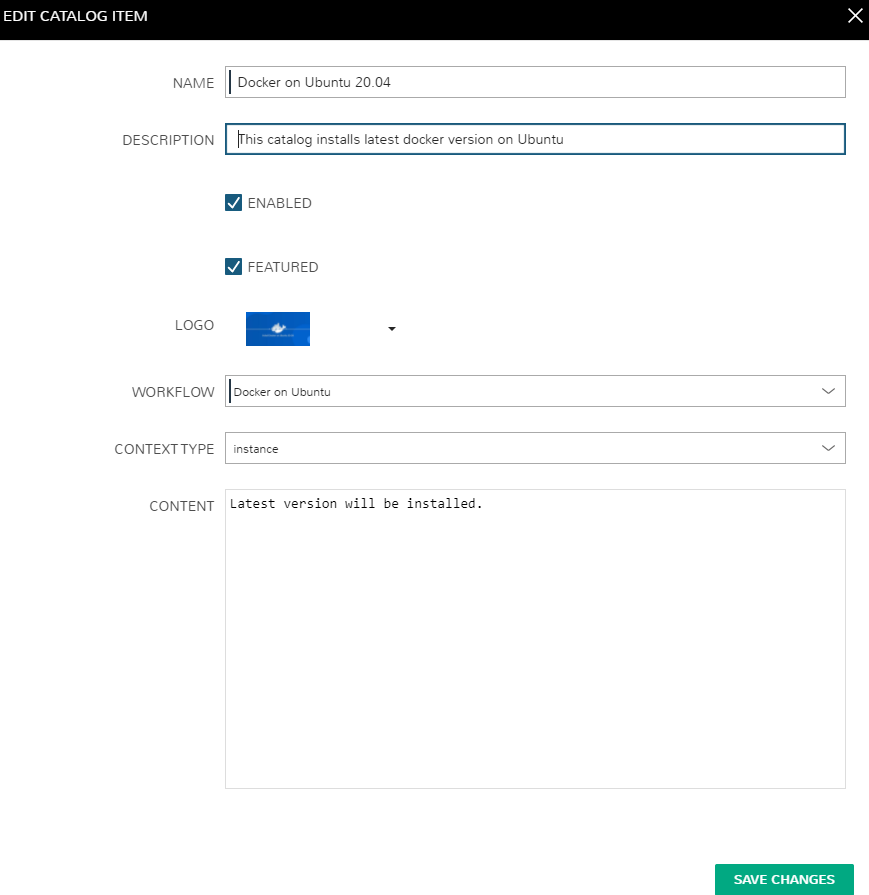
The ADD CATALOG ITEM dialog box opens
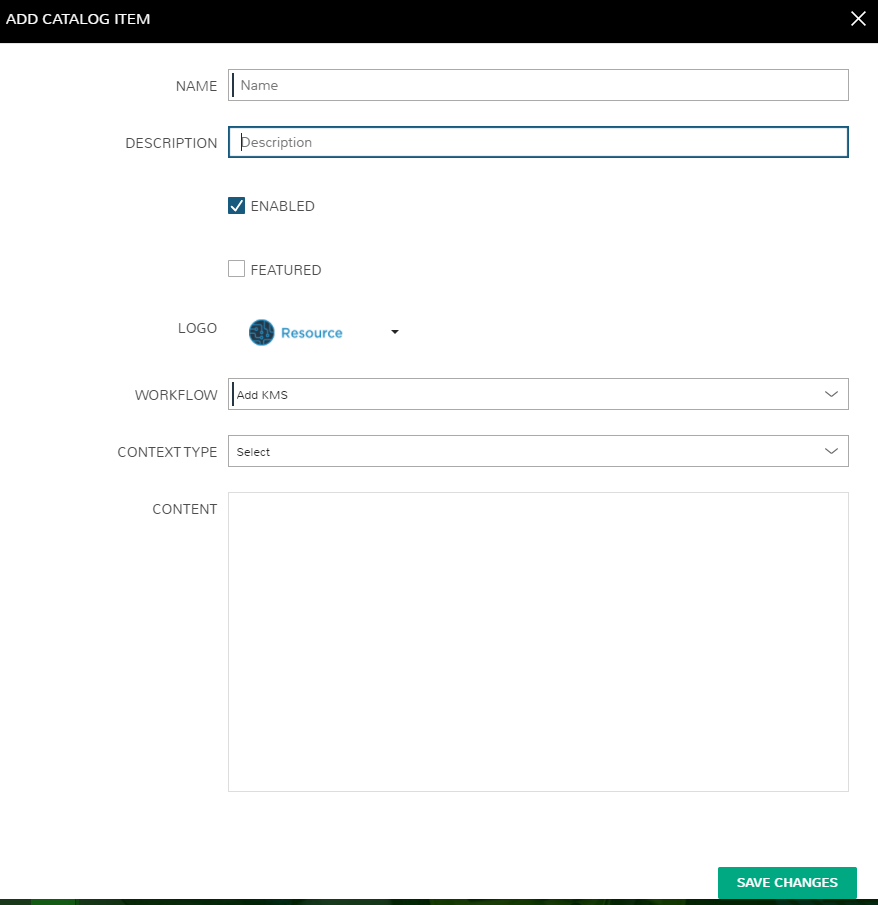
Configure the catalog items as follows:
- NAME - Enter the catalog item name
- DESCRIPTION - (Optional) Enter the catalog item description
- ENABLED - Select to enable the catalog item, making it available for provisioning (default). Clear to disable.
- FEATURED - Select to enable special visibility of this catalog item in the Service Catalog persona view. Clear to disable. Special visibility means that an item can be featured (a tag is added in the item) and given priority in the Service Catalog and Dashboard views.
- LOGO - From the drop-down list, do one of the following:
- Select an existing logo
- Select custom and click Browse to locate and upload a logo
- WORKFLOW - From the drop-down list, select the desired workflow
- CONTEXT TYPE - (Optional) From the drop-down list, select the context type: none,server or instance.
- CONTENT - Enter a more detailed description about the instance, which will display in the order screen
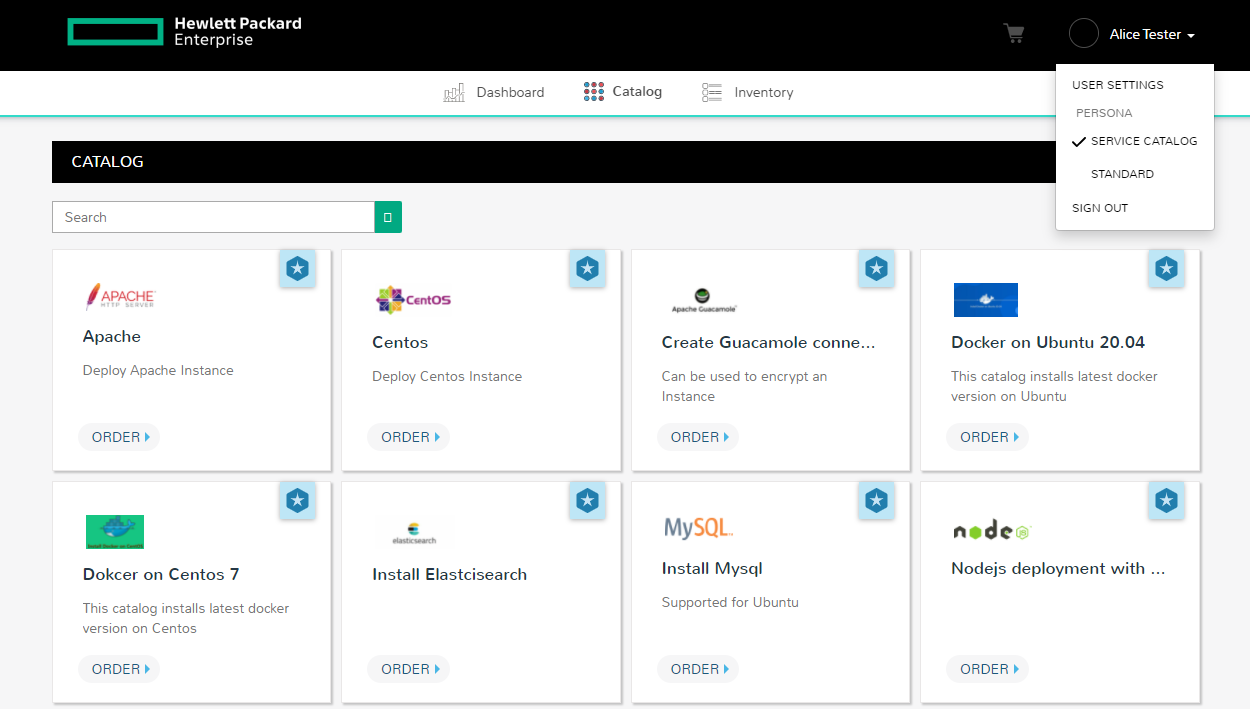
Accessing the Service Catalog persona
If your role’s default persona is set as “Service Catalog”, the link launching HPE GreenLake for private cloud dashboard card will open the Service Catalog persona dashboard.
Otherwise, switch personas by clicking on your name in the upper-right corner of the application window. If your role gives you access to any additional personas, they will be listed here.
The catalog shows the complete list of pre-defined catalog items available to the user for provisioning.
Ordering a Service catalog item
From the Service Catalog page, select the tile for your chosen item to see any custom options that need to be set prior to provisioning.
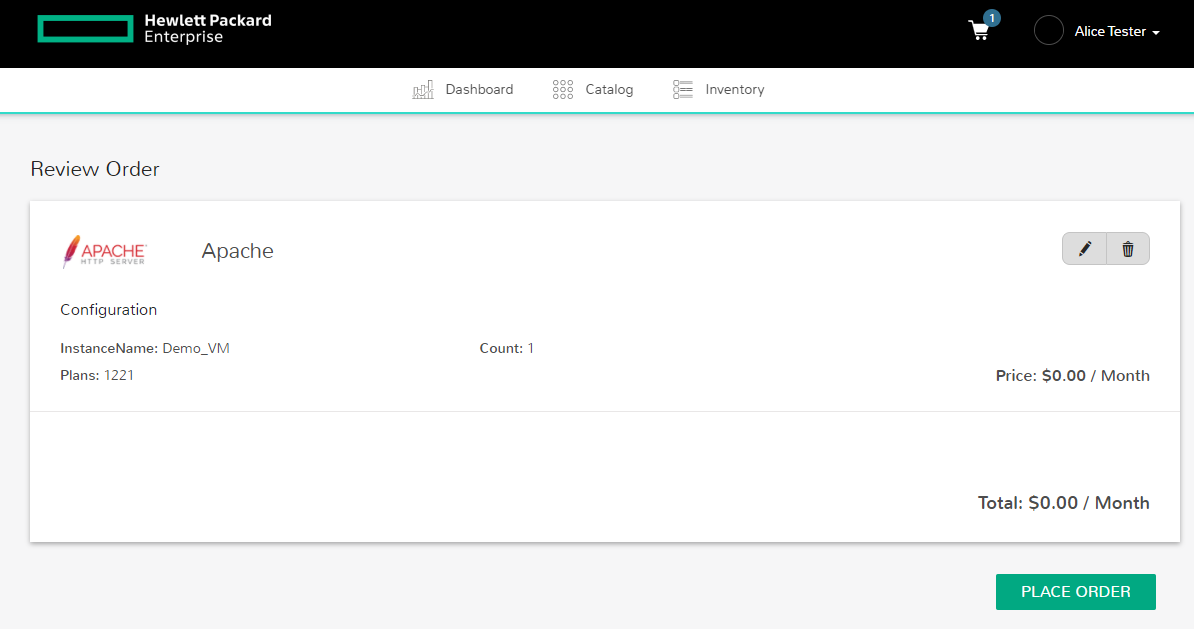
This example shows the ordering for the “Apache” catalog item created in the previous steps.
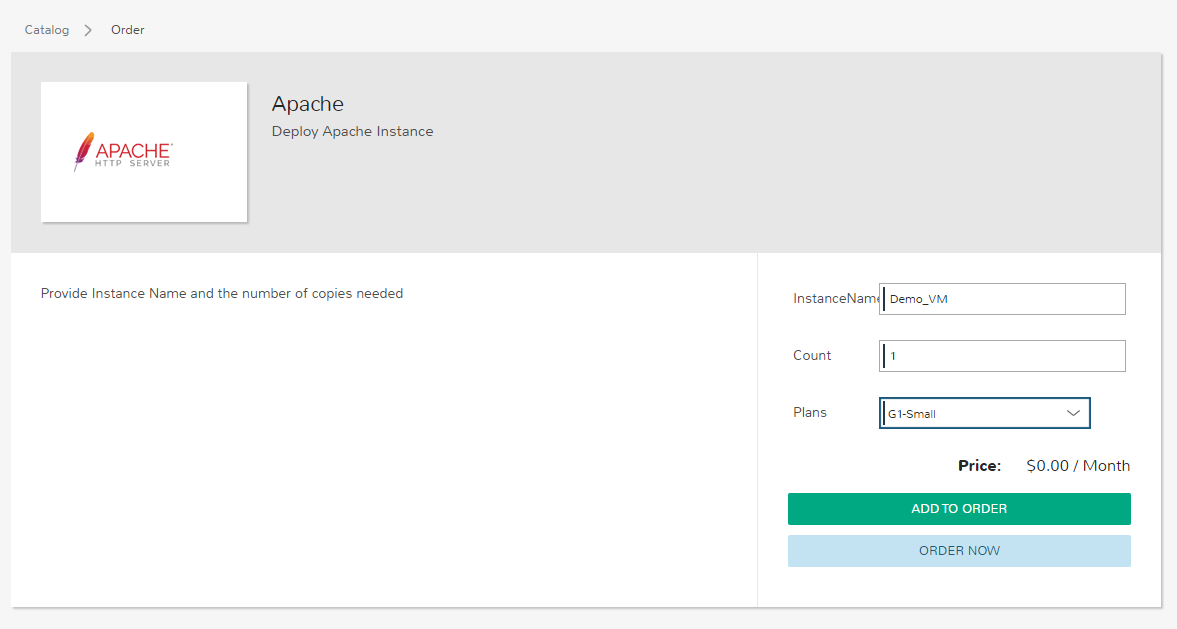
Based on the option types specified in the catalog item definition, custom options are displayed on the ordering page.
Click Order Now to place the order immediately or click Add to Order and proceed to the cart.
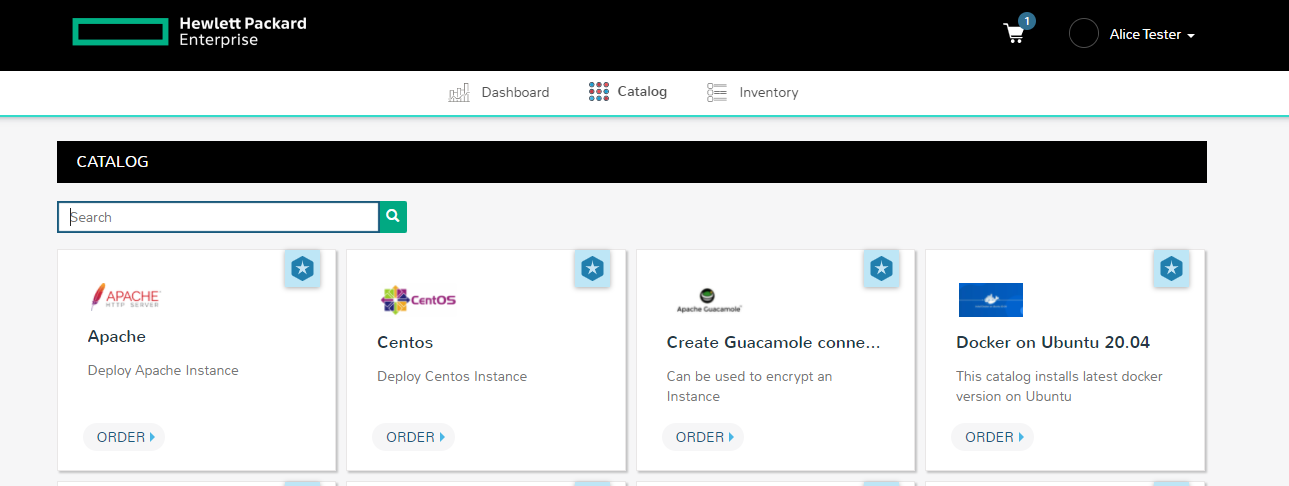
Click the cart to review and place the order.
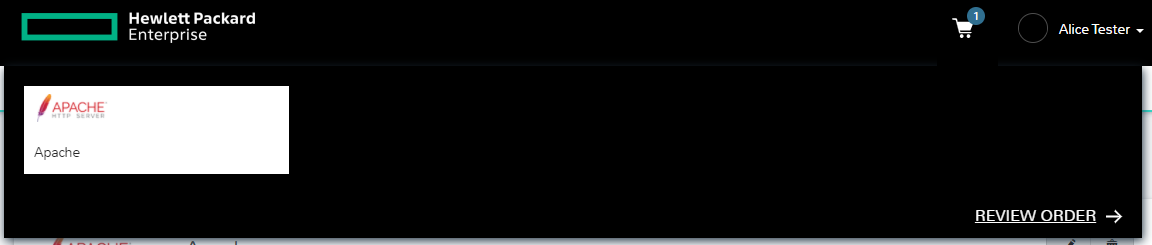
Click PLACE ORDER after reviewing the order.
The state of the order can be seen from the INVENTORY page.
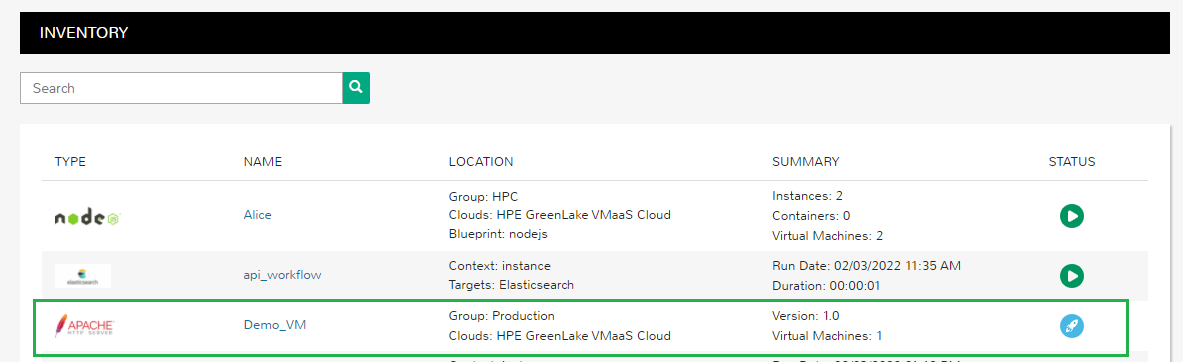
Upon clicking the inventory item Demo_VM, the instance details page is opened.
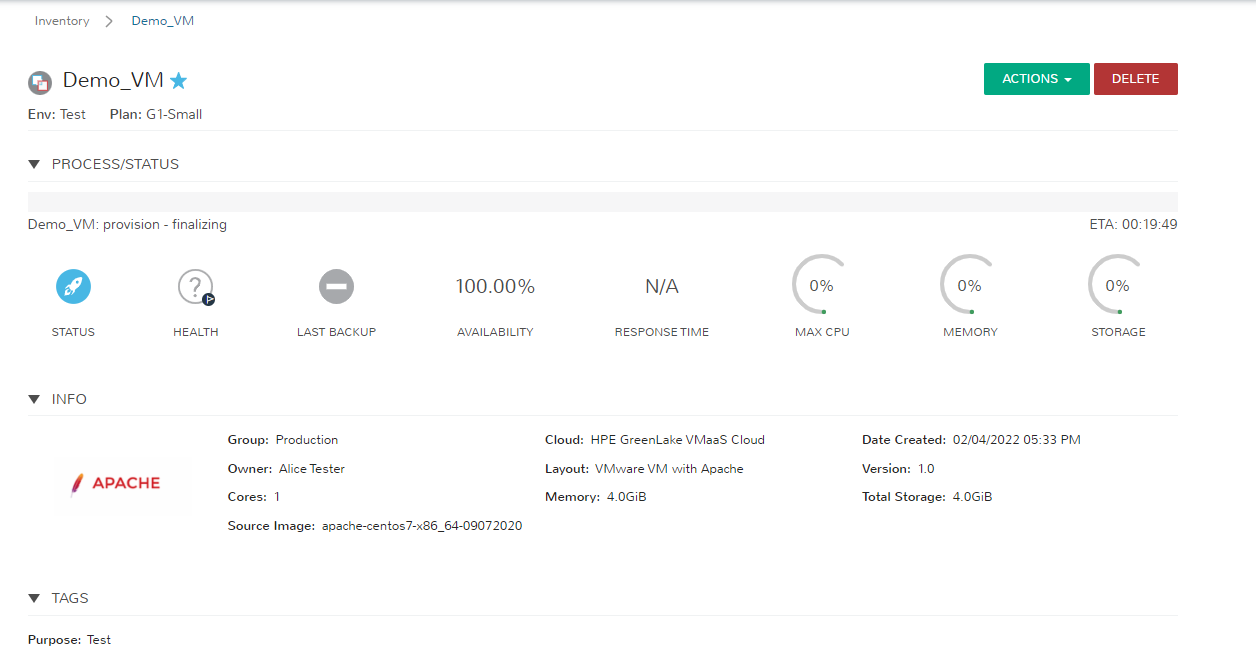
The order is now complete. In this case, the instance has been deployed in just a few steps as compared to how it is done with the Standard persona.
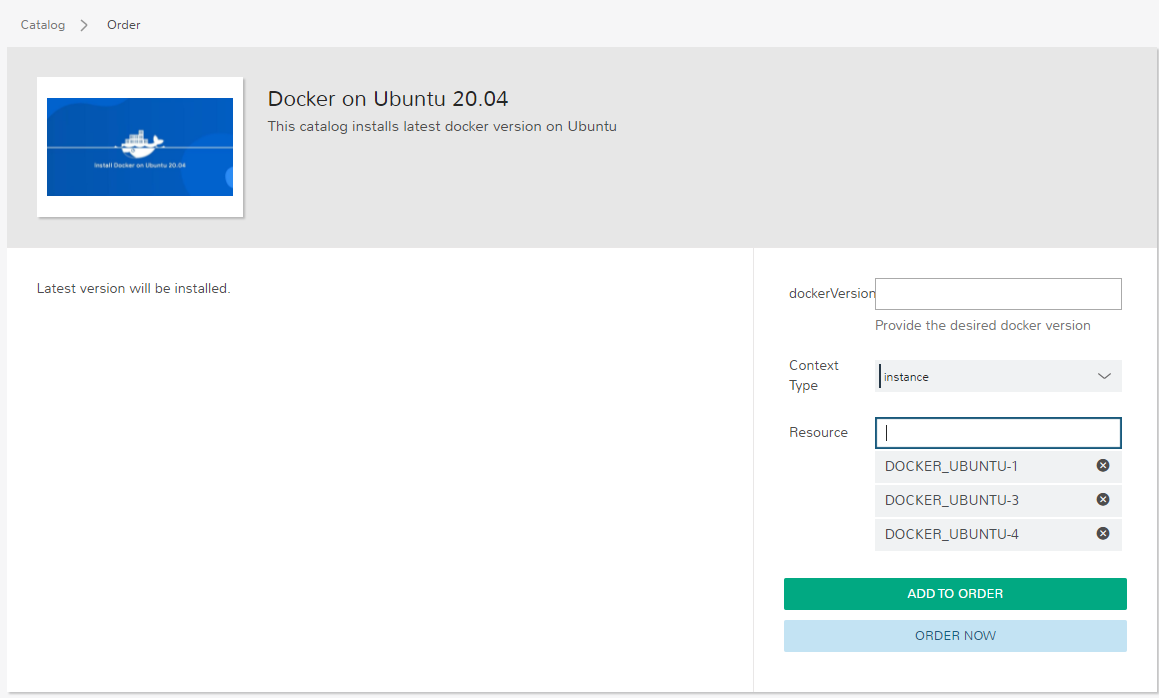
Ordering a Service catalog item for multiple resources
The example below shows the ordering process for a catalog item created for a workflow that will deploy Docker on multiple resources. On the Resource box, specify the list of instances to deploy the sample Docker install workflow and click on ORDER NOW.
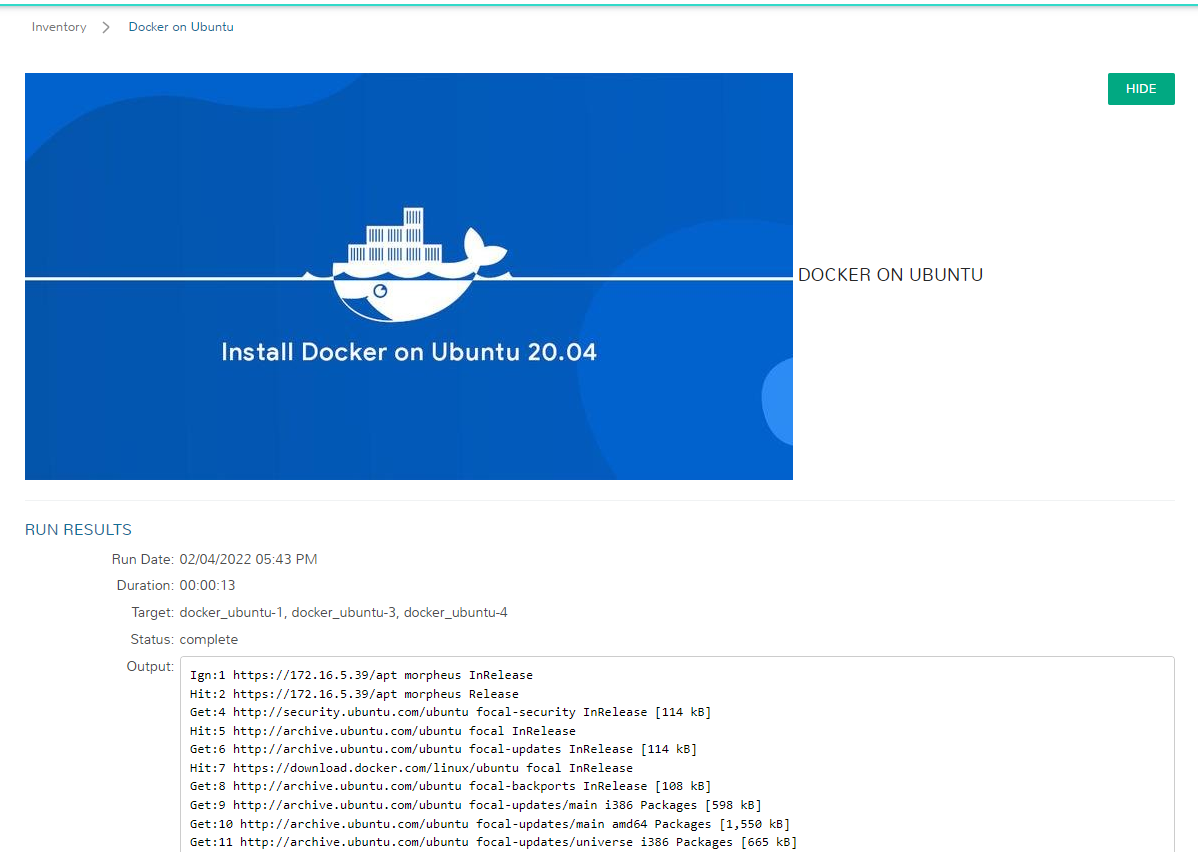
The order is now complete.

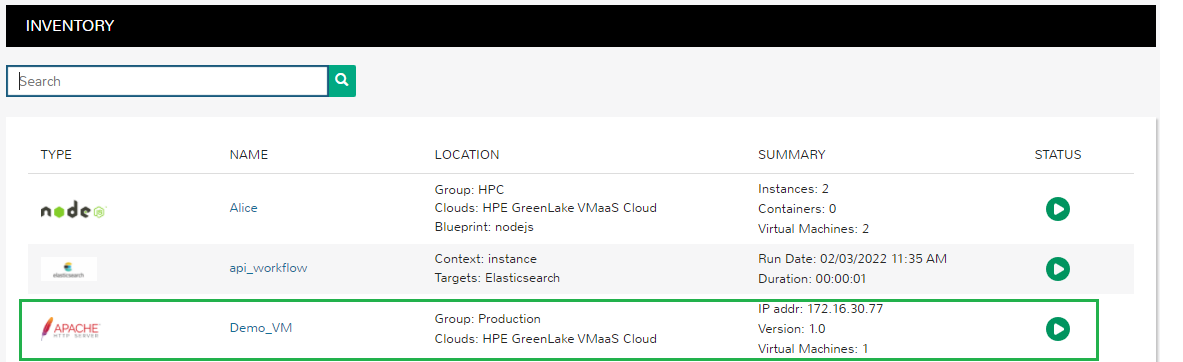
Clicking on the order in the inventory list shows the detail of the execution.
Summary
Use of the HPE GreenLake for private cloud Service Catalog persona improves the user experience with a simplified catalog where users can select and deploy instances or blueprints with a pre-defined configuration using just a few clicks and without presenting an overwhelming list of options. Hopefully, you found this tutorial helpful. Stay tuned to the HPE DEV blog for more posts on topics like this.
Related
A guide to enabling a managed Istio service mesh in a Kubernetes cluster on HPE GreenLake for Private Cloud Enterprise
Feb 16, 2023
Using HPE GreenLake Console's API Gateway for Data Services Cloud Console
Nov 30, 2021Automate ITOps: announcing foundational APIs for the HPE GreenLake edge-to-cloud platform
Dec 1, 2023
Bare metal provisioning on HPE GreenLake using Terraform
Mar 20, 2023
Bulk onboarding of users in HPE GreenLake edge-to-cloud platform
Apr 24, 2024
Configuring Azure AD as the SAML IDP with HPE Greenlake Cloud Platform and Aruba Central
Jul 11, 2022How to implement a single sign-on solution to authenticate users onto the HPE GreenLake edge-to-cloud platform
Nov 29, 2023