
Introduction
When I first began developing Redfish Workshops-on-Demand, I quickly realized that I would not be able to provision more than one or two physical servers with an embedded Redfish service allowing students to perform concurrent write operations. This was a problem since the infrastructure had been designed to host many more students.
So, I started to look for Redfish simulators and found the qemu based OpenBmc simulator that I used for the Redfish API 101 workshop. This simulator is perfect for this introductory lab as its Redfish implementation is simple and without Original Equipment Manufacturer (OEM) extensions. Moreover, its light memory and CPU consumption allows the start of almost a hundred instances in a single virtual machine, leading to as many attendees able to perform concurrent modifications.
For the other two workshops (iLOrest and Ansible/OneView), I had to look for a more fully featured Redfish implementation in order to propose a wider range of exercises.
This article presents the Distributed Management Task Force (DMTF) Redfish Mockup Creator and Redfish Mockup Server and how they can be used to learn and test the Redfish API by several tens of students concurrently.
The Redfish Mockup Creator
Basic presentation, installation and invocation
To create your own Redfish simulator, you need to have read mode access to a live Redfish service (i.e. iLO 5). Then, using the DMTF Redfish Mockup Creator deployed in a place with network connectivity to the live Redfish service, you will be able to retrieve the entire Redfish resources in index.json files under a specified directory.
The Redfish Mockup Creator is a single, simple and easy to deploy python 3 script with a very small number of parameters and options that makes it easy to use. The associated documentation is up to date and provides several deployment methods and invocation examples in its GitHub README.md file.
You can download the latest sources from this release location in .zip or .tar.gz format. Once downloaded, extract the sources into a location reachable by Python 3 and companion modules.
IMPORTANT NOTE: As mentioned in the
requirements.txtfile, the DMTFredfishPython module is required to run the Mockup Creator. However, this module is not compatible with the HPEpython-redfish-librarybecause both of them contain a class calledredfishbut with different content. Usepip uninstall python-redfish-librarybefore installing the DMTFredfishPython module withpip install redfish.
The python3 command below, launches the redfishMockupCreate.py script against a remote Redfish service (-r ilo5) accessible with the -u and -p credentials.
python3 redfishMockupCreate.py -r ilo5 -u ilouser -p ilopassword \
     --Secure --Auth Session  --Headers \
     --Dir ./ilo5
The --Secure argument specifies the use of the HTTPS secure protocol. The --Auth parameter allows two modes of authentication in the remote Redfish service: Basic and Session. With the Basic authentication, the username/password credentials will be used for each GET request. You can use the Session authentication mechanism, if it is supported by the remote Redfish service. In this case, the Mockup Creator will create a Redfish session using the supplied credentials and retrieve a session token from the response headers. This token will be used for all the GET requests needed to create the mockup.
The None authenticated mode displayed in the help message of the Mockup Creator is a synonym of Basic. See the Python code.
The --Headers options stores the response headers of each GET requests in a headers.json. More details are present in the in the next paragraph.
Lastly, the --Dir option provides the folder entry point for the mockup.
NOTE: The mockup target directory will be created if necessary. If it exists, it must be empty before the launch of the Mockup Creator.
Preparing the use of iLOrest against your Mockup Server
If you intend to use ilOrest against the mockup you created with the above command, you should, right after the mockup creation, open an iLOrest session and capture its cache. This cache directory is created during the authentication process in a default location unless a specific location is specified on the command line.
The easiest way to perform this action is to install iLOrest on your favorite operating system and identify the default cache location with the help command.
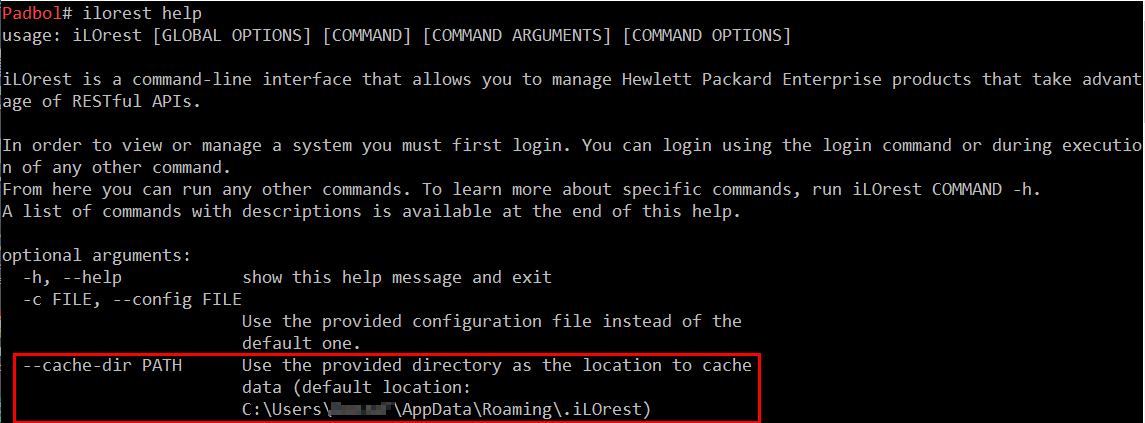
Then, open an iLOrest session (ilorest login <ilo-ip> -u <user> -p <password>) and save the content of the cache directory in a .zip or .tgzfile. Once the cache is saved, you can logout safely (ilorest logout). You will use it later when the mockup server is up and running.
Mockup structure
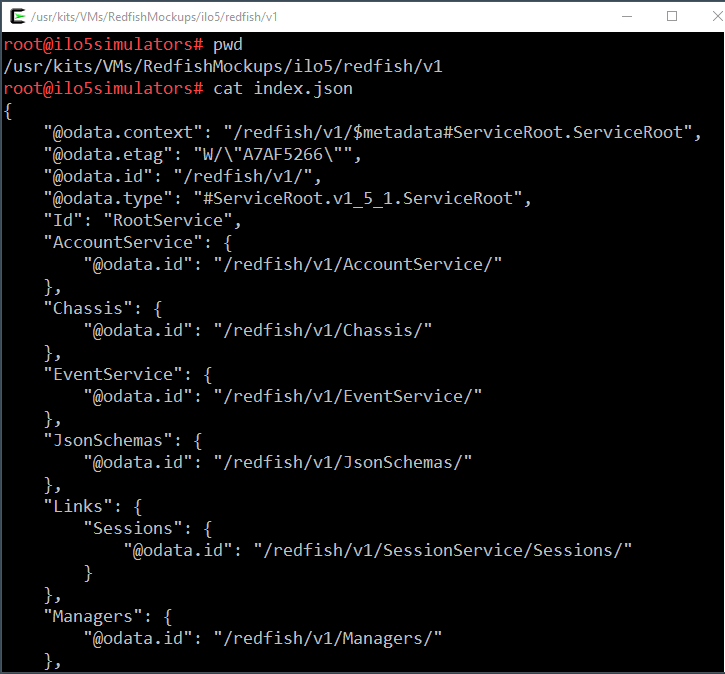
Once authenticated in the remote Redfish service, the Mockup Creator crawls recursively the service. For each endpoint, starting at /redfish it sends an HTTP(s) GET request and creates an index.json file containing the response body as well as a folder for each sub-endpoint present in the index.json file. The first three endpoint levels are shown in the next picture.
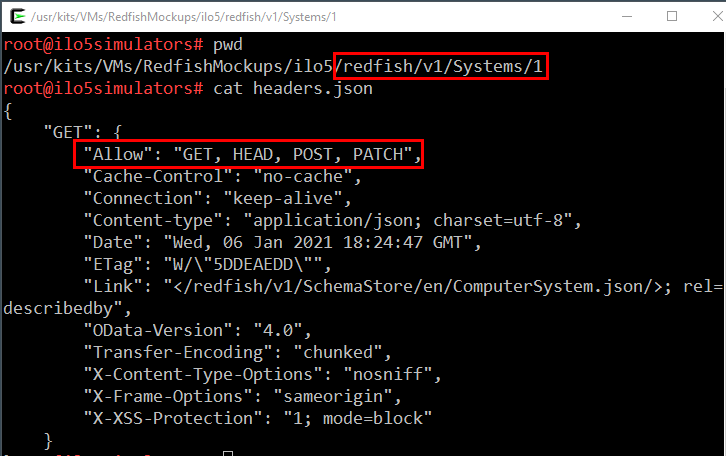
If the --Headers is present on the command line, a 'headers.json` file is created with the content of the GET response headers. This file holds potentially interesting information like the HTTP requests allowed against the current endpoint.
The following screenshot lists the content of the output directory of the of the above invocation of the Mockup Creator. The "root" folder (ilo5) contains a README file and a redfish\ directory. The README file contains the command line invocation. The redfish sub-folder contains two files (headers.json, index.json) and a directory (v1). Lastly, the v1 directory contains the same two files as well as a sub-folder for each endpoint contained in the index.json file (AccountService, Managers, ....).

The following picture displays the first lines of the redfish/v1/index.json file. Note that the endpoints location reflects the mockup directory structure.
The following image shows the content of the /redfish/v1/Systems/1/headers.json file with the list of possible requests: GET, HEAD, POST, PATCH.
Redfish Mockup Server
Basic presentation and invocation
Once the Redfish mockup is created, you can make it available to Redfish clients with the DMTF Mockup Server. This Python 3 application is a web server taking the location of a Redfish mockup as input.
Deployment and usage of this program is easy and well documented in its GitHub repository. The following code block shows how I launch it in the Workshops-on-Demand infrastructure.
python3 redfishMockupServer.py                 \
   --ssl                                       \
   --key  /SecureLocation/FdzSelfSigned.pem    \
   --cert /SecureLocation/FdzSelfSigned.pem    \
   --host 10.31.86.81                          \
   --port 45675                                \
   -D /usr/kits/VMs/RedfishMockups/ilo5
In the above command, the --ssl parameter specifies that the Redfish service simulator will be accessible via HTTPS/SSL. The required private and public keys are located in a single file (FdzSelfSigned.pem).
The --host and --port parameters specify the IP address and TCP port to listen to. Of course, the IP/Port tuple must be accessible to Redfish clients willing to send requests to the simulator.
The last option (-D) provides the location of the Redfish mockup created previously.
How does the simulator work ?
Upon startup, the simulator copies the Redfish mockup in a private location and use this copy for GET and set requests. The original mockup files are never modified. Hence, a restart of the simulator places the simulator back in a fresh and known state.
As of the writing of this article the DMTF Redfish Mockup Server does not implement any authentication mechanism. Hence, you don't have to authenticate before sending your client requests.
When a Redfish client sends a GET request to the Redfish Mockup Server, it responds with the index.json file located in the folder of the requested endpoint as well as 200 OK response code. If the target endpoint is not valid, the usual response codes 40X will be sent back.
For POST, PUT and PATCH requests, the simulator performs limited verification of the query, modifies the requested endpoint and sends back a 204 No Content status code with no associated body. For the same request, a real Redfish service performs additional verification and sends back a non-empty response body with a 20X status code.
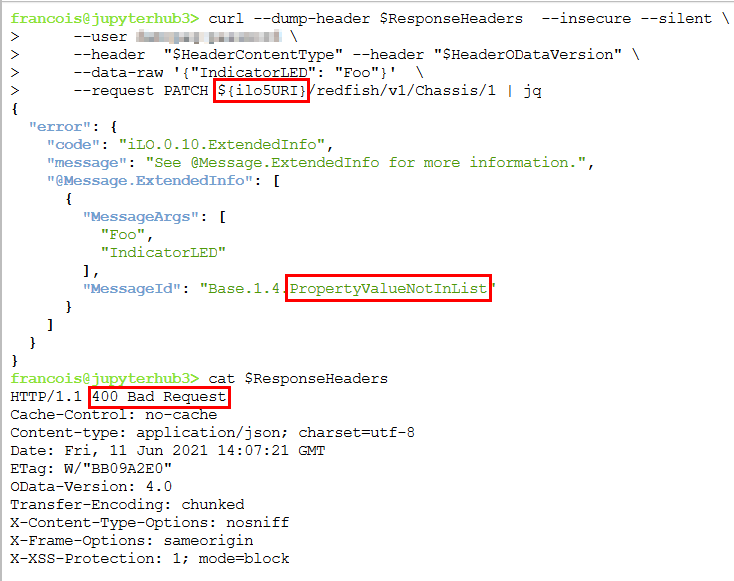
The different behavior of the simulator, compared to a real iLO 5 Redfish service, can be illustrated with a PATCH request for modifying the IndicatorLED resource of a computer chassis. The authorized values for this parameter are defined by the DMTF in the Chassis Redfish schema. For an iLO 5 with firmware version 2.30, the implemented schema specifies the following possible values: unknown, Lit, Blinking, Off. A physical iLO 5 complains if you supply a value different from what the schema proposes. However, the DMTF Redfish Mockup Server accepts any string, as shown in the following screenshot.
The command shown in the screen shot below show the sending of a PATCH request with an invalid value (Foo) toward an iLO 5 simulator. The simulator performs the patch action and responds with status code 204. The last command of shows that the action has been successfully performed.
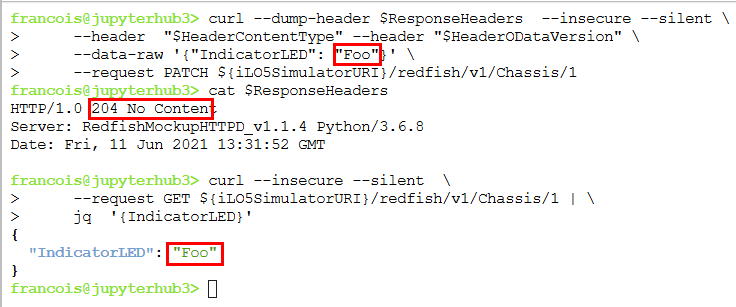
The same query against a physical iLO 5 returns a 400 Bad Request status and a @Message.ExtendedInfo mentioning the faulty argument.
Querying the Mockup Server with iLOrest
If you want to query your iLO simulator with iLOrest, you have to extract the cache directory you saved during the mockup creation (see the "Preparing the use of iLOrest against your Mockup Server" paragraph above) and edit the url property of its two files index and, <longUniqIdenfier>, to make them point to the simulator.
On a Linux system, this operation can be done with the following commands:
cd $iloCacheDir/cache/
sed -i 's?\("url": "https://\)ilo-IP-physical"?\1ilo-IP-simulator"?' *
Once the iLOrest cache points to your mockup server, you can use this Redfish client tool to query the mockup.
NOTE: If you use the
loginiLOrest commands, the cache will be overwritten. If you use thelogoutcommand, the cache will be erased.
Conclusion
To learn and test the Redfish API, the DMTF provides two very useful tools to create Redfish mockups and simulate a live service. They are easy to install and use, and their quality is good. In addition, from my personal experience, I found the maintainers of these active GitHub projects very responsive to address quality issues and proposed enhancements.
I presented only iLOrest to query this Redfish simulator, but many other Redfish clients can be used, like the ones mentioned in this video.
Related

Benefits of the Platform Level Data Model for Firmware Update Standard
Jun 7, 2022
Discover the power of data center monitoring using Redfish telemetry and cloud-native tooling: Part 2 - Streaming
Dec 1, 2023
Discover the power of data center monitoring using Redfish telemetry and cloud-native tooling
Oct 5, 2023
How to change the factory generated iLO Administrator password
Mar 29, 2018
HPE firmware updates: Part 3 - The Redfish update service
Oct 19, 2020Managing iLO sessions with Redfish®
Aug 27, 2018Massive parallel management with iLOrest on Linux
Jan 3, 2022